- Page 1 and 2: ACCU-CHEK ® Spirit Combo INSULIN P
- Page 3 and 4: Pump details and accessories Batter
- Page 5: About this User Guide To ensure saf
- Page 8 and 9: 6 Using the Accu-Chek Spirit Combo
- Page 10 and 11: STANDARD ADVANCED CUSTOM This is th
- Page 12 and 13: 1.2.1 Backlight The backlight helps
- Page 14 and 15: The RUN screen also displays Remind
- Page 16 and 17: Note You can move backwards through
- Page 18 and 19: The following table lists the keys
- Page 20 and 21: 1.3.2 Scrolling To enter larger or
- Page 22 and 23: 1.4.2 Adapter vents Note It is esse
- Page 24 and 25: 1.5 Emergency kit It is highly reco
- Page 27 and 28: 2 2 Getting started This chapter ex
- Page 29 and 30: 2 5. 6. Use the battery key to full
- Page 31 and 32: 2 2.3 Start-up process Your pump ru
- Page 33 and 34: 2 8. 9. 10. The display turns black
- Page 35 and 36: 2 Procedure for setting the time an
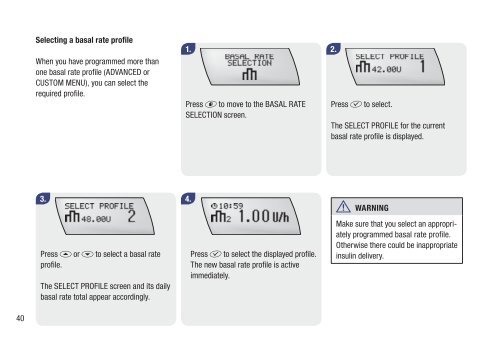
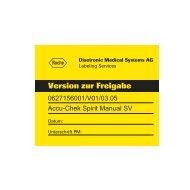
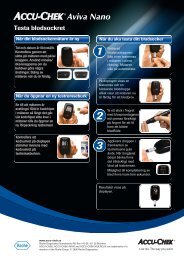
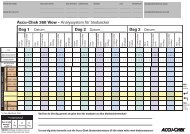
- Page 37 and 38: 2 2.5 Your basal rate profile Your
- Page 39 and 40: 2 4. Note The increments shown depe
- Page 41: 2 6. Note At any point in the progr
- Page 45 and 46: Procedure to connect the cartridge,
- Page 47 and 48: 2 4. 5. 6. Remove the cartridge, if
- Page 49 and 50: 2 13. 14. Position your insulin pum
- Page 51 and 52: 2 2.8 Priming the infusion set w Wa
- Page 53 and 54: 2 7. A count-up is shown on the dis
- Page 55 and 56: 2.9.2 Inserting the needle 1. Make
- Page 57 and 58: 2 2.10 Starting insulin delivery Pr
- Page 59 and 60: 2 STOP-Warning The STOP-Warning is
- Page 61: 2 Note Note Note Your pump cannot d
- Page 64 and 65: Your pump has been tested against,
- Page 66 and 67: 3.2 Interruption of insulin pump th
- Page 68 and 69: 3.2.2 Long interruptions When you n
- Page 70 and 71: What to do after any water contact
- Page 72 and 73: Procedure for changing the infusion
- Page 74 and 75: Note If you use a soft cannula-type
- Page 76 and 77: 4 . 5. Note Pulling the adapter fro
- Page 78 and 79: 3.6 General safety information w Wa
- Page 80 and 81: 4.2 Programming a Standard Bolus Th
- Page 82 and 83: 4. 5. 6. Five seconds after the las
- Page 84 and 85: 4.2.3 Programming a Standard Bolus
- Page 86 and 87: Cancellation during the start delay
- Page 88 and 89: 4. 5. Tip: Press d to switch betwee
- Page 90 and 91: Note If a Temporary Basal Rate is a
- Page 92 and 93:
Procedure for programming a Multiwa
- Page 94 and 95:
4.4.1 Cancelling a Multiwave Bolus
- Page 96 and 97:
Note A running Temporary Basal Rate
- Page 98 and 99:
Note Note During Temporary Basal Ra
- Page 100 and 101:
Note If an Extended Bolus or a Mult
- Page 102 and 103:
Standard ADVANCED CUSTOM This menu
- Page 104 and 105:
4. 5. … if the previous basal rat
- Page 106 and 107:
Some of the functions have already
- Page 108 and 109:
5.4.1 Viewing your bolus history Th
- Page 110 and 111:
5.4.3 Viewing the history of daily
- Page 112 and 113:
5.4.5 Viewing the time remaining (p
- Page 114 and 115:
4. Set up your pump with a cartridg
- Page 116 and 117:
Procedure for unlocking the Keylock
- Page 118 and 119:
5.6.3 Changing signal settings The
- Page 120 and 121:
5.6.5 Setting the display contrast
- Page 122 and 123:
5.7 ADVANCED user menu The followin
- Page 124 and 125:
Procedure for Programming additiona
- Page 126 and 127:
5.9 Setting a Reminder You can set
- Page 128 and 129:
5.10 Therapy settings These setting
- Page 130 and 131:
5.10.3 Locking basal rate profiles
- Page 132 and 133:
5.11 CUSTOM user menu The CUSTOM us
- Page 134 and 135:
132
- Page 136 and 137:
6.1.1 Tasks that must be performed
- Page 138 and 139:
6.3 Pairing your pump with the Mete
- Page 140 and 141:
7. Pump screen Pair with Pump Enter
- Page 142 and 143:
4. Press d to move to the DELETE DE
- Page 144 and 145:
142
- Page 146 and 147:
7.1.1 Checklist Check your pump dai
- Page 148 and 149:
7.3 Your insulin pump and water c C
- Page 150 and 151:
7.4 Repair of your pump c Caution D
- Page 152 and 153:
7.6 Storing your pump c Caution Whe
- Page 154 and 155:
8.1 Confirming a Warning or Error W
- Page 156 and 157:
Warning W2: BATTERY LOW The battery
- Page 158 and 159:
jj Move to the PUMP TIMER screen. T
- Page 160 and 161:
Warning W9: LOANTIME WARNING (loan
- Page 162 and 163:
jj Press f twice to snooze and to c
- Page 164 and 165:
In rare cases, the cartridge itself
- Page 166 and 167:
Error E6: MECHANICAL ERROR A mechan
- Page 168 and 169:
Error E9: END OF OPERATION (loan pu
- Page 170 and 171:
Error E12: DATA INTERRUPTED jj Pres
- Page 172 and 173:
8.4 List of Reminders Reminder R1:
- Page 174 and 175:
9.1 Therapy-related issues Many fac
- Page 176 and 177:
Problem There is a leak in the syst
- Page 178 and 179:
General Technical Data Barometric p
- Page 180 and 181:
General Technical Data Maximum time
- Page 182 and 183:
Technical standards Table 201: Elec
- Page 184 and 185:
Immunity test standard IEC 60601 te
- Page 186 and 187:
Guidance and manufacturer’s decla
- Page 188 and 189:
Note Note Note At 80 MHz and 800 MH
- Page 190 and 191:
Start-up graph over the stabilizati
- Page 192 and 193:
Typical range available on the pump
- Page 194 and 195:
Appendix C: Sterile products and ac
- Page 196 and 197:
Appendix D: Abbreviations Abbreviat
- Page 198 and 199:
Sound Function Sound Function BASE
- Page 200 and 201:
Sound Function Sound Function Remin
- Page 202 and 203:
Tactile Signals Dedicated functions
- Page 204 and 205:
Icon Meaning Icon Meaning Clock Key
- Page 206 and 207:
General Symbols Icon Meaning Icon M
- Page 208 and 209:
Icon FCC ID Meaning Federal Communi
- Page 210 and 211:
Bluetooth ® wireless technology Th
- Page 212 and 213:
210 Personal settings Your Accu-Che
- Page 214 and 215:
212
- Page 216 and 217:
214 E Electromagnetic immunity . .
- Page 218 and 219:
216 W Warning history viewing . . .
- Page 220 and 221:
Quick reference table for Errors, W
- Page 222 and 223:
Reminder No Warning What you have t
- Page 224 and 225:
Bluetooth ® registration Please no
- Page 226 and 227:
224
- Page 228:
The Bluetooth ® word mark and logo