Connecting Your Amplifier - Radio Shack
Connecting Your Amplifier - Radio Shack
Connecting Your Amplifier - Radio Shack

You also want an ePaper? Increase the reach of your titles
YUMPU automatically turns print PDFs into web optimized ePapers that Google loves.
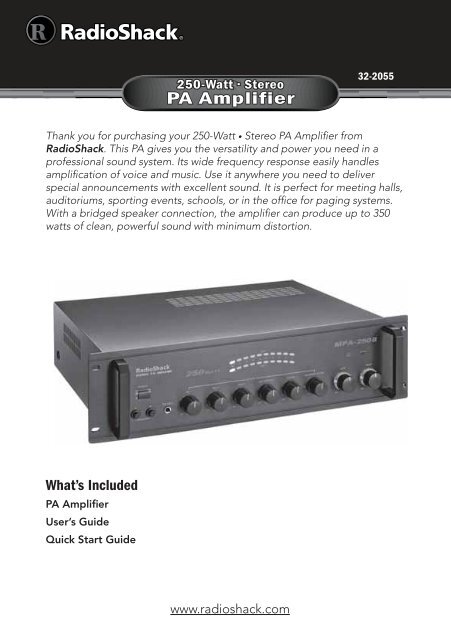
250-Watt • Stereo<br />
PA <strong>Amplifier</strong><br />
32-2055<br />
Thank you for purchasing your 250-Watt • Stereo PA <strong>Amplifier</strong> from<br />
<strong>Radio</strong><strong>Shack</strong>. This PA gives you the versatility and power you need in a<br />
professional sound system. Its wide frequency response easily handles<br />
amplification of voice and music. Use it anywhere you need to deliver<br />
special announcements with excellent sound. It is perfect for meeting halls,<br />
auditoriums, sporting events, schools, or in the office for paging systems.<br />
With a bridged speaker connection, the amplifier can produce up to 350<br />
watts of clean, powerful sound with minimum distortion.<br />
What’s Included<br />
PA <strong>Amplifier</strong><br />
User’s Guide<br />
Quick Start Guide<br />
www.radioshack.com
Contents<br />
Important Safety Instructions ............................................................................ 3<br />
About <strong>Your</strong> <strong>Amplifier</strong> ......................................................................... 6<br />
<strong>Amplifier</strong> Features.............................................................................................. 6<br />
<strong>Amplifier</strong> Setup............................................................................................ 10<br />
Getting Started ................................................................................................. 10<br />
Select a Location...................................................................................................10<br />
Preset the Controls ...............................................................................................10<br />
Preset the Audio Input Source...........................................................................10<br />
Presetting the <strong>Amplifier</strong> .....................................................................................10<br />
<strong>Connecting</strong> <strong>Your</strong> <strong>Amplifier</strong>................................................................................ 11<br />
<strong>Connecting</strong> Input Sources....................................................................................11<br />
<strong>Connecting</strong> Microphones ....................................................................................11<br />
<strong>Connecting</strong> a Turntable........................................................................................12<br />
<strong>Connecting</strong> an Auxiliary Sound Source ..............................................................12<br />
<strong>Connecting</strong> the MIX BUS Jack.............................................................................12<br />
<strong>Connecting</strong> an Equalizer......................................................................................13<br />
<strong>Connecting</strong> Speakers ...........................................................................................13<br />
Determining Total Speaker Impedance............................................................14<br />
Preparing the Speaker Wires .............................................................................14<br />
<strong>Connecting</strong> Two Speakers in Series ..................................................................15<br />
<strong>Connecting</strong> Two Speakers in Parallel ................................................................15<br />
Unbridged Connection ......................................................................................16<br />
Bridged Connection ...........................................................................................16<br />
<strong>Connecting</strong> Power ................................................................................................17<br />
Operating <strong>Your</strong> <strong>Amplifier</strong>............................................................................. 18<br />
Beginning Steps ......................................................................................................18<br />
Monitoring Sound Sources ..................................................................................18<br />
Listening Safely .....................................................................................................18<br />
Using the Feedback Filter ....................................................................................19<br />
Using the Level Meters and Clipping Indicator .................................................19<br />
Using Speaker A/B................................................................................................19<br />
Additional Information................................................................................. 20<br />
Care and Service .............................................................................................. 20<br />
Replacing the Fuse ...............................................................................................20<br />
Troubleshooting....................................................................................................21<br />
Specifications ........................................................................................................22<br />
Do More with <strong>Your</strong> <strong>Amplifier</strong> ........................................................................... 23<br />
2
Important Safety Instructions<br />
1. Read all safety and operating instructions before the appliance is used.<br />
2. Keep all safety and operating instructions for future reference.<br />
3. Follow all warnings on the appliance and in the operating instructions.<br />
4. Unplug this appliance from the wall outlet before cleaning. Use only a damp<br />
cloth for cleaning. Do not use liquid or aerosol cleaners.<br />
5. Do not use this appliance near water (for example, near a bathtub,<br />
washbowl, kitchen sink, or laundry tub; in a wet basement; or near a<br />
swimming pool).<br />
6. Do not place this appliance on an unstable cart, stand, tripod, bracket,<br />
or table. The appliance may fall, causing serious injury to a child or adult,<br />
and serious damage to the appliance. Use only with a cart, stand, tripod,<br />
bracket, or table recommended by the manufacturer or sold with the<br />
appliance. Follow the manufacturer’s instructions for mounting, and use a<br />
recommended mounting accessory.<br />
7. Slots and openings in the cabinet provide ventilation, ensure reliable<br />
operation, and protect from overheating. Do not block or cover these<br />
openings, and do not place the appliance on a bed, sofa, rug, or other<br />
similar surface. Do not place the appliance in a built-in installation such as<br />
a bookcase or rack unless it provides proper ventilation as specified by the<br />
manufacturer.<br />
8. Keep appliance away from heat sources such as radiators, heat registers,<br />
stoves, or other appliances (including amplifiers) that produce heat.<br />
9. Operate this appliance using only the power source indicated on its marking<br />
label. If you are not sure of your home’s power type, consult your appliance<br />
dealer or local power company.<br />
10. This device is equipped with a three-wire grounding-type plug, a plug<br />
having a third (grounding) pin. This plug will only fit into a grounding-type<br />
power outlet. This is a safety feature. If you are unable to insert the plug into<br />
the outlet, contact your electrician to replace your obsolete outlet. Do not<br />
defeat the safety purpose of the grounding-type plug.<br />
11. Route power-supply cords so they are not likely to be walked on or pinched<br />
by items placed on or against them, paying particular attention to cords<br />
at plugs, convenience receptacles, and the point where they exit from the<br />
appliance.<br />
3
12. Clean only as recommended by the manufacturer.<br />
13. An outside antenna system should not be located in the vicinity of overhead<br />
power lines or other electric light or power circuits, or where it can fall into<br />
such power lines or circuits. When installing an outside antenna system,<br />
extreme care should be taken to keep from touching such power lines or<br />
circuits as contact with them might be fatal.<br />
14. Unplug the power cord from the outlet when you know that you will not be<br />
using the appliance for a long period of time.<br />
15. Do not overload wall outlets, extension cords, or integral convenience<br />
receptacles, as this can result in a risk of fire or electric shock.<br />
16. Never push objects of any kind into this appliance through openings, as<br />
they may touch dangerous voltage points or short out parts that could result<br />
in a fire or electric shock. Never spill liquid of any kind on the appliance.<br />
17. Move appliance and cart combinations with care. Quick stops, excessive<br />
force, and uneven surfaces may cause the appliance and cart combination<br />
to overturn.<br />
18. Unplug this appliance from the wall outlet and refer servicing to qualified<br />
service personnel under the following conditions:<br />
• When the power-supply cord or plug is damaged.<br />
• If liquid has been spilled or objects have fallen into the appliance.<br />
• If the appliance has been exposed to rain or water.<br />
• If the appliance does not operate normally by following the operating<br />
instructions. Adjust only those controls that are covered by the operating<br />
instructions, as an improper adjustment of other controls may result in<br />
damage and will often require extensive work by a qualified technician to<br />
restore the appliance to normal operation.<br />
• If the appliance has been dropped or damaged in any way.<br />
• When the appliance exhibits a distinct change in performance.<br />
19. Do not attempt to service this appliance yourself, as opening or removing<br />
covers may expose you to dangerous voltage or other hazards. Refer all<br />
servicing to qualified service personnel.<br />
20. When replacement parts are required, be sure the service technician has<br />
used replacement parts specified by the manufacturer or have the same<br />
characteristics as the original part. Unauthorized substitutions may result in<br />
fire, electric shock, or other hazards.<br />
4
21. Upon completion of any service or repairs to this appliance, ask the service<br />
technician to perform safety checks to determine that the appliance is in<br />
proper operating condition.<br />
22. For added protection for this product during a lightning storm, unplug<br />
it from the wall outlet. This will prevent damage to the product due to<br />
lightning and power line surges.<br />
23. Only use attachments recommended by the product manufacturer.<br />
24. The product should be mounted to a wall or ceiling only as recommended<br />
by the manufacturer.<br />
25. Overloading — Do not overload wall outlets, extension cords, or integral<br />
convenience receptacles, as this can result in a risk of fire or electric shock.<br />
WARNING: To reduce the risk of fire or shock hazard, do not expose<br />
this product to rain or moisture.<br />
CAUTION<br />
RISK OF ELECTRIC SHOCK<br />
DO NOT OPEN<br />
CAUTION: TO REDUCE THE RISK OF ELECTRIC SHOCK, DO NOT<br />
REMOVE THE COVER OR BACK. NO USER-SERVICEABLE PARTS<br />
INSIDE. REFER SERVICING TO QUALIFIED PERSONNEL.<br />
This symbol is intended to alert you to the presence of uninsulated<br />
dangerous voltage within the product’s enclosure<br />
that might be of sufficient magnitude to constitute a risk of<br />
electric shock. Do not open the product’s case.<br />
This symbol is intended to inform you that important<br />
operating and maintenance instructions are included in the<br />
literature accompanying this product.<br />
5
About <strong>Your</strong> <strong>Amplifier</strong><br />
<strong>Amplifier</strong> Features<br />
Illuminated Power<br />
Switch<br />
Lights up when you<br />
turn on the switch.<br />
PHONES Jack<br />
Connect<br />
headphones<br />
here.<br />
Output Power<br />
Level Indicators<br />
Indicates the total<br />
stereo output<br />
power level.<br />
A/B Speaker Switch<br />
Select the speakers you want<br />
to use with the amplifier in<br />
Channel A, Channel B, or<br />
both (for use with 8 ohm<br />
speakers only).<br />
MIC 1, MIC 2, MIC 3<br />
Adjust volume for the<br />
connected microphones.<br />
6
About <strong>Your</strong> <strong>Amplifier</strong><br />
CD/AUX<br />
Adjust volume of<br />
CD or auxiliary<br />
sound source.<br />
CLIPPING Indicator<br />
Lights up to remind<br />
you to reduce volume<br />
when the amplifier<br />
output is too high.<br />
PROTECTION Indicator<br />
Lights up when the<br />
amplifier overheats or<br />
if a shorted load occurs<br />
on the amplifier output.<br />
The amplifier resets itself<br />
when the problem is<br />
corrected.<br />
MIC 4/PHONO<br />
Adjust volume<br />
of connected<br />
microphone (MIC 4)<br />
or turntable.<br />
FEEDBACK FILTER<br />
Turn to control audio<br />
feedback.<br />
Volume Control:<br />
Left/Right speakers<br />
Turn to regulate volume of<br />
left and right speakers.<br />
7
About <strong>Your</strong> <strong>Amplifier</strong><br />
XLR Balanced<br />
Microphone Inputs<br />
Connect up to four<br />
high impedance<br />
microphones to your<br />
amplifier.<br />
Cooling Fan<br />
Automatically activated<br />
whenever the amplifier<br />
is turned on. This air<br />
cooling system rapidly<br />
disperses interior heat<br />
to reduce operating<br />
temperature.<br />
¼” Stereo Input<br />
Jacks<br />
Connect stereo<br />
input sources (CD<br />
or DVD player, TV,<br />
etc.) here using a<br />
¼-inch (balanced)<br />
audio cable.<br />
¼” Unbalanced<br />
Microphone Inputs<br />
Connect up to four<br />
microphones to your<br />
amplifier using a ¼”<br />
unbalanced cable, for<br />
left and right mono<br />
sound.<br />
MIC 4/PHONO<br />
Switch<br />
Select MIC 4 or<br />
PHONO input.<br />
Phono Input Jacks<br />
Connect your turntable here.<br />
MIX BUS Jack<br />
Connect an extra amplifier if you<br />
have multiple audio sources.<br />
CD/AUX Jack<br />
Connect any high-level sound<br />
source for music or special effects.<br />
EQ IN/OUT Jacks<br />
Connect an equalizer or other<br />
external processor.<br />
8
About <strong>Your</strong> <strong>Amplifier</strong><br />
Audio Input Jacks<br />
Connect input sources<br />
(CD or DVD player,<br />
TV, etc.) here using an<br />
unbalanced audio cable.<br />
Match the colors on your<br />
cable connections with<br />
the colors on the jacks.<br />
STEREO/MONO Selector<br />
Select bridged mono input<br />
mode in combination with a<br />
mono signal source plugged<br />
into the left channel.<br />
Fuse<br />
GND<br />
(Ground Wire Connection)<br />
EQ/BYPASS Selector<br />
Select EQ if you are<br />
using an equalizer<br />
or BYPASS if you are<br />
using another external<br />
processor.<br />
Speaker Terminals<br />
Connect two sets of speakers<br />
(Left and Right, for A and B).<br />
9
<strong>Amplifier</strong> Setup<br />
Getting Started<br />
Select a Location<br />
Before you use your amplifier, be sure to place it on a surface with adequate<br />
ventilation. Do not put it on thick carpeting, which can restrict air flow, or near a<br />
heat source such as a heat vent or radiator, which can cause it to overheat.<br />
Preset the Controls<br />
Before you begin connecting or using your amplifier, preset the controls on the<br />
audio input source and amplifier to avoid overdriving a channel or producing<br />
loud sounds.<br />
Preset the Audio Input Source<br />
Set the controls on the audio input sources to the following levels:<br />
Audio Device Control Setting<br />
Turntable Power Flat<br />
Tape Deck Power Flat<br />
CD Player Power Flat<br />
<strong>Amplifier</strong> Power Flat<br />
Receiver Tone Off<br />
Presetting the <strong>Amplifier</strong><br />
To prevent excessive volume and possible hearing damage, set the controls on<br />
the amplifier to the following:<br />
Control<br />
POWER<br />
MIC 1, MIC 2, MIC 3, MIC 4/PHONO,<br />
CD/AUX Volume Control<br />
LEFT and RIGHT Volume Control<br />
Setting<br />
After you turn on the amplifier or change the program source, set the controls to<br />
a comfortable listening level.<br />
Off<br />
Min<br />
Min<br />
10
<strong>Connecting</strong> <strong>Your</strong> <strong>Amplifier</strong><br />
<strong>Connecting</strong> <strong>Your</strong> <strong>Amplifier</strong><br />
<strong>Connecting</strong> Input Sources<br />
You can connect optional components, such as microphones, tuner, turntable,<br />
audio mixer, preamplifier, or CD player to your amplifier to expand your system.<br />
To prevent hum and other noise, use low-capacitance shielded cable (not<br />
supplied, available at your local <strong>Radio</strong><strong>Shack</strong> store or at www.radioshack.com).<br />
Notes:<br />
• This amplifier is equipped with both stereo phono input and ¼-inch<br />
(6.35 mm) jacks. The ¼-inch input jacks on the top are stereo while the<br />
others are left and right mono.<br />
• Before you make any connections, be sure the amplifier is turned off<br />
and AC power cord is not plugged in.<br />
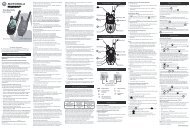
<strong>Connecting</strong> Microphones<br />
You can connect up to four high- or low-impedance microphones (not supplied)<br />
to the microphone inputs on the back of the amplifier. Each input (MIC1, MIC2,<br />
MIC3, and MIC4) has a balanced and unbalanced jack. You need a microphone<br />
with a ¼-inch (6.35 mm) plug to connect to an unbalanced jack or a microphone<br />
cord with a 3-pin XLR plug to connect to a balanced jack.<br />
Balanced<br />
Microphone<br />
Jacks<br />
Unbalanced<br />
Microphone Jacks<br />
MIC 4/PHONO Switch<br />
Notes:<br />
• If your microphone cord is longer than 20 feet (6 meters), we<br />
recommend that you connect it to a balanced jack to reduce signal<br />
hum.<br />
• If you connect a microphone to both balanced and unbalanced jacks<br />
for MIC1, MIC2, MIC3, or MIC4, the microphone you connect to the<br />
unbalanced jack has priority.<br />
• If you connect a microphone to either MIC4 jack, set the MIC4/PHONO<br />
switch to MIC4.<br />
11
<strong>Connecting</strong> <strong>Your</strong> <strong>Amplifier</strong><br />
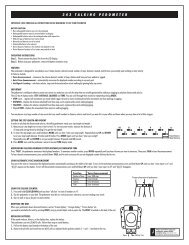
<strong>Connecting</strong> a Turntable<br />
Connect your low-level audio input source (turntable) to the L PHONO and<br />
R PHONO jacks on the back of the amplifier. If you connect a low-level audio<br />
input source to the PHONO jacks, set the MIC4/PHONO switch to PHONO.<br />
To avoid a low-level hum, connect your turntable’s ground wire (usually black or<br />
green) to the GND terminal on the amplifier.<br />
MIC 4/ PHONO<br />
Switch<br />
GND Terminal<br />
PHONO Input Jacks<br />
<strong>Connecting</strong> an Auxiliary Sound Source<br />
Connect any high-level sound source, such as a CD player, tape deck, or tuner,<br />
to the CD/AUX jack on the back of the amplifier.<br />
CD/AUX Jack<br />
<strong>Connecting</strong> the MIX BUS Jack<br />
Connect another amplifier (same model) to double the size of your PA system.<br />
You can then use up to eight microphones (or six microphones and two<br />
turntables) and two auxiliary sound sources.<br />
Use a shield cable with phono plugs at each end. Connect the cable between<br />
the MIX BUS jacks on the back of the two amplifiers.<br />
Note: For best results, do not use cable longer than 6 feet (1.8 meters).<br />
MIX BUS Jack<br />
12
<strong>Connecting</strong> an Equalizer<br />
<strong>Connecting</strong> <strong>Your</strong> <strong>Amplifier</strong><br />
Connect an equalizer or other external signal processor to the EQ IN and<br />
EQ OUT jacks on the back of the amplifier.<br />
EQ IN/OUT Jacks<br />
Notes:<br />
• You can also connect a tape deck to the EQ OUT jack for recording.<br />
• The EQ IN/OUT jacks handle the signal from an outside equalizer. They<br />
do not handle the signal from an outside equalizer’s stereo INPUT jacks.<br />
<strong>Connecting</strong> Speakers<br />
You can connect one or more 4-, 8-, or 16-Ohm speakers to the amplifier. To<br />
ensure equal volume from each speaker, all connected speakers should have the<br />
same impedance rating.<br />
Proper phasing is important when you use more than one speaker in the same<br />
room or area. Out-of-phase speakers can lose up to one-half of their potential<br />
volume, and can have a significantly decreased bass effect.<br />
Most speaker terminals are color-coded or have a mark that indicates the<br />
terminal’s polarity. Usually, terminals with positive polarity are red or have a<br />
plus symbol (+), and terminals with negative polarity are black or have a minus<br />
symbol (–). Phasing is correct when you connect + to + and – to –.<br />
You can also bridge the amplifier’s channels. The amplifier has two channels:<br />
A and B. If you connect two pairs of speakers, follow these guidelines:<br />
• Speakers connected to the same channel (A or B) are part of a pair and<br />
must be of the same impedance.<br />
• Speakers connected to different channels (A or B) are not part of a pair<br />
and can be of different impedance.<br />
STEREO/MONO Switch<br />
Speaker Terminals<br />
13
<strong>Connecting</strong> <strong>Your</strong> <strong>Amplifier</strong><br />
Determining Total Speaker Impedance<br />
Before you connect speakers to the amplifier, you must determine the total<br />
speaker impedance. To determine total speaker impedance, you must first<br />
decide if you are going to connect the speakers in series, parallel, or a series/<br />
parallel combination.<br />
If you are connecting more than two speakers in series only or parallel only, be<br />
sure the total impedance does not exceed the amplifier’s maximum impedance<br />
(16 ohms) or fall below the minimum impedance (4 ohms). You can achieve a<br />
proper total impedance by combining series and parallel connections.<br />
Note: A total speaker impedance higher than 16 ohms or lower than<br />
4 ohms can damage your amplifier or speakers. When determining the<br />
total speaker impedance, first determine whether you are connecting<br />
the speakers in series, parallel, or a series/parallel combination.<br />
Preparing the Speaker Wires<br />
Use the shortest length of wire possible to connect the speakers. After placing<br />
the speakers, use this table to determine the wire length and choose the<br />
appropriate gauge.<br />
Wire Length<br />
7.6 m<br />
(25 ft) or less<br />
Over 7.6 m<br />
(25 ft)<br />
Wire Gauge<br />
18 gauge<br />
16 gauge<br />
To prepare the speaker wire, remove about ½ inch (12.5 mm) of insulation from<br />
the end you are connecting to the amplifier. Twist the exposed wire to secure all<br />
of the wire strands.<br />
14
<strong>Connecting</strong> <strong>Your</strong> <strong>Amplifier</strong><br />
<strong>Connecting</strong> Two Speakers in Series<br />
Speakers are connected in series when the first speaker’s positive terminal is<br />
connected to the next speaker’s negative terminal.<br />
Note: Determine the total speaker impedance of speakers you want<br />
to connect in series by adding up the individual impedances of all<br />
connected speakers.<br />
For example: If connecting two 4-ohm speakers in series, your total<br />
speaker impedance is 8 ohms.<br />
<strong>Connecting</strong> Two Speakers in Parallel<br />
Speakers are connected in parallel when the speakers’ negative terminals are<br />
connected together and all their positive terminals are connected together.<br />
Note: Determine the total speaker impedance of speakers you want<br />
to connect in parallel by dividing the impedance of one speaker by the<br />
number of speakers.<br />
For example: If connecting two 8-ohm speakers in parallel, divide 8<br />
(one speaker’s impedance) by 2 (number of speakers). <strong>Your</strong> total speaker<br />
impedance is 4.<br />
15
<strong>Connecting</strong> <strong>Your</strong> <strong>Amplifier</strong><br />
Unbridged Connection<br />
Use this connection if you are connecting more than one speaker on the same<br />
channel or if you do not have high power speakers.<br />
1. Connect the speaker wires to the corresponding left and right positive (+)<br />
and negative (–) speaker terminals.<br />
2. Connect the other end of the left and right speaker’s positive (+) and<br />
negative (–) wires to the amplifier’s corresponding SPEAKER LEFT and<br />
SPEAKER RIGHT terminals for each channel. To connect speaker wires to<br />
the amplifier, turn the knob on the terminal counterclockwise until it stops,<br />
insert the bare wire inside the space between the knob and the amplifier,<br />
and turn the knob clockwise until it stops, securing the wire.<br />
3. Make sure the STEREO/MONO switch is set to STEREO.<br />
RIGHT Speaker<br />
LEFT Speaker<br />
Bridged Connection<br />
Use this connection if you have high power speakers that can handle a power<br />
output of 350 Watts.<br />
Note: For a bridged connection, do not connect any speaker wire to the<br />
black SPEAKER terminals.<br />
1. Connect the speaker wires to the speaker’s positive (+) and negative (–)<br />
terminals.<br />
16
<strong>Connecting</strong> <strong>Your</strong> <strong>Amplifier</strong><br />
2. Connect the other end of the speaker’s positive (+) and negative (–) wires to<br />
the amplifier’s red SPEAKER LEFT and SPEAKER RIGHT terminals.<br />
Note: SPEAKER RIGHT (+) on the amplifier is used as a negative (–)<br />
terminal for a bridged connection.<br />
3. Make sure STEREO/MONO is set to MONO.<br />
Note: In the bridged mono mode, only the LEFT volume control adjusts<br />
the output level.<br />
RIGHT Speaker<br />
LEFT Speaker<br />
<strong>Connecting</strong> Power<br />
To power the amplifier, plug the attached power cord into a standard AC<br />
outlet. <strong>Your</strong> amplifier’s fuse protects it from voltage surges. If the amplifier<br />
does not turn on when you press POWER, check the fuse. If it is blown, see<br />
“Replacing the Fuse.”<br />
17
Operating <strong>Your</strong> <strong>Amplifier</strong><br />
Beginning Steps<br />
1. Start the input sound source.<br />
2. Make sure the LEFT and RIGHT volume controls on the front of the amplifier<br />
are set to MIN.<br />
3. Press POWER to turn on the amplifier. The blue light around the power<br />
switch and LEFT and RIGHT volume controls will light.<br />
4. Rotate LEFT and RIGHT volume controls to their middle positions.<br />
5. One at a time, adjust MIC1, MIC2, MIC3, MIC4/PHONO, and CD/AUX to<br />
the desired volume and balance.<br />
If you hear feedback after you adjust these controls, turn FEEDBACK FILTER<br />
clockwise until the noise disappears (see “Using the Feedback Filter”).<br />
6. Adjust LEFT and RIGHT volume controls to the desired volume level after<br />
you find your desired balance.<br />
Monitoring Sound Sources<br />
To monitor sound sources, plug a pair of mono or stereo headphones (not<br />
supplied) with a ¼-inch (6.35mm) plug into the PHONES jack on the front of the<br />
amplifier. Headphones sometimes make it easier to check and adjust the sound<br />
source’s balance.<br />
Listening Safely<br />
To protect your hearing, follow these guidelines when you use headphones.<br />
• Set the volume to the lowest setting before you begin listening. After you<br />
begin listening, adjust the volume to a comfortable level.<br />
• Do not listen at extremely high volume levels. Extended high-volume<br />
listening can lead to permanent hearing loss.<br />
• Once you set the volume, do not increase it. Over time, your ears adapt to<br />
the volume level, so a volume level that does not cause discomfort might<br />
still damage your hearing.<br />
18
Operating <strong>Your</strong> <strong>Amplifier</strong><br />
Using the Feedback Filter<br />
The FEEDBACK FILTER control lets you reduce or eliminate squeal and other<br />
noise caused by feedback. After you adjust LEFT and RIGHT volume, MIC1,<br />
MIC2, MIC3, MIC4/PHONO, and CD/AUX , turn on the amplifier and any<br />
connected sound sources. If you hear any feedback, turn FEEDBACK FILTER<br />
clockwise until you reduce or eliminate the feedback.<br />
Note: The FEEDBACK FILTER control decreases feedback frequencies<br />
by up to 12dB. If it does not eliminate the feedback, try using a<br />
frequency equalizer to further decrease the feedback frequencies.<br />
Using the Level Meters and Clipping Indicator<br />
The output indicators reflect the amplifier’s output level. The stronger the signal<br />
the more indicators light. The maximum signal through the amplifier should<br />
cause the CLIPPING indicator to blink at peak music levels.<br />
Output<br />
Power<br />
Level<br />
Indicators<br />
Clipping Indicator<br />
Using Speaker A/B<br />
Press SPEAKER A or SPEAKER B on the front of the amplifier for the channel<br />
you want to listen to. If you have 8-Ohm speakers, press SPEAKER A and<br />
SPEAKER B to listen to all connected speakers.<br />
Speaker A<br />
Speaker B<br />
Note: If you have connected 4-Ohm speakers to the amplifier, do not<br />
press in both SPEAKER A and SPEAKER B.<br />
19
Additional Information<br />
Care and Service<br />
Keep the amplifier dry. If it gets wet, wipe it dry immediately. Use and store<br />
the amplifier only in normal temperature environments. Handle the amplifier<br />
carefully; do not drop it. Keep the amplifier away from dust and dirt, and wipe it<br />
with a damp cloth occasionally to keep it looking new.<br />
If your amplifier is not performing as it should, take it to your local <strong>Radio</strong><strong>Shack</strong><br />
store for assistance. To locate your nearest <strong>Radio</strong><strong>Shack</strong>, use the store locator<br />
feature at www.radioshack.com, or call 1-800-The <strong>Shack</strong> (1-800-843-7422) and<br />
follow the menu options. Modifying or tampering with the amplifier’s internal<br />
components can cause a malfunction and might invalidate its warranty.<br />
Replacing the Fuse<br />
If the amplifier does not operate, you might need to replace the fuse with<br />
another 7-amp, 250-volt fuse (not supplied).<br />
Fuse Holder Cap<br />
Notes:<br />
• Let the amplifier cool down and see if it starts again before you try<br />
fuse replacement.<br />
• Do not use a fuse with a rating other than that specified here. Doing<br />
so might damage your amplifier.<br />
1. Unplug the amplifier from the AC outlet.<br />
2. Turn the fuse holder cap counterclockwise then pull out the cap to remove<br />
the fuse.<br />
3. If the fuse is blown, replace it. Use only an identical fuse with the proper<br />
rating. The fuse must be 7 amps.<br />
4. Insert the fuse into the fuse holder’s socket and press the fuse holder back<br />
into the amplifier. Turn the fuse holder’s cap clockwise to tighten it.<br />
20
Additional Information<br />
Troubleshooting<br />
Problem Cause Solution<br />
Why isn’t my<br />
amplifier powering<br />
up, even though I<br />
have tried turning<br />
it on and off<br />
Why can’t I hear<br />
anything<br />
Why am I hearing<br />
feedback<br />
The device may have<br />
overheated.<br />
The fuse might be blown.<br />
The speakers might not be<br />
connected properly.<br />
The amplifier’s LEFT and RIGHT<br />
VOLUME, MIC1, MIC2, MIC3,<br />
MIC4/PHONO, or CD/AUX<br />
controls might be on their<br />
minimum settings.<br />
The speakers might not be<br />
connected properly.<br />
A microphone or cable might<br />
be faulty.<br />
The speakers might be the<br />
wrong impedance for the PA.<br />
The amplifier might have shut<br />
down.<br />
The FEEDBACK FILTER might<br />
need to be adjusted.<br />
<strong>Your</strong> microphones or speakers<br />
could be too close together.<br />
Turn your amplifier off. Wait until it<br />
cools down and try again.<br />
Check the amplifier’s fuse and<br />
replace it if necessary.<br />
Check all connections.<br />
Adjust the volume control to the<br />
desired setting.<br />
Check all connections.<br />
Check all microphones and cables.<br />
Make sure your speaker wires are<br />
18-gauge [for wire length up to<br />
7.6 m (25 ft)]. For best results, use<br />
the shortest length of speaker wire<br />
possible.<br />
Turn the amplifier off and let it cool<br />
down. Make sure the amplifier is<br />
properly vented, then turn it back<br />
on.<br />
Turn the FEEDBACK FILTER<br />
clockwise until you reduce or<br />
eliminate feedback.<br />
Reposition the microphones and<br />
speakers.<br />
21
Additional Information<br />
Specifications<br />
Input Impedance ............................................................................................................ 20k Ohms<br />
Continuous Output Power<br />
Stereo at 1 kHz .........................................................................................125 Watts × 2 (8 Ohms)<br />
Stereo at 1 kHz..........................................................................................175 Watts × 2 (4 Ohms)<br />
Bridged at 20 Hz to 20 kHz ............................................................................ 250 Watts (8 Ohms)<br />
Bridged at 1 kHz ............................................................................................. 350 Watts (8 Ohms)<br />
Total Harmonic Distortion (@ 70 Watts, 8 Ohms, 1 kHz, with Band Pass Filter)<br />
MIC (Phone Jack)................................................................................................................... 0.20%<br />
MIC (XLR Jack) ....................................................................................................................... 0.20%<br />
CD/AUX.................................................................................................................................. 0.15%<br />
PHONO .................................................................................................................................. 0.20%<br />
Input Sensitivity (at 0.5% THD, 1 kHz)<br />
MIC (Phone Jack)................................................................................................................1.35 mV<br />
MIC (XLR Jack) ....................................................................................................................1.35 mV<br />
CD/AUX................................................................................................................................500 mV<br />
PHONO ....................................................................................................................................3 mV<br />
Signal to Noise Ratio (Input Shorted) with WTD<br />
MIC (Phone Jack)....................................................................................................................65 dB<br />
MIC (XLR Jack) ........................................................................................................................65 dB<br />
CD/AUX...................................................................................................................................75 dB<br />
PHONO ...................................................................................................................................70 dB<br />
Frequency Response (at 1 Watt, ± 3dB)<br />
MIC (Phone Jack).................................................................................................... 40 Hz ~ 20 kHz<br />
MIC (XLR Jack) ........................................................................................................ 40 Hz ~ 20 kHz<br />
CD/AUX................................................................................................................... 20 Hz ~ 30 kHz<br />
PHONO (RIAA 100 Hz/10 kHz).............................................................................. +13dB ~ -14dB<br />
Notch Filter Effect<br />
Range........................................................................................................................ 300 Hz ~ 3kHz<br />
Depth...................................................................................................................................... -12dB<br />
Noise Level (Input Short) ....................................................................................................0.75mV<br />
Speaker Impedance ........................................................................................ A, B (4 ~16 Ohms),<br />
.......................................................................................A+B (8 ~16 Ohms), Bridge (8 ~16 Ohms)<br />
Power Requirement ..............................................................................................120V AC / 60Hz<br />
Power Fuse................................................................................................................7 Amps/250 V<br />
Dimensions.........................................................5 3/8 x 19 x 14 1/2 Inches (136 x 482 x 367 mm)<br />
Weight .....................................................................................................................27 lbs (12.3kgs)<br />
Specifications are subject to change and improvement without notice. Actual product may<br />
vary from the images found in this document.<br />
22
Additional Information<br />
Do More with <strong>Your</strong> <strong>Amplifier</strong><br />
Visit your local <strong>Radio</strong><strong>Shack</strong> store or www.radioshack.com to purchase these and<br />
other useful products.<br />
Two-way PA Speaker<br />
• 3 tweeters – 3x7” piezo horn<br />
tweeter plus two 3x3” piezo<br />
tweeters for sparkling highs<br />
• Great bass response – 15” woofer<br />
with and 50-ounce strontiumferrite<br />
magnet<br />
Audio Mixer<br />
• Separate master and record<br />
outputs<br />
• Echo section with delay,<br />
repeat and level controls<br />
• Assignable effect section<br />
with send and receive level<br />
controls<br />
16-Gauge Cable<br />
• Rope-strand design is more<br />
flexible than standard wire<br />
• Copper conductors, enclosed in<br />
tough plastic insulation with an<br />
embedded stripe for easy<br />
polarity ID<br />
23
Limited Warranty<br />
This product is warranted by <strong>Radio</strong><strong>Shack</strong> against manufacturing defects in material and<br />
workmanship under normal use for one (1) year from the date of purchase from <strong>Radio</strong><strong>Shack</strong><br />
company-owned stores and authorized <strong>Radio</strong><strong>Shack</strong> franchisees and dealers. EXCEPT AS<br />
PROVIDED HEREIN, <strong>Radio</strong><strong>Shack</strong> MAKES NO EXPRESS WARRANTIES AND ANY IMPLIED<br />
WARRANTIES, INCLUDING THOSE OF MERCHANTABILITY AND FITNESS FOR A PARTICULAR<br />
PURPOSE, ARE LIMITED IN DURATION TO THE DURATION OF THE WRITTEN LIMITED<br />
WARRANTIES CONTAINED HEREIN. EXCEPT AS PROVIDED HEREIN, <strong>Radio</strong><strong>Shack</strong> SHALL HAVE<br />
NO LIABILITY OR RESPONSIBILITY TO CUSTOMER OR ANY OTHER PERSON OR ENTITY WITH<br />
RESPECT TO ANY LIABILITY, LOSS OR DAMAGE CAUSED DIRECTLY OR INDIRECTLY BY USE OR<br />
PERFORMANCE OF THE PRODUCT OR ARISING OUT OF ANY BREACH OF THIS WARRANTY,<br />
INCLUDING, BUT NOT LIMITED TO, ANY DAMAGES RESULTING FROM INCONVENIENCE, LOSS<br />
OF TIME, DATA, PROPERTY, REVENUE, OR PROFIT OR ANY INDIRECT, SPECIAL, INCIDENTAL,<br />
OR CONSEQUENTIAL DAMAGES, EVEN IF <strong>Radio</strong><strong>Shack</strong> HAS BEEN ADVISED OF THE<br />
POSSIBILITY OF SUCH DAMAGES.<br />
Some states do not allow limitations on how long an implied warranty lasts or the exclusion or<br />
limitation of incidental or consequential damages, so the above limitations or exclusions may not<br />
apply to you.<br />
In the event of a product defect during the warranty period, take the product and the <strong>Radio</strong><strong>Shack</strong><br />
sales receipt as proof of purchase date to any <strong>Radio</strong><strong>Shack</strong> store. <strong>Radio</strong><strong>Shack</strong> will, at its option,<br />
unless otherwise provided by law: (a) correct the defect by product repair without charge for<br />
parts and labor; (b) replace the product with one of the same or similar design; or (c) refund<br />
the purchase price. All replaced parts and products, and products on which a refund is made,<br />
become the property of <strong>Radio</strong><strong>Shack</strong>. New or reconditioned parts and products may be used in<br />
the performance of warranty service. Repaired or replaced parts and products are warranted for<br />
the remainder of the original warranty period. You will be charged for repair or replacement of the<br />
product made after the expiration of the warranty period.<br />
This warranty does not cover: (a) damage or failure caused by or attributable to acts of God, abuse,<br />
accident, misuse, improper or abnormal usage, failure to follow instructions, improper installation<br />
or maintenance, alteration, lightning or other incidence of excess voltage or current; (b) any repairs<br />
other than those provided by a <strong>Radio</strong><strong>Shack</strong> Authorized Service Facility; (c) consumables such as<br />
fuses or batteries; (d) cosmetic damage; (e) transportation, shipping or insurance costs; or (f) costs<br />
of product removal, installation, set-up service adjustment or reinstallation.<br />
This warranty gives you specific legal rights, and you may also have other rights which vary from<br />
state to state.<br />
<strong>Radio</strong><strong>Shack</strong> Customer Relations<br />
300 <strong>Radio</strong><strong>Shack</strong> Circle, Fort Worth, TX 76102 12/99<br />
www.radioshack.com<br />
Protect the environment by recycling used electronics. Go to<br />
www.ecyclingcentral.com to find a recycling location near you.<br />
©2008. <strong>Radio</strong><strong>Shack</strong> Corporation.<br />
All rights reserved. <strong>Radio</strong><strong>Shack</strong> and <strong>Radio</strong><strong>Shack</strong>.com<br />
are trademarks used by <strong>Radio</strong><strong>Shack</strong> Corporation.<br />
33-2055 A<br />
Printed in China<br />
07A08