

Class 99 & 99K Sewing Machines - Sew-Classic.com
Class 99 & 99K Sewing Machines - Sew-Classic.com
Class 99 & 99K Sewing Machines - Sew-Classic.com

Create successful ePaper yourself
Turn your PDF publications into a flip-book with our unique Google optimized e-Paper software.
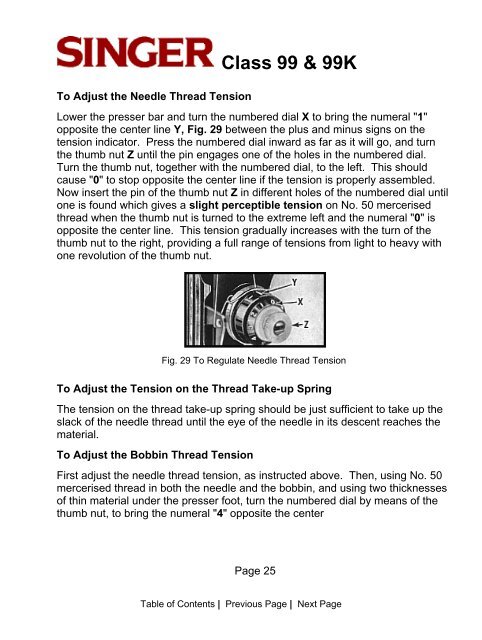
To Adjust the Needle Thread Tension<br />
<strong>Class</strong> <strong>99</strong> & <strong>99</strong>K<br />
Lower the presser bar and turn the numbered dial X to bring the numeral "1"<br />
opposite the center line Y, Fig. 29 between the plus and minus signs on the<br />
tension indicator. Press the numbered dial inward as far as it will go, and turn<br />
the thumb nut Z until the pin engages one of the holes in the numbered dial.<br />
Turn the thumb nut, together with the numbered dial, to the left. This should<br />
cause "0" to stop opposite the center line if the tension is properly assembled.<br />
Now insert the pin of the thumb nut Z in different holes of the numbered dial until<br />
one is found which gives a slight perceptible tension on No. 50 mercerised<br />
thread when the thumb nut is turned to the extreme left and the numeral "0" is<br />
opposite the center line. This tension gradually increases with the turn of the<br />
thumb nut to the right, providing a full range of tensions from light to heavy with<br />
one revolution of the thumb nut.<br />
Fig. 29 To Regulate Needle Thread Tension<br />
To Adjust the Tension on the Thread Take-up Spring<br />
The tension on the thread take-up spring should be just sufficient to take up the<br />
slack of the needle thread until the eye of the needle in its descent reaches the<br />
material.<br />
To Adjust the Bobbin Thread Tension<br />
First adjust the needle thread tension, as instructed above. Then, using No. 50<br />
mercerised thread in both the needle and the bobbin, and using two thicknesses<br />
of thin material under the presser foot, turn the numbered dial by means of the<br />
thumb nut, to bring the numeral "4" opposite the center<br />
Page 25<br />
Table of Contents | Previous Page | Next Page


