Download - YT Industries
Download - YT Industries
Download - YT Industries

Create successful ePaper yourself
Turn your PDF publications into a flip-book with our unique Google optimized e-Paper software.
6<br />
2.4 Sliding bushing and oil seals<br />
The guide of the stanchion tubes inside the sliders is formed by two<br />
bushings with Tefl on® facing, free from static friction.<br />
In the new forks, the notorious smoothness of Bomber models has<br />
been overcome thanks to the use of new bushings and seals that<br />
are offer a coeffi cient of friction that is 30% lower, as well as constant<br />
performances in time. When the bike is not moving, you can feel<br />
a little movement between the fork legs and the sliders: actually,<br />
there is a fundamental space to keep the sliding elements always<br />
lubricated, and therefore it can be no longer perceived during its<br />
use. Indeed, during the use the oil will take up the space between<br />
the bushings and the fork legs, thus offering an incomparable<br />
smoothness.<br />
At the top end of the monolite, there is a sealing group formed by<br />
a special ring with double lip and a dust seal. The sealing group<br />
prevents oil leakages, as well as the access of contaminating agents<br />
into the lubricant and into the hydraulic cartridges.<br />
3. INSTALLATION<br />
3.1 Installing on the frame<br />
The fork is supplied with an “A-Head Set” steer tube to be cut<br />
according to the frame size the fork is being installed on. Installing<br />
the fork on the bicycle frame is a delicate and critical operation, and<br />
should only be performed by skilled, trained personnel.<br />
WARNING!<br />
Suspension system installation requires specialized<br />
knowledge, tools and experience. General mechanical aptitude<br />
may not be sufficient to properly install your suspension<br />
system. Please have your suspension system installed only<br />
by an authorized Marzocchi Suspension Center. Improper<br />
installation can result in failure of your Marzocchi Suspension<br />
System, an accident, personal injury, or death.<br />
The interference of the cylinder on the base and the play between<br />
the cylinder and frame are particularly critical factors for the safety of<br />
the operator. For this reason, maintenance and installation must be<br />
performed exclusively at authorised technical assistance centres,<br />
which have suitable equipment and specifi c knowledge.<br />
WARNING!<br />
On all dual crown MY 2009 MARZOCCHI models, the lower<br />
crown is clamped to the stanchions using bolts. In this<br />
case, please be aware of the following precautions during<br />
installation.<br />
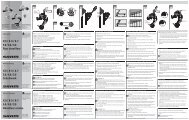
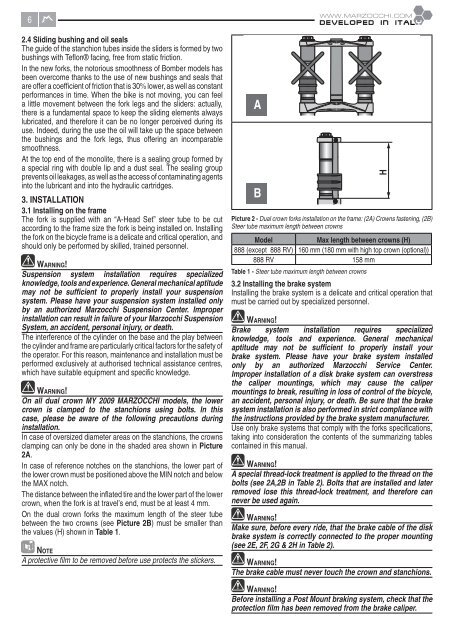
In case of oversized diameter areas on the stanchions, the crowns<br />
clamping can only be done in the shaded area shown in Picture<br />
2A.<br />
In case of reference notches on the stanchions, the lower part of<br />
the lower crown must be positioned above the MIN notch and below<br />
the MAX notch.<br />
The distance between the infl ated tire and the lower part of the lower<br />
crown, when the fork is at travel’s end, must be at least 4 mm.<br />
On the dual crown forks the maximum length of the steer tube<br />
between the two crowns (see Picture 2B) must be smaller than<br />
the values (H) shown in Table 1.<br />
NOTE<br />
A protective fi lm to be removed before use protects the stickers.<br />
A<br />
B<br />
H<br />
Picture 2 - Dual crown forks installation on the frame: (2A) Crowns fastening, (2B)<br />
Steer tube maximum length between crowns<br />
Model<br />
Max length between crowns (H)<br />
888 (except 888 RV) 160 mm (180 mm with high top crown (optional))<br />
888 RV 158 mm<br />
Table 1 - Steer tube maximum length between crowns<br />
3.2 Installing the brake system<br />
Installing the brake system is a delicate and critical operation that<br />
must be carried out by specialized personnel.<br />
WARNING!<br />
Brake system installation requires specialized<br />
knowledge, tools and experience. General mechanical<br />
aptitude may not be sufficient to properly install your<br />
brake system. Please have your brake system installed<br />
only by an authorized Marzocchi Service Center.<br />
Improper installation of a disk brake system can overstress<br />
the caliper mountings, which may cause the caliper<br />
mountings to break, resulting in loss of control of the bicycle,<br />
an accident, personal injury, or death. Be sure that the brake<br />
system installation is also performed in strict compliance with<br />
the instructions provided by the brake system manufacturer.<br />
Use only brake systems that comply with the forks specifi cations,<br />
taking into consideration the contents of the summarizing tables<br />
contained in this manual.<br />
WARNING!<br />
A special thread-lock treatment is applied to the thread on the<br />
bolts (see 2A,2B in Table 2). Bolts that are installed and later<br />
removed lose this thread-lock treatment, and therefore can<br />
never be used again.<br />
WARNING!<br />
Make sure, before every ride, that the brake cable of the disk<br />
brake system is correctly connected to the proper mounting<br />
(see 2E, 2F, 2G & 2H in Table 2).<br />
WARNING!<br />
The brake cable must never touch the crown and stanchions.<br />
WARNING!<br />
Before installing a Post Mount braking system, check that the<br />
protection film has been removed from the brake caliper.