
You also want an ePaper? Increase the reach of your titles
YUMPU automatically turns print PDFs into web optimized ePapers that Google loves.
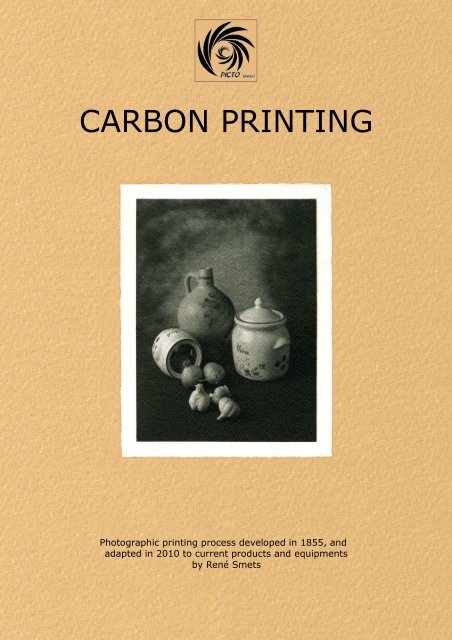
<strong>CARBON</strong> <strong>PRINTING</strong><br />
Photographic printing process developed in 1855, and<br />
adapted in 2010 to current products and equipments<br />
by René Smets
INTRODUCTION:<br />
Carbon printing is a photographic process the foundation of which was laid in<br />
1855 by Alphonse Poitevin.<br />
The process relies upon the ability of an organic material (gelatin) to become<br />
insoluble in water when sensitized with dichromates and exposed to sunlight.<br />
A substrate (carbon tissue) is coated with a layer of gelatin mixed with<br />
pigment, and sensitized with potassium dichromate. A contact print is made<br />
under a large negative. The gelatin layer is then transferred to a carrier, and<br />
developed.<br />
This development is done by rinsing away the gelatin that was not hardened by<br />
light. The result is a relief layer of gelatin, showing the full tonal scale of the<br />
negative, from paper white to maximum black, on the final paper support.<br />
Carbon printing is one of the few processes rendering all the details of the<br />
negative in the final print.<br />
Explanations of the above will be based on texts, pictures and drawings. Don't<br />
be impressed by the sometimes complicated equipment I built for this;<br />
everything can be carried out in a simple way, using simple tools.<br />
I have been working for months on the whole process, but considerable time<br />
was spent on the more or less successful building of several pieces of<br />
equipment. The taking of pictures, their digital processing and several<br />
drawings also took quite some time.<br />
I did thoroughly enjoy this, and am very pleased to share my findings with all<br />
those interested in the process. Questions are welcome at any time, and I'll try<br />
to answer them to the best of my abilities.<br />
The process will be explained in seven stages, each of them being presented<br />
with its own description, formulas, pictures and drawings.<br />
The seven stages are:<br />
1. making a large negative<br />
2. sizing watercolour paper<br />
3. mixing and coating a pigmented gelatin layer<br />
4. sensitizing<br />
5. exposure<br />
6. developing<br />
7. drying<br />
8. finishing
1. MAKING A LARGE NEGATIVE:<br />
In the early days of carbon printing, large negatives were not a problem, as<br />
the cameras in use were mostly large format.<br />
Currently, large negatives can be computer made, but I still have to see the<br />
large digital negative fitting my needs for various alternative processes and<br />
keeping their cost (printer, inks) at a reasonable level.<br />
The urge for sticking as much as<br />
possible with the traditional methods<br />
was so powerful, that I decided to build<br />
my own 4'x5' camera.<br />
(fig. 1)<br />
In order to be able to make even larger<br />
negatives, I bought some old cameras<br />
on used equipment markets. I<br />
refurbished these cameras and adapted<br />
their film holders to the modern sheet<br />
films<br />
(fig. 2 and 3)<br />
Using these cameras is the easiest way to get a large negative; let's see the<br />
hardest way now..<br />
After some years of activity, every amateur photographer is owning a serious<br />
number of negatives, either 24x36mm or 6x6cm. How to make large negatives<br />
from these small ones is shown below.
Under my camera and its bellows, I<br />
built a sliding support where bellows<br />
and negative holder can be mounted<br />
solidly and free from any vibrations.<br />
(picture #4).<br />
I completed the system with a small<br />
light box and with a negative holder<br />
that can be moved in order to allow<br />
pictures to be taken at 1x1 ratio.<br />
Using this light box ensures that the<br />
light intensity always is the same, and<br />
therefore also the corresponding<br />
exposure time, as long as the density<br />
of the negatives remains the same.<br />
(see sketch 1)<br />
To record the positive, I use Rollei Pan 25 film (25 ISO).<br />
After some testing with a step tablet ( Stouffer ) it is possible to determine the<br />
exact exposure which will produce a good positive showing full details in the<br />
shadows as well as in the highlights, provided they were in the original<br />
negative.<br />
The film is processed in ROLLEI RHS developer, diluted 1+7, during<br />
5min.30sec. at 20°C. That is about 10% more than the manufacturer's<br />
recommendations, in order to get full details in the whole negative.<br />
These positives are then enlarged under the enlarger, in just the same way<br />
than making a paper print. The only difference is that the film is exposed on a<br />
black background rather than a white one.<br />
Some years ago, continuous tone films similar to the variable contrast Gevarex<br />
were still available. These are gone now. It was possible to manipulate them<br />
under red safelight. The currently available orthochromatic films should be<br />
adequate for this use too, but until now I haven't done any testing with them.<br />
I use ADOX CHS panchromatic film (25 ISO) for making my large negatives.
This film is a normal film for picture taking purposes, and therefore rather fast.<br />
So I had to equip my enlarger with a shutter between negative and lens, as<br />
very short exposure times are necessary.<br />
(see pictures # 5, 6 and 7)<br />
Every single light leak has to be eliminated on the enlarger, as the film has to<br />
be manipulated in complete darkness.<br />
I use to process these large negatives in trays, just as prints; but sometimes I<br />
use a self-built container which makes it possible to process several negatives
together (see picture # 8).<br />
Contrast can be steered by adapting the developer<br />
concentration and development time.<br />
It is recommended to use a printing frame, preferably<br />
equipped with registering pins, on the baseboard of<br />
the enlarger for exact positioning of the film, as all<br />
the work has to be done in<br />
complete darkness.<br />
I built two such frames, one<br />
being somewhat more<br />
sophisticated than the<br />
other.<br />
Sketch 2 shows the first<br />
one, which has a base that can be fixed with pins to<br />
the enlarger's baseboard.<br />
This base is fitted with four registering pins for the<br />
positioning of masks and films. A pivoting glass plate<br />
provides the necessary pressure on the whole.<br />
Unlike photographic paper,<br />
film has to be exposed on a<br />
black background. The usual white base of most<br />
enlarging easels is inadequate. Finally, I have cut<br />
various masks corresponding to the film formats I<br />
use (see picture # 9).<br />
These accessories make it a snap to position<br />
precisely the film under the enlarger.<br />
Finally, I keep the exposed films in a light-tight<br />
drawer while working.<br />
The second, somewhat simpler frame basically is a<br />
board on which four registering pins were glued. The<br />
surface was painted black. For focusing, I use a white<br />
sheet of pvc that fits on the registering pins.<br />
Depending on its format, the large negative is placed<br />
in the corresponding mask, which then is placed on<br />
top of the surface to be exposed for contact printing.<br />
The masks were cut in 0,2mm thick aluminum sheets<br />
that I got from a printer.<br />
Remark: The support papers displayed in picture #9b<br />
were sized with Gesso, which guarantees good flatness.<br />
As for the carbon tissue, I do often use clear pvc sheets<br />
sanded on one face to make it matte, instead of paper. Pvc has the advantage of<br />
being indefinetly reusable, and of staying perfectly flat.
Picture #10 shows a 6x6cm (2.25"x2.25") negative<br />
with good detail in both shadows and highlights.<br />
Picture #11 shows a positive print of a Stouffer step<br />
tablet. it is used to evaluate exposure and<br />
development; when they are correct there is a<br />
distinct difference between steps #1 and 2 as well as<br />
between #20 en 21. Picture #12 shows one of the<br />
positives which got an accurate exposure and<br />
development time. Picture #13 shows a partial scan<br />
of a big negative made on ADOX CHS film.<br />
2. SIZING THE WATERCOLOUR PAPER<br />
the paper I'm using is Arches aquarelle hot<br />
pressed grain satiné which is 300 gr./sqm (see<br />
picture #14).<br />
In order to prevent the pigments from<br />
penetrating into the fibers of the paper, which<br />
would result in grayish white parts, the fibers<br />
have to be saturated with gelatin.<br />
The normal household gelatin in sheets is used for this.<br />
In order to prevent the gelating from being flushed away in the following<br />
baths, it has to be hardened with chrome alum (see picture #15).<br />
I use the formula below:<br />
– water 1 liter<br />
– gelatin 50 gr.<br />
– chrome alum 5 gr. in 100 ml water<br />
I mix 2 cc of this solution per 100 ml<br />
of gelatin solution, i.e. 20 cc per liter.<br />
The gelatin is soaked in cold water for about 30<br />
min. and then warmed in a bain-marie until it<br />
dissolves completely.<br />
Simultaneously, the chrome alum solution is<br />
warmed too, and then stirred into the hot<br />
gelatin.
In order to size easily a significant number of papers, I use a warming plate on<br />
which I put an aluminum tray, on one face of which is fixed a spring-loaded<br />
bar. The moist<br />
paper is pulled<br />
between this bar<br />
and the edge of<br />
the tray, which<br />
eliminates air bells<br />
as well as the<br />
excess of gelatin<br />
(see pictures #16a<br />
and 16b).<br />
The paper is left for a couple of minutes in the<br />
gelatin before the sheets are taken out one by<br />
one and suspended to dry (see picture #18).<br />
The sizing is repeated twice in order to be sure<br />
that the fibers are completely saturated.<br />
MY GESSO METHOD.<br />
When painting with oil paints on paper, I apply a<br />
Gesso primer. I tried this also on a carbon<br />
tissue, and the result were astonishing. The white parts are beautifully white,<br />
and the pigmented gelatine adheres very well.<br />
This is how I proceed:<br />
a watercolour paper is put on a varnished plate<br />
and moistened thoroughly on one face. The<br />
paper is left until completely straightened.<br />
In the meantime, all air bells are continuously<br />
wiped away with the sponge.<br />
The paper is then fixed on the plate with a<br />
special tape, that sticks when moistened (see<br />
pictures A and B).<br />
The entire sheet<br />
is now coated<br />
with Gesso:<br />
a brush is gently<br />
stroked in all<br />
directions in order<br />
to get an even<br />
distribution.<br />
When the product<br />
is evenly spread,<br />
the layer is<br />
equalized with a<br />
very soft brush<br />
stroked in all<br />
ways (see pictures C<br />
and D).
Very gentle brush strokes will ensure a beautiful, even layer of Gesso (see<br />
picture E). After a couple of hours, the paper is completely dry and outstretched.<br />
I get very nice results with this technique.<br />
There might be criticisms, as this is not respecting the original way of doing. I<br />
fully agree, but in my opinion, what's important is the final result. Digital<br />
negatives are also miles away from the original technique, after all...<br />
Picture F shows the result after drying.<br />
The gelatin-sized papers show creases from the<br />
hanging pins, aren't flat and are far less white<br />
than the Gesso papers.<br />
The latter are perfectly flat and present a quite<br />
even white surface, very pleasant to work with.<br />
3. MIXING THE PIGMENTED GELATIN AND COATING<br />
To make the carbon tissue, the products shown in picture #19 are used in<br />
following proportions:<br />
water<br />
250 ml.<br />
gelatin 30 gr.<br />
candi sugar 12,5 gr.<br />
fish glue 5 ml.<br />
glycerin 5 ml.<br />
agepon 2 ml.<br />
ivory black 15 gr.<br />
lime blue 1 gr.<br />
Vandyck brown 4 gr.<br />
gum arabic 2,5 gr.<br />
The powder pigments<br />
cannot just<br />
be mixed with the<br />
liquids. They have<br />
to be crushed<br />
with a little liquid,<br />
as shown on<br />
picture #20. 25<br />
ml. of the above mentioned water is used to<br />
crush the pigment on a sanded glass plate with<br />
the fish glue and the glycerin (see picture # 21).
At the beginning, the pigment floats on the<br />
liquid, but after some time (about 20 minutes)<br />
one gets an quite liquid, homogeneous pasta<br />
(see picture #22).<br />
The gelatin, sugar, gum arabic and Agepon<br />
wetting agent are poured in the cold water,<br />
stirred from time to time during 30 minutes.<br />
The liquid is the warmed in a bain-marie until<br />
the gelatin becomes liquid (see picture #23).<br />
The crushed pigment mixture is also warmed before<br />
being added to the gelatin. The liquid is filtered and<br />
stirred for 2 hours. I build an electric mixer for this (see<br />
picture #24).<br />
The mixer is placed on top of a measuring glass at the<br />
bottom of which a tapping hose has been fitted. This<br />
allows to take the liquid while the possible air bells<br />
remain at the surface (see picture #25).<br />
The paper I'm using is Canson Bristol (see picture #26).
Sketch 1 shows the accessory I built for crushing<br />
the pigment. It is made from a sanded glass<br />
plate on top of which is fixed another glass plate<br />
of 8mm. thickness with a round hole of 18 cm,<br />
the whole being sealed with silicon.<br />
POURING THE PIGMENT COAT.<br />
In order to make the coating easier, an<br />
accessory was built. It is composed by a plate in<br />
plexiglass on both sides of which were fixed<br />
aluminum profiles which will determine the<br />
thickness of the coat. In the middle of this is<br />
sitting a removable plexi plate on which the<br />
paper is to be laid (see picture #27).<br />
This accessory is placed on a warming plate, and<br />
once the whole is at temperature, the coating can begin.<br />
The paper to be coated is soaked for a couple of<br />
minutes in cold water. Then the water in excess is<br />
wiped off the sheet, the paper laid on the plexi plate<br />
and squeegeed to complete flatness.<br />
Due to the moist, the paper adheres well to the plexi<br />
plate. The upper face of the paper is dabbed to<br />
remove every trace of liquid.<br />
(See picture #28).<br />
The gelatin-pigment mixture is then poured on the<br />
paper and evenly spread out with a few movements<br />
of an aluminum rod.<br />
As the mixture is warm, it's easy to spread.<br />
A cold glass plate is then slipped under the coated<br />
paper, and the whole is put aside (keeping it perfectly<br />
horizontal) until the coating congeals (see picture #29).<br />
This way, a nice, even, shiny coat is obtained (see<br />
picture #30).<br />
After the coating,<br />
all sheets are<br />
suspended for<br />
drying (see picture<br />
#31).
4. SENSITIZING<br />
The carbon tissue is sensitized with a 3%<br />
solution of potassium dichromate. Here is how:<br />
The dry pigment paper is soaked in water until it<br />
becomes perfectly flat (picture #32).<br />
Water in excess is wiped off (picture #33).<br />
The temperature of the dichromate bath is set<br />
around 15°C.<br />
The paper is weltered fo 3 minutes in the<br />
dichromate solution (picture #34).<br />
Then the paper is wiped again, as shown on<br />
picture #32.<br />
Finally, the sheets are hung to dry.<br />
The drying can be speeded up with a fan set on<br />
"cold" (picture #35).<br />
5. EXPOSING<br />
A carbon print can be perfectly exposed to<br />
daylight; but as this light can be quite unstable,<br />
the resulting exposure times might be<br />
unpredictable and changing. It is therefore<br />
advisable to expose to UV light using a 120 watt<br />
Philips HPR lamp or a light unit with UV TL<br />
lamps.<br />
I have built such a<br />
light unit with six<br />
tubes of 20 watt, as<br />
shown in the<br />
following pictures<br />
(see pictures #36 and<br />
37).
Personally, I use the<br />
HPR lamp with<br />
preheating device.<br />
The correct exposure<br />
has to be found<br />
by testing.<br />
To give you an idea: I expose for 4 minutes at a<br />
distance of 40 cm.<br />
The work is easier when using a printing frame<br />
with registering pins, as this allows fast and<br />
accurate positioning of paper and film (pictures<br />
#38 and 39).<br />
Here you can see how the carbon tissue is<br />
exposed under the HPR lamp (picture #40).<br />
Before the exposure, the support paper is soaked<br />
for about ten minutes in cold water (picture #41).<br />
After exposure, the carbon tissue is immersed in<br />
the same water bath until the paper is fully<br />
stretched out (picture #42).<br />
Both papers are then put face to face under<br />
water, and subsequently pressed together on a<br />
plexi plate using a squeegee (picture #43).
This sandwich is pressed tightly using a roller, from<br />
the centre towards the sides (picture #44).<br />
To get an even better pressure on a small surface, I<br />
built my own squeegee (picture #45).<br />
Finally, the sandwich is put for about 15 minutes<br />
under a weighted flat plate (picture #46).<br />
6. DEVELOPING<br />
After that time, the sandwich is slipped<br />
cautiously, without crumpling, into a water bath<br />
of about 40 °C.<br />
(pictures 47 and 48)<br />
The pigment tissue is on top; after a while, one<br />
can see the pigment-loaded gelatin starting to<br />
melt all around the pigment tissue. That takes a<br />
few minutes (3 to 4).<br />
Both papers are then separated in one<br />
continuous movement (picture 49).<br />
Discard the pigment tissue and keep the support<br />
paper in the warm water bath.<br />
Move the paper gently back and forth and turn it<br />
with the gelatin layer down.<br />
Leave it alone for a few minutes; this can take<br />
about 15 minutes (picture 50).
After this interval, the<br />
gelatin that wasn't<br />
hardened is washed<br />
away and the image<br />
appears in all its glory<br />
(picture 51).<br />
7. DRYING<br />
Hang the paper on a vertical plane; when there<br />
isn't any pigment coming off, the processing is<br />
completed and the print can be hung to dry.<br />
(picture 52)<br />
René Smets<br />
May 2010<br />
translation: J. Kevers<br />
<strong>Picto</strong> <strong>Benelux</strong><br />
<strong>Picto</strong> is an informal group, open to everybody in the <strong>Benelux</strong> who has an active interest in any<br />
photographic processes developed from the very beginning of Photography. The aim is to<br />
revisit them, while respecting anyone's creative approach.<br />
http://www.picto.info/