Set Up Guide & User Manual - Williams Sound
Set Up Guide & User Manual - Williams Sound
Set Up Guide & User Manual - Williams Sound

You also want an ePaper? Increase the reach of your titles
YUMPU automatically turns print PDFs into web optimized ePapers that Google loves.
<strong>Set</strong> <strong>Up</strong><br />
<strong>Guide</strong> &<br />
<strong>User</strong><br />
<strong>Manual</strong><br />
Hearing Helper ® PERSONAL FM System<br />
Models PFM 300 & PFM 350<br />
Wireless FM Listening System<br />
Transmitter Model T30<br />
Receiver Models R31, R32<br />
<strong>Williams</strong> <strong>Sound</strong> ®<br />
Helping People Hear<br />
MAN 072C
HEARING HELPER ® PERSONAL FM SYSTEM, MODELS PFM 300 / PFM 350<br />
INSTALLATION GUIDE & USER MANUAL<br />
Contents<br />
Page<br />
SYSTEM OVERVIEW 4<br />
SYSTEM COMPONENTS 5<br />
USING THE T30 TRANSMITTER 6<br />
USING THE PFM R32 RECEIVER 7<br />
USING THE PFM R31 RECEIVER 8<br />
BATTERY INFORMATION 10<br />
USING YOUR PERSONAL FM SYSTEM WITH A HEARING AID 12<br />
APPLICATIONS FOR VARIOUS HEARING LOSS LEVELS 13<br />
IN CASE OF DIFFICULTY 14<br />
CHANGING FREQUENCIES 15<br />
WARRANTY 17<br />
SYSTEM SPECIFICATIONS 18<br />
ACOUSTIC SPECIFICATIONS 19<br />
<strong>Williams</strong> <strong>Sound</strong> ®<br />
Helping People Hear<br />
3
SYSTEM OVERVIEW<br />
Thank you for purchasing the Hearing Helper ® Personal FM System from <strong>Williams</strong> <strong>Sound</strong><br />
Corp. Anyone needing auditory assistance to overcome background noise, reverberation, or<br />
distance from the sound source can benefit from the Personal FM System.<br />
Your PFM System has two principal parts: the Transmitter and the Receiver. Much like a<br />
miniature radio station, the Transmitter and microphone pick up the sounds you want to hear<br />
and broadcast them over an FM radio signal. The receiver and earphone are used to pick up<br />
the broadcast up to 100 feet away.<br />
To avoid difficulties, please read through these instructions as you begin to use the system.<br />
Then save them for questions that arise as you continue to use your <strong>Williams</strong> <strong>Sound</strong> Personal<br />
FM System.<br />
If you have problems with the PFM system, don’t hesitate to call us toll-free at<br />
1-800-843-3544.<br />
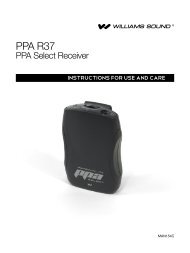
FIGURE 1: HOW THE PFM SYSTEM WORKS<br />
FM Radio Signal<br />
Speaker Uses Transmitter<br />
With Microphone<br />
Listeners use R31 or R32 Receivers with<br />
Earphones, Headphones, Or Neckloop<br />
The speaker wears the body-pack transmitter and a clip-on microphone. The<br />
speaker’s voice is broadcast as an FM radio signal over a distance of 100-150 feet<br />
(30-45 m). Listeners use the pocket receiver and earphone or headphone to hear the<br />
speaker’s voice directly, with reduced background noise. A neckloop telecoil<br />
coupler allows the system to be used with telecoil (T-Switch) equipped hearing aids.<br />
4<br />
<strong>Williams</strong> <strong>Sound</strong> ®<br />
Helping People Hear
SYSTEM COMPONENTS<br />
Body Pack Transmitter (PFM T30) with (2) AA batteries (BAT 001)<br />
Lavalier microphone (MIC 090)<br />
Mini earphone (EAR 013)<br />
Soft Nylon System Carry Case (CCS 020)<br />
(2) Belt clip cases (CCS 021)<br />
Instructions (MAN 072)<br />
<br />
<br />
PFM System 300 Only:<br />
Personal FM Receiver (PFM R32) with (2) AA batteries (BAT 001)<br />
PFM System 350 Only:<br />
Personal FM Receiver (PFM R31) with Plug Mount Microphone (MIC 014)<br />
and (2) AA batteries (BAT 001)<br />
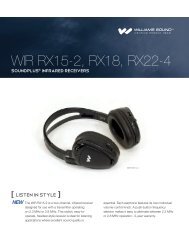
FIGURE 2: SYSTEM COMPONENTS<br />
Microphone<br />
Earphone<br />
Earphone<br />
Microphone<br />
On/Off Switch<br />
On/Off &<br />
FM Volume<br />
Mic<br />
Volume<br />
On/Off &<br />
FM Volume<br />
Mic Jack<br />
<strong>Williams</strong> <strong>Sound</strong><br />
<strong>Williams</strong> <strong>Sound</strong><br />
Hearing Helper<br />
Hearing Helper ®<br />
®<br />
<strong>Williams</strong> <strong>Sound</strong><br />
<strong>Williams</strong> <strong>Sound</strong><br />
Hearing Helper<br />
Hearing Helper ®<br />
®<br />
<strong>Williams</strong> <strong>Sound</strong><br />
<strong>Williams</strong> <strong>Sound</strong><br />
Hearing Helper<br />
Hearing Helper ®<br />
®<br />
T30 Transmitter<br />
(PFM 300 & 350 Systems)<br />
R32 Receiver<br />
(PFM 300 System)<br />
R31 Receiver<br />
(PFM 350 System)<br />
<strong>Williams</strong> <strong>Sound</strong> ®<br />
Helping People Hear<br />
5
USING THE T30 TRANSMITTER<br />
1. Make sure there are two charged AA batteries in the transmitter. If batteries are not<br />
installed, see Battery Information on page 10.<br />
2. Plug the microphone cord into the “Mic” jack on top of the Transmitter.<br />
FIG. 3: T30 TRANSMITTER TOP VIEW<br />
Mic<br />
Jack<br />
Mic<br />
Off<br />
FM<br />
On<br />
On/Off<br />
Switch<br />
<strong>Williams</strong> <strong>Sound</strong> FM<br />
3. Place the Transmitter in the belt clip case provided.<br />
4. Turn the power switch on top of the Transmitter to “On.”<br />
5. Clip the microphone onto a collar, lapel, or tie. It should be as close to the speaker’s<br />
mouth as is practical. (See Figure 4.)<br />
The transmitter can be placed in a pants pocket, or clipped onto a belt or<br />
waistband. Make sure the Transmitter is turned OFF when not in use.<br />
FIGURE 4: CORRECT MICROPHONE PLACEMENT<br />
Yes Yes No<br />
The PFM System 300/350 comes with an omnidirectional, lapel-clip style microphone. It<br />
should be clipped to a collar, lapel, tie, or neckline as close to the mouth as possible and<br />
centered on the body as shown.<br />
Note On The Transmitter Antenna:<br />
The microphone cord is the transmitting antenna. Do not bunch up the cord or wrap it around<br />
the transmitter. For maximum range, the cord should hang as straight as possible.<br />
6<br />
<strong>Williams</strong> <strong>Sound</strong> ®<br />
Helping People Hear
USING THE PFM R32 RECEIVER (PFM 300):<br />
Receiver model PFM R32 has a single volume control and an earphone output jack.<br />
1. Make sure there are two charged AA batteries in the Receiver. If batteries are not<br />
installed, see Battery Information on page 10.<br />
2. Plug the earphone or headphone into the “Ear” jack on top of the Receiver.<br />
FIGURE 5: R32 RECEIVER TOP VIEW<br />
Earphone<br />
Jack<br />
FM Indicator<br />
EAR<br />
FM<br />
FM<br />
On<br />
Off Max<br />
On<br />
Indicator<br />
Volume<br />
Control<br />
3. Turn the power on by rotating the volume control knob on top of the Receiver.<br />
4. Place the earphone in your ear.<br />
5. Choose the correct channel using the right switch on the R32’s back panel.<br />
Unless you have changed the Transmitter channel, set the receiver to channel 1. If the<br />
Transmitter is on and tuned to channel 1, the FM Indicator light on the R32 will light.<br />
FIGURE 6: RECEIVER TONE &CHANNEL CONTROLS<br />
TONE<br />
Channel<br />
Lo Mid Hi<br />
CH1 CH2<br />
6. Adjust the receiver volume control to a comfortable listening level.<br />
You should be able to hear someone speaking into the Transmitter microphone.<br />
7. Adjust the receiver tone control to your needs. Lo – more low frequencies;<br />
Mid – some low frequency cut; Hi – maximum low frequency cut, emphasizes higher<br />
frequencies. (See Figure 6.)<br />
8. Place the Receiver in the belt clip case provided. The Receiver can be placed in a pants<br />
pocket, or clipped onto a belt, harness, or waistband.<br />
Notes:<br />
The earphone cord is the receiving antenna. Do not bunch up the cord or wrap it around the<br />
receiver. For best reception, the cord should hang as straight as possible. Make sure the<br />
Receiver is turned OFF when not in use. The channel selector can be used to switch between<br />
an individual and a group channel.<br />
<strong>Williams</strong> <strong>Sound</strong> ®<br />
Helping People Hear<br />
7
USING THE PFM R31 RECEIVER (PFM 350):<br />
Receiver model PFM R31 has two volume control knobs (one for the FM signal, one for<br />
environmental sounds), a microphone input jack, and an earphone output jack.<br />
1. Make sure there are two charged AA batteries in the Receiver. If batteries are not<br />
installed, see Battery Information on page 10.<br />
2. Insert the small Plug Mount Microphone (MIC 014) into the “Mic” jack on top of the<br />
R31 Receiver.<br />
FIGURE 7: R31 TOP VIEW<br />
FM Volume<br />
On Indicator<br />
Mic Jack<br />
EAR<br />
FM<br />
On<br />
Mic<br />
MIC<br />
Mic<br />
Volume<br />
FM<br />
Indicator<br />
FM<br />
Off<br />
Max<br />
Min<br />
Max<br />
Mic<br />
Jack<br />
3. Plug the earphone or headphone into the “Ear” jack on top of the Receiver.<br />
4. Turn the power on by rotating the taller “FM” volume control on top of the Receiver.<br />
5. Place the earphone in your ear.<br />
FIGURE 8: RECEIVER TONE &CHANNEL CONTROLS<br />
TONE<br />
Channel<br />
Lo Mid Hi<br />
CH1 CH2<br />
6. Choose the correct channel using the right switch on the R31’s back panel. If the<br />
Transmitter is on and tuned to channel 1, the FM Indicator light on the R31 will light.<br />
7. Adjust the receiver tone control to your needs. Lo – more low frequencies;<br />
Mid – some low frequency cut; Hi – maximum low frequency cut, emphasizes higher<br />
frequencies. (See Figure 6.)<br />
8. Place the Receiver in the belt clip case provided. The Receiver can be placed in a pants<br />
pocket, or clipped onto a belt, harness, or waistband.<br />
8<br />
<strong>Williams</strong> <strong>Sound</strong> ®<br />
Helping People Hear
Notes:<br />
The earphone cord is the receiving antenna. Do not bunch up the cord or wrap it around the<br />
receiver. For best reception, the cord should hang as straight as possible. Make sure the<br />
Receiver is turned OFF when not in use. The channel selector can be used to switch between<br />
an individual and a group channel.<br />
Adjusting The R31 Volume Controls<br />
1. Adjust the taller “FM” volume control to a comfortable listening level. You should be<br />
able to hear someone speaking into the Transmitter microphone.<br />
2. Now adjust the shorter “Mic” volume control until you can hear sounds picked up by the<br />
environmental microphone on top of the receiver.<br />
3. Adjust the two volume controls for a comfortable mix of FM and environmental sounds.<br />
You will normally want to have the FM signal louder than the environmental Mic<br />
signal to avoid picking up extra background noise. If no environmental sounds are<br />
desired, turn the “Mic” control fully to “Min”. If you want to hear nearby<br />
conversation or your own voice, turn the “Mic” control up.<br />
<strong>Williams</strong> <strong>Sound</strong> ®<br />
Helping People Hear<br />
9
BATTERY INFORMATION<br />
INSTALLATION<br />
Open the battery compartment using a coin in the slot in the bottom of the receiver. Press the<br />
batteries into place, observing proper battery polarity. Incorrect insertion of the battery is<br />
difficult, and may cause both mechanical and electrical damage to transmitters or receivers<br />
not covered by the 5 year warranty. Units will not work with the battery incorrectly installed.<br />
FIGURE 9:<br />
INSTALLATION OF BATTERIES<br />
Rear of Transmitter<br />
or Receiver<br />
Battery<br />
Compartment<br />
Note Proper<br />
Polarity<br />
–<br />
+<br />
+ –<br />
Pry<br />
Slot<br />
DISPOSABLE BATTERIES<br />
In normal use, two AA 1.5 V alkaline batteries will last about 12 hours in the T30<br />
Transmitter and approximately 80 hours in the R31 and R32 Receivers, respectively.<br />
If the sound becomes weak or distorted, replace the battery. The indicator light may still be<br />
on, even with a battery that is weak. Do not leave dead batteries in the receivers. Battery<br />
corrosion is not covered by the <strong>Williams</strong> <strong>Sound</strong> five year warranty.<br />
RECHARGEABLE BATTERIES<br />
The PFM 300 and PFM 350 Systems can use rechargeable AA batteries (BAT 026). On an<br />
overnight charge, these NiMH batteries are designed to operate a T30 Transmitter for<br />
approximately 10 hours, and R31 and R32 Receivers for 50 and 60 hours, respectively.<br />
The battery installed in the receiver may be recharged in the receiver only if it is a Nickel<br />
Cadmium battery, and only if the <strong>Williams</strong> <strong>Sound</strong> CHG 200A charger is used. Damage from<br />
improper charging is not covered by the <strong>Williams</strong> <strong>Sound</strong> five year warranty. For charging<br />
directions, see figure 9.<br />
!! IMPORTANT WARNINGS !!<br />
DO NOT ATTEMPT TO RECHARGE ZINC CARBON (“HEAVY DUTY”), ALKALINE, OR LITHIUM BATTERIES!<br />
DO NOT ATTEMPT TO RECHARGE DISPOSABLE BATTERIES! These batteries may heat up and<br />
explode, causing possible injury and damage to the equipment.<br />
Avoid shorting the plus and minus battery terminals together with metal objects. Battery damage<br />
and burns can result!<br />
Use only <strong>Williams</strong> <strong>Sound</strong> Supplied chargers and batteries!<br />
10<br />
<strong>Williams</strong> <strong>Sound</strong> ®<br />
Helping People Hear
FIGURE 10: USING THE OPTIONAL CHG 200A BATTERY CHARGER TO CHARGE TRANSMITTERS AND RECEIVERS<br />
Step 1:<br />
Plug the CHG 200’s power supply into<br />
the Power Input on the charger’s side and<br />
a standard AC wall outlet.<br />
Route the power cord around the Cord<br />
Hook (see figure at right). This will<br />
minimize strain on the cord and jack and<br />
insure that the power cord is not detached<br />
during charging.<br />
Make sure the receivers/transmitters to be<br />
charged are turned OFF.<br />
Place the receivers/transmitters in the<br />
slots so that the CHG 200’s Charging<br />
Pins and receiver’s side panel contacts<br />
are coupled. Make sure that the charging<br />
contact holes line up with the charging<br />
pins. The receivers should drop easily<br />
into the slots. DO NOT FORCE THEM<br />
IN BACKWARDS.<br />
The Charging Indicators will light,<br />
indicating that charging is in process.<br />
It takes 14–16 hours to fully charge the<br />
batteries. Remove the receivers when<br />
charging is completed.<br />
Step 2:<br />
Charging<br />
Contact Holes<br />
Step 3:<br />
Step 4:<br />
Charging<br />
Pins<br />
Charging<br />
Indicators<br />
Step 5:<br />
Cord Hook<br />
Power Input<br />
FURTHER SUGGESTIONS<br />
Receivers and Transmitters SHOULD NOT be left charging continuously when not in use.<br />
Receivers should always be turned OFF while charging.<br />
It’s best to allow the batteries to fully discharge before charging.<br />
If the batteries are near end of life and the LED turns off while the receiver is operating, this is an<br />
indication to change or recharge your batteries. Approximately one hour of battery life remains.<br />
Repeatedly charging the batteries after short periods of use (1-2 hours) will shorten battery life.<br />
Rechargeable batteries will need to be replaced after 1–2 years of use.<br />
!! WARNING !!<br />
DO NOT ATTEMPT TO RECHARGE DISPOSABLE BATTERIES!<br />
The batteries may heat up and burst, causing possible injury and damage to the equipment.<br />
Avoid shorting the plus and minus battery terminals together with metal objects. Battery damage and<br />
burns can result!<br />
Use only <strong>Williams</strong> <strong>Sound</strong> supplied chargers and batteries.<br />
<strong>Williams</strong> <strong>Sound</strong> ®<br />
Helping People Hear<br />
11
USING YOUR PERSONAL FM SYSTEM WITH A HEARING AID<br />
If you have a hearing aid equipped with a Telecoil (T-Switch), you can use a Neckloop<br />
(NKL 003–children’s size, or NKL 001–adult’s size) or Silhouette coil (INC 005 WC) to<br />
magnetically couple the signal from the PFM Receiver into your hearing aid.<br />
The Neckloop plugs into the earphone jack of the receiver. Turn the switch to the “T”<br />
position on your hearing aid and adjust the volume control on the receiver to a comfortable<br />
level. If you have two hearing aids with telecoils, the signal will couple into both hearing aids<br />
(when using INC 006 WC).<br />
Direct Audio Input cords can be used with compatible hearing aids as well as with Cochlear<br />
Implant Processors. If your hearing aid has a direct audio input boot, you can obtain a cord<br />
from your hearing aid manufacturer to plug directly into the PFM receiver. The cord should<br />
have a 3.5 mm plug.<br />
12<br />
<strong>Williams</strong> <strong>Sound</strong> ®<br />
Helping People Hear
APPLICATIONS FOR VARIOUS HEARING LOSS LEVELS<br />
The Personal FM is designed to provide hearing assistance for anyone when background<br />
noise or distance from the sound source make listening difficult. The microphone and<br />
transmitter are placed close to the desired sound source to help minimize background noise<br />
and to effectively eliminate the distance between the listener and the sound source. Because<br />
hearing ability varies, three categories of amplification have been delineated:<br />
NO HEARING LOSS – LOW AMPLIFICATION<br />
Among Low Amplification applications are classroom and similar uses. The PFM System<br />
can be used with headphones or earphones for Central Auditory Processing Disorders,<br />
Learning Disabilities, or Attention Deficit Disorders. The PFM System is used primarily to<br />
boost speech sounds above other background noises, making it easier for the listener to focus<br />
on what is being said. The optional Rugged Headphone (HED 022–children’s size, and HED<br />
021–adult’s size) are recommended for this application. The EAR 013 Single Mini Earphone,<br />
EAR 008 Surround Earphone, or EAR 014 Dual Mini Earphone can also be used.<br />
MILD – MODERATE HEARING LOSS<br />
These applications include the classroom, TV listening, car riding, and one-on-one<br />
conversations. The PFM System can be used with the Single or Dual Mini Earphone<br />
(EAR 013 or EAR 014) for moderate amplification fittings. The Button Receiver Earphone<br />
(EAR 012 WC) is also available for use with a snap-on custom earmold. The PFM System is<br />
also suitable for temporary mild hearing loss due to Otitis Media. The Rugged Headphones<br />
(HED 021) or Surround Earphone (EAR 022 or EAR 008) are recommended since they do<br />
not enter the ear canal.<br />
SEVERE – PROFOUND HEARING LOSS<br />
These applications include the classroom, TV listening, car riding, and one-on-one<br />
conversations. For severe to profound hearing loss, the PERSONAL FM System should be<br />
used in conjunction with a hearing aid. A Neckloop can be used with hearing aids that have a<br />
telecoil. An adaptor cord can be used with hearing aids that have direct audio input.<br />
<strong>Williams</strong> <strong>Sound</strong> ®<br />
Helping People Hear<br />
13
IN CASE OF DIFFICULTY<br />
If your Personal FM System is not working, check the following:<br />
1. Make sure the batteries are fresh or completely charged and that the “plus” and “minus”<br />
terminals are installed correctly.<br />
2. If the rechargeable batteries will only work for a short period of time (less than 1 hour)<br />
even after they are fully charged, they must be regenerated. Leave them in the receiver or<br />
transmitter with the unit turned on, for 5 - 6 hours. Then turn receiver or transmitter off,<br />
place it in the charger, and charge for 14 - 16 hours. This should restore normal battery<br />
life. Rechargeable batteries will gradually lose their capacity over time and should be<br />
replaced every year.<br />
3. Make sure the microphone is plugged into the T30 Transmitter and the earphone is<br />
plugged into the Receiver.<br />
4. If you have the PFM System 350, make sure the R31 Receiver’s plug mount microphone<br />
IS NOT plugged into the Transmitter.<br />
5. If you’re using the PFM System 350 with the PFM R31 Receiver, make sure that the<br />
earphone has been plugged into the earphone jack and not into the R31 Receiver’s<br />
microphone jack.<br />
6. Move the Transmitter and Receiver closer together. You may be out of range. When<br />
using the system indoors, it’s normal for the signal to momentarily disappear in certain<br />
locations. This is called a “drop-out.” Moving a few feet will restore the signal.<br />
7. Make sure that the Transmitter and Receivers are tuned to the same channel. The units<br />
have stickers inside the back cover identifying the channel. Unless the Transmitter<br />
channel has been changed, set the Receiver to channel 1.<br />
8. Do not try to use more than one Transmitter on the same channel in close proximity to<br />
each other. MORE THAN ONE TRANSMITTER ON THE SAME CHANNEL WILL<br />
RESULT IN INTERFERENCE IF THEY ARE CLOSE TOGETHER. Keep the systems<br />
50 - 100 feet apart or use separate channels for each system used.<br />
9. If you are still hearing interference on the Receivers, turn the Transmitter off and listen<br />
with a receiver. If you hear the interference with the Transmitter off, you need to change<br />
to a clear channel. See the re-tuning instructions.<br />
10. If problems remain, contact your dealer for further help. Or call <strong>Williams</strong> <strong>Sound</strong> toll-free<br />
at 1-800-843-3544.<br />
14<br />
<strong>Williams</strong> <strong>Sound</strong> ®<br />
Helping People Hear
CHANGING FREQUENCIES<br />
If you experience FM signal interference, you can easily adjust your transmitter and receivers<br />
to a use different frequencies. Your first channel choice should be Channel G (75.7 MHz).<br />
This matches channel 2 on the R31 and R32 Receivers.<br />
CHANGING THE PFM T30 TRANSMITTER FREQUENCY<br />
1. Open the battery compartment using a coin in the slot in the bottom of the transmitter.<br />
Remove the batteries.<br />
2. Lift the flap up and to your left. The back of the Transmitter case will open like a book,<br />
exposing the circuit board.<br />
3. Use the diagram in Figure 11 to locate the channel selector switches.<br />
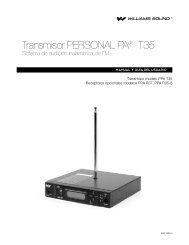
FIGURE 11: TRANSMITTER FREQUENCY CHANGE INFORMATION<br />
Switches set for 72.9 MHz<br />
1 2 3 4 5 6 7 8<br />
UP (OFF) DOWN (ON)<br />
Batteries<br />
T30 Transmitter<br />
Switch <strong>Set</strong>tings<br />
CH (MHz) 1 2 3 4 5 6 7 8<br />
A 72.1 DN UP DN UP DN DN DN DN<br />
B 72.3 DN UP DN UP UP DN DN DN<br />
C 72.5 DN UP DN UP DN DN UP DN<br />
D 72.7 DN UP DN UP UP DN UP DN<br />
E 72.9 DN UP DN UP DN DN DN UP<br />
F 75.5 UP UP DN UP UP DN DN DN<br />
G 75.7 UP UP DN UP DN DN UP DN<br />
H 75.9 UP UP DN UP UP DN UP DN<br />
I 74.7 UP DN DN UP UP DN DN UP<br />
J 75.3 UP UP DN UP DN DN DN DN<br />
4. Use the tip of a paper clip or a small screwdriver (not a pencil point) to move the<br />
switches to correspond with the switch positions on the programming chart in Figure 11.<br />
Remember, your first choice should be G (75.7 MHz). If you must use another channel,<br />
select a frequency at least two channels away from the one on which you are<br />
experiencing interference. Do not touch any other adjustments.<br />
5. Reinstall the batteries, then close the back of the Transmitter.<br />
6. Plug the microphone in and turn the Transmitter on to provide a tuning signal for the receivers.<br />
7. Change the receivers to channel 2. If you set the transmitter to any channel other than E or G,<br />
you will need to re-tune the receivers. See the next section for receiver tuning instructions.<br />
Note:<br />
Many PFM users reserve Channel 1 on their receivers to match large area FM systems set to<br />
Channel E (72.9 MHz). They set their T30 Transmitter to Channel G (75.7 MHz) to allow<br />
receiver users to switch between channels depending on the listening situation.<br />
<strong>Williams</strong> <strong>Sound</strong> ®<br />
Helping People Hear<br />
15
TUNING THE PFM R31 & R32 RECEIVERS<br />
Tuning for the R31 and R32 Receivers is determined by tuning coils, and is stabilized by<br />
phase-locked-loop circuitry. A plastic tuning wrench (PLT 005) is needed to adjust the<br />
receiver tuning coil.<br />
1. Use the Transmitter as a tuning signal source. Have someone speak into the microphone<br />
so you have something to listen to.<br />
2. Keep the Transmitter and Receiver about 15 - 20 feet apart while tuning. The receiver<br />
must be tuned under weak signal conditions.<br />
3. Open the battery compartment using a coin in the slot in the bottom of the transmitter.<br />
Pull up the receiver battery flap to open the receiver back like a book. This will expose<br />
the circuit board.<br />
4. Move the channel selector switch to channel 2 (right position).<br />
5. Use Figure 12 below to locate the tuning coils. Use the earphone supplied with the<br />
receiver to listen for the transmitter signal while you slowly and gently rotate the tuning<br />
slugs inside the tuning coil with the tuning wrench. Adjust the tuning coil for channel 2<br />
slowly and carefully. Do not press down on the tuning slug. Adjust for maximum signal.<br />
5. Re-tune all the receivers and mark the new frequency inside the case for future reference.<br />
FIGURE 12: LOCATION OF RECEIVER TUNING COILS<br />
Channel 1 Tuning Coil<br />
Channel 2<br />
Tuning Coil<br />
Batteries<br />
Channel Selector Switch<br />
R31/R32 Receiver<br />
16<br />
<strong>Williams</strong> <strong>Sound</strong> ®<br />
Helping People Hear
WARRANTY<br />
The <strong>Williams</strong> <strong>Sound</strong> T30 Transmitter, R31 and R32 Receivers are engineered and designed<br />
to provide you with many years of reliable service. <strong>Williams</strong> <strong>Sound</strong> warrants it against<br />
defects in materials and workmanship for FIVE (5) years EXCEPT FOR earphones,<br />
headphones, rechargeable batteries, chargers, cables, antennas, carry cases, and all other<br />
accessory products. Accessory products carry a 90 day warranty.<br />
If the product fails within the specified warranty period, <strong>Williams</strong> <strong>Sound</strong> will determine<br />
whether to repair or replace the defective equipment. This warranty does not apply to<br />
physical damage, products that have been abused or mis-used, or modified.<br />
If you experience difficulty with your system, call Toll-Free for Customer Assistance:<br />
1-800-843-3544.<br />
If it is necessary to return the system for service, your Customer Service Representative will<br />
give you a Return Authorization Number (RA) and shipping instructions.<br />
Pack the system carefully and send it to:<br />
<strong>Williams</strong> <strong>Sound</strong> Corp.<br />
Attn: Repair Dept.<br />
10321 W. 70th St.<br />
Eden Prairie, MN 55344<br />
Your warranty becomes effective the date you purchase your system. Your returned warranty<br />
card is our way of knowing when your warranty begins. It also gives us important<br />
information about your system including the serial number. This information will help us<br />
serve you better in the future. Please take a moment to complete the warranty card. Thank<br />
you.<br />
<strong>Williams</strong> <strong>Sound</strong> ®<br />
Helping People Hear<br />
17
TECHNICAL SPECIFICATIONS<br />
FM TRANSMITTER, MODEL PFM T30<br />
Dimensions:<br />
Weight:<br />
Color:<br />
Battery Type:<br />
Operating Freq’s:<br />
Stability:<br />
Modulation:<br />
RF Output:<br />
FCC ID:<br />
Freq Response:<br />
Signal–Noise Ratio:<br />
Auto Gain Control:<br />
Transmit Antenna:<br />
Microphone:<br />
Controls:<br />
Mic Connector:<br />
3-5/8" L x 2-3/8" W x 7/8" H (92.1 mm x 60.3 mm x 22.2 mm)<br />
4.4 oz (125 g) with battery<br />
Royal blue, shatter-resistant polypropylene<br />
Two (2) AA 1.5 V Non-rechargeable Alkaline batteries<br />
(BAT 001), 70 mA nominal current drain, 12 hours approx. life<br />
(OR)<br />
Two (2) AA 1.5 V NiMH Rechargeable batteries (BAT 026),<br />
70 mA nominal current drain, 10 hours per charge approx., recharges in 14–16<br />
hours, uses CHG 200 Charger<br />
Selectable, 10 channels, 72.1 – 75.9 MHz, internal DIP switch<br />
+ .005%, frequency synthesized, crystal reference, PLL<br />
Wide-band FM, 75 kHz, 75 µS pre-emphasis<br />
8000 µV/m at 30 m, max., 40 mW typical<br />
CNM T30<br />
100 to 10 kHz, + 3 dB at 1% max. THD<br />
55 - 60 dB, with R31 or R32 Receiver<br />
40 dB range, 30 mV threshold<br />
Integral with 40" microphone cord<br />
Omnidirectional condenser, Lavalier-type, 40" cord,<br />
3.5 mm mono phone plug (MIC 090)<br />
On/Off switch, slide-type<br />
3.5 mm mono phone jack<br />
RECEIVER, MODELS PFM R31 & PFM R32<br />
Dimensions and<br />
3-5/8" L x 2-3/8" W x 7/8" H (92.1 mm x 60.3 mm x 22.2 mm)<br />
Weight:<br />
4.6 oz (130 g) with batteries<br />
Color:<br />
Royal blue, shatter-resistant polypropylene<br />
Battery Type:<br />
Two (2) AA 1.5 V non-rechargeable Alkaline batteries<br />
(BAT 001), 14 mA nom. current drain, 80 hours approx. life<br />
(OR)<br />
Two (2) AA 1.5 V NiMH rechargeable batteries (BAT 026), 14 mA nominal<br />
current drain, 50 hours per charge approx., recharges in 14–16 hours, uses<br />
CHG 200 Charger<br />
FCC ID:<br />
CNM R31<br />
Operating Freq’s:<br />
Pre-Tuned, Field–tuneable, 72 MHz - 76 MHz.<br />
Pre-set channels are E (72.9 MHz) and G (75.7 MHz)<br />
FM Deviation:<br />
Wide-band, 75 kHz, 75 µS de-emphasis<br />
AFC Range:<br />
± 120 kHz<br />
Sensitivity:<br />
4 µV at 12 dB Sinad with squelch defeated,<br />
squelches at 10 µV for min. 50 dB S/N ratio<br />
Freq Response:<br />
100 to 10 kHz, + 3 dB<br />
Signal–Noise Ratio: 50 dB at 10 uV<br />
Receive Antenna: Integral with earphone cord<br />
Audio Output:<br />
35 mW, max. at 16 Ω<br />
Output Connector: 3.5 mm mono phone jack<br />
Squelch:<br />
<strong>Set</strong> to turn off audio under weak or no signal condition<br />
Carrier Detect Ind: Red LED, turns on in the presence of a carrier<br />
Controls: Volume: rotary/on/off/volume<br />
Tone: 3-way slide switch; Lo = flat response (20 Hz),<br />
Mid = –3 dB at 235 Hz, Hi = –3 dB at 730 Hz<br />
Channel: 2-way slide switch; Ch 1 = 72.9 MHz, Ch 2 = 75.7 MHz<br />
Indicators: On/off and FM<br />
Note:<br />
Specifications are electrical performance<br />
PFM R31 Receiver Only<br />
Mic Connector:<br />
3.5 mm mono phone jack, supplies positive DC for <strong>Williams</strong> <strong>Sound</strong> electret<br />
mics<br />
Microphone:<br />
Plug mount electret, omnidirectional, with windscreen, 3.5mm mono phone<br />
plug (MIC 014)<br />
Mic Volume:<br />
Rotary control<br />
18<br />
<strong>Williams</strong> <strong>Sound</strong> ®<br />
Helping People Hear
ACOUSTIC SPECIFICATIONS<br />
ANSI 2.44 TEST<br />
ANSI S3.22–1987 TEST<br />
FM Response (PFM R31, R32)<br />
MINIMUM LOW CUT (TONE SET TO LOW)<br />
Max. SSPL90:<br />
135.8 dB at 500 Hz<br />
HF Avg SSPL90:<br />
127.1 dB<br />
HF Avg Full On Gain: 37.7 dB at 60 dB in<br />
Reference Test Gain: 38.1 dB<br />
Response Limit:<br />
80.1 dB F1=200 Hz, F2=8 kHz<br />
Total Harmonic Dist: 3.6 % at 500 Hz<br />
3.9 % at 800 Hz<br />
2.2 % at 1600 Hz<br />
FM Response (PFM R31, R32)<br />
Input: 80 dB random noise<br />
Device: KEMAR mannequin with BTK 3550 Tester<br />
Y: 80.0 dB 80 db Main Y: 34.1 dB<br />
X: 100 Hz + 8 OCT LOG Main X: 4 kHz<br />
MEDIUM LOW CUT (TONE SET TO MID)<br />
Max. SSPL90:<br />
135.5 dB at 600 Hz<br />
HF Avg SSPL90:<br />
127.1 dB<br />
HF Avg Full On Gain: 36.8 dB at 60 dB in<br />
Reference Test Gain: 37.3 dB<br />
Response Limit:<br />
79.4 dB F1=200 Hz, F2=8 kHz<br />
Total Harmonic Dist: 3.4 % at 500 Hz<br />
3.4 % at 800 Hz<br />
2.2 % at 1600 Hz<br />
MAXIMUM LOW CUT (TONE SET TO HI)<br />
Max. SSPL90:<br />
133.5 dB at 1000 Hz<br />
HF Avg SSPL90:<br />
127.0 dB<br />
HF Avg Full On Gain: 35.4 dB at 60 dB in<br />
Reference Test Gain: 35.8 dB<br />
Response Limit:<br />
78.01 dB F1=200 Hz, F2=8 kHz<br />
Total Harmonic Dist: 1.1 % at 500 Hz<br />
2.7 % at 800 Hz<br />
2.1 % at 1600 Hz<br />
Environmental Mic Response (PFM R31 Only)<br />
NO TONE MODIFICATION<br />
Max. SSPL90:<br />
HF Avg SSPL90:<br />
HF Avg Full On Gain:<br />
Reference Test Gain:<br />
Response Limit:<br />
Total Harmonic Dist:<br />
134.8 dB at 500 Hz<br />
126.4 dB<br />
40.9 dB at 60 dB in<br />
40.8 dB<br />
81.1 dB F1=200 Hz, F2=8 kHz<br />
1.1 % at 500 Hz<br />
1.1 % at 800 Hz<br />
0.3 % at 1600 Hz<br />
Environmental Mic Response (PFM R31 Only)<br />
Input: 80 dB random noise<br />
Device: KEMAR mannequin with BTK 3550 Tester<br />
Y: 80.0 dB 80 db Main Y: 50.2 dB<br />
X: 100 Hz + 8 OCT LOG Main X: 4 kHz<br />
<strong>Williams</strong> <strong>Sound</strong> ®<br />
Helping People Hear<br />
19
<strong>Williams</strong> <strong>Sound</strong> Corp.<br />
10321 West 70th St., Eden Prairie, MN 55344<br />
U.S.A. 800-328-6190 / 952-943-2252 / FAX: 952-943-2174<br />
www.williamssound.com © 2003, <strong>Williams</strong> <strong>Sound</strong> Corp. MAN 072C