2003 sid owners manual.pdf - Birota
2003 sid owners manual.pdf - Birota
2003 sid owners manual.pdf - Birota

You also want an ePaper? Increase the reach of your titles
YUMPU automatically turns print PDFs into web optimized ePapers that Google loves.
ENGLISH<br />
ROCKSHOX, INC. • <strong>2003</strong> SID OWNER’S MANUAL<br />
ROCKSHOX, INC. • <strong>2003</strong> SID OWNER’S MANUAL<br />
ENGLISH<br />
3. Do not let brake or derailleur cables rest on or be attached to the crown. Abrasion over time may cause damage to<br />
the crown. If contact is unavoidable, use tape or similar protection to cover the surface.<br />
4. To prevent damage to the carbon crown-steerer, a qualified technician should take care when installing or removing<br />
the crown race.<br />
5. Follow the stem manufacturer's torque specifications when installing a stem. Exceeding the torque specifications may<br />
damage the carbon crown-steerer and reduce the strength of the fork. Cotter style stems are not recommended as the<br />
small surface area may cause damage.<br />
6. Take your bicycle to a qualified dealer for inspection and repair if there is any question of component integrity due to<br />
a crash or other direct impact.<br />
P ERFORMANCE<br />
T UNING<br />
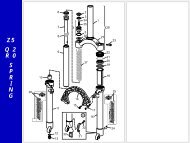
RockShox SID forks can be tuned for your particular weight, riding style, and terrain.<br />
Setting Sag<br />
SID forks are designed to sag when you are sitting on your bike. Sag is the compression of the<br />
fork caused by the rider's weight. Proper sag allows the front wheel to follow the contour of<br />
the terrain as you ride. Sag is adjusted by increasing or decreasing the positive air pressure of<br />
your fork. Increasing the pressure in your positive chambers will decrease sag. Decreasing the<br />
pressure in your positive air chambers will increase sag.<br />
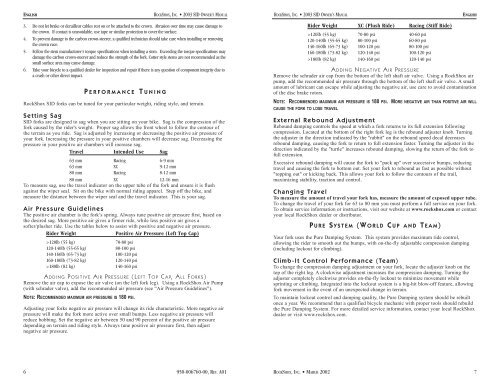
Travel Intended Use Sag<br />
63 mm Racing 6-9 mm<br />
63 mm XC 9-12 mm<br />
80 mm Racing 8-12 mm<br />
80 mm XC 12-16 mm<br />
To measure sag, use the travel indicator on the upper tube of the fork and ensure it is flush<br />
against the wiper seal. Sit on the bike with normal riding apparel. Step off the bike, and<br />
measure the distance between the wiper seal and the travel indicator. This is your sag.<br />
Air Pressure Guidelines<br />
The positive air chamber is the fork’s spring. Always tune positive air pressure first, based on<br />
the desired sag. More positive air gives a firmer ride, while less positive air gives a<br />
softer/plusher ride. Use the tables below to assist with positive and negative air pressure.<br />
Rider Weight<br />
Positive Air Pressure (Left Top Cap)<br />
>120lb (55 kg)<br />
70-80 psi<br />
120-140lb (55-65 kg)<br />
80-100 psi<br />
140-160lb (65-73 kg)<br />
100-120 psi<br />
160-180lb (73-82 kg)<br />
120-140 psi<br />
>180lb (82 kg)<br />
140-160 psi<br />
A DDING P OSITIVE A IR P RESSURE (LEFT T OP C AP, ALL F ORKS)<br />
Remove the air cap to expose the air valve (on the left fork leg). Using a RockShox Air Pump<br />
(with schrader valve), add the recommended air pressure (see “Air Pressure Guidelines").<br />
NOTE: RECOMMENDED MAXIMUM AIR PRESSURE IS 180 PSI.<br />
Adjusting your forks negative air pressure will change its ride characteristic. More negative air<br />
pressure will make the fork more active over small bumps. Less negative air pressure will<br />
reduce bobbing. Set the negative air between 50 and 90 percent of the positive air pressure<br />
depending on terrain and riding style. Always tune positive air pressure first, then adjust<br />
negative air pressure.<br />
Rider Weight XC (Plush Ride) Racing (Stiff Ride)<br />
>120lb (55 kg) 70-80 psi 40-60 psi<br />
120-140lb (55-65 kg) 80-100 psi 60-80 psi<br />
140-160lb (65-73 kg) 100-120 psi 80-100 psi<br />
160-180lb (73-82 kg) 120-140 psi 100-120 psi<br />
>180lb (82 kg) 140-160 psi 120-140 psi<br />
A DDING N EGATIVE A IR P RESSURE<br />
Remove the schrader air cap from the bottom of the left shaft air valve. Using a RockShox air<br />
pump, add the recommended air pressure through the bottom of the left shaft air valve. A small<br />
amount of lubricant can escape while adjusting the negative air, use care to avoid contamination<br />
of the disc brake rotors.<br />
NOTE: RECOMMENDED MAXIMUM AIR PRESSURE IS 180 PSI. MORE NEGATIVE AIR THAN POSITIVE AIR WILL<br />
CAUSE THE FORK TO LOSE TRAVEL<br />
External Rebound Adjustment<br />
Rebound damping controls the speed at which a fork returns to its full extension following<br />
compression. Located at the bottom of the right fork leg is the rebound adjuster knob. Turning<br />
the adjuster in the direction indicated by the "rabbit" on the rebound speed decal decreases<br />
rebound damping, causing the fork to return to full extension faster. Turning the adjuster in the<br />
direction indicated by the "turtle" increases rebound damping, slowing the return of the fork to<br />
full extension.<br />
Excessive rebound damping will cause the fork to "pack up" over successive bumps, reducing<br />
travel and causing the fork to bottom out. Set your fork to rebound as fast as possible without<br />
"topping out" or kicking back. This allows your fork to follow the contours of the trail,<br />
maximizing stability, traction and control.<br />
Changing Travel<br />
To measure the amount of travel your fork has, measure the amount of exposed upper tube.<br />
To change the travel of your fork for 63 to 80 mm you must perform a full service on your fork.<br />
To obtain service information or instructions, visit our website at www.rockshox.com or contact<br />
your local RockShox dealer or distributor.<br />
P URE S YSTEM (WORLD C UP AND T EAM)<br />
Your fork uses the Pure Damping System. This system provides maximum ride control,<br />
allowing the rider to smooth out the bumps, with on-the-fly adjustable compression damping<br />
(including lockout for climbing).<br />
Climb-It Control Performance (Team)<br />
To change the compression damping adjustment on your fork, locate the adjuster knob on the<br />
top of the right leg. A clockwise adjustment increases the compression damping. Turning the<br />
adjuster completely clockwise provides on-the-fly lockout to minimize movement while<br />
sprinting or climbing. Integrated into the lockout system is a big-hit blow-off feature, allowing<br />
fork movement in the event of an unexpected change in terrain.<br />
To maintain lockout control and damping quality, the Pure Damping system should be rebuilt<br />
once a year. We recommend that a qualified bicycle mechanic with proper tools should rebuild<br />
the Pure Damping System. For more detailed service information, contact your local RockShox<br />
dealer or visit www.rockshox.com.<br />
6 950-006760-00, REV. A01<br />
ROCKSHOX, INC. • MARCH 2002 7