SunSaver Duo Operator's Manual
SunSaver Duo Operator's Manual
SunSaver Duo Operator's Manual

You also want an ePaper? Increase the reach of your titles
YUMPU automatically turns print PDFs into web optimized ePapers that Google loves.
SUNSAVER DUO TM<br />
Installation and Operation <strong>Manual</strong><br />
….<br />
Dual Battery Charging Solar Controller<br />
for RVs, Caravans, and Boats<br />
….<br />
……………………………….…………<br />
Ratings<br />
Nominal Voltage<br />
12 Volts<br />
Rated Solar Current 25 Amps<br />
8 Pheasant Run<br />
Newtown, PA 18940 USA<br />
www.morningstarcorp.com
SUNSAVER DUO DIMENSIONS<br />
2
Contents<br />
1.0 Important Safety Information ................................................................................. 4<br />
2.0 General Information ................................................................................................ 5<br />
2.1 Overview .............................................................................................................. 5<br />
2.2 Morningstar Accessories ...................................................................................... 7<br />
3.0 Installation ............................................................................................................... 8<br />
3.1 General Installation Notes .................................................................................... 8<br />
3.2 Adjusting DIP Switches ........................................................................................ 9<br />
3.3 Mounting ............................................................................................................ 11<br />
3.4 Wiring ................................................................................................................. 12<br />
4.0 Operation ............................................................................................................... 19<br />
4.1 LED Indications .................................................................................................. 19<br />
4.2 Charging Information ......................................................................................... 20<br />
4.3 Protections ......................................................................................................... 21<br />
4.4 Inspection and Maintenance .............................................................................. 22<br />
5.0 Troubleshooting .................................................................................................... 23<br />
5.1 Error Indications ................................................................................................. 23<br />
5.2 General Problems .............................................................................................. 23<br />
6.0 Limited Warranty ................................................................................................... 25<br />
7.0 Technical Specifications ...................................................................................... 26<br />
3
1.0 Important Safety Information<br />
SAVE THESE INSTRUCTIONS:<br />
This manual contains important safety, installation and operating instructions for the<br />
<strong>SunSaver</strong> <strong>Duo</strong> solar controller.<br />
The following symbols are used throughout this manual to indicate potentially<br />
dangerous conditions or important safety instructions.<br />
WARNING: Indicates a potentially dangerous condition. Use extreme caution when<br />
performing this task.<br />
CAUTION: Indicates a critical procedure for safe and proper operation of the<br />
controller.<br />
NOTE: Indicates a procedure or function that is important for the safe and proper<br />
operation of the controller.<br />
General Safety Information<br />
• Read all of the instructions and cautions in the manual before starting the<br />
installation.<br />
• There are no user serviceable parts inside the <strong>SunSaver</strong> <strong>Duo</strong>. Do not disassemble<br />
or attempt to repair the controller.<br />
• Disconnect all sources of power to the controller before installing or adjusting the<br />
<strong>SunSaver</strong> <strong>Duo</strong>. Ensure that both batteries and the solar power have been<br />
disconnected before opening the access cover.<br />
• There are no fuses or disconnects in the <strong>SunSaver</strong> <strong>Duo</strong>. Power must be removed<br />
externally.<br />
• Do not allow water to enter the controller.<br />
• Confirm that the power wires are tightened to avoid excessive heating from a loose<br />
connection.<br />
4
2.0 General Information<br />
2.1 Overview<br />
Thank you for selecting the <strong>SunSaver</strong> <strong>Duo</strong> solar charge controller. The <strong>SunSaver</strong> <strong>Duo</strong><br />
is an advanced PWM dual-battery charge controller for RV’s, caravans, boats, and other<br />
installations that require simultaneous battery charging of two separate (isolated)<br />
batteries. The controller features a solar input connection and two battery connections.<br />
The <strong>SunSaver</strong> <strong>Duo</strong> will charge one battery or two batteries simultaneously using an<br />
advanced multi-stage charging algorithm.<br />
A Status LED indicates charging progress and controller operating state. Battery<br />
charging and operating parameters are adjusted using five (5) Settings DIP Switches.<br />
The <strong>SunSaver</strong> <strong>Duo</strong> also features self-diagnostics and electronic error protection.<br />
Corrosion resistant power terminals and an epoxy-encapsulated circuit board provide<br />
maximum environmental protection. The <strong>SunSaver</strong> <strong>Duo</strong> also provides connections for a<br />
Remote Temperature Sensor (RTS) and Remote Meter (RM-1).<br />
5
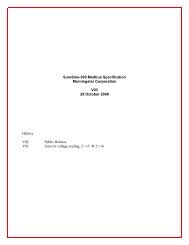
The major features of the <strong>SunSaver</strong> <strong>Duo</strong> are shown in figure 1 below. An explanation of<br />
each feature is provided.<br />
Remote Temperature Sensor (RTS)<br />
Terminals<br />
Local Temperature<br />
Sensor<br />
Status LED<br />
Indicator<br />
Settings<br />
DIP Switches<br />
Battery #1<br />
Power Terminals<br />
Solar Input<br />
Power Terminals<br />
Battery #2<br />
Power Terminals<br />
RemoteMeter<br />
Connection<br />
(RJ-11)<br />
Figure 1. <strong>SunSaver</strong> <strong>Duo</strong> features<br />
Remote Temperature Sensor (RTS) Terminals<br />
A connection point for a Morningstar RTS (optional) to remotely monitor battery<br />
temperature.<br />
Local Temperature Sensor<br />
Measures ambient temperature. Battery regulation is adjusted accordingly.<br />
Status LED Indicator<br />
Provides system status and error indication.<br />
Settings DIP Switches<br />
Adjustment switches that define the operating parameters of the <strong>SunSaver</strong> <strong>Duo</strong>.<br />
Battery #1 Power Terminals<br />
Power connections for battery #1.<br />
Solar Input Power Terminals<br />
Power connections for solar module(s).<br />
Battery #2 Power Terminals<br />
Power wire connections for battery #2.<br />
Remote Meter Connection (RJ-11)<br />
A communication port for the Morningstar Remote Meter.<br />
6
2.2 Morningstar Accessories<br />
Remote Temperature Sensor (Model: RTS)<br />
The RTS measures battery temperature for accurate temperature compensation.<br />
Use when the ambient battery temperature differs from the ambient controller<br />
temperature by +/- 5 degrees C or more. An RTS can be attached to the<br />
<strong>SunSaver</strong> <strong>Duo</strong> at any time. The <strong>SunSaver</strong> <strong>Duo</strong> will automatically use the RTS for<br />
battery temperature compensation when installed. The standard cable length is<br />
25 ft (7.6 m), and this can easily be extended to 100 ft (30 m) or longer.<br />
Installation instructions are provided with the RTS.<br />
Remote Meter (Model: RM-1)<br />
The digital Remote Meter displays system operating information, error<br />
indications, and self-diagnostic read-out. Information is displayed on a backlit 4-<br />
digit custom LCD display. The large numerical display and icons are easy to read<br />
and large buttons make navigating the meter menus easy. Additionally, a status<br />
LED and three (3) battery SOC LEDs provide a quick reference to system<br />
operation.<br />
The meter can be mounted in a wall or on the surface of a wall in a frame. The<br />
RM-1 is supplied with 32.8 ft (10.0 m) of cable, a mounting frame, and mounting<br />
screws. The RM-1 connects to the MeterBus port on the <strong>SunSaver</strong> <strong>Duo</strong>.<br />
PC MeterBus Adapter (Model: MSC)<br />
The MSC converts the MeterBus RJ-11 electrical interface to a standard RS-232<br />
interface which allows communication between the <strong>SunSaver</strong> <strong>Duo</strong> and a PC. The<br />
MSC is required for programming custom charging setpoints and for logging<br />
data. Visit Morningstar’s website for more information.<br />
7
3.0 Installation<br />
3.1 General Installation Notes<br />
• Read through the entire installation section before beginning installation.<br />
• Be very careful when working with batteries. Wear eye protection. Have fresh<br />
water available to wash and clean any contact with battery acid.<br />
• Use insulated tools and avoid placing metal objects near the batteries.<br />
• Explosive battery gasses may be present during charging. Be certain there is<br />
sufficient ventilation to release the gasses.<br />
• Do not install in locations where water can enter the controller.<br />
• Loose power connections and/or corroded wires can melt wire insulation, burn<br />
surrounding materials, or even cause fire. Ensure tight connections and use<br />
cable clamps to secure cables in mobile applications.<br />
• Only charge lead-acid batteries.<br />
• Each of the two <strong>SunSaver</strong> <strong>Duo</strong> Battery connections may be wired to one battery<br />
or a bank of batteries. The following instructions refer to a singular battery, but it<br />
shall be implied that each battery connection can be made to either one battery<br />
or a group of batteries wired in parallel to form a 12 volt battery bank.<br />
8
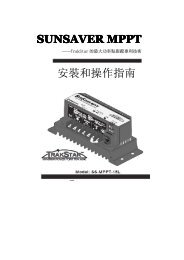
3.2 Adjusting DIP Switches<br />
ON<br />
OFF<br />
Battery #1 Type<br />
Battery #2 Type<br />
Battery Charging Priority<br />
Custom Setpoints<br />
Figure 2. Setting DIP switch definitions<br />
Regulation Type<br />
DIP Switches 1 & 2 – Battery Type Select<br />
The <strong>SunSaver</strong> <strong>Duo</strong> charges both sealed and flooded lead-acid batteries per the<br />
charging specifications in table 1 below. Sealed batteries are typically<br />
maintenance-free batteries that do not require water. Flooded batteries have<br />
removable caps that allow the addition of water when needed. DIP switches 1 &<br />
2 select the battery type for Battery #1 and Battery #2 respectively. Choose the<br />
correct battery type for each battery.<br />
DIP Switch OFF:<br />
DIP Switch ON:<br />
Sealed battery type (factory pre-set)<br />
Flooded battery type<br />
Battery Type<br />
Setpoint Sealed Flooded<br />
Absorption Voltage 14.1 V 14.4 V<br />
Float Voltage 13.7 V 13.7 V<br />
Boost Voltage X 14.8 V<br />
Boost Time X 2 hrs<br />
Boost Interval X 28 days<br />
Table 1. Standard battery charging programs<br />
DIP Switch 3 – Battery Charging Priority<br />
Select the percentage of available charge current to each battery.<br />
9
The 90% / 10% priority setting allows Battery #1 to receive 90% of available<br />
charging current, while Battery #2 receives 10% of charging current. This setting<br />
is ideal for RV and boat systems where a “house” bank requires most of the<br />
available charge current and a separate engine starter battery requires only a<br />
“trickle charge” to remain topped-off. When Battery #1 reaches full charge, more<br />
charge current will be diverted to Battery #2 as needed.<br />
The 50% / 50% priority setting splits available charge current equally between<br />
two battery banks. This priority setting is ideal for systems with two equal-sized<br />
battery banks that require simultaneous charging. If one battery bank reaches full<br />
charge before the other, more charge current will be diverted to the lower stateof-charge<br />
battery.<br />
DIP Switch 3 OFF: 90% / 10% Priority (factory pre-set)<br />
DIP Switch 3 ON: 50% / 50% Priority<br />
DIP Switch 4 – Custom Setpoints<br />
If the standard battery type settings are not suitable, custom charging setpoints<br />
can be programmed using a PC and a Morningstar Serial to Meterbus adapter<br />
(not included). See Morningstar’s website for more information.<br />
DIP Switch 4 OFF: Factory settings (factory pre-set)<br />
DIP Switch 4 ON: Custom programmed settings<br />
DIP Switch 5 – Regulation Type<br />
The <strong>SunSaver</strong> <strong>Duo</strong> is a PWM charge controller. Some systems with sensitive<br />
equipment may experience noise interference from PWM charging. Refer to the<br />
FAQ in section 4.0 Troubleshooting for tips on how to reduce or eliminate PWM<br />
noise.<br />
If the noise cannot be satisfactorily reduced, place DIP switch 5 in the ON<br />
position. While less efficient, Slow Switching regulation will significantly reduce or<br />
eliminate PWM noise.<br />
DIP Switch 5 OFF: PWM Regulation (factory pre-set)<br />
DIP Switch 5 ON: Slow Switching Regulation<br />
10
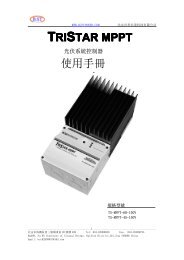
3.3 Mounting<br />
NOTE: When mounting the <strong>SunSaver</strong> <strong>Duo</strong>, ensure free air flow through the controller<br />
heat sink fins. There should be at least 3 inches (75 mm) clearance above and below<br />
the controller to allow for cooling. If mounted in an enclosure, ventilation is highly<br />
recommended.<br />
WARNING: Never install the <strong>SunSaver</strong> <strong>Duo</strong> in a sealed enclosure with vented<br />
(flooded) batteries! Do not install in a confined area where battery gasses can<br />
accumulate. Risk of explosion!<br />
1. Locate the <strong>SunSaver</strong> <strong>Duo</strong> on a vertical surface protected from direct sun, high<br />
temperatures, and water.<br />
2. Place the <strong>SunSaver</strong> <strong>Duo</strong> in the location where it will be mounted. Verify that<br />
there is sufficient room to run wires and that there is ample room above and<br />
below the controller for air flow.<br />
MOUNTING<br />
HOLES<br />
At least<br />
3" (75 mm)<br />
WARM AIR<br />
HEATSINK<br />
FINS<br />
At least<br />
3" (75 mm)<br />
COOL AIR<br />
Figure 3. Mounting and cooling<br />
3. Use a pencil or pen to mark the four (4) mounting hole locations on the mounting<br />
surface.<br />
4. Remove the controller and drill 3/32” (2.5 mm) holes in the marked locations.<br />
5. Place the controller on the surface and align the mounting holes with the drilled<br />
holes in step 4. Secure the controller in place using the mounting screws<br />
(included).<br />
11
3.4 Wiring<br />
Three system wiring examples are provided for RV’s and caravans, boats, and nonmobile<br />
installations. Reference the appropriate wiring diagram for your installation.<br />
CAUTION: Protect system wiring from sharp edges and foot traffic. Use grommets and<br />
wire loom where necessary.<br />
NOTE: Power connection order is not critical. A connection order has been provided<br />
for each installation type for instructional purposes only.<br />
NOTE: Wiring charts on the back page of this manual provide minimum<br />
recommended wire size.<br />
NOTE: The <strong>SunSaver</strong> <strong>Duo</strong> can charge just 1 battery connected to either the Battery<br />
#1 or Battery #2 connections. If Battery #1 or Battery #2 is missing, the remaining<br />
battery will be charged with 100% of available power regardless of the charging<br />
priority setting.<br />
RV / CARAVAN INSTALLATION<br />
-<br />
+<br />
30A Fuse<br />
30A Fuse<br />
+ -<br />
Battery<br />
#1<br />
+ -<br />
Battery<br />
#2<br />
=<br />
Vehicle Chassis<br />
Common Ground<br />
Figure 4. Typical RV / Caravan wiring diagram<br />
NOTE: To ensure good vehicle chassis ground connections:<br />
- remove all paint, grease, debris at grounding point.<br />
- use sandpaper/emory cloth to expose chassis bare metal.<br />
- use ring terminal and star- or lock-washer to secure cable.<br />
- dielectric grease can be used to minimize corrosion.<br />
12
NOTE: A wire jumper is installed across the Remote Temperature Sensor (RTS)<br />
terminals at the factory. The jumper can prevent false RTS detection due to<br />
condensation on the <strong>SunSaver</strong> <strong>Duo</strong>. Do not remove this jumper unless an<br />
optional RTS is to be installed.<br />
Before proceeding, mount the solar module(s) per the manufacturer’s instructions. If<br />
adding batteries that are not factory installed, they should be safely secured in their<br />
desired location. The <strong>SunSaver</strong> <strong>Duo</strong> should be mounted per the instructions in section<br />
2.3 Mounting.<br />
Step 1: Ground <strong>SunSaver</strong> <strong>Duo</strong><br />
Ground a negative terminal of the <strong>SunSaver</strong> <strong>Duo</strong> to the vehicle chassis. The<br />
<strong>SunSaver</strong> <strong>Duo</strong> has a common negative; it does not matter which negative<br />
terminal is grounded. Use wire with black insulation, appropriately sized for the<br />
system charging current (see back page).<br />
Step 2: Battery #1 (“house” battery bank)<br />
Connect Battery #1 to the <strong>SunSaver</strong> <strong>Duo</strong> as shown in figure 4. In RV<br />
installations, Battery #1 should be the “house” or cabin battery.<br />
If the cabin battery was factory installed, battery negative should already be<br />
grounded to the vehicle chassis. Use a short piece of black wire to ground the<br />
cabin battery if necessary. Use red wire for battery positive. Use wire<br />
appropriately sized for the system charging current (see back page).<br />
An in-line fuse holder should be wired in the positive line no further 12” ( 305 mm<br />
) from the battery post. Do not insert a fuse in the fuse holder at this time.<br />
Step 3: Battery #2 (engine battery)<br />
Connect Battery #2 to the <strong>SunSaver</strong> <strong>Duo</strong> as shown in figure 4. The engine<br />
battery should already be grounded to the vehicle chassis. Use red wire for<br />
battery positive. Use wire appropriately sized for the system charging current<br />
(see back page).<br />
An in-line fuse holder should be wired in the positive line no further 12” ( 305 mm<br />
) from the battery post. Do not insert a fuse in the fuse holder at this time.<br />
Step 4: Solar<br />
Ground the solar module(s) to the vehicle chassis with black wire. Multiple 12V<br />
nominal solar modules may be wired together in parallel and grounded with one<br />
wire. Use red wire for the solar positive connection to the <strong>SunSaver</strong> <strong>Duo</strong>. Use<br />
wire appropriately sized for the system charging current (see back page).<br />
Confirm that the solar modules are wired for 12V nominal output before<br />
connecting them to the <strong>SunSaver</strong> <strong>Duo</strong>. In full sun, the output voltage of the solar<br />
modules should be 18 – 25 Volts before connection to the <strong>SunSaver</strong> <strong>Duo</strong>.<br />
13
Upon connection of the Solar positive wire, the <strong>SunSaver</strong> <strong>Duo</strong> should begin the<br />
start-up sequence, flashing the Status LED 3 times.<br />
Step 5: Remote Temperature Sensor (optional)<br />
An optional Remote Temperature Sensor (purchased separately) measures the<br />
temperature directly at the battery for more accurate battery charging. Remove<br />
the wire jumper from the RTS terminals before installing the sensor. The RTS<br />
includes full installation instructions.<br />
Step 6: Insert Fuses<br />
Insert a 30 A dc-rated fuse into the fuse holder in each of the battery positive<br />
wires. If the solar module(s) is in full sun, charging should begin.<br />
14
BOAT INSTALLATION<br />
WARNING: Only ground the DC system to battery negative (one-point ground). Never<br />
ground the DC system to the boat bonding system or to any metallic part, fixture, or<br />
component on the boat.<br />
NOTE: An existing common ground wire may connect the negative battery terminals<br />
of two or more on-board batteries. This cable will not interfere with the <strong>SunSaver</strong> <strong>Duo</strong><br />
operation.<br />
NOTE: A wire jumper is installed across the Remote Temperature Sensor (RTS)<br />
terminals at the factory. The jumper can prevent false RTS detection due to<br />
condensation on the <strong>SunSaver</strong> <strong>Duo</strong>. Do not remove this jumper unless an<br />
optional RTS is to be installed.<br />
Solar PV<br />
Array<br />
-<br />
+<br />
30A<br />
Fuse<br />
+ - + -<br />
Battery<br />
#1<br />
Common<br />
Ground Wire<br />
30A<br />
Fuse<br />
Battery<br />
#2<br />
“House” Bank<br />
Engine Starter Battery<br />
Figure 5. Typical boat wiring diagram<br />
Before proceeding :<br />
• Install the solar module(s) per the manufacturer’s instructions.<br />
• Batteries should be installed per the U.S Coast Guard regulations for<br />
pleasureboats. The batteries must be secured to prevent movement and the<br />
battery terminals covered to prevent arcing. A battery box to contain any<br />
spilled battery acid is strongly recommended.<br />
• The <strong>SunSaver</strong> <strong>Duo</strong> should be mounted per the instructions in section 2.3<br />
Mounting.<br />
15
Step 1: Battery # 1 (“house” battery bank)<br />
Wire the negative terminal of the “house” battery to the negative Battery 1<br />
terminal on the <strong>SunSaver</strong> <strong>Duo</strong> with black wire as shown in figure 5. Wire the<br />
“house” battery positive power cable as shown in figure 5. Wire a DC-rated in-line<br />
fuse holder in the cable. The length of cable between the Battery (+) post and inline<br />
fuse holder should be no longer than 12” ( 305 mm ). Use wire with red<br />
insulation, appropriately sized for the system charging current (see back page).<br />
Do not insert a fuse in the fuse holder at this time.<br />
Step 2: Battery # 2 (“engine” battery)<br />
Wire the negative terminal of the engine battery to the negative Battery 2 terminal<br />
on the <strong>SunSaver</strong> <strong>Duo</strong> with black wire as shown in figure 5. Wire the engine<br />
battery positive power cable as shown in figure 5. Wire a DC-rated in-line fuse<br />
holder in the cable. The length of cable between the Battery (+) post and in-line<br />
fuse holder should be no longer than 12” ( 305 mm ). Use wire with red<br />
insulation, appropriately sized for the system charging current. Do not insert a<br />
fuse in the fuse holder at this time.<br />
Step 3: Solar<br />
Connect the solar module(s) output to the Solar input connection of the<br />
<strong>SunSaver</strong> <strong>Duo</strong>. Multiple 12V nominal modules may be wired together in parallel<br />
and wired to the <strong>SunSaver</strong> <strong>Duo</strong> with one pair of wires. Use red wire for solar<br />
positive and black wire for solar negative.<br />
Confirm that the modules are wired for 12V nominal output before connecting<br />
them to the <strong>SunSaver</strong> <strong>Duo</strong>. Double-check polarity before connection. In full sun,<br />
the output voltage of the solar modules should be 18 – 25 Volts before<br />
connection to the <strong>SunSaver</strong> <strong>Duo</strong>.<br />
Upon connection of the Solar positive wire, the <strong>SunSaver</strong> <strong>Duo</strong> should begin the<br />
start-up sequence, flashing the Status LED 3 times.<br />
Step 4: Remote Temperature Sensor (optional)<br />
An optional Remote Temperature Sensor (purchased separately) measures the<br />
temperature directly at the battery for more accurate battery charging. Remove<br />
the wire jumper from the RTS terminals before installing the sensor. The RTS<br />
includes full installation instructions.<br />
Step 5: Insert Fuses<br />
Insert a 30 A dc-rated fuse into the fuse holder in each of the battery positive<br />
wires. If the solar module(s) is in full sun, charging should begin.<br />
16
NON-MOBILE / PERMANENT DWELLING INSTALLATION<br />
Solar PV<br />
Array<br />
-<br />
+<br />
30A Fuse<br />
30A Fuse<br />
Earth<br />
Ground<br />
Figure 6. Terrestrial wiring diagram<br />
+ - + -<br />
Battery<br />
#1<br />
Earth<br />
Ground<br />
Battery<br />
#2<br />
Earth<br />
Ground<br />
NOTE: Earth grounding is recommended but not required. Grounding helps protect<br />
against lightning by providing a direct path to earth. In areas prone to frequent<br />
lightning strikes, external lightning arrestors and/or other means of protection may be<br />
needed.<br />
NOTE: If a Remote temperature Sensor (RTS) is not used, inserting a jumper across<br />
the RTS terminals can prevent false RTS detection due to condensation on the<br />
<strong>SunSaver</strong> <strong>Duo</strong>. Secure a short piece of wire across the RTS terminals.<br />
Step 1: Battery #1<br />
Connect Battery #1 to the <strong>SunSaver</strong> <strong>Duo</strong> as shown in figure 6. If charging priority<br />
is set to the default 90% / 10% setting, battery 1 will receive 90% priority. Use red<br />
wire for battery positive and black for battery negative. An in-line fuse holder<br />
should be wired in the positive line no further 12” ( 305 mm ) from the battery<br />
post. Earth ground the battery negative post if desired using a short piece of<br />
black wire appropriately sized for the system charging current (see back page).<br />
Do not insert a fuse in the fuse holder at this time.<br />
Step 3: Battery #2<br />
Connect Battery #2 to the <strong>SunSaver</strong> <strong>Duo</strong> as shown in figure 6. Use red wire for<br />
battery positive and black for battery negative. An in-line fuse holder should be<br />
wired in the positive line no further 12” ( 305 mm ) from the battery post. Earth<br />
ground the battery negative post if desired using a short piece of black wire<br />
appropriately sized for the system charging current (see back page). Do not<br />
insert a fuse in the fuse holder at this time.<br />
17
Step 4: Solar<br />
Connect the solar module(s) output to the Solar input connection of the<br />
<strong>SunSaver</strong> <strong>Duo</strong>. Multiple 12V nominal modules may be wired together in parallel<br />
and wired to the <strong>SunSaver</strong> <strong>Duo</strong> with one pair of wires. Use appropriately sized<br />
red wire for solar positive and black wire for solar negative.<br />
Confirm that the modules are wired for 12V nominal output before connecting<br />
them to the <strong>SunSaver</strong> <strong>Duo</strong>. Double-check polarity before connection. In full sun,<br />
the output voltage of the solar modules should be 18 – 25 Volts before<br />
connection to the <strong>SunSaver</strong> <strong>Duo</strong>.<br />
Upon connection of the Solar positive wire, the <strong>SunSaver</strong> <strong>Duo</strong> should begin the<br />
start-up sequence, flashing the Status LED 3 times.<br />
Earth ground solar negative if desired using a short piece of black wire<br />
appropriately sized for the system charging current (see back page). Do not<br />
insert a fuse in the fuse holder at this time.<br />
Step 5: Remote Temperature Sensor (optional)<br />
An optional Remote Temperature Sensor (purchased separately) measures the<br />
temperature directly at the battery for more accurate battery charging. Remove<br />
the wire jumper from the RTS terminals before installing the sensor. The RTS<br />
includes full installation instructions.<br />
Step 6: Insert Fuses<br />
Insert a 30 A dc-rated fuse into the fuse holder in each of the battery positive<br />
wires. If the solar module(s) is in full sun, charging should begin.<br />
18
4.0 Operation<br />
4.1 LED Indications<br />
The Status LED indicates system operational state and any existing error conditions.<br />
Table 1 below defines the Status LED indications.<br />
Status LED<br />
Operating State<br />
Off : 5 second heartbeat¹ Night<br />
Green : on solid ( 5 second heartbeat² ) Bulk Charging<br />
Green : Flashing ³ Absorption, Float, or Equalize<br />
Red : flashing Error<br />
Red : on solid ( 5 second heartbeat² ) Critical Error<br />
Table 1. Status LED definitions<br />
¹ heartbeat indication flickers the Status LED on briefly every 5 seconds<br />
² heartbeat indication flickers the Status LED off briefly every 5 seconds<br />
³ Battery 1 and Battery 2 must both be in regulation<br />
Red (flashing) Errors<br />
- reverse polarity battery connection.<br />
- reverse polarity solar connection.<br />
- solar over-current condition.<br />
- high temperature.<br />
- damaged or disconnected Remote Temperature Sensor.<br />
- high voltage disconnect.<br />
Red (on solid) Critical Errors<br />
- damaged local temperature sensor.<br />
- damaged heatsink temperature sensor.<br />
For more information on errors, see Protections section 4.3<br />
19
4.2 Charging Information<br />
The <strong>SunSaver</strong> <strong>Duo</strong> is an advanced, fully automatic solar battery charger. No<br />
adjustments are required except to select the battery type at installation. Each battery is<br />
charged independently. The <strong>SunSaver</strong> <strong>Duo</strong> has a 4-stage charging algorithm as shown<br />
in figure 7.<br />
4<br />
BOOST<br />
VOLTAGE<br />
NIGHT<br />
1<br />
BULK<br />
CHARGE<br />
2<br />
ABSORPTION<br />
3<br />
FLOAT<br />
NIGHT<br />
TIME<br />
Figure 7. <strong>SunSaver</strong> <strong>Duo</strong> charging algorithm<br />
1. Bulk Charge – Recharging with 100% of available solar energy.<br />
2. Absorption – PWM constant-voltage regulation to prevent heating and<br />
excessive battery gassing. Pulse charging to restore full battery capacity.<br />
3. Float – After battery is fully charged, <strong>SunSaver</strong> <strong>Duo</strong> reduces to a float or “trickle<br />
charge”.<br />
4. Boost (Flooded battery type only – Every 28 days) – A boost charge for flooded<br />
batteries, bringing uneven cell voltages into balance and extending battery life.<br />
Sometimes called an equalization charge.<br />
NOTE: A 15V maximum battery voltage limit prevents damage to sensitive DC loads.<br />
20
4.3 Protections<br />
Over-current – Solar charge current exceeds the current rating of the <strong>SunSaver</strong> <strong>Duo</strong>.<br />
Automatically reconnects in 30 seconds.<br />
CAUTION: A mis-wired connection of a battery to the Solar input when a second<br />
battery is already connected to a Battery input may damage the <strong>SunSaver</strong> <strong>Duo</strong>.<br />
High Temperature – The heatsink temperature is above safe limits. Automatically<br />
reconnects when heatsink cools to a safe temperature.<br />
Short Circuit – Solar input power wires are short-circuited. Charging automatically<br />
resumes when the error is cleared.<br />
Battery Reverse Polarity – Battery 1 or Battery 2 power connections are connected<br />
backwards. Error clears when the mis-wire is corrected.<br />
Damaged Local Temperature Sensor - The local ambient temperature sensor is shortcircuited<br />
or damaged. Charging stops to avoid over- or under-charging. This is a critical<br />
error.<br />
Damaged Internal Temperature Sensor – The internal heatsink temperature sensor<br />
reading is damaged. This is a critical error.<br />
Remote Temperature Sensor (RTS) - A bad RTS connection or severed RTS lead has<br />
disconnected the temperature sensor during charging. Charging automatically resumes<br />
when the problem is fixed. To resume operation without an RTS, disconnect all power to<br />
the <strong>SunSaver</strong> <strong>Duo</strong> and then reconnect.<br />
High Voltage Transients – Battery 1, Battery 2, and Solar input power connections are<br />
protected against high voltage transients. In lightning prone areas, additional external<br />
suppression is recommended.<br />
21
4.4 Inspection and Maintenance<br />
The following inspections and maintenance tasks are recommended at least two times<br />
per year for best controller performance.<br />
Tighten all terminals. Inspect for loose, broken, or corroded connections.<br />
Verify all wire clamps and tie-downs are secure.<br />
Check that the controller is mounted in a clean protected environment free of dirt,<br />
insects, nests, and corrosion.<br />
Check enclosure ventilation and air flow holes for obstructions if applicable.<br />
Verify LED indication is consistent with the system conditions at that time.<br />
Verify that the Remote Temperature Sensor (if used) is securely attached to the<br />
battery.<br />
22
5.0 Troubleshooting<br />
5.1 Error Indications<br />
NOTE: If an optional Morningstar Remote Meter is attached to the <strong>SunSaver</strong> <strong>Duo</strong>,<br />
use the self-diagnostic feature to determine the cause of the error indication. Refer to<br />
the Remote Meter Operator’s <strong>Manual</strong> for more information.<br />
Red ( flashing ) Errors<br />
See section 4.1 LED Indications for a list of possible errors.<br />
Test the following:<br />
Check for correct polarity: Battery 1, Battery 2, and Solar connections.<br />
Verify that the current output of the solar module(s) is less than 25 Amps.<br />
Inspect the Remote Temperature Sensor connection and leads for breaks.<br />
Measure battery 1 and battery 2 voltage. If either battery voltage measurement<br />
exceeds 15.5 V, a High Voltage error has occurred.<br />
• If the engine is running, turn it off to see if the error clears. The engine<br />
alternator may be over-charging the battery.<br />
• Check the solar input wiring. Solar + may be wired to a battery + terminal.<br />
• The <strong>SunSaver</strong> <strong>Duo</strong> may be damaged, resulting in over-charging.<br />
If the ambient temperature at the controller is hot or there is little ventilation, the<br />
<strong>SunSaver</strong> <strong>Duo</strong> may have an error due to high temperature. Add ventilation,<br />
relocate the controller to a cooler location, or reduce charge current.<br />
Red ( solid on ) Errors<br />
A solid red Status LED indicates a critical error. See section 4.1 LED Indications for a<br />
list of possible errors. Inspect the Local Temperature Sensor (LTS) for corrosion or<br />
breaks. Alternatively, the internal heatsink temperature sensor may be damaged. The<br />
<strong>SunSaver</strong> <strong>Duo</strong> should be returned to your Morningstar dealer for service.<br />
5.2 General Problems<br />
Problem: The battery(s) will not recharge or recharges slowly.<br />
Solution: If the optional Remote Meter is attached, verify that solar charge current is<br />
being produced by the solar modules. Otherwise, use a multi-meter to measure solar<br />
current. If no current is measured, check the solar module(s) wiring.<br />
23
Verify that the priority setting (DIP switch #3) is set to provide the correct percentage of<br />
charge current to the problem battery(s).<br />
The time required to recharge a battery or battery bank depends on:<br />
• The amount of current produced by the solar module(s).<br />
• percentage of charge current provided.<br />
• initial “state of charge” of the battery(s).<br />
• size of the battery bank.<br />
• age of the batteries.<br />
• amount of energy drawn out of the battery by system loads.<br />
Consult your Morningstar dealer for proper system design.<br />
Problem: The solar module(s) are in full sun but the Status LED is off, indicating that<br />
the <strong>SunSaver</strong> <strong>Duo</strong> is in Night state.<br />
Solution: Check the solar module(s) wiring and connections. Disconnect the solar<br />
module(s) from the <strong>SunSaver</strong> <strong>Duo</strong>. In full sun, measure the output voltage from the<br />
module(s). The voltage should be between 17 V and 25 V.<br />
Problem: A buzzing noise can be heard in a radio or communications equipment.<br />
Solution: The buzzing noise may be produced by the vehicle alternator or the PWM<br />
regulation of the <strong>SunSaver</strong> <strong>Duo</strong>.<br />
1) If this is a mobile application, turn off the engine. If the noise stops, the engine<br />
alternator is producing noise.<br />
2) Turn off any other charging sources on the battery. If the noise stops, an<br />
alternate charging source is producing noise.<br />
3) Remove the Solar(+) connection on the <strong>SunSaver</strong> <strong>Duo</strong>. If the noise stops, the<br />
<strong>SunSaver</strong> <strong>Duo</strong> PWM regulation is producing noise.<br />
To reduce or eliminate noise:<br />
− Ensure good system grounding.<br />
− Minimize cable runs between system components.<br />
− Do not run equipment signal lines parallel to system power cables.<br />
− Twist power cable pairs(+/-) to reduce radiated noise.<br />
− Increase distance between the controller and the equipment experiencing noise.<br />
− Increase the distance between the equipment antenna and the system power<br />
cables.<br />
− Add a line filter such as a car audio alternator filter.<br />
If the noise still persists, adjust the Regulation Type DIP switch on the <strong>SunSaver</strong> <strong>Duo</strong>.<br />
See section 2.2 Configuring DIP Switches<br />
Problem: The <strong>SunSaver</strong> <strong>Duo</strong> reports E05 – removed RTS error. No RTS is connected.<br />
Solution: Condensation may be causing false detection of the RTS. Water dew creates<br />
a resistance across the terminals. Power down the unit and place a wire jumper across<br />
the RTS terminals. Re-apply power. The jumper prevents false detection.<br />
24
6.0 Limited Warranty<br />
The <strong>SunSaver</strong> <strong>Duo</strong> charge controller is warranted to be free from defects in material and workmanship for<br />
a period of FIVE (5) years from the date of shipment to the original end user. Morningstar will, at its<br />
option, repair or replace any such defective products.<br />
CLAIM PROCEDURE<br />
Before requesting warranty service, check the Operator’s <strong>Manual</strong> to be certain that there is a problem<br />
with the controller. Return the defective product to your authorized Morningstar distributor with shipping<br />
charges prepaid. Provide proof of date and place of purchase.<br />
To obtain service under this warranty, the returned products must include the model, serial<br />
number and detailed reason for the failure, the module type, array size, type of batteries and<br />
system loads. This information is critical to a rapid disposition of your warranty claim.<br />
Morningstar will pay the return shipping charges if the repairs are covered by the warranty.<br />
WARRANTY EXCLUSIONS AND LIMITATIONS<br />
This warranty does not apply under the following conditions:<br />
• Damage by accident, negligence, abuse or improper use.<br />
• PV or load currents exceeding the ratings of the product.<br />
• Unauthorized product modification or attempted repair<br />
• Damage occurring during shipment<br />
THE WARRANTY AND REMEDIES SET FORTH ABOVE ARE EXCLUSIVE AND IN LIEU OF ALL<br />
OTHERS, EXPRESS OR IMPLIED. MORNINGSTAR SPECIFICALLY DISCLAIMS ANY AND ALL<br />
IMPLIED WARRANTIES, INCLUDING, WITHOUT LIMITATION, WARRANTIES OF MERCHANTABILITY<br />
AND FITNESS FOR A PARTICULAR PURPOSE. No Morningstar distributor, agent or employee is<br />
authorized to make any modification or extension to this warranty.<br />
MORNINGSTAR IS NOT RESPONSIBLE FOR INCIDENTAL OR CONSEQUENTIAL DAMAGES OF<br />
ANY KIND, INCLUDING BUT NOT LIMITED TO LOST PROFITS, DOWNTIME, GOODWILL OR<br />
DAMAGE TO EQUIPMENT OR PROPERTY.<br />
8 Pheasant Run<br />
Newtown, PA 18940 USA<br />
Tel 215-321-445 Fax 215-321-4458<br />
Email: info@morningstarcorp.com<br />
Website: www.morningstarcorp.com<br />
25
7.0 Technical Specifications<br />
Electrical<br />
• Nominal system voltage 12 V<br />
• Max. solar current 25 A<br />
• Battery voltage range 1 V – 15 V<br />
• Max. solar voltage 30 V<br />
• Self-consumption 5.5 mA (night)<br />
10.0 mA (charging)<br />
• Accuracy<br />
Voltage 1.0 %<br />
Current 2.0 %<br />
• Meterbus Connection 6-pin RJ-11<br />
• Transient Surge Protection 1500 Watts, all power connections<br />
Battery Charging<br />
• Regulation Method 300 Hz PWM or<br />
Slow Switching (10 Hz max.)<br />
• Temp. Compensation Coefficient -30 mV / °C (25°C reference)<br />
• Temp. Compensation Range - 30°C to + 60°C<br />
• Temp. Compensated Setpoints Absorption, Float, Equalize<br />
Battery Setpoints<br />
Sealed Flooded<br />
• Absorption 14.1 V 14.4 V<br />
• Float 13.7 V 13.7 V<br />
• Time until Float 1 hr 1 hr<br />
• Equalize N/A 14.6 V<br />
• Equalize Calendar N/A 28 days<br />
• Maximum Regulation 15.0 V 15.0 V<br />
• High Voltage Disconnect 15.5 V 15.5 V<br />
• High Voltage Reconnect 14.0 V 14.0 V<br />
26
Mechanical<br />
• Power terminals wire size (max.)<br />
Solid #6 AWG / 16 mm 2<br />
Multistrand #6 AWG / 16 mm 2<br />
Fine strand #8 AWG / 10 mm 2<br />
Terminal Diameter 0.210 in / 5.4 mm<br />
• Power terminals torque (max.) 35 in-lb / 4 Nm<br />
• RTS terminals wire size (max.)<br />
Wire gauge (min) #22 AWG / 0.3 mm 2<br />
Wire gauge (max) #12 AWG / 3.0 mm 2<br />
• RTS terminals torque (max.) 0.4 Nm / 3.5 in-lb<br />
• Dimensions see inside front cover<br />
• Weight 0.57 lbs / 0.26 kg<br />
Environmental<br />
• Operating temperature -40°C to +45°C<br />
• Storage temperature -40°C to +85°C<br />
• Humidity 100% N.C.<br />
Specifications subject to change without notice.<br />
Designed in the U.S.A.<br />
Assembled in Taiwan<br />
MS-ZMAN-SSD01-D<br />
27
Minimum Recommended Wire Gauge<br />
One Way Wire Distance ( feet )<br />
Solar<br />
Wire Gauge ( AWG )<br />
Amps<br />
14 12 10 8 6<br />
2 70 112 180 287 456<br />
4 35 56 90 143 228<br />
8 18 28 45 72 114<br />
12 12 19 30 48 76<br />
16 9 14 23 36 57<br />
20 7 11 18 29 46<br />
25 6 9 14 23 36<br />
3% Voltage drop, Annealed Copper Wire at 20°C<br />
One-way wire distance: Solar ↔ <strong>SunSaver</strong> <strong>Duo</strong> or <strong>SunSaver</strong> <strong>Duo</strong> ↔ Battery<br />
One Way Wire Distance ( meters )<br />
Solar<br />
Wire Gauge ( mm^2 )<br />
Amps<br />
2.0 3.0 5.0 8.0 13.0<br />
2 21.3 34.1 54.9 87.5 139.0<br />
4 10.7 17.1 27.4 43.6 69.5<br />
8 5.5 8.5 13.7 21.9 34.7<br />
12 3.7 5.8 9.1 14.6 23.2<br />
16 2.7 4.3 7.0 11.0 17.4<br />
20 2.1 3.4 5.5 8.8 14.0<br />
25 1.8 2.7 4.3 7.0 11.0<br />
3% Voltage drop, Annealed Copper Wire at 20°C<br />
One-way wire distance: Solar ↔ <strong>SunSaver</strong> <strong>Duo</strong> or <strong>SunSaver</strong> <strong>Duo</strong> ↔ Battery<br />
28