2. FORM D1 (REQUEST TO CHANGE OR CORRECT NAME AND ...
2. FORM D1 (REQUEST TO CHANGE OR CORRECT NAME AND ...
2. FORM D1 (REQUEST TO CHANGE OR CORRECT NAME AND ...

Create successful ePaper yourself
Turn your PDF publications into a flip-book with our unique Google optimized e-Paper software.
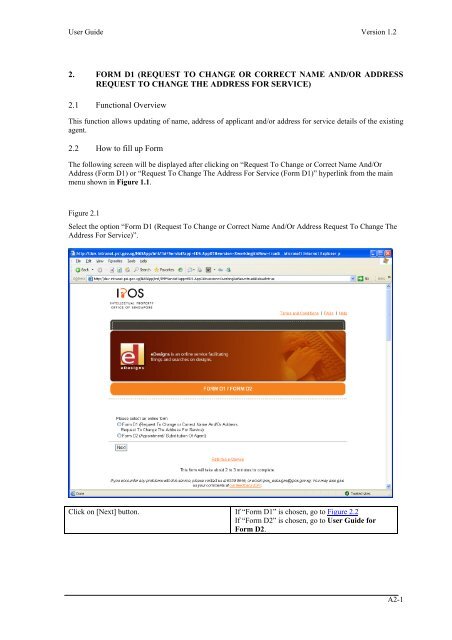
User Guide Version 1.2<br />
<strong>2.</strong> <strong>F<strong>OR</strong>M</strong> <strong>D1</strong> (<strong>REQUEST</strong> <strong>TO</strong> <strong>CHANGE</strong> <strong>OR</strong> C<strong>OR</strong>RECT <strong>NAME</strong> <strong>AND</strong>/<strong>OR</strong> ADDRESS<br />
<strong>REQUEST</strong> <strong>TO</strong> <strong>CHANGE</strong> THE ADDRESS F<strong>OR</strong> SERVICE)<br />
<strong>2.</strong>1 Functional Overview<br />
This function allows updating of name, address of applicant and/or address for service details of the existing<br />
agent.<br />
<strong>2.</strong>2 How to fill up Form<br />
The following screen will be displayed after clicking on “Request To Change or Correct Name And/Or<br />
Address (Form <strong>D1</strong>) or “Request To Change The Address For Service (Form <strong>D1</strong>)” hyperlink from the main<br />
menu shown in Figure 1.1.<br />
Figure <strong>2.</strong>1<br />
Select the option “Form <strong>D1</strong> (Request To Change or Correct Name And/Or Address Request To Change The<br />
Address For Service)”.<br />
Click on [Next] button. If “Form <strong>D1</strong>” is chosen, go to Figure <strong>2.</strong>2<br />
If “Form D2” is chosen, go to User Guide for<br />
Form D<strong>2.</strong><br />
A2-1
User Guide Version 1.2<br />
(eDesigns Service)<br />
Figure <strong>2.</strong>2<br />
Select one of the payment options.<br />
Click on [Next] button. If “GIRO” is chosen, go to Figure <strong>2.</strong>3<br />
If “FlexiPay, Credit/Debit Card, Internet Banking”<br />
is chosen, go to Figure <strong>2.</strong>7.<br />
A2-2
User Guide Version 1.2<br />
(eDesigns Service)<br />
Figure <strong>2.</strong>3<br />
Authentication is required for payment through GIRO. Please select “SingPass” as the preferred sign in<br />
service from the drop down list to proceed.<br />
Click on [Next] button. Proceed to the next page (Figure <strong>2.</strong>4).<br />
A2-3
User Guide Version 1.2<br />
(eDesigns Service)<br />
Figure <strong>2.</strong>4<br />
Enter the SingPass ID in the field provided.<br />
Click on [Submit] button. Proceed to the next page (Figure <strong>2.</strong>6).<br />
Click on [Cancel] button. Go back to the previous page (Figure <strong>2.</strong>3).<br />
A2-4
User Guide Version 1.2<br />
(eDesigns Service)<br />
Figure <strong>2.</strong>6<br />
Enter the agent code of the representing law firm.<br />
Click on [Next] button. Proceed to the next page (Figure <strong>2.</strong>7).<br />
A2-5
User Guide Version 1.2<br />
(eDesigns Service)<br />
Figure <strong>2.</strong>7<br />
You may select “Retrieve Application Details, please enter Save Ref No.”. Otherwise, you may select<br />
“Proceed with New EFiling”.<br />
Click on [Next] button. Proceed to the next page (Figure <strong>2.</strong>8).<br />
A2-6
User Guide Version 1.2<br />
(eDesigns Service)<br />
Figure <strong>2.</strong>8<br />
Read the instructions before proceeding to the next page.<br />
Click on [Next] button. Proceed to the next page (Figure <strong>2.</strong>9).<br />
A2-7
User Guide Version 1.2<br />
(eDesigns Service)<br />
Figure <strong>2.</strong>9<br />
Enter the details as follow:<br />
Click on [Next] button.<br />
Click on [Reset] button.<br />
If “Name/Address of Applicant” is chosen, go to<br />
Figure <strong>2.</strong>10 (for multiple Applicants) or Figure <strong>2.</strong>11<br />
(for single Applicant).<br />
If “Address for Service” is chosen, go to Figure<br />
<strong>2.</strong>1<strong>2.</strong><br />
Reset fields to default values.<br />
A2-8
User Guide Version 1.2<br />
(eDesigns Service)<br />
Figure <strong>2.</strong>10<br />
Enter the S/No. for the Applicant to amend.<br />
Click on [Next] button. Proceed to the next page (Figure <strong>2.</strong>11).<br />
Click on [Reset] button.<br />
Reset fields to default values.<br />
Click on [Previous] button. Go back to the previous page (Figure <strong>2.</strong>9).<br />
Click on [Done] button.<br />
Go to Figure <strong>2.</strong>13 if the change option is<br />
“Name/Address of Applicant”.<br />
Go to Figure <strong>2.</strong>12 if the change option is “Address<br />
for Service” or “Name/Address of Applicant and<br />
Address for Service”.<br />
A2-9
User Guide Version 1.2<br />
(eDesigns Service)<br />
Figure <strong>2.</strong>11<br />
Enter the Applicant details.<br />
Click on [Next] button.<br />
Click on [Reset] button.<br />
Click on [Cancel] button.<br />
Proceed to the next page (Figure <strong>2.</strong>10 for multiple<br />
Applicants; Figure <strong>2.</strong>12 for single Applicant and if<br />
the change option is “Name/Address of Applicant<br />
and Address for Service”; Figure <strong>2.</strong>13 if the change<br />
option is “Name/Address of Applicant”).<br />
Reset fields to default values.<br />
Proceed to the previous page (Figure <strong>2.</strong>10 for<br />
multiple Applicants; Figure <strong>2.</strong>9 for single<br />
applicant).<br />
A2-10
User Guide Version 1.2<br />
(eDesigns Service)<br />
Figure <strong>2.</strong>12<br />
Enter the Address for Service details<br />
Click on [Next] button. Proceed to the next page (Figure <strong>2.</strong>13).<br />
Click on [Reset] button.<br />
Reset fields to default values.<br />
Click on [Previous] button.<br />
Go to Figure <strong>2.</strong>9 if the change option is “Address<br />
for Service”.<br />
Go to Figure <strong>2.</strong>11 for single applicant or Figure<br />
<strong>2.</strong>10 for multiple applicants if the change option is<br />
“Name/Address of Applicant and Address for<br />
Service”.<br />
A2-11
User Guide Version 1.2<br />
(eDesigns Service)<br />
Figure <strong>2.</strong>13<br />
Enter the particulars of person submitting the application.<br />
Click on [Next] button. Proceed to the next page (Figure <strong>2.</strong>14).<br />
Click on [Reset] button.<br />
Reset fields to default values.<br />
Click on [Previous] button.<br />
Go back to the previous page (Figure <strong>2.</strong>12) if the<br />
change option is “Address for Service” or<br />
“Name/Address of Applicant and Address for<br />
Service”.<br />
Go back to the previous page (Figure <strong>2.</strong>11 for<br />
single applicant or Figure <strong>2.</strong>10 for multiple<br />
applicants) if the change option is “Name/Address<br />
of Applicant”.<br />
A2-12
User Guide Version 1.2<br />
(eDesigns Service)<br />
Figure <strong>2.</strong>14<br />
Select the option to save or submit the application.<br />
Click on [Next] button.<br />
If “Save & Revisit Later” is selected, go to the next<br />
page (Figure <strong>2.</strong>19).<br />
If “Submit Application” is selected, go the Figure<br />
<strong>2.</strong>15.<br />
Click on [Previous] button. Go back to the previous page (Figure <strong>2.</strong>13).<br />
A2-13
User Guide Version 1.2<br />
(eDesigns Service)<br />
Figure <strong>2.</strong>15<br />
Confirm the form details entered in the confirmation page before clicking on the “Submit & Make<br />
Payment” button.<br />
Click on [Submit & Make Payment] button. If payment will be made via GIRO, Figure <strong>2.</strong>16<br />
will be displayed.<br />
A2-14
User Guide Version 1.2<br />
(eDesigns Service)<br />
Click on [Amend Details] button.<br />
For other payment modes, Figure <strong>2.</strong>22 will be<br />
displayed.<br />
Go back to the first page to amend details (Figure<br />
<strong>2.</strong>9).<br />
A2-15
User Guide Version 1.2<br />
(eDesigns Service)<br />
Figure <strong>2.</strong>16<br />
You may want to print a copy of the GIRO Acknowledgement Slip for your own reference by clicking on<br />
the “Print” icon on your web browser.<br />
Click on [Next] button. Proceed to the next page (Figure <strong>2.</strong>17).<br />
Acknowledgement Email (Figure <strong>2.</strong>18) will be<br />
generated and sent to the Email Address indicated<br />
in the “Particulars of Person Submitting<br />
Application” screen.<br />
A2-16
User Guide Version 1.2<br />
(eDesigns Service)<br />
Figure <strong>2.</strong>17<br />
The details you have just filed will be displayed. You may want to print a copy of the details for your own<br />
reference by clicking on the “Print” icon on your Web Browser.<br />
A2-17
User Guide Version 1.2<br />
(eDesigns Service)<br />
Figure <strong>2.</strong>17 (continued)<br />
Click on [Continue with Current eService] button. Proceed to the next page (Figure <strong>2.</strong>7).<br />
A2-18
User Guide Version 1.2<br />
(eDesigns Service)<br />
Figure <strong>2.</strong>18<br />
An acknowledgement email will be sent to the Email Address (if any) of the person specified in the<br />
‘Particulars of Person Submitting Application’ screen.<br />
From: eDesigns<br />
Sent:<br />
To:<br />
Cc:<br />
Subject: Confirmation of eDesigns application (efiling no xxxx)<br />
Dear xxxx,<br />
The following application was received.<br />
_____________________________________________________<br />
Your Ref :<br />
Form Name: Request To Change or Correct Name And/Or Address Request To Change The Address<br />
For Service (<strong>D1</strong>)<br />
e-filing No :<br />
Design No:<br />
Date/Time of Submission:<br />
E-Filing Date :<br />
Receipt No:<br />
Payment mode:<br />
Form Fee:<br />
Amount Paid: (for non-GIRO case only)<br />
Agent Code:<br />
Agent Name:<br />
A2-19
User Guide Version 1.2<br />
(eDesigns Service)<br />
Figure <strong>2.</strong>19<br />
Confirm the form details entered in the confirmation page and click on the “Save & Revisit Later” button<br />
to save the details.<br />
A2-20
User Guide Version 1.2<br />
(eDesigns Service)<br />
Figure <strong>2.</strong>19 (Continued)<br />
Click on [Save & Revisit Later] button. Proceed to the next page (Figure <strong>2.</strong>20).<br />
Click on [Amend Details] button. Proceed to the Figure <strong>2.</strong>9.<br />
A2-21
User Guide Version 1.2<br />
(eDesigns Service)<br />
Figure <strong>2.</strong>20<br />
Once the saving of the application is successful, the following message will be displayed.<br />
Click on [Next] button. Proceed to the next page (Figure <strong>2.</strong>21).<br />
A2-22
User Guide Version 1.2<br />
(eDesigns Service)<br />
Figure <strong>2.</strong>21<br />
The details you have just saved will be displayed. You may want to print a copy of the details for your<br />
own reference by clicking on the “Print” icon on your Web Browser. You have to use the same ‘Save Ref<br />
No’ to retrieve this application again. The ‘Save Ref No’ can be found under the section ‘EFiling<br />
Particulars’ below.<br />
A2-23
User Guide Version 1.2<br />
(eDesigns Service)<br />
Click on [Continue with Current eService] button. Proceed to the next page (Figure <strong>2.</strong>7).<br />
A2-24
User Guide Version 1.2<br />
(eDesigns Service)<br />
Figure <strong>2.</strong>22<br />
Payment details for the ‘FlexiPay, eNets Credit or eNets Debit’ case.<br />
Click on [Submit] button. Proceed to the next page (Figure <strong>2.</strong>23).<br />
Click on [Cancel] button. Proceed to the next page (Figure <strong>2.</strong>35).<br />
A2-25
User Guide Version 1.2<br />
(eDesigns Service)<br />
Figure <strong>2.</strong>23<br />
You may select one of the Payment Modes by double clicking on one of the icons in the ‘Payment Mode’<br />
column<br />
Double Click on the Payment Mode.<br />
If ‘eNets Internet Banking’ is selected, proceed to<br />
the next page (Figure <strong>2.</strong>24).<br />
If ‘eNets Credit Card’ is selected, proceed to the<br />
next page (Figure <strong>2.</strong>25).<br />
If ‘FlexiPay’ is selected, proceed to the next page<br />
(Figure <strong>2.</strong>27).<br />
Click on [Cancel Payment] button. Proceed to the next page (Figure <strong>2.</strong>34).<br />
A2-26
User Guide Version 1.2<br />
(eDesigns Service)<br />
Figure <strong>2.</strong>24<br />
For the case of ‘eNets Internet Banking’, the following Bank detail is to be entered.<br />
Click on [Submit] button. Proceed to the next page (Figure <strong>2.</strong>26).<br />
Figure <strong>2.</strong>17 will also be shown.<br />
Acknowledgement Email (Figure <strong>2.</strong>18) will be<br />
generated and sent to the Email Address indicated<br />
in the “Particulars of Person Submitting<br />
Application” screen.<br />
Click on [Cancel] button. Proceed to the next page (Figure <strong>2.</strong>23).<br />
A2-27
User Guide Version 1.2<br />
(eDesigns Service)<br />
Figure <strong>2.</strong>25<br />
For the case of ‘eNets Credit Card’, the following Card details are to be entered.<br />
Click on [Clear] button.<br />
The details will be cleared.<br />
Click on [Submit] button. Proceed to the next page (Figure <strong>2.</strong>26).<br />
Figure <strong>2.</strong>17 will also be shown.<br />
Acknowledgement Email (Figure <strong>2.</strong>18) will be<br />
generated and sent to the Email Address indicated<br />
in the “Particulars of Person Submitting<br />
Application” screen.<br />
Click on [Cancel] button. Proceed to the next page (Figure <strong>2.</strong>23).<br />
A2-28
User Guide Version 1.2<br />
(eDesigns Service)<br />
Figure <strong>2.</strong>26<br />
You may want to print a copy of the Receipt for your own reference by clicking on the “Print” icon on<br />
your web browser. Payment Ref No. is the receipt number.<br />
Click on [Close this window] button.<br />
The window will be closed and the next page<br />
(Figure <strong>2.</strong>17) will be shown.<br />
A2-29
User Guide Version 1.2<br />
(eDesigns Service)<br />
Figure <strong>2.</strong>27<br />
Enter the SingPass ID in the field provided.<br />
Click on [Submit] button. Proceed to the next page (Figure <strong>2.</strong>28).<br />
Click on [Cancel] button. Go back to the previous page (Figure <strong>2.</strong>23).<br />
A2-30
User Guide Version 1.2<br />
(eDesigns Service)<br />
Figure <strong>2.</strong>28<br />
Enter the SingPass in the field provided.<br />
Click on [Login] button. Proceed to the next page (Figure <strong>2.</strong>29).<br />
Click on [Cancel] button. Go back to the previous page (Figure <strong>2.</strong>23).<br />
A2-31
User Guide Version 1.2<br />
(eDesigns Service)<br />
Figure <strong>2.</strong>29<br />
Select your preferred account to make payment.<br />
Click on [Ok] button. Proceed to the next page (Figure <strong>2.</strong>30).<br />
Click on [Cancel] button. Go back to the previous page (Figure <strong>2.</strong>27).<br />
A2-32
User Guide Version 1.2<br />
(eDesigns Service)<br />
Figure <strong>2.</strong>30<br />
Confirm the selected account details.<br />
Click on [Confirm] button. Proceed to the next page (Figure <strong>2.</strong>31).<br />
Click on [Cancel] button. Go back to the previous page (Figure <strong>2.</strong>29).<br />
A2-33
User Guide Version 1.2<br />
(eDesigns Service)<br />
Figure <strong>2.</strong>31<br />
Confirm the selected account details.<br />
Click on [Ok] button. Proceed to the next page (Figure <strong>2.</strong>32).<br />
Click on [Cancel] button. Go back to the previous page (Figure <strong>2.</strong>30).<br />
A2-34
User Guide Version 1.2<br />
(eDesigns Service)<br />
Figure <strong>2.</strong>32<br />
Enter the SingPass ID in the field provided.<br />
Click on [Submit] button. Proceed to the next page (Figure <strong>2.</strong>33).<br />
Click on [Cancel] button. Go back to the previous page (Figure <strong>2.</strong>23).<br />
A2-35
User Guide Version 1.2<br />
(eDesigns Service)<br />
Figure <strong>2.</strong>33<br />
Enter the SingPass in the field provided.<br />
Click on [Login] button. Proceed to the next page (Figure <strong>2.</strong>26).<br />
Figure <strong>2.</strong>17 will also be shown.<br />
Acknowledgement Email (Figure <strong>2.</strong>18) will be<br />
generated and sent to the Email Address indicated<br />
in the “Particulars of Person Submitting<br />
Application” screen.<br />
Click on [Cancel] button. Go back to the previous page (Figure <strong>2.</strong>23).<br />
A2-36
User Guide Version 1.2<br />
(eDesigns Service)<br />
Figure <strong>2.</strong>34<br />
The payment transaction has been cancelled.<br />
Important: It is mandatory to click on the link ‘Return to agency website’ to return to the current e-<br />
service.<br />
Click on [Return to agency website] button. Proceed to the next page (Figure <strong>2.</strong>35).<br />
A2-37
User Guide Version 1.2<br />
(eDesigns Service)<br />
Figure <strong>2.</strong>35<br />
The whole transaction has been cancelled.<br />
Click on [Continue with Current eService] button. Proceed to the next page (Figure <strong>2.</strong>7).<br />
A2-38