Introduction to gnuplot
Introduction to gnuplot
Introduction to gnuplot

You also want an ePaper? Increase the reach of your titles
YUMPU automatically turns print PDFs into web optimized ePapers that Google loves.
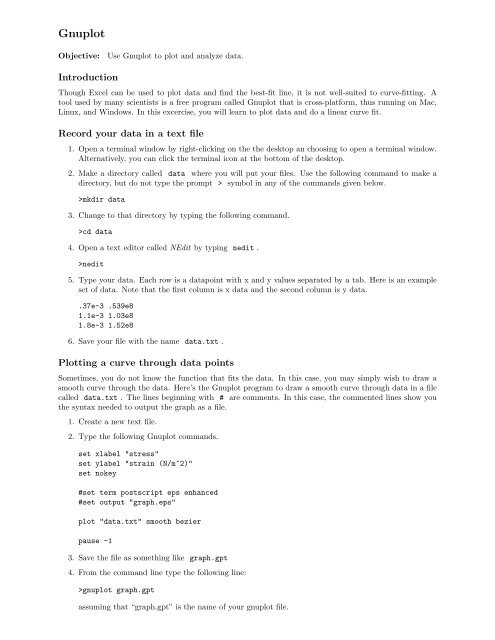
Gnuplot<br />
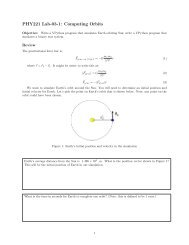
Objective:<br />
Use Gnuplot <strong>to</strong> plot and analyze data.<br />
<strong>Introduction</strong><br />
Though Excel can be used <strong>to</strong> plot data and find the best-fit line, it is not well-suited <strong>to</strong> curve-fitting. A<br />
<strong>to</strong>ol used by many scientists is a free program called Gnuplot that is cross-platform, thus running on Mac,<br />
Linux, and Windows. In this excercise, you will learn <strong>to</strong> plot data and do a linear curve fit.<br />
Record your data in a text file<br />
1. Open a terminal window by right-clicking on the the desk<strong>to</strong>p an choosing <strong>to</strong> open a terminal window.<br />
Alternatively, you can click the terminal icon at the bot<strong>to</strong>m of the desk<strong>to</strong>p.<br />
2. Make a direc<strong>to</strong>ry called data where you will put your files. Use the following command <strong>to</strong> make a<br />
direc<strong>to</strong>ry, but do not type the prompt > symbol in any of the commands given below.<br />
>mkdir data<br />
3. Change <strong>to</strong> that direc<strong>to</strong>ry by typing the following command.<br />
>cd data<br />
4. Open a text edi<strong>to</strong>r called NEdit by typing nedit .<br />
>nedit<br />
5. Type your data. Each row is a datapoint with x and y values separated by a tab. Here is an example<br />
set of data. Note that the first column is x data and the second column is y data.<br />
.37e-3 .539e8<br />
1.1e-3 1.03e8<br />
1.8e-3 1.52e8<br />
6. Save your file with the name data.txt .<br />
Plotting a curve through data points<br />
Sometimes, you do not know the function that fits the data. In this case, you may simply wish <strong>to</strong> draw a<br />
smooth curve through the data. Here’s the Gnuplot program <strong>to</strong> draw a smooth curve through data in a file<br />
called data.txt . The lines beginning with # are comments. In this case, the commented lines show you<br />
the syntax needed <strong>to</strong> output the graph as a file.<br />
1. Create a new text file.<br />
2. Type the following Gnuplot commands.<br />
set xlabel "stress"<br />
set ylabel "strain (N/m^2)"<br />
set nokey<br />
#set term postscript eps enhanced<br />
#set output "graph.eps"<br />
plot "data.txt" smooth bezier<br />
pause -1<br />
3. Save the file as something like graph.gpt<br />
4. From the command line type the following line:<br />
><strong>gnuplot</strong> graph.gpt<br />
assuming that “graph.gpt” is the name of your <strong>gnuplot</strong> file.
Plotting your data and the best-fit line using Gnuplot<br />
1. Create a new text file.<br />
2. Type the following Gnuplot commands<br />
y(x)=m*x+b<br />
fit y(x) "data.txt" via m,b<br />
set xlabel "stress"<br />
set ylabel "strain (N/m^2)"<br />
set nokey<br />
#set term postscript eps enhanced<br />
#set output "graph.eps"<br />
plot y(x), "data.txt"<br />
pause -1<br />
The first line defines the function that we wish <strong>to</strong> fit the data <strong>to</strong>. This is the function of a straight<br />
line. The next line instructs Gnuplot <strong>to</strong> fit the function <strong>to</strong> the data in the file data.txt by finding<br />
the constants m and b that make the function best fit the data. The next three lines define the labels<br />
on the graph and tell Gnuplot not <strong>to</strong> print a legend (or key). The next two lines are commented out,<br />
but you can use these lines <strong>to</strong> output the graph <strong>to</strong> a file instead of the screen.<br />
The plot command is then used <strong>to</strong> plot both the best-fit function y(x) and the data on the same<br />
graph. The final line instructs Gnuplot <strong>to</strong> pause (i.e. not quit) when it is finished.<br />
3. Save the file as something like graph.gpt .<br />
4. Type the following command <strong>to</strong> run the file.<br />
><strong>gnuplot</strong> graph.gpt<br />
assuming that “graph.gpt” is the name of your <strong>gnuplot</strong> file.