Quick Start Guide - Windows and Daylighting Group - Lawrence ...
Quick Start Guide - Windows and Daylighting Group - Lawrence ...
Quick Start Guide - Windows and Daylighting Group - Lawrence ...

Create successful ePaper yourself
Turn your PDF publications into a flip-book with our unique Google optimized e-Paper software.
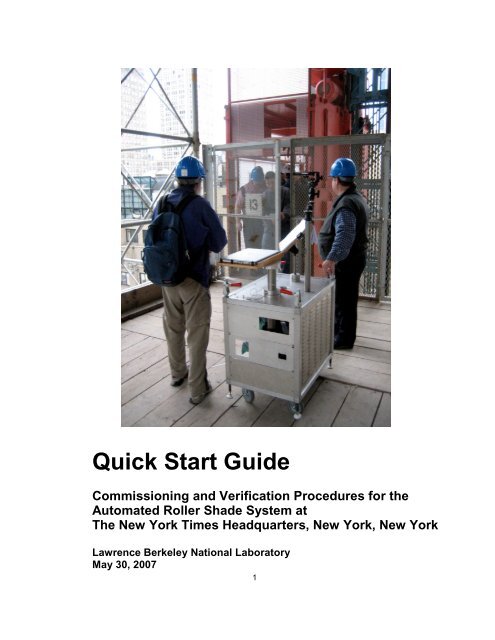
<strong>Quick</strong> <strong>Start</strong> <strong>Guide</strong><br />
Commissioning <strong>and</strong> Verification Procedures for the<br />
Automated Roller Shade System at<br />
The New York Times Headquarters, New York, New York<br />
<strong>Lawrence</strong> Berkeley National Laboratory<br />
May 30, 2007<br />
1
Prepared for:<br />
Glenn D. Hughes <strong>and</strong> Larry Dumpert, The New York Times, New York, New York<br />
Prepared by:<br />
Eleanor S. Lee, Robert D. Clear, <strong>and</strong> Luis Fern<strong>and</strong>es, <strong>Lawrence</strong> Berkeley National<br />
Laboratory, Berkeley, CA<br />
Greg Ward, Anyhere Software, Berkeley, CA<br />
Notice<br />
This report was prepared by the <strong>Lawrence</strong> Berkeley National Laboratory (LBNL),<br />
Anyhere Software, <strong>and</strong> The New York Times Company (hereafter the “Contractor”) in<br />
the course of performing work contracted for <strong>and</strong> sponsored by the New York State<br />
Energy Research <strong>and</strong> Development Authority <strong>and</strong> the U.S. Department of Energy<br />
(hereafter the "Sponsors"). The opinions expressed in this report do not necessarily<br />
reflect those of the Sponsors or the State of New York, <strong>and</strong> reference to any specific<br />
product, service, process, or method does not constitute an implied or expressed<br />
recommendation or endorsement of it. Further, the Sponsors <strong>and</strong> the State of New<br />
York make no warranties or representations, expressed or implied, as to the fitness<br />
for particular purpose or merchantability of any product, apparatus, or service, or the<br />
usefulness, completeness, or accuracy of any processes, methods, or other<br />
information contained, described, disclosed, or referred to in this report. The<br />
Sponsors, the State of New York, <strong>and</strong> the Contractor make no representation that the<br />
use of any product, apparatus, process, method, or other information will not infringe<br />
privately owned rights <strong>and</strong> will assume no liability for any loss, injury, or damage<br />
resulting from, or occurring in connection with, the use of information contained,<br />
described, disclosed, or referred to in this report.<br />
Acknowledgements<br />
This work was supported by the New York State Energy Research <strong>and</strong> Development<br />
Authority <strong>and</strong> by the Assistant Secretary for Energy Efficiency <strong>and</strong> Renewable<br />
Energy, Office of Building Technology, State <strong>and</strong> Community Programs, Office of<br />
Building Research <strong>and</strong> St<strong>and</strong>ards of the U.S. Department of Energy under Contract<br />
No. DE-AC03-76SF00098.<br />
2
Summary<br />
This quick start guide summarizes the steps required to verify the performance of a<br />
newly installed automated roller shade system. The automated roller shade<br />
system at The New York Times Headquarters has been designed to control direct<br />
sun <strong>and</strong> window glare while admitting daylight <strong>and</strong> permitting view out. Procedures<br />
in this guide focus on verifying that the glare control aspect of this commerciallyavailable<br />
system works prior to building occupancy. A high dynamic range<br />
luminance measurement tool, developed for this project, is used to verify that the<br />
average window luminance is within acceptable limits. The commissioning agent<br />
(CxA) <strong>and</strong> The New York Times will use these procedures during the<br />
commissioning phase of the building to verify that the automated control system is<br />
operating as intended.<br />
For a detailed description of these procedures <strong>and</strong> how to use the shade cart tools,<br />
refer to the main commissioning manual:<br />
E.S. Lee, R.D. Clear, G.J. Ward, L.L. Fern<strong>and</strong>es. 2007.<br />
Commissioning <strong>and</strong> Verification Procedures for the<br />
Automated Roller Shade System at<br />
The New York Times Headquarters, New York, New York<br />
<strong>Lawrence</strong> Berkeley National Laboratory, Berkeley, CA<br />
http://windows.lbl.gov/comm_perf/newyorktimes.htm<br />
3
1. Consult commissioning schedule<br />
For a detailed description of the automated roller shade system installed in The New<br />
York Times Headquarters, consult the main commissioning (Cx) manual (see Summary<br />
for reference).<br />
The verification procedures described in this <strong>Quick</strong> <strong>Start</strong> <strong>Guide</strong> focus on verifying the<br />
glare control mode of the automated roller shade system.<br />
The direct sun control mode can be checked <strong>and</strong> documented using procedures<br />
documented in Steps 10-12. Other problems such as improper shade motor<br />
assignments or groupings, shade height misalignment, problems with the touch screen<br />
user interface, etc. can be recorded using the same procedures used to document<br />
failure of the direct sun control mode. These checks can be done quickly by walking the<br />
floor or can be conducted in parallel while verifying the glare control mode with the<br />
shade cart.<br />
Schedule:<br />
The glare measurements will be taken in sequence at particular locations <strong>and</strong> at given<br />
times, as defined in the commissioning schedule. Create the schedule a day in<br />
advance using the procedures described in Section 2 of the main Cx manual. Adjust<br />
the commissioning schedule if the weather changes.<br />
5
2. <strong>Start</strong> computer<br />
Turn computer on,<br />
then log in as Shade<br />
Cart<br />
Input password<br />
Use only “Shade Cart” login name. Do not log on as a different user. Using any<br />
other login will cause the image capture program to no longer work.<br />
6
3. Check the clock<br />
Check time<br />
●<br />
●<br />
●<br />
●<br />
The shade cart's laptop must have the same time as the shade<br />
supervisory control computer.<br />
The supervisory control computer’s clock should agree with actual local<br />
time to within one minute.<br />
Check the time <strong>and</strong> synchronize regularly, as often as once per day<br />
depending on how the shade supervisory control system is set up to<br />
access time.<br />
Make sure the time zone is set for New York City.<br />
7
4. Correct the clock<br />
To check time,<br />
open Date & Time<br />
control<br />
●<br />
●<br />
●<br />
Cart computer's time should not differ by more than one minute from the<br />
supervisory control computer’s clock. If the difference is more than one<br />
minute, contact NYT (for the administrator’s login <strong>and</strong> password) to reset<br />
the time prior to performing any tests.<br />
Both the shade cart’s computer <strong>and</strong> the supervisory control’s computer<br />
should be set to local time, observing daylight savings time.<br />
Shutdown Cart computer at this time prior to transporting the cart to the<br />
measurement location.<br />
8
5. Prepare the cameras<br />
Make sure round<br />
dial is set to "C"<br />
Lens should be set<br />
to manual focus<br />
HDR Camera:<br />
Use this port to<br />
connect camera to<br />
computer<br />
Prepare the camera prior to moving cart to test location. The high dynamic range<br />
(HDR) Canon camera must be configured as follows:<br />
● Confirm round dial on camera top is set to “C”. Do not press any other control<br />
on the camera. If the C mode gets inadvertently reprogrammed, consult the<br />
manual on configuring the manual (M) mode on the camera <strong>and</strong> use the M<br />
mode instead.<br />
● Confirm lens is set to Manual focus (switch on lens set to “M” or “MF”,<br />
depending on lens model).<br />
● Turn Camera on. Check battery level. If battery level is low, the automated<br />
capture may not work because the camera will frequently go to “sleep”, forcing<br />
you to abort the shade verification program <strong>and</strong> in some cases restart the shade<br />
cart computer.<br />
Clean the camera if necessary.<br />
Do not touch the glass of the lens with anything except lens tissue (sold in camera<br />
stores). It should be done very gently, to avoid leaving marks or damaging the antireflection<br />
coating. Should dirt not come off this way, the lens should be cleaned by a<br />
professional.<br />
Regular Camera:<br />
Check the battery level <strong>and</strong> time stamp on the portable regular digital camera. This<br />
camera should have the same date <strong>and</strong> time as the shade cart computer.<br />
9
6. Check cart inventory prior to transport<br />
The shade commissioning cart transports the following equipment:<br />
● Digital camera with fisheye lens <strong>and</strong> tripod mount on an extendable arm<br />
● Digital camera with regular lens for site documentation (not shown)<br />
● Laptop computer (with power cord to uninterruptible power supply shown above)<br />
● Electronic or regular measuring tape<br />
● Document holder<br />
● Backup rechargeable batteries for the computer <strong>and</strong> camera<br />
The following paper documents should accompany the shade cart when taking<br />
measurements. They can also be referenced from the laptop computer.<br />
● 11x17 inch furniture plans showing measurement locations*<br />
● 11x17 inch MechoShade System (MSS) control diagrams*<br />
● Schedule of when to take measurements (from Section 2 of manual)<br />
* These are also available electronically in folder:<br />
scart/nytimes documents/c Measurement point descriptions<br />
10
7. Transport the cart then set up the camera<br />
Bring all equipment needed for verification activities. Transport cart with<br />
computer <strong>and</strong> camera stowed safely in carrying cases.<br />
●<br />
●<br />
●<br />
●<br />
●<br />
Place camera on tripod mount being careful not to strip the threads on the<br />
camera. Use mounting plate, then take camera in <strong>and</strong> out by releasing the<br />
quick-release latch <strong>and</strong> pulling out camera+mounting plate.<br />
Slide bubble mount into top flash port of camera.<br />
Adjust height so that the center of the lens is at 4 ft (± 0.5 inches) above the<br />
finished floor.<br />
Level the camera using the bubble mount on top of camera (pitch <strong>and</strong> yaw).<br />
Using connector cable, connect camera to laptop by attaching cable to USB port<br />
on laptop <strong>and</strong> port labeled “Digital” on the side of the camera (this port is<br />
reached by lifting one of the rubber flaps). Be careful when removing cable<br />
from side of camera – once this port is damaged, the camera is useless<br />
since it can no longer be remotely controlled by the computer.<br />
11
8. <strong>Start</strong> the shade commissioning (Cx) software<br />
Restart the computer <strong>and</strong> log in as Shade Cart user (see step 2).<br />
Launch the Terminal window (see “a” below).<br />
If the Terminal window is not visible, you can open the Terminal application by clicking<br />
on the corresponding icon in the lower right of the dock. If dock isn’t visible, it will<br />
appear when you move the cursor so that it hits the bottom of the screen. Or doubleclick<br />
on the Terminal icon in the Utilities folder, which is inside the Applications folder on<br />
the hard drive called “Commissioner 0”.<br />
a) Double-click on Terminal window icon<br />
- b) Key-in (type): cd nytimes/shadecomm <br />
- c) Key-in: run <br />
d) Type in your name or ID then . Use<br />
the same ID throughout the Cx tests.<br />
12
9. Select the database<br />
Make sure that the current database is correct. The top line shows the name of the<br />
existing database (in the example above, the database is called “Training”).<br />
Change the database if you need to change or create a new database. There can<br />
be more than one database, such as one for training, another for commissioning,<br />
another for post-occupancy evaluations, etc.<br />
- To specify database, key-in Choice "4" <br />
- Then key-in database name, e.g. "Training" <br />
13
10. Check for direct sun control problems<br />
Check to see if direct sun control mode is operating properly.<br />
a) If it is sunny <strong>and</strong> you observe improper sun control:<br />
●<br />
●<br />
●<br />
●<br />
●<br />
●<br />
Look at the depth of sun penetration on the floor.<br />
Check if the depth of sun penetration is greater than 3 or 6 ft perpendicular from<br />
the face of the window glass (depending on the control zone, 3 ft is typically the<br />
maximum depth where work stations are close to the window <strong>and</strong> 6 ft is depth<br />
allowed near the stairs).<br />
If it exceeds the maximum depth, document the failed mode as follows:<br />
Lay the measuring tape on the floor <strong>and</strong> take photos of the condition (using the<br />
h<strong>and</strong>held regular camera) showing depth of penetration with tape in photo <strong>and</strong><br />
photo from greater distance for documentation of shade height.<br />
Open the verification database (see Step 22), click on the “Observations”<br />
worksheet tab, then note your observations as an entry in the database.<br />
Download the photo from the camera using the “Image Capture” program (icon is<br />
on the dock) into the folder “scart/nytimes observations”. Record the image<br />
number into the database.<br />
Click on “Observations” worksheet tab<br />
14
11. Check for direct sun/ urban shadow control problems<br />
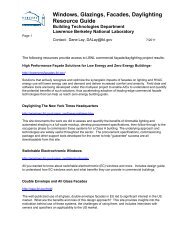
b) If it is sunny, check whether the urban shadow mode is working properly:<br />
●<br />
●<br />
●<br />
●<br />
●<br />
●<br />
Key-in Choice 1: Select date for shadow <strong>and</strong> sunpath diagrams.<br />
Key-in Choice 2: View urban shadows.<br />
The software will take some time to compute <strong>and</strong> generate images. To save time,<br />
specify 21 st day of the month (closest to actual date) <strong>and</strong> precalculated images will<br />
be loaded immediately.<br />
Click on image showing the proper time, find the control zone, <strong>and</strong> determine<br />
whether the control zone is entirely in shadow (see Section 3.3.3 of the Cx manual).<br />
If it is fully in shadow, then the shades should be raised to preset 0 <strong>and</strong> there should<br />
be no direct sun penetration.<br />
If the shades are lowered, document the failed control mode using the procedures<br />
described in step 10 above.<br />
Date <strong>and</strong> time of<br />
shadows<br />
View looking out. The corner<br />
zone is shadowed by urban<br />
obstructions on the 3 rd floor on<br />
May 21 st at 12:30 EDT.<br />
15
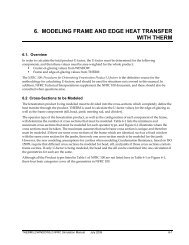
12. Check for direct sun/ attached exterior shading control<br />
problems <strong>and</strong> other control problems<br />
c) If it is sunny, check whether the direct sun control mode is accounting for the<br />
exterior ceramic tubes:<br />
●<br />
●<br />
Find the correct graph (located in scart/nytimes resources/R1-pdfs) to determine the<br />
approximate shade position. The tubes will be shading the façade when the sun has<br />
a high altitude <strong>and</strong> in the plane of the window. Compare for example, the graphs<br />
East-tubes.pdf versus East-NT3.pdf (NT=no tubes) <strong>and</strong> note when presets 1 <strong>and</strong> 2<br />
are used in the NT case. These are times when you should check the façade with<br />
tubes.<br />
If the shades are lowered but the tubes shade the façade, document this failed<br />
control mode using the photo documentation procedures described in step 10 above.<br />
If there are any other problems (shade alignment, improper motor groupings,<br />
problems with touch screen user interface), then use the photo documentation<br />
procedures described in step 10 above.<br />
Ceramic tubes shade the east<br />
façade on March 30 th from ~12:00-<br />
12:30 EST<br />
16
13. Specify the measurement point to check glare control<br />
Consult the Cx schedule <strong>and</strong> locate the measurement point location on the NYT<br />
furniture plans. The measurement point location refers to the MSS control zone number<br />
shown in their shop drawings (3/7/06). If changes are made to the furniture <strong>and</strong>/or<br />
control zones, define a new measurement location using the procedures described in<br />
Section 2.1.2 of the main Cx manual.<br />
- To enter measurement point, key-in Choice "3“ <br />
- Then enter point name, e.g. "W-07.4“ <br />
To list all existing point names, enter a bogus name then answer “n” to the question “Is<br />
this a new measurement point”.<br />
17
14. Read measurement point header<br />
After selecting the point, the software will display information about where to<br />
position the camera <strong>and</strong> what part of the window wall to measure.<br />
Measurement position information includes:<br />
● Point name (e.g. W-07.4)<br />
● NYT coordinate system (e.g., 07-N2-J3)<br />
● Floor (e.g. 7)<br />
● Wing (e.g. North)<br />
● Position <strong>and</strong> direction of measurement (e.g. 5 ft from window, facing West,<br />
centered on mullion)<br />
● Image processing information (e.g. image width +/-2, image height<br />
floor/ceil)<br />
● Priority (e.g. 3) where 0=very low <strong>and</strong> 4= very high.<br />
For details, see Section 2.1.2.5 of the Cx manual.<br />
- Read measurement point header<br />
18
15. Position camera<br />
Remove lens cap <strong>and</strong> hood<br />
Turn camera on<br />
Place your eyes in the position <strong>and</strong> direction of measurement, or place the camera<br />
instead <strong>and</strong> look through the view finder. If you can see the sun directly, the<br />
measurement cannot be taken – it will damage the camera.<br />
When you are ready to take a measurement, the position for the camera is given in the<br />
header for the measurement point (see Sections 2.1.2.5 <strong>and</strong> 3.3.4 in the Cx manual).<br />
Position the camera accurately once you have determined that<br />
● a) the sun orb is not in the camera’s field of view, or<br />
● b) the orb is in the field of view but is completely obstructed by the interior<br />
shades.<br />
Use the electronic or regular tape measure to measure the distance(± 0.25 inches) from<br />
the rim of the fisheye lens to the window glass or frame. Keep lens cap on until time of<br />
measurement.<br />
Line the camera up so that the lens is centered on the mullion, corner, or on the width of<br />
the window glass, according to the measurement information (see previous step).<br />
19
16. Take a window luminance measurement<br />
To take the HDR window luminance<br />
measurement, key-in choice "D“ <br />
THIS NEXT STEP WILL START THE CAMERA:<br />
Press to accept default of [1]<br />
measurement.<br />
Camera will immediately start taking 5-8<br />
photos.<br />
Do not enter a number other than 1. If you enter a different number, then abort<br />
the program (control-C).<br />
Do not walk in front of the camera or cause it to move (e.g. by moving the<br />
cart, or typing on the computer) when image capture is underway.<br />
Complete steps 16-22 as quickly as possible (< 5 minutes).<br />
20
17. Taking a measurement (continued)<br />
Wait while camera<br />
takes pictures<br />
Wait for pictures to be<br />
transferred to computer<br />
If the CanonHDRcap.out window indicates an error (“No camera found!”), then there<br />
is a problem with the camera connection <strong>and</strong> the two new windows will need to be<br />
closed manually <strong>and</strong> the whole process restarted. Turn the camera off, wait a few<br />
seconds, then turn it back on, again waiting a few seconds. In the Terminal window,<br />
abort the HDR software using the ctrl-C comm<strong>and</strong> or click on the red “close” button<br />
on the title bar.<br />
21
18. Taking a measurement (continued)<br />
Replace lens cap <strong>and</strong> hood<br />
Turn camera off<br />
1. Select lasso tool<br />
2. Outline the appropriate<br />
window area according to<br />
measurement position info<br />
2b. Click on Terminal<br />
icon if you need to<br />
check measurement<br />
position info<br />
3. Select<br />
WriteMask<br />
action<br />
4. Click on "Play" button<br />
When outlining the window, more than one area can be selected by also holding down<br />
the Shift key. Use the escape key to retrace the mask. To abort the outline, click on any<br />
new location on the photo. To close a lasso loop, position the cursor close to the start<br />
point <strong>and</strong> key-in .<br />
If the "Actions" pane isn't already open, it can be selected from the “View” menu.<br />
22
19. Taking a measurement (continued)<br />
Check that image is being<br />
processed, then go to main<br />
program Terminal window<br />
While image is being processed, you can start<br />
answering these questions<br />
How clear is the sky (0-1) Describes overall sky condition viewed from measurement point. Value entered<br />
should be scaled according to below:<br />
0 Completely overcast<br />
0.25 Some blue patches<br />
0.50 Partly cloudy<br />
0.75 A few clouds<br />
1 Nothing but sky<br />
Is the sun in the field of view (y/n) If sun is visible from measurement point through the lowered shades,<br />
value should be “y”, otherwise “n”. Do not take a measurement if entire orb of the sun is not obstructed by<br />
the shade, the building, urban obstructions, or by heavy clouds.<br />
Are the shades on manual override [n] Enter y if yes. Enter n, if no (default=automatic mode).<br />
What is the shade preset height (0-5)<br />
0 = fully retracted<br />
1 = half way between the fully retracted position <strong>and</strong> the top of the vision window<br />
2 = top of the vision window<br />
3 = 4 feet above finished floor<br />
4 = bottom of vision window<br />
5 = down to the floor<br />
Subjective rating of discomfort glare (0-100). If your eye were positioned in the same location as the<br />
measurement, how would you rate your level of visual discomfort<br />
0 = no glare<br />
25 = perceptible glare<br />
50 = noticeable glare<br />
75 = disturbing glare<br />
100= intolerable glare<br />
Additional comment Indicate, in one line, any noteworthy condition (e.g. reflected sunlight off opposing<br />
building, pattern of sunlight on work surfaces, etc.).This field could also be left blank. Don't finish entering<br />
this comment just yet.<br />
23
20. Taking a measurement (continued)<br />
When image<br />
processing is<br />
complete,<br />
Terminal window<br />
name changes to<br />
“Completed<br />
Comm<strong>and</strong>”. You<br />
can analyze the<br />
image now.<br />
If necessary,<br />
click on green<br />
button to enlarge<br />
window<br />
1. Study glare<br />
sources (highlighted<br />
in pink)<br />
2. If average window luminance,<br />
Lw, is close to 2000 cd/m 2 , then<br />
enter comments about glare in the<br />
Terminal window<br />
Compare the glare sources highlighted in pink to the actual view <strong>and</strong> note possible<br />
reasons for glare.<br />
<strong>Quick</strong>ly step through pass/fail logic on the following page before moving the<br />
camera.<br />
24
21. Assess the glare control mode (long version)<br />
Using the average window luminance value, Lw, from the previous step, apply the<br />
following logic to determine what to do next:<br />
a) When in the automatic mode:<br />
●<br />
●<br />
●<br />
●<br />
●<br />
●<br />
If the shade is up (fully retracted or shade preset height 0), then it is in the<br />
daylight mode. The shade control zone passes if the average window<br />
luminance is below 2200 cd/m 2 , <strong>and</strong> fails if it is above 2200 cd/m 2 .<br />
If it passes, make your final comments <strong>and</strong> save the measurement, then go<br />
to the next measurement point <strong>and</strong> repeat steps 13-21.<br />
If it fails, make your final comments <strong>and</strong> save the measurement, then go to<br />
the next measurement point <strong>and</strong> repeat steps 13-21.<br />
If the shade is down (covering any portion of the window wall or shade<br />
preset heights 1-5), then the shade is in the direct sun <strong>and</strong>/or glare control<br />
mode. The shade control zone passes if the window luminance is below<br />
2200 cd/m 2 <strong>and</strong> fails if it is above 2200 cd/m 2 .<br />
If it passes, make your final comments <strong>and</strong> save the measurement, then go<br />
to step (b) below.<br />
If it fails, make your final comments <strong>and</strong> save the measurements. The shade<br />
is failing because the fabric is not dense enough. Go to the next<br />
measurement point <strong>and</strong> repeat steps 13-21.<br />
b) If the shade passes in the automatic mode, then test the system in the<br />
manual mode:<br />
If sunny, check if the shade control zone is in the direct sun control mode by raising<br />
the shade(s) to preset 2 <strong>and</strong> measuring the horizontal depth of sun penetration. If<br />
the depth exceeds the maximum allowable distance <strong>and</strong> passes in the automatic<br />
mode, then the shade control system passes.<br />
If the depth of sun penetration does not exceed the maximum allowable distance or<br />
if not sunny, then check if the glare mode is too restrictive with the shade(s) at<br />
preset 2 (façade with or without tubes):<br />
● Make your final comments <strong>and</strong> save the measurement for the automatic<br />
mode.<br />
● Raise the shade to preset 2 using the touch screen user interface.<br />
● Repeat steps 16-21 to take a 2 nd window luminance measurement, keeping<br />
the same camera position. Do not take a measurement if the sun is in the<br />
field of view of the camera (even if the sun is slightly obscured by tubes).<br />
● The shade control zone passes if the average window luminance is above<br />
1800 cd/m 2 <strong>and</strong> fails if it is below 1800 cd/m 2 .<br />
●<br />
Note: The pass/fail status is determined automatically in the<br />
verification software.<br />
25
21. Assess the glare control mode (short version)<br />
Using the average window luminance value, Lw, from the previous step, apply the<br />
following logic to determine what to do next:<br />
a) When in the automatic mode:<br />
If the shade is up (shade preset 0), then:<br />
●<br />
●<br />
●<br />
If Lw>2200 cd/ m 2 , system fails.<br />
If Lw2200 cd/ m 2 , system fails because the fabric is not dense enough.<br />
Make your final comments <strong>and</strong> save the measurements. Go to the next<br />
measurement point <strong>and</strong> repeat steps 13-21.<br />
If Lw max, then system passes. Make your final comments <strong>and</strong> save the<br />
measurements. Go to the next measurement point <strong>and</strong> repeat steps 13-21.<br />
●<br />
●<br />
●<br />
●<br />
●<br />
●<br />
●<br />
If d < max or if not sunny, then:<br />
Make your final comments <strong>and</strong> save the measurement for the automatic mode.<br />
Raise the shade to preset 2 using the touch screen user interface.<br />
Repeat steps 16-21 to take a 2nd window luminance measurement, keeping the<br />
same camera position. Do not take a measurement if the sun is in the field of view<br />
of the camera (even if the sun is slightly obscured by tubes).<br />
If Lw > 1800 cd/m 2 , system passes.<br />
If Lw < 1800 cd/m 2 , system fails.<br />
Make your final comments <strong>and</strong> save the measurements. Go to the next<br />
measurement point <strong>and</strong> repeat steps 13-21.<br />
Note: The pass/fail status is determined automatically in the verification<br />
software.<br />
26
22. Open the verification database<br />
After entering<br />
comments, save<br />
measurement<br />
To check data either during the<br />
measurement process or when<br />
measurements are done, click here<br />
to open the verification database.<br />
Click here to enable macros.<br />
27
23. Update the verification database<br />
If this is the first time you are using<br />
this database, delete cell B1<strong>and</strong><br />
enter "0" (zero) in cell B2<br />
Click here to load data. (Note: this gets<br />
data from the ASCII text files generated<br />
during the measurement process.)<br />
If this is the first time you use this database, select it within the<br />
"meas" folder, then click on the “Open” button.<br />
28
24. Check the verification database<br />
Find your measurement in the<br />
database.<br />
Check column AJ for pass (white)<br />
or fail (orange)<br />
If measurement passes, check<br />
column AK: orange is warning flag for<br />
glare<br />
All header information related to the measurement point is located in columns A-Q.<br />
HDR data are given in columns R- AB. User input information are given in columns<br />
AC-AI. The pass/fail result which is computed automatically based on criteria given in<br />
Section 1.4 of the Cx manual is shown in column AJ. A subjective brightness estimate<br />
is computed automatically in column AK.<br />
You can add additional fields after column AK that will not be overwritten by the Excel<br />
macros. Original values in columns A-AK can be modified but this is not advised.<br />
If points are superseded because of furniture or other space changes, then follow the<br />
instructions in Section 2.1.2.3 <strong>and</strong> 3.5.1 to archive old images <strong>and</strong> tag data in the<br />
verification database as superseded.<br />
29
25. Wrap up<br />
Perform measurements for all points on floor per the measurement schedule.<br />
When all points are done for a floor, review database <strong>and</strong> check for fails. Alert the<br />
manufacturer of any problems <strong>and</strong> provide substantiating data. If time, check the<br />
manufacturer’s computer to determine source of error in collaboration with the<br />
manufacturer.<br />
Store shade cart in secure location. Put away all computer <strong>and</strong> camera equipment.<br />
Recharge all batteries.<br />
Synchronize the cart computer with the LBNL computer each day data are<br />
collected.<br />
Synchronize/ save the data to the hard disk for backup each day data are collected.<br />
If there are changes to HDR software, MSS control software, protocol, etc., note<br />
date <strong>and</strong> time changes were made in the experimental log (MS Word file located on<br />
the dock).<br />
30