Operator Card - Rice Lake Weighing Systems
Operator Card - Rice Lake Weighing Systems
Operator Card - Rice Lake Weighing Systems
Create successful ePaper yourself
Turn your PDF publications into a flip-book with our unique Google optimized e-Paper software.
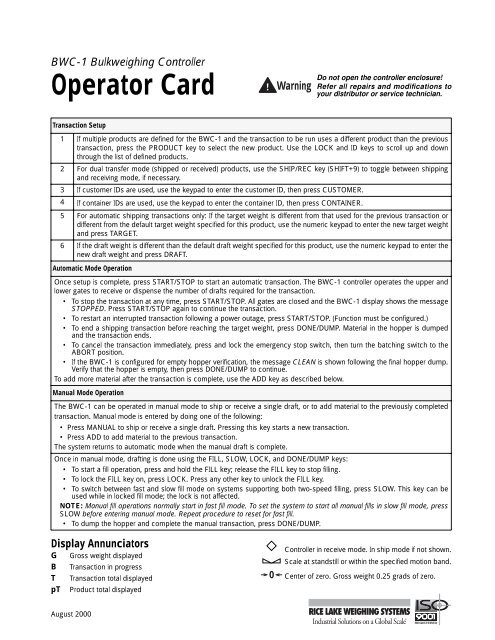
BWC-1 Bulkweighing Controller<br />
<strong>Operator</strong> <strong>Card</strong><br />
Warning<br />
Do not open the controller enclosure!<br />
Refer all repairs and modifications to<br />
your distributor or service technician.<br />
Transaction Setup<br />
1 If multiple products are defined for the BWC-1 and the transaction to be run uses a different product than the previous<br />
transaction, press the PRODUCT key to select the new product. Use the LOCK and ID keys to scroll up and down<br />
through the list of defined products.<br />
2 For dual transfer mode (shipped or received) products, use the SHIP/REC key (SHIFT+9) to toggle between shipping<br />
and receiving mode, if necessary.<br />
3 If customer IDs are used, use the keypad to enter the customer ID, then press CUSTOMER.<br />
4 If container IDs are used, use the keypad to enter the container ID, then press CONTAINER.<br />
5 For automatic shipping transactions only: If the target weight is different from that used for the previous transaction or<br />
different from the default target weight specified for this product, use the numeric keypad to enter the new target weight<br />
and press TARGET.<br />
6 If the draft weight is different than the default draft weight specified for this product, use the numeric keypad to enter the<br />
new draft weight and press DRAFT.<br />
Automatic Mode Operation<br />
Once setup is complete, press START/STOP to start an automatic transaction. The BWC-1 controller operates the upper and<br />
lower gates to receive or dispense the number of drafts required for the transaction.<br />
• To stop the transaction at any time, press START/STOP. All gates are closed and the BWC-1 display shows the message<br />
STOPPED. Press START/STOP again to continue the transaction.<br />
• To restart an interrupted transaction following a power outage, press START/STOP. (Function must be configured.)<br />
• To end a shipping transaction before reaching the target weight, press DONE/DUMP. Material in the hopper is dumped<br />
and the transaction ends.<br />
• To cancel the transaction immediately, press and lock the emergency stop switch, then turn the batching switch to the<br />
ABORT position.<br />
• If the BWC-1 is configured for empty hopper verification, the message CLEAN is shown following the final hopper dump.<br />
Verify that the hopper is empty, then press DONE/DUMP to continue.<br />
To add more material after the transaction is complete, use the ADD key as described below.<br />
Manual Mode Operation<br />
The BWC-1 can be operated in manual mode to ship or receive a single draft, or to add material to the previously completed<br />
transaction. Manual mode is entered by doing one of the following:<br />
•Press MANUAL to ship or receive a single draft. Pressing this key starts a new transaction.<br />
•Press ADD to add material to the previous transaction.<br />
The system returns to automatic mode when the manual draft is complete.<br />
Once in manual mode, drafting is done using the FILL, SLOW, LOCK, and DONE/DUMP keys:<br />
• To start a fill operation, press and hold the FILL key; release the FILL key to stop filling.<br />
• To lock the FILL key on, press LOCK. Press any other key to unlock the FILL key.<br />
• To switch between fast and slow fill mode on systems supporting both two-speed filling, press SLOW. This key can be<br />
used while in locked fill mode; the lock is not affected.<br />
NOTE: Manual fill operations normally start in fast fill mode. To set the system to start all manual fills in slow fill mode, press<br />
SLOW before entering manual mode. Repeat procedure to reset for fast fill.<br />
• To dump the hopper and complete the manual transaction, press DONE/DUMP.<br />
Display Annunciators<br />
G Gross weight displayed<br />
B Transaction in progress<br />
T Transaction total displayed<br />
pT Product total displayed<br />
0<br />
Controller in receive mode. In ship mode if not shown.<br />
Scale at standstill or within the specified motion band.<br />
Center of zero. Gross weight 0.25 grads of zero.<br />
August 2000
Front Panel Keys<br />
Key<br />
START/<br />
STOP<br />
A<br />
CUSTOMER<br />
B<br />
TARGET<br />
C<br />
PRODUCT<br />
D<br />
DRAFT<br />
E<br />
CONTAINER<br />
F<br />
DONE/<br />
DUMP<br />
G<br />
MANUAL<br />
H<br />
ADD<br />
T<br />
CLEAR<br />
N<br />
ENTER<br />
X<br />
FILL<br />
I<br />
SLOW<br />
O<br />
ALPHA/<br />
NUMERIC<br />
LOCK<br />
M<br />
ID<br />
S<br />
Description<br />
START/STOP: Press to start, restart, or stop an automatic multidraft transaction. Also used in test mode<br />
to start the automatic build-up test.<br />
CUSTOMER: Press the CUSTOMER key to display the current customer ID. To enter a customer ID for<br />
the current transaction, use the keypad to enter the customer ID, then press CUSTOMER to set the value.<br />
TARGET: Press the TARGET key to view the current target value, or use the numeric keypad to enter the<br />
target weight for a shipping mode transaction, then press TARGET to set the value.<br />
PRODUCT: Press the PRODUCT key to display the current product name or to select a new product to<br />
ship or receive.<br />
DRAFT: Press the DRAFT key to view the current draft weight, or use the numeric keypad to enter the<br />
draft weight, then press DRAFT to set the value.<br />
CONTAINER: Press the CONTAINER key to display the current container ID. To enter a container ID for<br />
the current transaction, use the keypad to enter the container ID, then press CONTAINER to set the value.<br />
DONE/DUMP: In receive mode, press DONE/DUMP to indicate that the transaction is complete. In ship<br />
mode, press DONE/DUMP to finish the transaction before the target weight is reached. In operator setup<br />
mode, press DONE/DUMP to exit to normal mode.<br />
In setup mode, press the DONE/DUMP key to send all configuration data to the EDP port.<br />
MANUAL: Places the BWC-1 in manual mode, resets the current draft number to one, increments the<br />
transaction number, and clears the transaction accumulator. Also used as an up arrow key when<br />
navigating the configuration menus in setup mode.<br />
ADD: Used to manually add material to a transaction. Pressing the ADD key places the BWC-1 in manual<br />
mode but does not change the transaction number and does not reset the current draft number or<br />
transaction accumulator value. Also used as a down arrow key when navigating the configuration menus<br />
in setup mode.<br />
CLEAR: Press CLEAR to delete the last character when entering a numeric value or to return to the gross<br />
weight display when viewing other data. Also used as a left arrow key when navigating the configuration<br />
menus or editing character strings in setup mode.<br />
ENTER: Used to save previously entered data. Also used as a right arrow key when navigating the<br />
configuration menus or editing character strings in setup mode.<br />
When the STOPPED message is shown on the display. press ENTER to display the reason for the<br />
stopped condition.<br />
FILL: In manual mode, press and hold the FILL key to hold the fast fill supply gate open.<br />
SLOW: In manual mode, press the SLOW key to toggle the gate signal between the fast and slow. When<br />
not in manual mode, press SLOW to toggle the manual mode start speed between fast and slow.<br />
ALPHA/NUMERIC: Used to toggle between alpha and numeric entry modes. To temporarily override the<br />
current mode, press and hold the ALPHA/NUMERIC key, then press the desired key. For example, to<br />
enter the character P while in numeric entry mode, hold the ALPHA/NUMERIC key and press the 4 key.<br />
LOCK: While holding the FILL key, press to lock the fast fill gate open. Press any key to close the gate.<br />
ID: Press to display or change a user-defined ID.<br />
2 BWC-1 <strong>Operator</strong> <strong>Card</strong>
Key<br />
SHIFT<br />
Description<br />
SHIFT: Used in combination with the numeric keypad to provide alternate key functions.<br />
ROC UNITS TOTALS<br />
2<br />
J<br />
K<br />
L<br />
TIME/DATE PRINT TEST<br />
4 5 6<br />
P Q<br />
R<br />
ZERO SETUP SHIP/REC<br />
7 8 9<br />
U<br />
V W<br />
SPACE<br />
0<br />
3<br />
Y<br />
Z<br />
SHIFT<br />
+ ROC<br />
J<br />
2<br />
SHIFT<br />
+ UNITS<br />
K<br />
3<br />
SHIFT<br />
+ TOTALS<br />
L<br />
SHIFT<br />
+ TIME/DATE<br />
4<br />
P<br />
5<br />
SHIFT<br />
+ PRINT<br />
Q<br />
6<br />
SHIFT<br />
+ TEST<br />
R<br />
7<br />
SHIFT<br />
+ ZERO<br />
U<br />
8<br />
SHIFT<br />
+ SETUP<br />
V<br />
Numeric keypad: The numeric keypad is used to enter numeric values, such as target weights and ID<br />
numbers. To enter a numeric value, use the keypad to enter the number, then press ENTER or the<br />
function key. Each digit appears on the display screen as entered.<br />
If you key a number and don’t press ENTER and/or a function key within several seconds, the display<br />
reverts to the previous mode and the number is ignored. If you make a mistake entering a number, press<br />
CLEAR to erase the previous digit. Repeat pressing CLEAR to erase as many digits as necessary.<br />
Each of the keys on the numeric keypad also provides a second function when pressed in combination<br />
with the SHIFT key (see descriptions below); in alpha entry mode, the numeric keys are used to enter<br />
upper- or lower-case alpha characters, depending on whether the SHIFT key is pressed.<br />
ROC (SHIFT+1): Displays the rate of change. Hold SHIFT and press the 1 key repeatedly to cycle through<br />
the calculated ROC values listed below. The character (ROC annunciator) shown at the left of the display<br />
(C, T, G, F, D, or E) indicates which ROC value is shown.<br />
•C Current ROC: Material flow rate for last x cycles<br />
•T Transaction ROC: Average flow rate from start of transaction to last time fill gate was opened<br />
•G Previous gate-to gate ROC: Average flow rate between last two times fill gate was opened<br />
•F Fill ROC: Average flow rate during current or previous fill operation<br />
•D Dump ROC: Average flow rate during current or previous dump operation<br />
•E Estimated time to completion for this transaction, in minutes and seconds (MMM.SS). Value<br />
displayed only if a target value is specified.<br />
Press CLEAR to return to the gross weight display.<br />
UNITS (SHIFT+2): Hold SHIFT and press the 2 key repeatedly to cycle the displayed units between<br />
primary, secondary, and product units.<br />
TOTALS (SHIFT+3): Hold SHIFT and press the 3 key repeatedly to cycle through displays of the<br />
transaction accumulator, current draft number, and product accumulator values.<br />
TIME/DATE (SHIFT+4): Display or change the current time and date. Hold SHIFT and press the 4 key<br />
once to display the date; press SHIFT+4 again to display the time.<br />
You can enter new values for the date and time while they are displayed by keying the new value and<br />
pressing ENTER. Use the 24-hour format to enter time values.<br />
PRINT (SHIFT+5): Hold SHIFT and press the 5 key to send data to the serial port. See Section 5.3 on<br />
page 48 for more information. In setup mode, press the DONE/DUMP key to send all configuration data to<br />
the EDP port.<br />
TEST (SHIFT+6): Hold SHIFT and press the 6 key to enter test mode.<br />
ZERO (SHIFT+7): Hold SHIFT and press the 7 key to zero the scale.<br />
SETUP (SHIFT+8): Hold SHIFT and press the 8 key to enter operator setup mode.<br />
SHIFT<br />
+ SHIP/REC<br />
9<br />
W<br />
SHIP/REC (SHIFT+9): In controllers configured for dual (ship/receive) mode, press SHIP/REC to toggle<br />
between ship and receive mode. The rhombus symbol ( ) on the display indicates receive mode;<br />
absence of the rhombus indicates ship mode.<br />
BWC-1 <strong>Operator</strong> <strong>Card</strong> 3
Key<br />
Manual<br />
lb<br />
kg<br />
Slow<br />
Low<br />
High<br />
Hopper<br />
Gate<br />
Description<br />
LED Annunciators: The LED annunciators provide status information about the BWC-1 controller.<br />
On the left side of the front panel, the Manual LED lights when the unit is in manual mode; the Slow LED<br />
flashes when the minimum material flow specified for a dump or fill operation is not being met.<br />
The lb and kg LEDs on the left side of the display indicate the display units. These LEDs function as<br />
follows:<br />
• If the displayed weight is in pounds, the lb LED is lit; if kilograms, the kg LED is lit.<br />
• If the primary unit of weight is pounds, the kg LED is lit for secondary units—or, if the primary unit is<br />
kilograms, the lb LED is lit for secondary units, unless the secondary unit of weight is the same as the<br />
primary unit.<br />
• If neither primary nor secondary units are pounds or kilograms, the lb LED is used as a primary units<br />
annunciator and the kg LED is used as the secondary units annunciator.<br />
• When displaying product-specific units, if the units are the same as either the primary or secondary<br />
units, the LED representing primary or secondary units is lit. If the product-specific units are not the<br />
same as either primary or secondary units, both LEDs are lit.<br />
On the right side of the front panel, all four LEDs represent alarm conditions:<br />
• Low flashes when material in the supply garner is below the bindicator (LOWPROD alarm)<br />
• High flashes when material in the surge garner is above the bindicator (HGHSRGE alarm)<br />
• Hopper flashes when material in the hopper is above the bindicator (HOPPER alarm)<br />
• Gate flashes when the supply gate is open during a dump operation (PRDGATE alarm) or the<br />
hopper gate is open during a fill operation (HPRGATE alarm)<br />
All of the alarm conditions indicated by a flashing LED also present an alarm message on the display. See<br />
Section 5.5 on page 49 for more information about alarm conditions and display prompts.<br />
Display Prompts and Error Messages<br />
The table below lists the prompts and error messages that can be shown on the BWC-1 display. Several alarm<br />
conditions are indicated by both the displayed message and a flashing front panel LED, as shown in the table.<br />
Message<br />
CLEAN<br />
DUMP<br />
FILL<br />
HIGHREC<br />
Meaning<br />
Prompt for operator to verify that the hopper is empty. This message is shown only if empty<br />
hopper verification (EHVERFY parameter on the CONFIG menu) is turned on. Verify hopper is<br />
empty, then press DONE to continue.<br />
Manual fill operation at maximum draft size for current product. Press DONE/DUMP to empty the<br />
hopper. To add another manual draft to the transaction, press the ADD key.<br />
Manual or add mode entered. Press FILL to open product gate and start hopper fill operation.<br />
For systems using high material surge garner bindicators, material in surge garner is above the<br />
bindicator.<br />
Flashing<br />
LED<br />
HIGHHPR For systems using high material hopper bindicators, material in hopper is above bindicator. Hopper<br />
HPRGATE Hopper gate detected open during fill operation or prior to printing gross or tare weight. Gate<br />
LOWPROD<br />
For systems using low material supply garner bindicators, material in the supply garner is below<br />
the bindicator.<br />
MOTION Upper and lower gates are closed but hopper weight is not stable. —<br />
PRDGATE Supply gate detected open during dump operation or prior to printing gross or tare weight. Gate<br />
PRINTER Printer problem. Either the printer_available signal was lost or a print request failed to receive a —<br />
print_complete signal.<br />
SLWDUMP Minimum material flow rate specified for dump not being met. Slow<br />
SLWFILL Minimum material flow rate specified for fill not being met.<br />
SLWOPER Minimum material flow rate specified for transaction not being met.<br />
STOPPED Transaction stopped. Press START/STOP to continue operation. Press ENTER to display the —<br />
reason for the stopped condition.<br />
HELD The transaction has been paused by the HOLD digital input. —<br />
—<br />
High<br />
Low<br />
4 BWC-1 <strong>Operator</strong> <strong>Card</strong>


