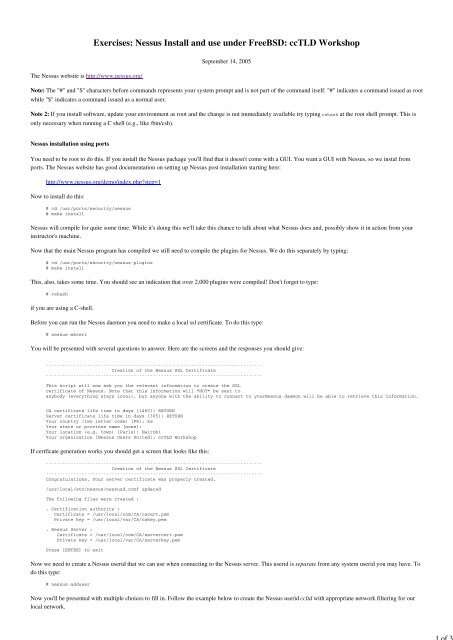
Exercises: Nessus Install and use under FreeBSD: ccTLD ... - PacNOG
Exercises: Nessus Install and use under FreeBSD: ccTLD ... - PacNOG
Exercises: Nessus Install and use under FreeBSD: ccTLD ... - PacNOG

You also want an ePaper? Increase the reach of your titles
YUMPU automatically turns print PDFs into web optimized ePapers that Google loves.
<strong>Exercises</strong>: <strong>Nessus</strong> <strong>Install</strong> <strong>and</strong> <strong>use</strong> <strong>under</strong> <strong>FreeBSD</strong>: <strong>ccTLD</strong> Workshop<br />
September 14, 2005<br />
The <strong>Nessus</strong> website is http://www.nessus.org/<br />
Note: The "#" <strong>and</strong> "$" characters before comm<strong>and</strong>s represents your system prompt <strong>and</strong> is not part of the comm<strong>and</strong> itself. "#" indicates a comm<strong>and</strong> issued as root<br />
while "$" indicates a comm<strong>and</strong> issued as a normal <strong>use</strong>r.<br />
Note 2: If you install software, update your environment as root <strong>and</strong> the change is not immediately available try typing rehash at the root shell prompt. This is<br />
only necessary when running a C shell (e.g., like /bin/csh).<br />
<strong>Nessus</strong> installation using ports<br />
You need to be root to do this. If you install the <strong>Nessus</strong> package you'll find that it doesn't come with a GUI. You want a GUI with <strong>Nessus</strong>, so we instal from<br />
ports. The <strong>Nessus</strong> website has good documentation on setting up <strong>Nessus</strong> post installation starting here:<br />
http://www.nessus.org/demo/index.phpstep=1<br />
Now to install do this:<br />
# cd /usr/ports/security/nessus<br />
# make install<br />
<strong>Nessus</strong> will compile for quite some time. While it's doing this we'll take this chance to talk about what <strong>Nessus</strong> does <strong>and</strong>, possibly show it in action from your<br />
instructor's machine.<br />
Now that the main <strong>Nessus</strong> program has compiled we still need to compile the plugins for <strong>Nessus</strong>. We do this separately by typing:<br />
# cd /usr/ports/security/nessus-plugins<br />
# make install<br />
This, also, takes some time. You should see an indication that over 2,000 plugins were compiled! Don't forget to type:<br />
# rehash<br />
if you are using a C-shell.<br />
Before you can run the <strong>Nessus</strong> daemon you need to make a local ssl certificate. To do this type:<br />
# nessus-mkcert<br />
You will be presented with several questions to answer. Here are the screens <strong>and</strong> the responses you should give:<br />
-------------------------------------------------------------------------------<br />
Creation of the <strong>Nessus</strong> SSL Certificate<br />
-------------------------------------------------------------------------------<br />
This script will now ask you the relevant information to create the SSL<br />
certificate of <strong>Nessus</strong>. Note that this information will *NOT* be sent to<br />
anybody (everything stays local), but anyone with the ability to connect to your<strong>Nessus</strong> daemon will be able to retrieve this information.<br />
CA certificate life time in days [1460]: RETURN<br />
Server certificate life time in days [365]: RETURN<br />
Your country (two letter code) [FR]: ke<br />
Your state or province name [none]:<br />
Your location (e.g. town) [Paris]: Nairobi<br />
Your organization [<strong>Nessus</strong> Users United]: <strong>ccTLD</strong> Workshop<br />
If certficate generation works you should get a screen that looks like this:<br />
-------------------------------------------------------------------------------<br />
Creation of the <strong>Nessus</strong> SSL Certificate<br />
-------------------------------------------------------------------------------<br />
Congratulations. Your server certificate was properly created.<br />
/usr/local/etc/nessus/nessusd.conf updated<br />
The following files were created :<br />
. Certification authority :<br />
Certificate = /usr/local/com/CA/cacert.pem<br />
Private key = /usr/local/var/CA/cakey.pem<br />
. <strong>Nessus</strong> Server :<br />
Certificate = /usr/local/com/CA/servercert.pem<br />
Private key = /usr/local/var/CA/serverkey.pem<br />
Press [ENTER] to exit<br />
Now we need to create a <strong>Nessus</strong> <strong>use</strong>rid that we can <strong>use</strong> when connecting to the <strong>Nessus</strong> server. This <strong>use</strong>rid is separate from any system <strong>use</strong>rid you may have. To<br />
do this type:<br />
# nessus-add<strong>use</strong>r<br />
Now you'll be presented with multiple choices to fill in. Follow the example below to create the <strong>Nessus</strong> <strong>use</strong>rid ccltd with appropriate network filtering for our<br />
local network.
Login : cctld<br />
Authentication (pass/cert) [pass] : RETURN<br />
Login password :<br />
Login password (again) :<br />
User rules<br />
----------<br />
nessusd has a rules system which allows you to restrict the hosts<br />
that sanog has the right to test. For instance, you may want<br />
them to be able to scan their own host only. Note the "nnn.nnn.nnn.0"<br />
prefix should be substituted with our class IP prefix. The "xx" should<br />
be our class allocation, which in this case is a /27. So, our class network is<br />
196.216.0.0/27, <strong>and</strong> we want to only allow the <strong>use</strong>r ccltd to scan in<br />
our network. This looksl ike this:<br />
Please see the nessus-add<strong>use</strong>r(8) man page for the rules syntax<br />
Enter the rules for this <strong>use</strong>r, <strong>and</strong> hit ctrl-D once you are done :<br />
(the <strong>use</strong>r can have an empty rules set)<br />
accept 196.216.0.0/27<br />
default deny<br />
Login : cctld<br />
Password : ***********<br />
DN :<br />
Rules :<br />
accept 196.216.0.0/27<br />
default deny<br />
Is that ok (y/n) [y]<br />
<strong>use</strong>r added<br />
You could enable <strong>Nessus</strong> to boot every time you start your machine by adding the following line to your /etc/rc.conf file:<br />
nessusd_enable="YES"<br />
but, I would recommend against this unless you plan on using this machine heavily as a <strong>Nessus</strong> scanner.<br />
Now you can start the <strong>Nessus</strong> daemon:<br />
# nessusd -D<br />
Now as a <strong>use</strong>r other than root connect to the <strong>Nessus</strong> server on your local machine using the <strong>Nessus</strong> program:<br />
$ nessus &<br />
In the opening screen enter in the <strong>Nessus</strong> Login name you created (not your account name) <strong>and</strong> password, then press the "Log in" button.<br />
At this point you could read in detail about configuring <strong>Nessus</strong> to be <strong>use</strong>d exactly as you want here:<br />
http://www.nessus.org/demo/index.phpstep=2<br />
Or, you can follow these quick steps to run an initial scan using <strong>Nessus</strong>:<br />
Press "OK" on the initial SSL dialogue that appears.<br />
Press "YES" to accept the local SSL certificate you have generated.<br />
By default you'll be dumped to the "Plugins" tab screen. And, by default all plugins are enabled. Either make no changes <strong>and</strong> continue to start scanning, or<br />
pick some subset of plugins that you think might be interesting. Do this by pressing "Disable all" <strong>and</strong> then choosing the plugins you want. A scan with all<br />
plugins may take so long that we won't have time to complete it during class.<br />
Click on the "Target" tab.<br />
In the "Target(s):" box enter in the IP address of the machine to your right. If no one is to your right, then enter in the IP address of the machine to your<br />
left.<br />
Press the "Start the scan" button. A new window opens.<br />
Scanning may take quite some time since we have enabled all plugins.<br />
If you had chosen to scan an entire network this can take quite some time <strong>and</strong> can generate a lot of traffic.<br />
Be very careful about using this tool as it can set off all sorts of security alarms. You should always let the recipient of a <strong>Nessus</strong> scan know ahead of time<br />
that you are going to be scanning their machine for potential security holes.<br />
Once scanning completes click on the "Subnet" icon, then the "Host" icon, <strong>and</strong> then on the individual "Port" icons to get more information.<br />
If you click on "Save report..." <strong>and</strong> then choose a "Report file format" of "HTML with Pies <strong>and</strong> Graphs", then you can save your report to a folder <strong>and</strong><br />
view it in a web browser immediately. Maybe <strong>use</strong> the IP address of the scanned machine as the report name.<br />
Open the folder that is created <strong>and</strong> then open the "index.html" file that should exist.<br />
Click around in the report, particularly the IP address at the bottom of the first page, to see a large amount of information.<br />
If you scan on a subnet, then <strong>Nessus</strong> will give you meaninful aggregate results on the initial report page.<br />
As you may note as you read through your report, <strong>Nessus</strong> has up-to-date security vulnerabilities listed via their web site.<br />
You can configure <strong>Nessus</strong> using cron <strong>and</strong> by going to:<br />
http://www.nessus.org/register/<br />
to get a "full plugin feed" <strong>and</strong> to stay up-to-date at all times if you wish. You will receive an activation code via email for plugins if you register your <strong>Nessus</strong><br />
installation at the site above.
Hervey Allen<br />
Last modified: Thu Sep 15 01:14:14 EAT 2005