Part # 12014099 49-51 Mercury Rear AirOverLeaf Kit - Air Ride ...
Part # 12014099 49-51 Mercury Rear AirOverLeaf Kit - Air Ride ...
Part # 12014099 49-51 Mercury Rear AirOverLeaf Kit - Air Ride ...

You also want an ePaper? Increase the reach of your titles
YUMPU automatically turns print PDFs into web optimized ePapers that Google loves.
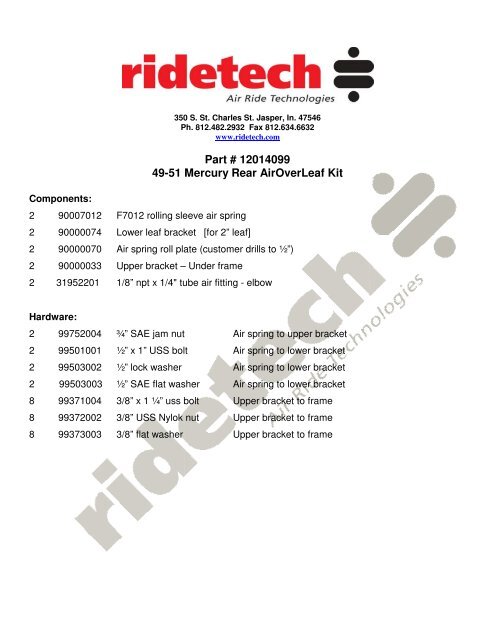
Components:<br />
2 90007012 F7012 rolling sleeve air spring<br />
350 S. St. Charles St. Jasper, In. 47546<br />
Ph. 812.482.2932 Fax 812.634.6632<br />
www.ridetech.com<br />
<strong>Part</strong> # <strong>12014099</strong><br />
<strong>49</strong>-<strong>51</strong> <strong>Mercury</strong> <strong>Rear</strong> <strong><strong>Air</strong>OverLeaf</strong> <strong>Kit</strong><br />
2 90000074 Lower leaf bracket [for 2” leaf]<br />
2 90000070 <strong>Air</strong> spring roll plate (customer drills to ½”)<br />
2 90000033 Upper bracket – Under frame<br />
2 31952201 1/8” npt x 1/4" tube air fitting - elbow<br />
Hardware:<br />
2 99752004 ¾” SAE jam nut <strong>Air</strong> spring to upper bracket<br />
2 99501001 ½” x 1” USS bolt <strong>Air</strong> spring to lower bracket<br />
2 99503002 ½” lock washer <strong>Air</strong> spring to lower bracket<br />
2 99503003 ½” SAE flat washer <strong>Air</strong> spring to lower bracket<br />
8 99371004 3/8” x 1 ¼” uss bolt Upper bracket to frame<br />
8 99372002 3/8” USS Nylok nut Upper bracket to frame<br />
8 99373003 3/8” flat washer Upper bracket to frame
350 S. St. Charles St. Jasper, In. 47546<br />
Ph. 812.482.2932 Fax 812.634.6632<br />
www.ridetech.com<br />
REAR INSTALLATION<br />
SUPPLEMENT FOR MOUNTING AIRSPRING ON TOP OF LEAFSPRING<br />
NOTE: WHEN INSTALLING THE FITTING INTO THE AIRSPRING BE SURE TO USE SOME<br />
TYPE OF THREAD SEALANT, THE COMPOUND YOU SEE ON THE THREADS IS NOT A<br />
SEALANT.<br />
1. This installation is performed with the vehicle at ride height. When you raise the vehicle to a<br />
comfortable working height, support it by the axle housing.<br />
2. Attach the lower airspring bracket to the top of the leafspring, preferably behind the rearend, using<br />
the attachment hardware provided. On some models, the lip of the airspring bracket will locate in the<br />
axle plate. NOTE: On some vehicles, a softer ride is obtained by removing leafs from the spring<br />
pack. Be sure to leave at least 2 leafs in the spring pack for stability.<br />
3. Attach the airspring to the lower bracket. Be sure to use the A079 pattern plate between the<br />
bottom of the airspring and the lower bracket; this will give the airspring a platform to roll down onto.<br />
4. The upper bracket can now be attached to the airspring and its placement on the framerail can be<br />
determined. If the leafspring is under the frame, the upper bracket will be a “J” shaped piece that the<br />
airspring screws into. If the leafspring is beside the frame, the upper bracket will be an angle bracket<br />
that will bolt on to the frame. Using the proper inflated dimensions, check for airspring clearance to<br />
nearby obstacles. [Refer to the airspring dimension chart.] Note that the proper inflated dimensions<br />
will not be the same as the uninflated dimensions.<br />
5. Mark the bolt holes for drilling or clamp in place to weld.[Remove airspring before welding to avoid<br />
weld splatter damage!]<br />
6. Reassemble, inflate, and re-inspect for proper clearance.<br />
REMEMBER: THE AIRSPRING BELLOWS MUST NOT TOUCH ANYTHING AT ANYTIME!! IT IS<br />
THE FINAL RESPONSIBILITY OF THE INSTALLER TO DETERMINE ADEQUATE CLEARANCE.<br />
CAUTION!!! EXCEEDING THE DIMENSIONS IN THE CHART BELOW MAY RESULT IN SUDDEN<br />
AIRSPRING FAILURE! PROPER CLEARANCES MUST BE MAINTAINED AT ALL RIDE HEIGHTS<br />
AND STEERING ANGLES. BUMPSTOPS MUST BE USED TO LIMIT SUSPENSION TRAVEL<br />
BEFORE THESE DIMENSIONS ARE EXCEEDED.<br />
PLEASE CALL AIR RIDE TECHNOLOGIES IF YOU HAVE ANY QUESTIONS.
Installation using 7000series or 9000 series airspring<br />
DIMENSION CHART<br />
B<br />
air inlet<br />
A<br />
Top<br />
Bottom<br />
Double<br />
Convoluted<br />
Compressed<br />
<strong>Ride</strong> Height<br />
Extended<br />
Tapered<br />
Sleeve<br />
Top<br />
Rolling<br />
Sleeve<br />
Top<br />
AIRSPRING DIMENSION CHART<br />
PART# TYPE Capacity Compres <strong>Ride</strong> Height Max. Max Bolt Pattern<br />
@100psi s Height<br />
Height Diameter<br />
255C Double 2040# 3” [built in 5”-6” 7” 6.5” A=1.75 B=.875<br />
[F6957] Convoluted<br />
bumpstop]<br />
224C Double 3150# 3” 5”-6” 8” 8.0” A=2.75 B=1.312<br />
[F0335 Convoluted<br />
26C Double 3400# 3” 5”-6” 10” 8.5” A=2.75 B=1.312<br />
[F7325] Convoluted<br />
20 Double 4790# 3” 7”-8” 11” 9.9” A=3.50 B=1.75<br />
[F6908] Convoluted<br />
F9000 Tapered Sleeve 1500# 4.5 8” - 9” 13” 5” A=2.75 B=1.312<br />
F9002 Tapered Sleeve 1500# 4.5 7” - 8” 12” 5” A=2.75 B=1.312<br />
F9003 Tapered Sleeve 1500# 4.5 6.5”-7” 11” 5” A=2.75 B=1.312<br />
F9010 Tapered Sleeve 2000# 6.5” 10.5”-11.5” 16” 6.5” .750 SAE/.250npt<br />
7012 Rolling Sleeve 1020# 4” 7” - 8” 13” 5” .750SAE/.125npt<br />
7076 Rolling Sleeve 800# 3.5” 5”-6” 9” 4” .750SAE/.125npt