RAMP Ricin Test Package Insert - Accutest
RAMP Ricin Test Package Insert - Accutest
RAMP Ricin Test Package Insert - Accutest

You also want an ePaper? Increase the reach of your titles
YUMPU automatically turns print PDFs into web optimized ePapers that Google loves.
esponse<br />
Biomedical Corp.<br />
<strong>RAMP</strong> ® <strong>Ricin</strong> <strong>Test</strong> <strong>Package</strong> <strong>Insert</strong><br />
Note: Failure to follow documented procedures may result in invalid and/or erroneous<br />
results. Read the entire <strong>Package</strong> <strong>Insert</strong> prior to use.<br />
INTENDED USE<br />
The <strong>RAMP</strong> <strong>Ricin</strong> <strong>Test</strong> is intended for the screening of environmental samples for the presence of ricin<br />
toxin, the causative agent of ricin poisoning. A positive test result indicates the presence of ricin toxin<br />
at or above the detectable concentration.<br />
This test is intended for trained users only. It is not for use by the general public or individuals<br />
untrained in the handling of hazardous materials. This test is not to be used for human medical<br />
diagnostic purposes.<br />
PRINCIPLES OF THE TEST<br />
The <strong>RAMP</strong> <strong>Ricin</strong> <strong>Test</strong> is an immunochromatographic test for the detection of ricin toxin. To begin the<br />
test of suspect materials or areas, powders are sampled using a dry Microbrush ® while liquids are<br />
sampled with a Swab and surfaces are sampled with a pre-wetted Swab.<br />
The sample is then recovered into a <strong>Ricin</strong> Sample Buffer Vial. A measured amount of the sample in<br />
buffer is transferred to the sample well of the <strong>Ricin</strong> <strong>Test</strong> Cartridge using the supplied pipette and <strong>Ricin</strong><br />
Assay Tip. The <strong>Test</strong> Cartridge is then placed into the <strong>RAMP</strong> Reader.<br />
In the <strong>Test</strong> Cartridge, the buffered sample migrates along a test strip. Fluorescent particles, coated<br />
with anti-ricin antibodies, bind to ricin if present in the sample. As the sample migrates, ricin-bound<br />
particles are immobilized at the detection zone, and additional control particles are immobilized at the<br />
internal control zone.<br />
The <strong>RAMP</strong> Reader then measures the amount of fluorescence emitted by the particles bound at each<br />
zone. Using a ratio between the two fluorescence values, a “POSITIVE” or “NEGATIVE” test result is<br />
determined and displayed on the Reader. For further information on the use of the <strong>RAMP</strong> Reader<br />
refer to the Operator’s Manual.<br />
Materials Provided<br />
Amount<br />
<strong>RAMP</strong> <strong>Ricin</strong> <strong>Test</strong> Cartridges 25<br />
<strong>Ricin</strong> Assay Tips (packaged with <strong>Test</strong> Cartridges) 25<br />
<strong>Ricin</strong> Sample Buffer Vials 25<br />
TriContinent MiniPet – 70 µL 1<br />
Disposable Liquid Sampling Swabs 10<br />
Disposable Powder Sampling Microbrushes® 25<br />
Lot Card 1<br />
<strong>Package</strong> <strong>Insert</strong> 1<br />
Marking Pen 1<br />
MiniPet is a trademark of TriContinent Inc.<br />
Microbrush ® is a registered trademark of Microbrush International<br />
Equipment required, but<br />
not provided<br />
<strong>RAMP</strong> Reader<br />
Equipment recommended, but<br />
not required<br />
• Small 40 character serial printer and<br />
accessories<br />
• Personal computer with RS-232 connector<br />
50080-Rev7 2004-06<br />
<strong>RAMP</strong>® <strong>Ricin</strong> <strong>Test</strong> <strong>Package</strong> <strong>Insert</strong>
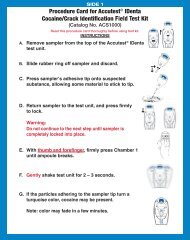
SAMPLE COLLECTION AND PREPARATION<br />
Sample Collection – Visible Powders<br />
1. Obtain a <strong>Ricin</strong> Sample Buffer Vial from the Kit. With the lid on, hold the lid of the Vial and<br />
quickly flick your wrist in a downward motion to ensure that no liquid is retained in the Vial lid.<br />
2. Remove a Powder Sampling Microbrush from its container, holding it by the handle so as not<br />
to touch the head.<br />
3. Lightly touch the dry head of the Microbrush to the surface of the powder, taking care not to<br />
pick up too much powder.<br />
4. Open the Vial, dip the head of the Microbrush into the buffer and stir for 10 seconds. Avoid<br />
foaming the buffer.<br />
5. Pull the Microbrush from the buffer and rotate against the inside of the Vial to remove excess<br />
liquid.<br />
6. Discard Microbrush. Proceed to “Reader Set-up” then “Analysis Procedure”.<br />
Sample Collection – Area Swipe<br />
1. Obtain a <strong>Ricin</strong> Sample Buffer Vial from the Kit. With the lid on, hold the lid of the Vial and quickly<br />
flick your wrist in a downward motion to ensure that no liquid is retained in the Vial lid.<br />
2. Remove a Liquid Sampling Swab from its container, holding it by the handle so as not to touch the<br />
absorbent end.<br />
3. Open the Vial, dip the absorbent end of the Swab into the buffer and soak for 3 seconds.<br />
4. Pull the Swab from the buffer and rotate against the inside of the Vial above the liquid to remove<br />
excess liquid.<br />
5. Swipe the suspect area using the moistened end of the Swab.<br />
6. Place the absorbent end of the Swab back into the buffer and stir the Swab in the buffer for 10<br />
seconds. Avoid foaming the buffer.<br />
7. Pull the Swab from the buffer and rotate against the inside of the Vial to remove excess liquid.<br />
8. Discard Swab. Proceed to “Reader Set-up” then “Analysis Procedure”.<br />
Sample Collection – Liquids or Suspensions<br />
1. Obtain a <strong>Ricin</strong> Sample Buffer Vial from the Kit. With the lid on, hold the lid of the Vial and<br />
quickly flick your wrist in a downward motion to ensure that no liquid is retained in the Vial lid.<br />
2. Remove a Liquid Sampling Swab from its container, holding it by the handle so as not to<br />
touch the absorbent end.<br />
3. Dip the absorbent end of the dry Swab into the suspect liquid and soak for 3 seconds.<br />
4. Open the Vial, dip the absorbent end of the Swab into the buffer and stir the Swab in the<br />
buffer for 10 seconds. Avoid foaming the buffer.<br />
5. Pull the Swab from the buffer and rotate against the inside of the Vial to remove excess<br />
liquid.<br />
6. Discard Swab. Proceed to “Reader Set-up” then “Analysis Procedure”.<br />
Reader Set-up<br />
1. Turn on the Reader.<br />
2. If not previously done, remove the Lot Card from its pouch and insert the Lot Card for the <strong>Test</strong><br />
Cartridge lot being used into the Lot Card slot below the keypad on the Reader. Once the Lot Card<br />
information has been uploaded, return the Lot Card to its pouch.<br />
Warning: Avoid touching the contacts at the end of the Lot Card<br />
3. Press [Enter] to select RUN TEST on the <strong>RAMP</strong> Reader.<br />
4. Enter Sample ID (user defined up to 20 alphanumeric characters), and if the User ID feature has<br />
been enabled, select or enter User ID.<br />
For detailed information regarding <strong>RAMP</strong> Reader or Lot Card operation, refer to the <strong>RAMP</strong><br />
Environmental Reader Operator’s Manual<br />
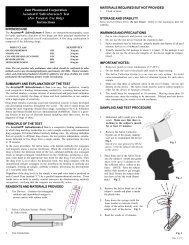
Analysis Procedure<br />
1. Open a kit pouch containing a <strong>Test</strong> Cartridge and Assay Tip. Place the <strong>Test</strong> Cartridge on a clean,<br />
dry, level surface.<br />
2. Firmly place the single-use Assay Tip on the 70 µL MiniPet. Check to confirm that there is a pink<br />
dot on the inside surface of the Assay Tip.<br />
3. If required, write the Sample ID on the <strong>Test</strong> Cartridge with the marking pen provided.<br />
50080-Rev7 2004-06<br />
<strong>RAMP</strong>® <strong>Ricin</strong> <strong>Test</strong> <strong>Package</strong> <strong>Insert</strong>
4. Fully depress the MiniPet plunger and insert the Assay Tip into the Sample Buffer Vial containing<br />
the suspected agent sample, close to the bottom of the Vial (not touching).<br />
5. Holding the Vial at eye level, gently release the plunger to fill the Assay Tip. Avoid pressing<br />
against the bottom of the Vial, which may block the Tip.<br />
6. Mix the sample by slowly pressing and releasing the plunger 10 times (2 seconds per cycle),<br />
taking care each time to eject all of the sample into the Vial and to draw only liquid and no air into<br />
the Assay Tip. This will prevent foaming.<br />
7. Check that the sample is fully mixed by confirming that the pink dot is no longer visible on the<br />
inside of the Assay Tip.<br />
8. Fully depress and gently release the plunger to fill the Assay Tip with sample (no foam).<br />
9. Position the filled Assay Tip directly over the sample well on the <strong>Test</strong> Cartridge and fully depress<br />
the plunger to dispense the entire sample into the sample well. (Disregard any remaining droplet<br />
within the Assay Tip). Remove and dispose of Assay Tip.<br />
10. Immediately (within 30 seconds) insert the <strong>Test</strong> Cartridge into the Reader and then press until firm<br />
resistance is felt.<br />
NOTE: Do not try to hold onto or force the <strong>Test</strong> Cartridge into the Reader once resistance is felt.<br />
11. The Reader accepts the <strong>Test</strong> Cartridge and begins timing the test development process. Within<br />
approximately 15 minutes, when the test is complete, the Reader will scan the <strong>Test</strong> Cartridge,<br />
perform data analysis and report the result from the <strong>RAMP</strong> <strong>Ricin</strong> test on the LCD display.<br />
12. Remove the used <strong>Test</strong> Cartridge from the Reader when prompted to do so by the Reader LCD<br />
display. Dispose of the <strong>Test</strong> Cartridge and Vial.<br />
CALIBRATION PROCEDURES – LOT CARD<br />
Each <strong>RAMP</strong> <strong>Ricin</strong> <strong>Test</strong> kit includes a Lot Card that is individually packaged in an anti-static pouch.<br />
The Lot Card provides information specific to the Kit <strong>Test</strong> Cartridge lot, including lot number, expiration<br />
date and Negative/Positive threshold value. For further details, refer to the Operator’s Manual on<br />
loading lot-specific information. <strong>Insert</strong>ion of the Lot Card into the Reader is the only calibration<br />
necessary.<br />
QUALITY CONTROL<br />
System Quality Control (QC)<br />
• The <strong>RAMP</strong> Reader has error checking and self-diagnostic functions that assure procedural control.<br />
These include algorithms and measurements used to confirm acceptable operator technique,<br />
sample handling, and assay performance.<br />
• If a problem is detected, a user message is displayed.<br />
• Sample results are displayed only after all QC performance requirements have been met.<br />
<strong>Test</strong> Cartridge QC<br />
• Each <strong>Test</strong> Cartridge has a control zone that is scanned as part of the test protocol.<br />
• Control limits for each lot of <strong>Test</strong> Cartridge are established during the manufacturing process and<br />
are included in the specific Lot Card. If a control result does not meet specifications, the sample<br />
result is not reported and an error message is displayed.<br />
Run Messages<br />
There are four particular Run Messages that may be resolved by a retest, beginning with the SAMPLE<br />
COLLECTION AND PREPARATION section, using a new sample, Swab or Microbrush, Sample Buffer<br />
Vial, <strong>Test</strong> Cartridge and Assay Tip. These are:<br />
• (SAMPLING ERROR # 1) – This message indicates that the sample flow occurred before the <strong>Test</strong><br />
Cartridge was inserted into the Reader. This may be because: 1) there was an unacceptable delay<br />
between sample addition to the Cartridge and insertion of the Cartridge into the Reader, 2) an<br />
already-used Cartridge was inserted, or 3) a Cartridge was re-inserted that had already been<br />
rejected by the Reader.<br />
• (SAMPLING ERROR # 2) – This message indicates that the sample flow was not detected. This<br />
may be because: 1) the sample pad is clogged with excess powder, 2) the sample was<br />
insufficiently mixed with the Assay Tip, 3) there was less than 70 µL of diluted sample in buffer<br />
transferred to the Cartridge, or 4) the supplied Assay Tip was not used. If repeating the test does<br />
not solve the problem, attempt to pick up less powder or dilute the raw sample.<br />
• (LOW SIGNAL) – This message may be due to insufficient sample being transferred to the <strong>Test</strong><br />
Cartridge or insufficient mixing of the sample.<br />
50080-Rev7 2004-06<br />
<strong>RAMP</strong>® <strong>Ricin</strong> <strong>Test</strong> <strong>Package</strong> <strong>Insert</strong>
• (HIGH BACKGROUND SEE PACKAGE INSERT) - This message may be due to interfering<br />
substances in the sample. Dilute the raw sample or retest, attempting to pick up less powder.<br />
Sensitivity<br />
1. When a Microbrush or Swab contains 10 ng or more ricin toxin (equivalent to 5 ng delivered to the<br />
<strong>Test</strong> Cartridge) the <strong>RAMP</strong> <strong>Ricin</strong> <strong>Test</strong> will give a positive result. Due to the variable nature of toxin<br />
preparations, actual test sensitivity can vary for any given sample containing ricin toxin.<br />
2. If repeated tests give unexpected or inconsistent results, contact Technical Support.<br />
WARNINGS AND PRECAUTIONS<br />
• For environmental testing use only, not for in vitro diagnostic use.<br />
• Use appropriate precautions in the collection, handling, storage and disposal of raw or diluted<br />
samples and used kit contents.<br />
• Discard and do not use any visibly damaged cartridges, or the contents of any Cartridge / Assay<br />
Tip pouch with a damaged seal.<br />
• Do not use kit contents after the expiration dates.<br />
• Do not mix components from different kits.<br />
• The <strong>Test</strong> Cartridge should be discarded after a single-use. DO NOT REUSE.<br />
• Sample must be applied to sample well only.<br />
• If sample has spilled on the outside surface of the <strong>Test</strong> Cartridge, do not insert into the <strong>RAMP</strong><br />
Reader. This may cause permanent contamination or damage to the <strong>RAMP</strong> Reader.<br />
• If not used within 60 minutes of opening the pouch, dispose of unused <strong>Test</strong> Cartridges.<br />
STORAGE INSTRUCTIONS<br />
<strong>Ricin</strong> <strong>Test</strong> Cartridges and Sample Buffer Vials should be stored at 2 - 24°C (36 - 75°F).<br />
LIMITATIONS OF PROCEDURE<br />
• The results obtained from the use of this product should be used only as an adjunct to other<br />
confirmational procedures.<br />
• Adulterant such as bleach in the specimen may produce an erroneous result. If adulteration is<br />
suspected, the test should be repeated with a new or diluted sample.<br />
• A positive test result does not provide any indication of the concentration of ricin toxin.<br />
RICIN TOXIN DETECTION PROTOCOL<br />
If a test result is “POSITIVE”, follow State and Federal Law concerning the handling of TOXIC<br />
SUBSTANCES. Usually these protocols include:<br />
• Handle all material with appropriate personal protective equipment.<br />
• Avoid generating any kind of aerosol.<br />
• Secure the area to prevent further exposure.<br />
• Bag and secure a sample, including the Swab, making sure not to contaminate the outer bag.<br />
If the incident poses an immediate threat, contact the appropriate authorities, which may include:<br />
• Local Hazardous Material Unit or State Public Health Office<br />
• Local FBI Office - WMD Coordinator<br />
• Domestic Preparedness Office 1-800-424-8802<br />
• Center for Disease Control Bioterrorism Unit 1-770-488-7100<br />
Response Biomedical Corp. Tel.: 888.591.5577 (toll-free)<br />
8081 Lougheed Highway 604.681.4101<br />
Burnaby, BC Canada V5J 5J1 Fax: 604.412.9830<br />
techsupport@responsebio.com<br />
www.responsebio.com<br />
50080-Rev7 2004-06<br />
<strong>RAMP</strong>® <strong>Ricin</strong> <strong>Test</strong> <strong>Package</strong> <strong>Insert</strong>