Accustrip URS Reader Manual - Accutest
Accustrip URS Reader Manual - Accutest
Accustrip URS Reader Manual - Accutest

Create successful ePaper yourself
Turn your PDF publications into a flip-book with our unique Google optimized e-Paper software.
User <strong>Manual</strong><br />
CAT. NO: UA850
User <strong>Manual</strong><br />
The instrument is CLIA waived for <strong>Accustrip</strong> urine reagent strips.<br />
A certificate of CLIA waiver is required to perform the testing in a waived<br />
setting. If the laboratory does not have a Certificate of Waiver, the<br />
Application for Certification (Form CMS-116), can be obtained at<br />
http://www.cms.hhs.goc/clia/. The form should be mailed to the address of<br />
the local State Agency of the State in which the laboratory resides<br />
(http://www.cms.hhs.gov/clia/ssa-map.asp).<br />
Laboratories with a certificate of waiver must follow the manufacturer's<br />
instructions for performing the test. If the laboratory modifies the<br />
instructions, the test no longer meets the requirements for waived<br />
categorization. A modified test is considered to be high complexity and<br />
subject to all CLIA requirements.<br />
<strong>Manual</strong> V2.00 USA / 06-08 1
User <strong>Manual</strong><br />
User <strong>Manual</strong><br />
Content<br />
1. Quickstart ................................................................................................ 5<br />
2. Introduction............................................................................................. 7<br />
2.1 System Description ............................................................................. 7<br />
2.1.1 Measuring Principle...................................................................... 7<br />
2.1.2 Functional Principle ...................................................................... 8<br />
3. Unpacking and Set Up ........................................................................... 9<br />
3.1 List of delivered parts.......................................................................... 9<br />
3.2 Description of instrument parts ......................................................... 10<br />
3.3 Setting up the instrument .................................................................. 10<br />
3.4 How to plug the instrument in ........................................................... 11<br />
3.5 How to load the printer paper............................................................ 11<br />
3.6 How to install batteries (optional)...................................................... 12<br />
3.6.1 Instrument self test ..................................................................... 13<br />
3.6.2 Calibration .................................................................................. 13<br />
3.7 Use of the instrument........................................................................ 13<br />
3.7.1 Buttons ....................................................................................... 13<br />
3.7.2 Scroll Arrows .............................................................................. 14<br />
3.7.3 Round buttons ........................................................................... 14<br />
4. User Menu ............................................................................................. 15<br />
4.1 Flow-chart of the Menu Structure...................................................... 15<br />
4.2 Description of the Menu Items .......................................................... 16<br />
5. Analysis of Test Strips......................................................................... 17<br />
5.1 How to perform a measurement ....................................................... 17<br />
5.2 Display of Results ............................................................................. 18<br />
5.3 Measurement Errors ......................................................................... 18<br />
5.4 Entering the Patient Identification ..................................................... 19<br />
5.5 Changing the sequence number ("SN")............................................ 20<br />
5.6 Transferring data to a PC.................................................................. 20<br />
6. Enter the Main Menu............................................................................. 21<br />
<strong>Manual</strong> V2.00 USA / 06-08 2
User <strong>Manual</strong><br />
7. Recall results ........................................................................................ 22<br />
7.1 How to scroll through memory .......................................................... 23<br />
7.2 How to find specific results (filtering) ................................................ 24<br />
7.2.1 Selecting the Day ....................................................................... 25<br />
7.2.2 Selecting Search Criteria............................................................ 26<br />
7.2.3 Display suitable matches............................................................ 27<br />
7.3 How to delete results from memory .................................................. 28<br />
8. Expected waiver performance............................................................. 29<br />
9. Quality control testing ......................................................................... 30<br />
9.1 How to run a quality control test........................................................ 30<br />
9.2 How to review old QC measurements .............................................. 31<br />
10. Equipment Settings............................................................................ 32<br />
10.1 How to modify strip settings............................................................ 32<br />
10.1.1 Units ......................................................................................... 32<br />
10.1.2 Order of Parameters................................................................. 33<br />
10.1.3 Test Stick LOT.......................................................................... 33<br />
10.2 How to protect settings from unauthorized access......................... 34<br />
10.3 How to turn the printer on and off ................................................... 34<br />
10.4 How to enable and disable acoustic signals ................................... 34<br />
10.4.1 Acoustic confirmation of user inputs ........................................ 34<br />
10.4.2 Acoustic warning on positive results ........................................ 35<br />
10.5 How to deactivate and activate the autostart.................................. 35<br />
10.6 How to set energy saving options for the battery mode ................. 35<br />
10.7 How to change the language .......................................................... 35<br />
10.8 How to set time and date ................................................................ 36<br />
10.9 How to activate data transfer .......................................................... 37<br />
10.10 How to change the text of the printout header.............................. 37<br />
10.11 How to print settings ..................................................................... 37<br />
11. Cleaning and Maintenance ................................................................ 38<br />
11.1 How to clean the housing................................................................ 38<br />
11.2 How to clean the strip holder .......................................................... 39<br />
12. Table of Results.................................................................................. 40<br />
13. Service Menu....................................................................................... 41<br />
<strong>Manual</strong> V2.00 USA / 06-08 3
User <strong>Manual</strong><br />
13.1 How to reset the system (Load Default) ......................................... 41<br />
13.2 How to control the LOT-control (LOT activate)............................... 41<br />
13.2.1 Entry of test sticks’ LOT ........................................................... 42<br />
13.2.2 Warning on expired test strips.................................................. 43<br />
13.3 How to update the instrument......................................................... 43<br />
14. Interface Description.......................................................................... 44<br />
14.1 Serial Interface................................................................................ 44<br />
14.2 USB 1.1-Interface ........................................................................... 44<br />
14.3 Transmission Protocol .................................................................... 44<br />
15. Error Messages und Fault Clearance ............................................... 45<br />
16. Technical Information ........................................................................ 46<br />
16.1 Technical Data ................................................................................ 46<br />
16.2 Security standards .......................................................................... 46<br />
17. Customer Service ............................................................................... 47<br />
<strong>Manual</strong> V2.00 USA / 06-08 4
User <strong>Manual</strong><br />
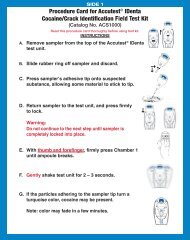
1. Quickstart<br />
Unpack the instrument and place it on an even, hard surface. Connect the<br />
power supply and turn the equipment on with the On/Off-switch (Pic. 3.3-8).<br />
After the self test the start screen will appear on the display.<br />
1<br />
Display 1 : Start menu<br />
• Dip a test strip into the urine sample for approx. one second.<br />
• Blot by touching the edge of the strip to a paper towel to remove<br />
excess urine.<br />
• Place the strip on the strip holder<br />
• Slide or push the strip to the end of the channel. Do not touch the<br />
reagent pads on the test strip.<br />
The instrument will automatically detect an applied strip. The measurement<br />
cycle will be started. A progress bar on the display shows the remaining<br />
measurement time.<br />
Note: If “Autostart“ (Chapter 10.5) is deactivated, the measurement must<br />
be started using the start control panel (Display 1-1).<br />
Notice:<br />
The strip will be drawn into the instrument after 30 sec.<br />
<strong>Manual</strong> V2.00 USA / 06-08 5
User <strong>Manual</strong><br />
After approximately 60 sec the result will be displayed on the screen<br />
(Display 2) and transferred to the printer and interfaces.<br />
2<br />
3<br />
Display 2 : Result<br />
By pressing the printer symbol (Display 2-2) the result can be printed again.<br />
Choosing the return panel (Display 2-3) will lead back to the start screen.<br />
Another analysis may be started by applying the next test strip.<br />
Notice :<br />
To start a new measurement it is not necessary to go back to the start<br />
screen. A new strip is detected at any time and the measurement is<br />
then started automatically.<br />
<strong>Manual</strong> V2.00 USA / 06-08 6
User <strong>Manual</strong><br />
2. Introduction<br />
The instrument is a reflection photometer for the analysis of urine test<br />
strips. When measurements are performed under standardized conditions,<br />
measured values may be displayed, printed and transferred to a computer.<br />
The instrument is designed for in-vitro diagnostic use (IVD) and should be<br />
used by healthcare professionals, only.<br />
2.1 System Description<br />
2.1.1 Measuring Principle<br />
The test strip moves below a fixed measuring head on a slide with an<br />
embedded reference pad. The reflectometric analysis of the test strip and<br />
the reference field take place during withdrawal and release of the slide.<br />
Pic. 2.1: Measuring Principle<br />
The strip is illuminated with an LED and a detector registers the intensity of<br />
light reflected by the test strip at three different wavelengths. Using an<br />
<strong>Manual</strong> V2.00 USA / 06-08 7
User <strong>Manual</strong><br />
internal calibration, the results are calculated from the reflection values.<br />
Whenever samples are strongly alkaline, a density correction is<br />
automatically conducted.<br />
2.1.2 Functional Principle<br />
A measurement is started by placing a strip on the holder. If the Autostartfeature<br />
is turned off, the measurement is started by pressing the start panel<br />
in the display.<br />
The result is shown on the display, printed out and released via the<br />
interfaces after the measurement has been completed. After three minutes<br />
the instrument will go to stand-by. Touching the screen will reactivate the<br />
instrument.<br />
All user inputs are performed via the touch-screen (3.7 Use of the<br />
instrument).<br />
<strong>Manual</strong> V2.00 USA / 06-08 8
User <strong>Manual</strong><br />
3. Unpacking and Set Up<br />
3.1 List of delivered parts<br />
• instrument reflectometer<br />
• Power pack 100 - 240 V, 47/63 Hz, 9V<br />
• Printer paper<br />
• User manual (this booklet)<br />
Pic. 3.1 : Content<br />
Read the operating manual for the instrument carefully before the first<br />
startup in order to ensure an error free operation.<br />
<strong>Manual</strong> V2.00 USA / 06-08 9
User <strong>Manual</strong><br />
3.2 Description of instrument parts<br />
3<br />
8 5 7<br />
1<br />
Pic. 3.2 : Front view<br />
2<br />
Pic. 3.3 : Backside view<br />
4<br />
6<br />
Actuator<br />
Function<br />
1. Touch-Screen Control of equipment functions<br />
2. Test Strip Slide Test strip retainer and automatic start of analysis<br />
3. Printer Flap Opening the printer flap for paper replacement<br />
4. Serial Interface Connection of a computer<br />
5. USB - Interface Connection of a computer<br />
6. PS/2 Interface Connection of a keyboard or a bar code scanner<br />
7. Mains Connection Contact for the provided power pack<br />
8. On/Off Switch (I/O) Turning the equipment on and off<br />
3.3 Setting up the instrument<br />
Place the instrument on a hard, even surface where humidity and<br />
temperature are fairly constant. Make sure that the instrument is allowed to<br />
acclimate to room temperature prior to use.<br />
Make sure that you<br />
• Do not place the instrument near strong electromagnetic fields<br />
• Do not place the instrument near heating plates, ovens or radiators<br />
• Do not expose the instrument to strong light sources (i.e. direct<br />
sunlight)<br />
<strong>Manual</strong> V2.00 USA / 06-08 10
User <strong>Manual</strong><br />
3.4 How to plug the instrument in<br />
Pic. 3.4 : Power pack<br />
Pic. 3.5 : DC in<br />
Three adapters are provided for adapting the power pack to the available<br />
mains connection. The adapter matching the mains connection is plugged<br />
on to the power pack (Pic. 3.4). After plugging the power pack cable into<br />
the jack “DC in“ (Pic. 3.3-7) and connecting the power pack to the power<br />
socket the instrument is ready for operation.<br />
3.5 How to load the printer paper<br />
Pic. 3.6 : Printer A<br />
Pic. 3.7: Printer B<br />
Open the printer flap by pressing the rectangular key next to the paper<br />
outlet (Pic. 3.6).<br />
<strong>Manual</strong> V2.00 USA / 06-08 11
User <strong>Manual</strong><br />
Pic. 3.8 : Printer C<br />
Pic. 3.9 : Printer D<br />
Unroll the paper roll by 5 cm and place the roll in the paper compartment<br />
with the end on the lower side. Fix the end of the paper to the housing with<br />
your forefinger while closing the flap (Pic. 3.8).<br />
3.6 How to install batteries (optional)<br />
The instrument can be operated with type AA batteries independent of the<br />
mains supply. The battery compartment is on the underside of the<br />
equipment. Notice the designated polarity (+/-) marked on the battery<br />
compartment while inserting the batteries.<br />
Pic. 3.10 : battery compartment<br />
<strong>Manual</strong> V2.00 USA / 06-08 12
User <strong>Manual</strong><br />
3.6.1 Instrument self test<br />
The instrument will perform an automatic self test each time it is turned on.<br />
If an error message appears, the instrument will not start measurements. In<br />
this case, please contact your local service provider.<br />
3.6.2 Calibration<br />
The instrument will perform an automatic calibration each time a test is run.<br />
3.7 Use of the instrument<br />
All user inputs are done via a touch-screen (touch-display). All functions<br />
are activated directly by slight pressure with the finger on explicit<br />
pictograms or text representing the menu items.<br />
3.7.1 Buttons<br />
Framed areas react to pressure and trigger the action linked to it. The<br />
caption of an area describes its function.<br />
Examples:<br />
Confirm / perform action<br />
Cancel action<br />
e.g. display of equipment settings<br />
<strong>Manual</strong> V2.00 USA / 06-08 13
User <strong>Manual</strong><br />
3.7.2 Scroll Arrows<br />
Press the up-and-down arrows (Display 3-2) on the right side of the screen<br />
to scroll through a list of information on the left side of the screen. Once the<br />
desired information (Display 3-1) on the left side is highlighted, press<br />
to confirm your selection.<br />
1<br />
2<br />
Display 3 : Selective lists<br />
Pressing will select the highlighted line. You can leave the menu by<br />
pressing .<br />
3.7.3 Round buttons<br />
These buttons typically appear on screens that require a selection among<br />
serial items. The button with a filled circle is the current selection.<br />
Pressing the circle will activate a selection. Save your selection by pressing<br />
. Pressing will quit the menu without performing any changes.<br />
<strong>Manual</strong> V2.00 USA / 06-08 14
User <strong>Manual</strong><br />
4. User Menu<br />
4.1 Flow-chart of the Menu Structure<br />
SN:<br />
ID:<br />
(P)<br />
Memory<br />
List<br />
Search<br />
Clear<br />
Check mode<br />
Memory<br />
Measurement<br />
Settings<br />
Strip<br />
Password<br />
Printer<br />
Sound<br />
Autostart<br />
Battery<br />
Language<br />
Date / Time<br />
Interface<br />
Customization<br />
Print settings<br />
Type<br />
Units<br />
Parameter order<br />
Touch<br />
Positive<br />
Backlight<br />
Printer<br />
<strong>Manual</strong> V2.00 USA / 06-08 15
User <strong>Manual</strong><br />
4.2 Description of the Menu Items<br />
• SN:<br />
5.5 Changing the sequence number («SN»)<br />
• ID:<br />
5.4 Entering the Patient Identification<br />
• (P):<br />
Standby<br />
• ▼:<br />
Main menu<br />
• Memory:<br />
7. Recall results<br />
• Check mode:<br />
9. Quality control testing<br />
• Settings:<br />
• 10.2 Password<br />
• 10.1 Strip Parameters<br />
• 10.3 Printer<br />
• 10.4 Sound<br />
• 10.5 Autostart<br />
• 10.6 Battery<br />
• 10.7 Languages<br />
• 10.8 Date / Time<br />
• 10.9 Interface<br />
• 10.11 Print Settings<br />
• 10.10 Customization<br />
<strong>Manual</strong> V2.00 USA / 06-08 16
User <strong>Manual</strong><br />
5. Analysis of Test Strips<br />
Note: The instrument will perform an automatic calibration each time a test<br />
is run.<br />
5.1 How to perform a measurement<br />
The instrument is very easy to use. In order to start the measurement, the<br />
test strip is placed on the strip holder. The instrument automatically detects<br />
a new strip and starts the measurement. A progress bar appears which<br />
indicates the remaining analysis time. After 30 seconds the test strip is<br />
drawn into the instrument, after 60 seconds it is released.<br />
Notice:<br />
Make sure to remove excess urine by blotting the test strip carefully<br />
on a lint-free cloth.<br />
Notice:<br />
If auto mode (Chapter 10.5 Autostart) is deactivated, the analysis<br />
needs to be started by pressing on the touch-screen.<br />
After the measurement, the instrument will release the analyzed test strip<br />
which can now be discarded. The result is displayed on the screen and is<br />
transferred via the interfaces and /or printed according to equipment<br />
settings.<br />
For additional information on the test strip, please read the package insert<br />
that comes with the strips.<br />
DANGER OF INFECTION:<br />
Urine and used test sticks bear the danger of infection. Always use<br />
protective gloves during handling and disposal. The disposal of used<br />
test strips should be performed according to the regulations for the<br />
handling of potentially infectious material.<br />
<strong>Manual</strong> V2.00 USA / 06-08 17
User <strong>Manual</strong><br />
5.2 Display of Results<br />
The sequence number (Display 4-1) as well as the patient identification<br />
(Display 4-2) will be displayed with the results.<br />
2<br />
1<br />
3<br />
4<br />
3 5<br />
Display 4 : Result<br />
Positive findings are clearly marked by an asterisk (*) on the printout and<br />
on the display (Display 4-3). Additionally, it is possible to enable an<br />
acoustic signal on positive findings.<br />
The printout is light-sensitive and may turn yellow when exposed to light<br />
during storage. For archiving purposes the printouts should be kept in a<br />
dark place (patient file) or as a photocopy.<br />
The result displayed may be printed again by pressing (Display 4-4). The<br />
return panel (Display 4-5) will lead back to the start screen.<br />
5.3 Measurement Errors<br />
If the display shows “Measuring Error ...“ instead of a result please read the<br />
instructions in Chapter 14. “Error Messages and Fault Clearance“.<br />
Repeat the measurement. In case of permanent errors please contact<br />
Customer Service.<br />
<strong>Manual</strong> V2.00 USA / 06-08 18
User <strong>Manual</strong><br />
5.4 Entering the Patient Identification<br />
The patient identification needs to be entered before starting the analysis.<br />
This can be done as follows:<br />
a) Directly on the equipment: Pressing in the start menu brings up an<br />
alphanumeric keypad. Enter the ID using the keys. To enter characters<br />
(i.e. “Miller”) press (Display 5-1) to change the character entry.<br />
Repeated pressing on the same field within 0.5 seconds switches<br />
through the characters displayed on the key. Wrong entries may be<br />
erased by pressing (Display 6-2).<br />
1 1<br />
2<br />
Display 5 : Entering ID (numerics)<br />
Display 6 : Entering ID (letter)<br />
b) Using a standard PC-keyboard: Connect the keyboard to the PS/2 jack<br />
in the backside of the instrument. User inputs on the keyboard will<br />
automatically be interpreted as Patient Identifications.<br />
c) Using a bar code reader: Connect the barcode reader to the PS/2 jack<br />
in the backside of the instrument. Barcode readings will automatically<br />
be interpreted as Patient Identifications.<br />
<strong>Manual</strong> V2.00 USA / 06-08 19
User <strong>Manual</strong><br />
After entering the patient identification start the measurement. The Patient<br />
Identification is saved together with the diagnostic findings.<br />
Attention:<br />
A new ID cannot be entered before the present analysis has been<br />
completed.<br />
5.5 Changing the sequence number ("SN")<br />
Pressing the field in the start menu brings up a numerical pad. Enter a<br />
new sequence number using the keys on the pad. All following<br />
measurements will now be counted from this number on.<br />
Display 7 : Seq.-Input<br />
5.6 Transferring data to a PC<br />
The results may be transferred to a PC via the USB- or RS232-interface.<br />
A detailed description of the interface can be found in Chapter 14 Interface<br />
Description.<br />
<strong>Manual</strong> V2.00 USA / 06-08 20
User <strong>Manual</strong><br />
6. Enter the Main Menu<br />
Pressing<br />
on the start screen will bring up the main menu.<br />
1<br />
Display 8 : Start menu<br />
Display 9 : Main menu<br />
From here the other functions e.g. memory (7. Recall results), the test<br />
mode (9. Quality Control Testing) as well as the settings ( 10. Equipment<br />
Settings) can be reached.<br />
<strong>Manual</strong> V2.00 USA / 06-08 21
User <strong>Manual</strong><br />
7. Recall results<br />
The instrument has memory for 200 measurements. Every result is<br />
automatically saved after the analysis. After 200 measurements, new data<br />
will overwrite the oldest saved dataset.<br />
Access the memory by pressing (Display 10-1) in the Main menu .<br />
1<br />
2<br />
3<br />
4<br />
Display 10 : Main menu<br />
Display 11 : Memory mode<br />
<strong>Manual</strong> V2.00 USA / 06-08 22
User <strong>Manual</strong><br />
7.1 How to scroll through memory<br />
Pressing (Display 11-2) will bring up (Display 12). Scrolling through the<br />
memory is possible by pressing the arrows (Display 12-5) on the right side.<br />
The next [→] or previous [←] result will be displayed.<br />
5<br />
6<br />
7<br />
8<br />
Display 12 : Memory contents<br />
It is possible to print (Display 12-6) and send (Display 12-7) the dataset<br />
displayed. The memory menu will reappear upon pressing Return<br />
(Display 12-8).<br />
<strong>Manual</strong> V2.00 USA / 06-08 23
User <strong>Manual</strong><br />
7.2 How to find specific results (filtering)<br />
To find the result you may select the date of the measurement and a<br />
specific parameter.<br />
9<br />
10<br />
Display 13 : Filtering<br />
<strong>Manual</strong> V2.00 USA / 06-08 24
User <strong>Manual</strong><br />
7.2.1 Selecting the Day<br />
By pressing the panel “Day“ (Display 13-9) you will reach the menu<br />
displayed below.<br />
Display 14 : Select day<br />
Set the day with the buttons (Display 14). Selecting “Date“ will bring up a<br />
screen with the list of available dates (only days with measurements are<br />
shown on the screen). Select the desired date with the up-and-down<br />
arrows and confirm your selection by pressing . After confirmation<br />
your selection will be displayed on the screen 'SET FILTER PAR.'<br />
<strong>Manual</strong> V2.00 USA / 06-08 25
User <strong>Manual</strong><br />
7.2.2 Selecting Search Criteria<br />
Pressing<br />
(Display 15).<br />
(Display 13-10, “SET FILTER PAR.“) brings up display<br />
11<br />
Display 15 : Select parameter<br />
Use the arrow keys (Display 15-11) to select the desired criteria and<br />
confirm with . The filter criteria will be displayed on filter settings<br />
screen (Display 16).<br />
<strong>Manual</strong> V2.00 USA / 06-08 26
User <strong>Manual</strong><br />
7.2.3 Display suitable matches<br />
After setting Day and Parameter the search may be started by pressing<br />
.<br />
Display 16 : Filtering<br />
<strong>Manual</strong> V2.00 USA / 06-08 27
User <strong>Manual</strong><br />
When suitable matches are found, an option will appear, allowing to print<br />
the datasets (Display 17-12), send them to a PC (Display 17-13) or display<br />
them on the screen (Display 17-14).<br />
12<br />
13<br />
14<br />
Display 17 : Search result<br />
If no matching results are found, the equipment returns to the memory<br />
menu.<br />
7.3 How to delete results from memory<br />
Pressing (Display 11-4) will delete all data in the memory. You will need<br />
to confirm this again on another screen.<br />
<strong>Manual</strong> V2.00 USA / 06-08 28
User <strong>Manual</strong><br />
8. Expected waiver performance<br />
At 3 sites, 66 untrained users with no laboratory experience tested<br />
randomized samples using the <strong>Accustrip</strong> urine reagent strips and the<br />
<strong>Accustrip</strong> <strong>URS</strong> <strong>Reader</strong>. The CLIA waiver study demonstrated that the<br />
performance of the <strong>Accustrip</strong> <strong>URS</strong> <strong>Reader</strong> is acceptable in the hands of<br />
non-technical users when only the Quick Reference Guide is used to learn<br />
and perform tests. The performance of the <strong>Accustrip</strong> urine reagent strip<br />
with the instrument , in the hands of the Lay-users, met the primary<br />
performance criteria that 90% of the results should be within ± one level of<br />
the expected results.<br />
Table 1: Percent Agreement of the instrument Results to Target Levels for<br />
Lay-users<br />
Analyte<br />
Concentrations<br />
tested<br />
Exact<br />
Agreement (%)<br />
Lay-user<br />
Concentration<br />
Exact and<br />
+ One (1)<br />
color<br />
block<br />
Level (%)<br />
Lay-user<br />
Ascorbic 0, 10, 20 98.5, 92.4, 100% 10 96.9<br />
Acid<br />
Bilirubin 0, 1, 4 100, 92.4, 100% 1 95.5<br />
Blood 0, 10, 250 100, 96.9, 71.2% 10 96.9<br />
Glucose 0, 50, 500 98.5, 83.3, 100% 50 100<br />
Ketone 0, 25, 300 96.9, 100, 98.5% 25 100<br />
Leukocyte 0, 25, 500 98.5, 62.1, 100% 25 96.9<br />
Nitrite Neg, pos 98.5, 100% 100<br />
pH 5, 6, 8 98.5, 93.9, 100% 6 93.9<br />
Protein 0, 30, 500 100, 98.5, 100% 30 98.5<br />
Specific<br />
Gravity<br />
1.005, 1.010,<br />
1.015, 1.025<br />
95.5, 81.8, 46.9,<br />
100%<br />
1.005, 1.010,<br />
1.015, 1.025<br />
95.5, 100,<br />
98.5,<br />
100%<br />
Urobilinogen 0.2, 2, 5 100, 95.5, 98.5% 2 100<br />
<strong>Manual</strong> V2.00 USA / 06-08 29
User <strong>Manual</strong><br />
9. Quality control testing<br />
Test at least one known negative and one known positive specimen or<br />
control, whenever a new bottle of strips is first opened, for each new<br />
shipment, for each new lot or at least monthly. Quality control samples<br />
should be run like a patient sample. Do not use water as negative control.<br />
Positive and negative control solutions provide a convenient basis for a<br />
quality control program. Contact the service number for ordering<br />
information.<br />
If proper results are not obtained, consult your local product representative<br />
or contact Customer Service by calling the number given at the end of this<br />
manual for advise on testing techniques and results.<br />
9.1 How to run a quality control test<br />
Prepare the urine controls as described in the package insert and test them<br />
in test mode.<br />
Handle the urine control solutions exactly as patient samples.<br />
Upon pressing (Display 18-1) on the start menu the “CHECK<br />
MODE“ screen will appear.<br />
2<br />
1<br />
3<br />
Display 18 : Main menu<br />
Display 19 : Check mode<br />
<strong>Manual</strong> V2.00 USA / 06-08 30
User <strong>Manual</strong><br />
By pressing the panel (Disp. 19-3) the sample selection will appear. Select<br />
the type of control sample you want to analyze.<br />
Display 20 : Control sample<br />
After pressing<br />
the instrument expects the test strip.<br />
9.2 How to review old QC measurements<br />
The equipment saves the results of the last 20 QC measurements in<br />
separate memory. They may be displayed by selecting memory<br />
(Display 19-2) and may be printed for documentation purposes.<br />
<strong>Manual</strong> V2.00 USA / 06-08 31
User <strong>Manual</strong><br />
10. Equipment Settings<br />
Enter the main menu by pressing the menu key<br />
“SETTINGS“ display press (Display 21-1).<br />
to reach the<br />
1<br />
Display 21 : Main menu<br />
Display 22 : Settings<br />
10.1 How to modify strip settings<br />
10.1.1 Units<br />
The instrument can report the results in different units:<br />
• Conventional (e.g. 10 mg/dL)<br />
• SI (e.g. 56 mmol/L)<br />
• ARB, Plus-System (e.g. +++)<br />
• Conventional + ARB<br />
• SI + ARB<br />
Choose the desired unit from the menu.<br />
<strong>Manual</strong> V2.00 USA / 06-08 32
User <strong>Manual</strong><br />
10.1.2 Order of Parameters<br />
The output order of the parameters may be customized via a list of<br />
selections. The parameters need to be selected in the desired order and<br />
confirmed by pressing . After the last parameter the equipment will<br />
ask whether the setting is to be saved. Save by pressing or go back<br />
to the preprogrammed order by pressing .<br />
10.1.3 Test Stick LOT<br />
The LOT-administration of the instrument is deactivated in the default<br />
setting. See Chapter 13.2 “LOT activate“.<br />
<strong>Manual</strong> V2.00 USA / 06-08 33
User <strong>Manual</strong><br />
10.2 How to protect settings from unauthorized access<br />
Select 'Password' in the settings menu if you want to protect the instrument<br />
settings with a PIN. An option panel with the choices “ON“ and “OFF“ will<br />
be displayed. Selecting “ON“ will enable the PIN-protection.<br />
After enabling the PIN-protection a numerical pad will appear. Enter a<br />
4-digit PIN and confirm by pressing . The PIN will be asked for upon<br />
the next attempt to change the settings.<br />
Attention:<br />
A forgotten PIN can not be reconstructed. Only a complete reset of the<br />
instrument will delete the PIN-protection. This will result in loss of all<br />
results and settings!<br />
10.3 How to turn the printer on and off<br />
Selecting 'Printer' in the settings menu will bring up an option panel.<br />
Choose the desired option and confirm.<br />
10.4 How to enable and disable acoustic signals<br />
Select “Sound” in the settings menu to enter the settings for acoustic<br />
signals.<br />
10.4.1 Acoustic confirmation of user inputs<br />
In the preprogrammed settings all user inputs are confirmed with an<br />
acoustic signal. Disable or enable these signals by choosing “ON“ or “OFF“<br />
in the box 'Touch'.<br />
<strong>Manual</strong> V2.00 USA / 06-08 34
User <strong>Manual</strong><br />
10.4.2 Acoustic warning on positive results<br />
In the preprogrammed settings an acoustic signal will be given on positive<br />
findings. Disable or enable this signal by choosing „ON“ or „OFF“ in the box<br />
'Positive'.<br />
10.5 How to deactivate and activate the autostart<br />
Select “Autostart” in the settings menu. In basic mode the instrument<br />
automatically detects an applied test strip and starts the measurement.<br />
This function may be deactivated via an option panel.<br />
If Autostart is deactivated the analysis must be triggered by pressing a<br />
panel in the Start menu.<br />
10.6 How to set energy saving options for the battery mode<br />
Select 'Battery' in the settings menu. Settings in this menu will only apply<br />
when the instrument is operated with batteries.<br />
To increase the lifetime of the batteries, the LCD backlight and the printer<br />
can be turned off using the option panels.<br />
10.7 How to change the language<br />
Select 'Language' in the settings menu. The language of the instrument<br />
menu can be switched to the following languages using the respective<br />
selective list:<br />
English, German, Spanish, French, Italian, Portuguese, Polish, Turkish and<br />
Hungarian.<br />
<strong>Manual</strong> V2.00 USA / 06-08 35
User <strong>Manual</strong><br />
10.8 How to set time and date<br />
Select 'Date/Time' in the setting menu. To change, press on the respective<br />
number. A numerical pad appears. Enter the correct number and confirm<br />
by pressing .<br />
The date may be formatted in three ways. The active format is shown on a<br />
button (Display 23-1) on the right hand side of the date. Select a date<br />
format by pressing this button.<br />
Displayed Format Abbreviation Meaning Example<br />
YMD Year - Month - Day 2007-12-17<br />
DMY Day . Month . Year 17.12.2007<br />
MDY Month / Day / Year 12/17/2007<br />
The time format may be changed to 12 or 24 hours with the button<br />
displayed next to the time (Display 23-2).<br />
1<br />
2<br />
Display 23 : Date / time<br />
<strong>Manual</strong> V2.00 USA / 06-08 36
User <strong>Manual</strong><br />
10.9 How to activate data transfer<br />
Select 'Interface' on the settings menu. The data transfer via the interfaces<br />
can be activated or deactivated via an option panel.<br />
10.10 How to change the text of the printout header<br />
Select 'Customization' in the settings menu. The first two lines of the<br />
printout may be filled with a user-specific identifier. Each line contains 23<br />
characters.<br />
To enter the text an external keyboard or the alphanumerical pad on the<br />
display can be used. The keys on the touch-screen are linked to several<br />
letters. Repeated pressing within half a second switches through the letters<br />
displayed on the key.<br />
10.11 How to print settings<br />
Select 'Print Settings' on the settings menu to print the equipment settings<br />
for documentation purposes. Thermo printings fade with time. Therefore,<br />
please copy the printout or store it in a dark place.<br />
<strong>Manual</strong> V2.00 USA / 06-08 37
User <strong>Manual</strong><br />
11. Cleaning and Maintenance<br />
DANGER OF INFECTION:<br />
Urine and used test sticks bear the danger of infection. Always use<br />
protective gloves during handling and disposal. The disposal of used<br />
test sticks should be performed according to the regulations for the<br />
handling of potentially infectious material<br />
11.1 How to clean the housing<br />
The instrument housing may be wiped with a cloth. Mild cleaning agents or<br />
disinfectants may be used. Ensure that no moisture permeates the<br />
equipment<br />
<strong>Manual</strong> V2.00 USA / 06-08 38
User <strong>Manual</strong><br />
11.2 How to clean the strip holder<br />
Wipe off urine residues from the strip holder with a lint-free cloth after each<br />
measurement. This prevents crustification and drying of urine residues.<br />
The strip holder can be removed from its transport mechanism and should<br />
be cleaned with water and - when necessary - with cleaning agent or<br />
disinfectant. Make sure that the instrument is turned off before removing<br />
the test slide.<br />
After cleaning, the strip holder should be put back onto its transport<br />
mechanism carefully. The rectangular notches of transport mechanism and<br />
stick retainer must be placed on top of each other (Pic. Notch B).<br />
Pic. 8.1 : test slide<br />
(bottom view)<br />
Pic. 8.2 : Notch A<br />
Pic. 8.3: Notch B<br />
<strong>Manual</strong> V2.00 USA / 06-08 39
User <strong>Manual</strong><br />
12. Table of Results<br />
Param. CONV SI ARB Param. CONV SI ARB<br />
BLD NEG NEG NEG GLU NEG NEG NEG<br />
10 Ery/µl 10 Ery/µl + NORM NORM NORM<br />
50 Ery/µl 50 Ery/µl ++ 50 mg/dl 2,8 mmol/l +<br />
250 Ery/µl 250 Ery/µl +++ 150 mg/dl 8,3 mmol/l ++<br />
UBG NORM NORM NORM > 500 mg/dl > 27,8 mmol/l +++<br />
2 mg/dl 35 µmol/l + pH 5 5 5<br />
4 mg/dl 70 µmol/l ++ 6 6 6<br />
8 mg/dl 140 µmol/l +++ 6,5 6,5 6,5<br />
12 mg/dl 200 µmol/l ++++ 7 7 7<br />
BIL NEG NEG NEG 8 8 8<br />
1 mg/dl 17 µmol/l + 9 9 9<br />
2 mg/dl 35 µmol/l ++ SG 1,000 1,000 1,000<br />
4 mg/dl 70 µmol/l +++ 1,005 1,005 1,005<br />
PRO NEG NEG NEG 1,010 1,010 1,010<br />
30 mg/dl 0,3 g/l + 1,015 1,015 1,015<br />
100 mg/dl 1 g/l ++ 1,020 1,020 1,020<br />
500 mg/dl 5 g/l +++ 1,025 1,025 1,025<br />
NIT NEG NEG NEG 1,030 1,030 1,030<br />
POS POS + LEU NEG NEG NEG<br />
KET NEG NEG NEG 25 Leu/µl 25 Leu/µl +<br />
25 mg/dl 2,5 mmol/l + 75 Leu/µl 75 Leu/µl ++<br />
100 mg/dl 10 mmol/l ++ 500 Leu/µl 500 Leu/µl +++<br />
300 mg/dl 30 mmol/l +++<br />
<strong>Manual</strong> V2.00 USA / 06-08 40
User <strong>Manual</strong><br />
13. Service Menu<br />
The instrument has a password protected service menu. To enter the<br />
service menu press the touch-screen three times during the self test after<br />
turning the equipment on. Upon request, input the PIN “1111“.<br />
A menu with different options appears.<br />
Display 24 : Service menu<br />
13.1 How to reset the system (Load Default)<br />
Select 'Load default' from the service menu. The instrument will be reset to<br />
delivery status. All settings modified by the user as well as the memory will<br />
be cleared!<br />
13.2 How to control the LOT-control (LOT activate)<br />
Select 'LOT activate' from the service menu to activate the LOT-control.<br />
This will minimize the risk of using expired test strips. You will be asked for<br />
the LOT of strips currently used. The system will give a warning when the<br />
test strips are expired. After 100 measurements the system will ask for the<br />
LOT-number of the next tube.<br />
<strong>Manual</strong> V2.00 USA / 06-08 41
User <strong>Manual</strong><br />
13.2.1 Entry of test sticks’ LOT<br />
If LOT-control is activated, the actual LOT-number of the test strips can be<br />
entered using 'Strip' in the menu 'Settings'.<br />
When selecting “LOT number“ a numerical pad will appear, which can be<br />
used for entering the LOT printed on the stick packaging. If the entry does<br />
not have the format expected for a LOT number, an error message will<br />
appear.<br />
After entering the LOT, information on the number of strips from that LOT is<br />
requested. If three boxes of the same LOT are present, please enter '300'<br />
for the number of strips.<br />
Display 25 : LOT code<br />
Display 26 : LOT size<br />
NOTICE:<br />
The instrument counts the number of strips. If the number of<br />
measurements reaches the previously entered number of strips for that<br />
LOT, the instrument will request the entry of a new LOT-number. Then,<br />
please enter the LOT number of the strips you want to use.<br />
<strong>Manual</strong> V2.00 USA / 06-08 42
User <strong>Manual</strong><br />
13.2.2 Warning on expired test strips<br />
The date of expiry of the test strips is calculated from the LOT-number. If<br />
the expiry date has passed, a warning will appear (Display 27). If you<br />
choose to continue without entering a new LOT, Display 28 appears.<br />
Please choose the number of measurements you would like to perform<br />
without additional warnings.<br />
Display 27 : Expire date A<br />
Display 28 : Expire date B<br />
13.3 How to update the instrument<br />
Select 'Program update' from the service menu. The instrument now<br />
expects the upload of a new firmware. Follow the instructions that come<br />
with the update-file to finalize the update process.<br />
<strong>Manual</strong> V2.00 USA / 06-08 43
User <strong>Manual</strong><br />
14. Interface Description<br />
The instrument may be connected to a computer via the RS232 or the<br />
USB-interface (work station or laboratory information system).<br />
14.1 Serial Interface<br />
Protocol RS232, 19200 Baud, 8 bit, no parity (Picture 3.3-4)<br />
Connection plug arrangement:<br />
Pin Signal Description Direction<br />
1 Nc Not connected<br />
2 RxD Data reception Input<br />
3 TxD Send Output<br />
4 Nc Not connected<br />
5 GND Signal ground --<br />
6 Nc Not connected<br />
7 Nc Not connected<br />
8 Nc Not connected<br />
9 Nc Not connected<br />
14.2 USB 1.1-Interface<br />
Please contact your local service provider regarding the necessary driver<br />
for your PC.<br />
14.3 Transmission Protocol<br />
The data is released via the interfaces as plain text. The received dataset<br />
corresponds to the format of the printout.<br />
14.4 Barcode Scanner, PC-Keyboard<br />
A PS/2 jack (Pic. 3.3-6) is provided for connection of a keyboard or bar<br />
code scanner.<br />
<strong>Manual</strong> V2.00 USA / 06-08 44
User <strong>Manual</strong><br />
15. Error Messages und Fault Clearance<br />
Messages are displayed in plain text and are self-explanatory.<br />
Error Message / Error Cause Solution<br />
“Dry Stick“<br />
The test strip wasn’t Repeat measurement<br />
dipped completely with a new strip<br />
“Wrong Stick“<br />
“Wrong Stick Position“<br />
“No Paper“<br />
A wrong test strip has<br />
been detected (wrong<br />
type)<br />
The strip hasn’t been<br />
pushed into the strip<br />
retainer far enough<br />
Paper roll empty or<br />
printer flap open<br />
Use correct test strips<br />
New measurement,<br />
place strip in right<br />
position<br />
Replace paper and<br />
close printer flap<br />
“Battery Low“ Batteries are low Exchange batteries or<br />
use power pack<br />
Instrument doesn’t start<br />
Power supply not<br />
installed or defect<br />
Check whether all<br />
connections are<br />
plugged in and whether<br />
the power socket is<br />
functioning<br />
In case an error message cannot be cleared by following the above<br />
instructions, please contact your local distributor or Customer Service.<br />
<strong>Manual</strong> V2.00 USA / 06-08 45
User <strong>Manual</strong><br />
16. Technical Information<br />
16.1 Technical Data<br />
Required electric supply:<br />
Mains transformer:<br />
Input 100 - 240 V<br />
Output 9 V = 1.5 A<br />
Alternative: battery operation with 6 mignon batteries 1.5 V (AA).<br />
Dimensions:<br />
Height: 7.5 cm (3.0 inches)<br />
Width: 16 cm (6.3 inches)<br />
Depth: 20 cm (7.9 inches)<br />
Weight:<br />
710 g (without batteries and power pack)<br />
Range of Ambient Air Temperature:<br />
5 - 40 °C (41 - 104 °F)<br />
Humidity:<br />
20-80%<br />
16.2 Security standards<br />
The instrument is in compliance with directive 89/336/EEC and conforms to<br />
the German EMV - Law. Furthermore it complies with directive 73/23/EEC.<br />
This equipment and the designated test strips are in compliance with IVD<br />
directive 98/79/EC.<br />
<strong>Manual</strong> V2.00 USA / 06-08 46
User <strong>Manual</strong><br />
17. Customer Service<br />
If you have any questions after reading the manual or if you need further<br />
technical assistance, please contact Customer Service:<br />
Telephone: (800) 676-5565<br />
E-mail: info@accutest.net<br />
Jant Pharmacal Corporation, 16255 Ventura Blvd., Suite 505, Encino,<br />
California 91436 USA<br />
<strong>Manual</strong> V2.00 USA / 06-08 47