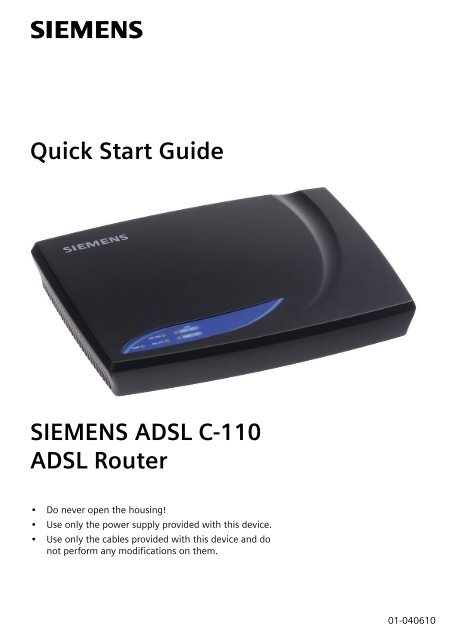
Quick Start Guide SIEMENS ADSL C-110 ADSL Router
Quick Start Guide SIEMENS ADSL C-110 ADSL Router
Quick Start Guide SIEMENS ADSL C-110 ADSL Router

You also want an ePaper? Increase the reach of your titles
YUMPU automatically turns print PDFs into web optimized ePapers that Google loves.
s<br />
<strong>Quick</strong> <strong>Start</strong> <strong>Guide</strong><br />
<strong>SIEMENS</strong> <strong>ADSL</strong> C-<strong>110</strong><br />
<strong>ADSL</strong> <strong>Router</strong><br />
• Do never open the housing!<br />
• Use only the power supply provided with this device.<br />
• Use only the cables provided with this device and do<br />
not perform any modifications on them.<br />
01-040610
Before you begin<br />
Verify that the following items came with your <strong>SIEMENS</strong> <strong>ADSL</strong> C-<strong>110</strong> kit:<br />
System Requirements<br />
Before starting the installation of the <strong>SIEMENS</strong> <strong>ADSL</strong> C-<strong>110</strong>, make sure your computer is<br />
equipped with:<br />
• Internet Browser (Internet Explorer or Netscape Version 4 or higher)<br />
• LAN interface (Ethernet Network interface card) with RJ45 socket<br />
(Windows 95, NT4, 98, ME, 2000, XP, Mac OS 8.6, 9.x, 10.x, Linux)<br />
or<br />
• USB interface<br />
(Windows 98 SE, ME, 2000, XP)<br />
2<br />
<strong>SIEMENS</strong> <strong>ADSL</strong> C-<strong>110</strong> <strong>Quick</strong> <strong>Start</strong> <strong>Guide</strong> CD-ROM Power supply<br />
USB cable<br />
(beige)<br />
<strong>ADSL</strong> cable Ethernet cable<br />
(silver) (light gray)<br />
Optional:<br />
Your service provider may include Stand-alone Line Filter(s) and Y-Line Filter(s). If you have<br />
received any of these items, follow the instructions provided in this guide for basic installation.<br />
If you need further assistance installing these items, please contact your service provider.<br />
Stand-alone<br />
Line Filter<br />
Y-Line Filter
Step 1:<br />
Install the Line Filter<br />
Devices such as fax machines or phones that share the same phone line as your <strong>ADSL</strong> account<br />
require a line filter, which protects your phone or fax from <strong>ADSL</strong> frequencies. Filters can be in<br />
the form of a stand-alone Line Filter or a Y-Line Filter. The Y-Line Filter can be used if your<br />
<strong>ADSL</strong> modem will share the same phone jack with another device.<br />
Stand-alone Line Filter<br />
For each device that shares the phone line as your <strong>ADSL</strong> account:<br />
1. Unplug the device’s cord from the phone jack.<br />
2. Plug the filter into the phone jack.<br />
3. Plug the phone cord (or other device cord)<br />
into the filter.<br />
1.<br />
Y-Line Filters<br />
2. 3.<br />
If your <strong>SIEMENS</strong> <strong>ADSL</strong> C-<strong>110</strong> and another device will share the same phone jack, install a<br />
Y-Line Filter:<br />
1. Unplug the device’s cord from the phone<br />
jack.<br />
2. Plug the Y-Line Filter into the phone jack.<br />
3. Plug the phone cord (or other device cord)<br />
into the ”PHONE” jack of your Y-Line Filter.<br />
4. Plug the <strong>ADSL</strong> cord into the ”<strong>ADSL</strong>” jack of<br />
2.<br />
your Y-Line Filter.<br />
4.<br />
3.<br />
3
Step 2a:<br />
Connect the <strong>SIEMENS</strong> <strong>ADSL</strong> C-<strong>110</strong> via Ethernet interface<br />
1a. With your computer off, plug the end of the <strong>ADSL</strong> cable (silver) into the Line port of your<br />
<strong>SIEMENS</strong> <strong>ADSL</strong> C-<strong>110</strong>.<br />
1b. Plug the other end of the cable into the phone jack.<br />
2a. Connect the Ethernet cable (light gray) to the LAN port of your <strong>SIEMENS</strong> <strong>ADSL</strong> C-<strong>110</strong>.<br />
2b. Connect the other end of the Ethernet cable to the LAN port of your computer.<br />
3. Connect the power supply to your <strong>SIEMENS</strong> <strong>ADSL</strong> C-<strong>110</strong>.<br />
4. Plug the power plug into a power outlet.<br />
5. Turn your <strong>SIEMENS</strong> <strong>ADSL</strong> C-<strong>110</strong> on by pushing on the power button.<br />
6. Turn your computer on and wait until your operating system (OS) is started up.<br />
7. Proceed with step 3. (Read first the introduction and continue then with the paragraph<br />
related to your operating system).<br />
4<br />
Y-Line Filter<br />
1b<br />
<strong>ADSL</strong> cabel (silver)<br />
<strong>SIEMENS</strong> <strong>ADSL</strong> C-<strong>110</strong><br />
1.<br />
2a.<br />
3.<br />
2b.<br />
5.<br />
Ethernet cabel<br />
(light gray)<br />
PC or Notebook
Step 2b - part 1:<br />
Connect the <strong>SIEMENS</strong> <strong>ADSL</strong> C-<strong>110</strong> via USB<br />
1a. With your computer off, plug the end of the <strong>ADSL</strong> cable (silver) into the Line port of your<br />
<strong>SIEMENS</strong> <strong>ADSL</strong> C-<strong>110</strong>.<br />
1b. Plug the other end of the cable into the phone jack.<br />
2a. Connect the USB cable to the USB port on your computer.<br />
2b. Do NOT connect the USB cable to your <strong>SIEMENS</strong> <strong>ADSL</strong> C-<strong>110</strong> yet!<br />
3. Proceed with step 2b - part 2.<br />
PC or Notebook<br />
Y-Line Filter<br />
2a<br />
1b<br />
1a<br />
USB cable (beige)<br />
2b<br />
<strong>ADSL</strong> cable (silver)<br />
<strong>SIEMENS</strong> <strong>ADSL</strong> C-<strong>110</strong><br />
5
Step 2b - part 2:<br />
Install the USB driver<br />
6<br />
The USB driver is only working on the following operating system (OS):<br />
Windows 98 SE, Windows ME, Windows 2000 and Windows XP.<br />
Windows 98 SE users need the Windows 98 SE CD-ROM to complete the<br />
installation.<br />
To install the USB driver proceed as follows:<br />
1. Turn on your computer.<br />
2. Insert the Siemens installation CD-ROM in your CD-ROM drive. Click on setup.exe in the<br />
directory /USB driver on your Siemens installation CD-ROM.<br />
Note for Windwos XP users: During installaion the following screen will appear<br />
several times. Click always on Continue Anyway.
3. After a while the following windwo will apppear. Connect the USB cable to your <strong>SIEMENS</strong><br />
<strong>ADSL</strong> C-<strong>110</strong>. The driver will be installed automatically.<br />
Note for Windows 98 SE users: If prompted, you need to insert the Windows 98<br />
SE CD-ROM in your CD-ROM drive to complete the installation<br />
4. If the following window appears click on Next.<br />
7
5. If the following window appears click on Finish.<br />
6. After finishing the installation a new icon is displayed in the Taskbar.<br />
7. Proceed with step 3. (Read first the introduction and continue then with the paragraph<br />
related to your operating system).<br />
8<br />
Note for Windows XP users: You have to repeat step 4 and 5.
Step 3:<br />
Configure the PC (TCP/IP settings)<br />
Introduction<br />
In step 3, you will configure your computer to communicate with the <strong>SIEMENS</strong> <strong>ADSL</strong> C-<strong>110</strong>.<br />
To do this, you will need to configure your PC’s network settings to obtain an IP address automatically.<br />
Computers use IP addresses to communicate with each other across a network or the<br />
Internet.<br />
Find out which operating system your computer is running, such as Windows 95, Windows 98,<br />
Windows Me, Windows NT4, Windows 2000 or Windows XP or Macintosh OS 8.6, 9.x, 10.x.<br />
You will need to know which operating system your computer is running. You can find out by<br />
clicking on <strong>Start</strong> -> Settings. (If your <strong>Start</strong> menu doesn’t have a Settings option, you are running<br />
Windows XP. You can select the Control Panel directly from the <strong>Start</strong> menu.) Then, click on<br />
Control Panel and double-click on the System icon.<br />
Click the Cancel button when done.<br />
Once you know which operating system you are running, follow the directions in this step<br />
(Step 3a – 3e) for your computer’s operating system.<br />
The next few pages tell you, step by step, how to configure your TCP/IP settings based on the<br />
type of Windows operating system you are using. Once you’ve configured your computer,<br />
continue with “Step 5: Configure the Internet Access on page 16.<br />
9
Step 3b:<br />
Configure the PC (TCP/IP settings)<br />
for Windows NT4<br />
1. Click on <strong>Start</strong> -> Settings -> Control Panel.<br />
Double-click on the Network icon. The<br />
Network screen will appear.<br />
2. Select the Protocol tab and highlight the<br />
TCP/IP line. Click on Properties.<br />
3. Select the IP Address tab and select Obtain<br />
an IP address from a DHCP server and click<br />
on OK on the subsequent screens to complete<br />
the PC’s configuration.<br />
4. When prompted with “Activate DHCP” dialog<br />
box, click Yes.<br />
5. Restart your computer.<br />
6. Go to Step 5 on page 16 to complete the<br />
configuration.<br />
10<br />
2<br />
3
Step 3a:<br />
Configure the PC (TCP/IP settings)<br />
for Windows 98 and Windows ME<br />
Windows 98 users need the Windows 98 Installation CD to complete the<br />
installation.<br />
1. Click on <strong>Start</strong> -> Settings -> Control Panel.<br />
Double-click on the Network icon to open<br />
the Network screen.<br />
2. Select the Configuration tab and highlight<br />
the TCP/IP line for the applicable Ethernet<br />
adapter1) . If the word TCP/IP appears by itself,<br />
select that line2) . Click on Properties.<br />
3. Click the IP Address tab and select Obtain<br />
an IP address automatically.<br />
4. Click on the Gateway tab and verify that the<br />
Installed Gateway field is blank. Click on<br />
OK.<br />
5. Click again on OK. Windows may ask you for<br />
the original Windows Installation disk or<br />
additional files. Supply them by pointing to<br />
the correct location, e.g. D:\win98, where<br />
“D” represents the letter of your CD-ROM<br />
drive.<br />
6. If Windows asks you to restart your PC, click<br />
on Yes. If Windows does not ask, restart<br />
your computer anyway.<br />
7. Go to Step 5 on page 16 to complete the<br />
configuration.<br />
1) Choose a TCP/IP entry whose name contains Ethernet adapter. Do not choose<br />
a TCP/IP entry whose name is PPPoE, VPN or other.<br />
2) If there is no TCP/IP line listed, refer to the User Manual on your Siemens CD-<br />
ROM to install TCP/IP now.<br />
2<br />
3<br />
11
Step 3c:<br />
Configure the PC (TCP/IP settings)<br />
for Windows 2000<br />
1. Click on <strong>Start</strong> -> Settings -> Control Panel.<br />
Double-click on the Network and Dial-up<br />
Connections icon. The Network screen will<br />
appear.<br />
2. Select the Local Area Connection icon for<br />
the applicable Ethernet adapter (usually it is<br />
the first Local Area Connection listed).<br />
Double-click on Local Area Connection and<br />
click on Properties.<br />
3. Select Internet Protocol (TCP/IP) and click<br />
on Properties.<br />
4. Select Obtain an IP address automatically<br />
and click on OK on the subsequent screens<br />
to complete the PC’s configuration.<br />
5. Restart your computer.<br />
6. Go to Step 5 on page 16 to complete the<br />
configuration.<br />
12<br />
2<br />
3<br />
4
Step 3d:<br />
Configure the PC (TCP/IP settings)<br />
for Windows XP<br />
The following instructions assume you are running Windows XP’s default interface. If you are<br />
using the Classical interface (where the icons and menus look like previous Windows versions),<br />
please follow the instructions for Windows 2000 (Step 3b).<br />
1. Click on start -> Control Panel. Click on the<br />
Network and Internet Connections icon.<br />
Click on the Network Connections icon. The<br />
Network screen will appear.<br />
2. Select the Local Area Connection icon for<br />
the applicable Ethernet adapter (usually it is<br />
the first Local Area Connection listed).<br />
Double-click on Local Area Connection and<br />
click on Properties.<br />
3. Select Internet Protocol (TCP/IP) and click<br />
on Properties.<br />
4. Select Obtain an IP address automatically<br />
and click on OK on the subsequent screens<br />
to complete the PC’s configuration.<br />
5. Restart your computer.<br />
6. Go to Step 5 on page 16 to complete the<br />
configuration.<br />
2<br />
3<br />
4<br />
13
Step 3e:<br />
Configure the PC (TCP/IP settings)<br />
for Mac OS 8.6 and OS 9.x<br />
1. From the Apple Menu, point to<br />
Control Panels and then click TCP/IP.<br />
2. From the Connect via pull-down<br />
menu select Ethernet built-in. From<br />
the Configure pull-down menu select<br />
Using DHCP Server.<br />
3. Close the TCP/IP window and click on<br />
[Save].<br />
14<br />
2
Step 3f:<br />
Configure the PC (TCP/IP settings)<br />
for Mac OS X<br />
1. From the Apple Menu, select System<br />
Preferences...<br />
2. Click on the Network icon in the Internet<br />
& Network area.<br />
3. From the Show pull-down select Built-in<br />
Ethernet. On the TCP/IP tab, select Using<br />
DHCP from the Configure pull-down<br />
menu.<br />
4. On the PPPoE tab, make sure that the<br />
Connect using PPPoE check box is NOT<br />
activated. Click Apply Now.<br />
5. Close the Network window.<br />
2<br />
3<br />
4<br />
15
Step 5:<br />
Configure the Internet Access<br />
Once installation is complete on your PC, you need to configure the Internet access. To access<br />
the <strong>SIEMENS</strong> <strong>ADSL</strong> C-<strong>110</strong> entry page proceed as follows:<br />
Accessing the modem entry page<br />
The modem state page is accessed via a web browser as follows:<br />
- Launch web browser.<br />
- First check that the browser configuration is not set to use a server proxy.<br />
When using Internet Explorer in Windows:<br />
- Select the Tools menu from the tool bar at the top of the screen<br />
- Select Internet Options Select Connections and then LAN Settings<br />
- Make sure that the Use Server Proxy option is not selected. If it is selected, deselect it<br />
and then click OK.<br />
- Enter the pre-set IP address of the <strong>ADSL</strong> modem in the browser address field:<br />
http://192.168.1.1<br />
The following page will be displayed:<br />
Connecting the Internet<br />
1. Introduce Username and Password which you got from your Internet Service Provider.<br />
2. Click on Save & Reboot and wait until the entry page is displayed again.<br />
3. Your Internet connection is established now.<br />
16<br />
1<br />
2<br />
To access the advanced configuration of the <strong>SIEMENS</strong> <strong>ADSL</strong> C-<strong>110</strong> enter the<br />
pre-set address in the browser field: http://192.168.1.1/doc/index.htm
Modem State Information<br />
Once installation is complete on your PC, it is possible to access the <strong>SIEMENS</strong> <strong>ADSL</strong> C-<strong>110</strong><br />
state page, which displays the most important information on the configuration and state of<br />
the <strong>ADSL</strong> Bridge C-<strong>110</strong>.<br />
Accessing the modem state page<br />
The modem state page is accessed via a web browser as follows:<br />
- Launch web browser.<br />
- Enter the pre-set IP address of the <strong>ADSL</strong> modem in the browser address field:<br />
http://192.168.1.1<br />
The following page will be displayed:<br />
17
Trouble shooting<br />
If the solution proposed in this section does not resolve your problem, contact your network<br />
administrator or technical support.<br />
No LEDs come on when the modem is on<br />
1. Check the connection between the power supply unit and the <strong>SIEMENS</strong> <strong>ADSL</strong> C-<strong>110</strong>.<br />
2. Check that the mains socket and power supply unit are operating correctly.<br />
The LAN LED does not come on<br />
1. Check the Ethernet connection between your PC and the <strong>SIEMENS</strong> <strong>ADSL</strong> C-<strong>110</strong>.<br />
2. Make sure that the cable being used is the one supplied, or that it is suitable (UTP5),<br />
and that it is not too long (100 cm).<br />
3. Check that the Ethernet network card being used is operating correctly.<br />
4. Check that the Ethernet network card has been enabled and that it is functioning<br />
correctly by using the checking tools in the operating system (for example, for<br />
Windows, via My Computer/Properties).<br />
5. Read the FAQs in the instructions on the self-installer CD in the section “Ethernet<br />
modem connection problems” and “Computer and <strong>ADSL</strong> modem”.<br />
The USB LED does not come on<br />
1. Check the USB connection between your PC and the <strong>ADSL</strong> modem.<br />
2. Make sure that the cable being used is the one supplied, or that it is suitable (A-to-B),<br />
and that it is not too long (100 cm).<br />
3. Check that the USB port being used is operating correctly.<br />
4. Check that the USB port has been enabled and that it is functioning correctly by using<br />
the checking tools in the operating system (for example, for Windows, via My<br />
Computer/Properties) and BIOS.<br />
5. Read the FAQs in the instructions on the self-installer CD in the section “USB modem<br />
connection problems” and “Computer and <strong>ADSL</strong> modem”.<br />
The DSL LNK LED is flashing<br />
1. Make sure that the <strong>ADSL</strong> line has been activated.<br />
2. Make sure you have connected the telephone cable as illustrated in the section<br />
“Installation and connection”. If the problem persists, contact technical support.<br />
Cannot connect to the Internet<br />
1. Check that the <strong>ADSL</strong> link LED is on. If it is not, the <strong>ADSL</strong> line is not active.<br />
2. If using the Ethernet card, check that the LAN link LED is on. If it is not, check the LAN<br />
or USB connection between the PC and the <strong>ADSL</strong> modem.<br />
18
3. Make sure that the user name and password entered are correct.<br />
4. Make a telephone call to ensure that there are no problems on the telephone line.<br />
The <strong>ADSL</strong> modem cannot be reached with the PING command<br />
1. Check the connection used (Ethernet or USB) between your PC and the <strong>ADSL</strong> modem.<br />
2. Check the configuration of the interface used by your PC.<br />
3. Make sure the TCP/IP settings of the Ethernet card or the virtual LAN card used by the<br />
USB interface are set to find the IP address automatically.<br />
My homepage is not displayed when I launch the browser<br />
19
Glossary<br />
20<br />
1. Make sure that the connections to the <strong>ADSL</strong> modem are correct, that the port used<br />
(Ethernet or USB) is working correctly and that the modem is on.<br />
2. Check that the IP address in the browser address bar is 192.168.1.1<br />
10/10 0Base-T<br />
10/100Base-T uses an unshielded UTP cable (category 5) for Fast Ethernet connections. The<br />
cable meets IEEE standard 802.3, has a maximum length of 100 meters and a transmission<br />
speed of 100 Mbps.<br />
<strong>ADSL</strong><br />
Abbreviation of Asymmetrical Digital Subscriber Line. Transmission technology using telephone<br />
lines. The high frequencies used by <strong>ADSL</strong> co-exist with voice frequencies, allowing<br />
basic telephone services and high-speed Internet connections to be used simultaneously.<br />
Depending on the configuration chosen by the telephone carrier, <strong>ADSL</strong> can reach data speeds<br />
of up to 8 Mbps downstream and 2 Mbps upstream.<br />
ATM<br />
Asynchronous Transfer Mode, which transfers multiple traffic (such as voice, video and data)<br />
in cells with a fixed length of 53 bytes (instead of in “packets” of variable length as is the case<br />
with Ethernet and FDDI technologies). ATM allows high speeds to be achieved and is particularly<br />
common in high-traffic network backbones. Next-generation network devices also enable<br />
ATM to be used for WAN transmissions, which will make it useful for large organizations that<br />
are spread over a wide area.<br />
Bridge<br />
“Bridge” between two networks. When it receives a data packet, instead of propagating it<br />
indiscriminately, the bridge recognizes the address and sends it to the relevant subnetwork,<br />
avoiding the unnecessary propagation of traffic and consequently limiting collisions between<br />
data packets.<br />
CPE<br />
Customer Premises Equipment. User equipment such as terminals, telephones and modems<br />
supplied by the telephone company, installed at the user’s premises and connected to the<br />
telephone network. These devices may also belong to the user.<br />
DHCP<br />
Dynamic Host Configuration Protocol. This protocol allows network administrators to centrally<br />
and automatically manage the allocation of IP addresses to all devices connected to a network<br />
(which must be unique).<br />
DNS
Domain name system. This is not an actual internet protocol, but a system for translating<br />
node names (for example www.nasa.org) into numerical addresses (for example<br />
192.168.2.1).<br />
DSL<br />
Digital Subscriber Line. Network Technology that transmits using a broad bandwidth over<br />
short distances using traditional telephone copper pairs. There are four types of DSL: <strong>ADSL</strong>,<br />
HDSL, SDSL and VDSL. Each of these uses two specific devices (similar to modems) at each<br />
end of the transmission. As most <strong>ADSL</strong> technology does not use all of the bandwidth available<br />
on the copper pair, there is space for a voice channel (for example: for normal telephone<br />
calls). See also <strong>ADSL</strong>, HDSL, SDSL and VDSL.<br />
FTP<br />
File Transfer Protocol. Principal element of the group (TCP/IP) of Internet protocols, used to<br />
transfer files from Internet servers to user computers.<br />
IPoA (RFC 1577)<br />
Classical IP over ATM.<br />
ISP<br />
Internet Service Provider. Company that manages Internet access. It is possible to access the<br />
Internet by connecting your computer (via a modem or router) to an ISP server, using special<br />
T1 telephone lines. A peer-to-peer (point-to-point) connection is used with the bandwidth of<br />
1.5 Mbps divided into 24 channels of 64 kb each. The larger ISPs may have several T1 lines.<br />
ISPs often offer additional services such as hosting & housing, e-commerce solutions and support<br />
to their customers.<br />
LAN<br />
Local Area Network. Network or group of network segments confined to a building or campus<br />
that connects computers and peripherals (such as printers, faxes and scanners) installed at<br />
the same location (for example: same building, including on different floors) or at neighboring<br />
locations (for example: two adjacent buildings). LANs usually work at high speed, for<br />
example: Ethernet has a data transfer speed of 10 Mbps or 100 Mbps in the case of Fast<br />
Ethernet. Compare WAN.<br />
MAC<br />
Media Access Control. The MAC is a radio control protocol in a wireless LAN (WLAN) network<br />
card. It corresponds to level 2 – OSI reference model data link layer. IEEE standard 802.11<br />
specifies the MAC protocol for the division of physical resources, formats and the addressing<br />
of packets and identification of errors.<br />
21
PPPoE (RFC2516)<br />
PPP over Ethernet. Transmission protocol used for <strong>ADSL</strong> connections. In Italy, this is usually an<br />
alternative to PPPoA. In fact, data packets, whether in PPPoA or PPPoE, are transmitted on the<br />
ATM network. The correct term for this protocol is in fact Ethernet over ATM.<br />
PVC<br />
Permanent Virtual Circuit. Virtual connection between two fixed endpoints of the network.<br />
Routing, frame and ATM network terminal.<br />
RFC<br />
Abbreviation of request for comments. Refers to each of the documents that define the standard<br />
communication protocols on the network.<br />
Spanning tree<br />
Bridges must ensure that there are no vicious circles in the network, i.e. that a single frame<br />
does not continue to travel round and round eternally looking for a path to its destination,<br />
unnecessarily occupying the network. This happens when there are several possible paths<br />
available between two networks or segments. Frames continue to propagate themselves on<br />
all possible segments and sometimes turn back, thus creating vicious circles. The frame leaves<br />
“through the door” and returns “through the window” continuously. To intercept these “wandering<br />
frames”, one of the possible paths is chosen and all of the frames addressed to a particular<br />
destination are routed on that path. The path chosen must be the shortest of those available.<br />
The decision is made using an algorithm called spanning tree. If the path originally chosen<br />
goes missing due to a network fault, the bridge switches to a second one, thus maintaining<br />
connection continuity. The end result is that the network appears to be structured like a<br />
large hierarchical tree without duplicate paths between any of its stations. The efficiency of<br />
this method is limited to local networks and does not work well on wide area connections as it<br />
involves the continuous exchange of information between bridges.<br />
Telnet<br />
Protocol similar to TCP/IP that allows the user to establish an interactive connection to a<br />
remote PC. It is a client/server application used to query databases or use specific services on<br />
a server.<br />
VCI<br />
Virtual Channel Identifier. The VCI, along with the VPI, unequivocally identifies the physical<br />
logical circuit assigned to a single <strong>ADSL</strong> subscriber in the ATM network.<br />
WAN<br />
22
Step 6:<br />
Front panel system messages<br />
LED Indicators<br />
The <strong>ADSL</strong> Bridge modem is equipped with LEDs on the front as described in the table below<br />
(from left to right):<br />
LED Color Status Description<br />
PWR green On<br />
Off<br />
DSL LNK green Blinking<br />
Constant<br />
USB green On<br />
Flashing<br />
Off<br />
ETH green On<br />
Flashing<br />
Off<br />
Unit is powered on<br />
Unit is powered off<br />
The modem is establishing the <strong>ADSL</strong> connection<br />
The physical <strong>ADSL</strong> link is active<br />
Connection active<br />
Traffic<br />
No connection active<br />
Ethernet connection active (10M or 100M)<br />
Traffic<br />
Ethernet connection not active<br />
23