02_Installation Setup.fm - Drake Software Support
02_Installation Setup.fm - Drake Software Support
02_Installation Setup.fm - Drake Software Support

You also want an ePaper? Increase the reach of your titles
YUMPU automatically turns print PDFs into web optimized ePapers that Google loves.
<strong>Drake</strong> <strong>Software</strong> User’s Manual<br />
Running <strong>Drake</strong> on a Network<br />
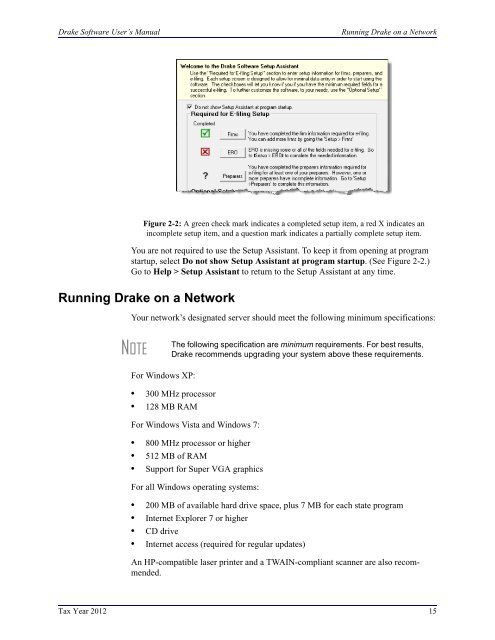
Figure 2-2: A green check mark indicates a completed setup item, a red X indicates an<br />
incomplete setup item, and a question mark indicates a partially complete setup item.<br />
You are not required to use the <strong>Setup</strong> Assistant. To keep it from opening at program<br />
startup, select Do not show <strong>Setup</strong> Assistant at program startup. (See Figure 2-2.)<br />
Go to Help > <strong>Setup</strong> Assistant to return to the <strong>Setup</strong> Assistant at any time.<br />
Running <strong>Drake</strong> on a Network<br />
Your network’s designated server should meet the following minimum specifications:<br />
NOTE<br />
The following specification are minimum requirements. For best results,<br />
<strong>Drake</strong> recommends upgrading your system above these requirements.<br />
For Windows XP:<br />
• 300 MHz processor<br />
• 128 MB RAM<br />
For Windows Vista and Windows 7:<br />
• 800 MHz processor or higher<br />
• 512 MB of RAM<br />
• <strong>Support</strong> for Super VGA graphics<br />
For all Windows operating systems:<br />
• 200 MB of available hard drive space, plus 7 MB for each state program<br />
• Internet Explorer 7 or higher<br />
• CD drive<br />
• Internet access (required for regular updates)<br />
An HP-compatible laser printer and a TWAIN-compliant scanner are also recommended.<br />
Tax Year 2012 15
Single Workstations and Network Options<br />
<strong>Drake</strong> <strong>Software</strong> User’s Manual<br />
As computers are added to the network, RAM and processing speed of the server and<br />
the workstations should be upgraded to improve performance.<br />
NOTE<br />
Your office’s network must be properly configured for <strong>Drake</strong> to run correctly.<br />
<strong>Drake</strong> cannot provide technical support for the network itself.<br />
Consult an IT professional for network setup and support.<br />
Single Workstations and Network Options<br />
New for 2012: Setting up <strong>Drake</strong> on stand-alone computers or on networks is easier<br />
and clearer. The software automatically sets up the location and data paths for you on<br />
the Data Locations dialog box (Figure 2-3).<br />
The location where you install <strong>Drake</strong> (see step 5 in Table 2-1 on page 13 or step 7 in<br />
“Downloading the <strong>Software</strong>” on page 13) will be the default location for all current<br />
and prior-year client files and returns, and the default location for such configuration<br />
settings as firm and preparer setup, reports, macros, letters, pricing files, preparer<br />
notes, and schedules. Unless you have files stored in different locations, or you have a<br />
unique network setup, it shouldn’t be necessary to make any changes to your data<br />
locations.<br />
Administrators have the option of changing these data locations to conform to a particular<br />
network setup.<br />
Figure 2-3: Network information is entered at <strong>Setup</strong> > Data Locations<br />
Networks<br />
Install <strong>Drake</strong> to your network’s server or to all workstations of a “peer-to-peer” network.<br />
Table 2-2 shows a comparison of the two network options:<br />
Table 2-2: Comparison of Network Option<br />
Server Only<br />
(Preferred <strong>Setup</strong>)<br />
For firms with a robust network setup<br />
All Workstations<br />
(“Peer-to-Peer” <strong>Setup</strong>s)<br />
For firms without resources to use a single server<br />
16 Tax Year 2012
<strong>Drake</strong> <strong>Software</strong> User’s Manual<br />
Single Workstations and Network Options<br />
Table 2-2: Comparison of Network Option<br />
Server Only<br />
(Preferred <strong>Setup</strong>)<br />
Simplified setup and updates<br />
No need to “stagger” DCN counter<br />
All Workstations<br />
(“Peer-to-Peer” <strong>Setup</strong>s)<br />
Updates must be installed to each computer<br />
Could be necessary to “stagger” DCN counter<br />
Server<br />
Networks<br />
Once your network has been mapped and <strong>Drake</strong> is installed on a server, complete the<br />
following steps at each workstation:<br />
1. Click Start > Run. (Windows 7 users: Click the Office button.) (The Windows<br />
Start and Office buttons are located at the lower-left corner of your screen.)<br />
2. Type F:\DRAKE12\NWCLIENT\NWCLIENT.EXE (substituting your server drive<br />
letter for “F”).<br />
3. Click OK. (Windows 7 users: Press ENTER.)<br />
4. Click OK. The server-only system is now in place.<br />
Once this process has been completed at each workstation that will be using <strong>Drake</strong>,<br />
you will be able to access the <strong>Drake</strong> program from any of these workstations.<br />
By default, all workstation use the configurations (for letters, pricing, firms, preparers,<br />
etc.), as set up on the server. To use configurations set up elsewhere (for instance, on<br />
each individual workstation):<br />
1. From the Home window in <strong>Drake</strong>, go to <strong>Setup</strong> > Data Locations.<br />
2. In the Network <strong>Setup</strong> section of the Data Locations dialog box (Figure 2-3 on<br />
page 16), choose the drive where you’ve made the configuration settings from the<br />
Share settings (letters, pricing...) drop list.<br />
3. Click OK.<br />
By default, all prior-year files are stored on the server. To access prior-year files stored<br />
elsewhere:<br />
1. From the Home window in <strong>Drake</strong>, go to <strong>Setup</strong> > Data Locations.<br />
2. In the Location of client folders section of the Data Locations dialog box<br />
(Figure 2-3 on page 16), enter the location where you wish to store and access<br />
prior-year files in the Location for 2011 client files drop list.<br />
3. Click OK.<br />
Other<br />
Network<br />
Configurations<br />
Some network setups—such as “peer-to-peer” networks—don’t work off an actual<br />
server. Each station runs <strong>Drake</strong> independently but one computer—a designated<br />
“server”— is used for transmitting returns. For such setups, follow the instructions in<br />
“Installing from CD” on page 12 to install <strong>Drake</strong> onto each workstation.<br />
Once <strong>Drake</strong> is installed on all your workstations and your network has been mapped,<br />
one of your workstations should be designated as the “server,” and the other workstations<br />
should linked to the “server” in the following manner:<br />
Tax Year 2012 17
<strong>Software</strong> <strong>Setup</strong><br />
<strong>Drake</strong> <strong>Software</strong> User’s Manual<br />
1. From the Home window in <strong>Drake</strong>, go to <strong>Setup</strong> > Data Locations to open the<br />
Data Locations dialog box. (See Figure 2-3 on page 16.)<br />
2. In the Network <strong>Setup</strong> section, select the drive of the workstation designated as<br />
the “server” from the Tax returns are stored here drop list.<br />
3. Click OK.<br />
By default, all workstation using <strong>Drake</strong> on a “peer-to-peer” network use the configuration<br />
files as set up on the individual workstations. To share the same configuration<br />
files as the “server” or some other workstation:<br />
1. From the Home window in <strong>Drake</strong>, go to <strong>Setup</strong> > Data Locations.<br />
2. In the Network <strong>Setup</strong> section of the Data Locations dialog box (Figure 2-3 on<br />
page 16), choose the drive letter where you’ve stored the configuration settings<br />
from the Share settings... drop list.<br />
3. Click OK.<br />
By default, all prior-year files are stored on the individual workstations. If your workstations<br />
should share the prior-year files:<br />
1. From the Home window in <strong>Drake</strong>, go to <strong>Setup</strong> > Data Locations.<br />
2. In the Location of client folders section of the Data Locations dialog box, enter<br />
the drive letter of the “server” workstation in the Location for 2011 client files<br />
drop list.<br />
3. Click OK.<br />
IMPORTANT<br />
All computers on the network must have access to the “server’s”<br />
drive – the drive on which the tax returns are stored and from<br />
which the returns will be e-filed. Map to the “server’s” drive—not<br />
to the <strong>Drake</strong>12 folder.<br />
All drives properly mapped and with <strong>Drake</strong> <strong>Software</strong> installed will<br />
appear in the Tax returns are stored here drop list and the<br />
Share settings... drop list. If the drive of the “server” does not<br />
appear in these lists, consult an IT professional. <strong>Drake</strong> cannot<br />
provide technical support for the network itself.<br />
CAUTION<br />
Do not change the Data Locations settings during tax season! If a<br />
change is necessary, contact <strong>Drake</strong> <strong>Support</strong>.<br />
<strong>Software</strong> <strong>Setup</strong><br />
Perform setup procedures before attempting to prepare or e-file returns. Some setup<br />
procedures are required; others are optional.<br />
Table 2-3: <strong>Setup</strong> Procedures: Required and Optional<br />
Required <strong>Setup</strong> Procedure<br />
Optional <strong>Setup</strong> Procedures<br />
Firm(s) (See “Firm <strong>Setup</strong>” on page 20.) Options (See “Options <strong>Setup</strong>” on page 27.)<br />
18 Tax Year 2012
<strong>Drake</strong> <strong>Software</strong> User’s Manual<br />
<strong>Software</strong> <strong>Setup</strong><br />
Table 2-3: <strong>Setup</strong> Procedures: Required and Optional<br />
Required <strong>Setup</strong> Procedure<br />
Optional <strong>Setup</strong> Procedures<br />
ERO (See “ERO <strong>Setup</strong>” on page 21.) Pricing (See “Pricing <strong>Setup</strong>” on page 37.)<br />
Preparer(s) (See “Preparer <strong>Setup</strong>” on page 22.) Macros (See “Macros <strong>Setup</strong>” on page 38.)<br />
Data Locations (See “Single Workstations and<br />
Network Options” on page 16.)<br />
Pay Per Return (PPR clients only; see PPR<br />
manual on CD, from the Home window of the<br />
software at Help > Online Resources, or from<br />
the <strong>Drake</strong> <strong>Support</strong> website.)<br />
Letters (See “Letters <strong>Setup</strong>” on page 43.)<br />
Colors (See “Color <strong>Setup</strong>” on page 46.)<br />
Printing (See “Printing <strong>Setup</strong>” on page 47.)<br />
If you used <strong>Drake</strong> last year, you can bring forward most required program settings<br />
from your 2011 program. See “Updating Settings” on page 79 for details.<br />
Logging in as an Administrative User<br />
Log in as ADMIN to enter setup information. The administrator can access the following<br />
features not available to non-administrative users:<br />
• Preparer setup security features in <strong>Setup</strong> > Preparer(s)<br />
• Additional features in <strong>Setup</strong> > Firm(s)<br />
• Network options (<strong>Setup</strong> > Data Locations)<br />
• The Administrative Options tab of <strong>Setup</strong> > Options<br />
• Additional tracking information on the ADMN screen in data entry<br />
Setting an<br />
ADMIN<br />
Password<br />
An ADMIN password is not required. If your firm chooses to have an ADMIN password,<br />
keep a record of the password. <strong>Drake</strong> cannot retrieve lost or forgotten login<br />
passwords.<br />
To set a password for the ADMIN account (optional):<br />
Shortcut: Doubleclick<br />
the ADM row<br />
to edit it.<br />
1. From the <strong>Drake</strong> Home window, select <strong>Setup</strong> > Preparer(s).<br />
2. Click the Administrator (ADM) row, and then click Edit Preparer.<br />
3. Enter a password in the Password field under Login Information. A password<br />
can be up to eight characters (alphabetic and/or numeric) and is not case-sensitive.<br />
4. Re-enter the password in the Password (Repeated) field.<br />
5. Click Save, and then click Exit.<br />
NOTE<br />
If no PTIN has been entered, you will be asked if you want to exit the<br />
window without entering a PTIN. Click Yes, or click No and enter a<br />
PTIN before saving and exiting. (A PTIN is required for e-filing.)<br />
Tax Year 2012 19
<strong>Software</strong> <strong>Setup</strong><br />
<strong>Drake</strong> <strong>Software</strong> User’s Manual<br />
Firm <strong>Setup</strong><br />
Firm setup must be completed before preparing and e-filing returns. If data is inaccurate<br />
or missing, tax returns might be e-filed with incorrect information.<br />
NOTE<br />
To ensure that all information needed for e-filing is entered for a firm,<br />
firms with incomplete information are highlighted in red in the <strong>Setup</strong> ><br />
Firm(s) grid. Fields required for e-filing are marked by red text.<br />
With the click of a button, you can now import the information from your<br />
firm’s bank application into the <strong>Drake</strong> program. (See “Banking Information,”<br />
below.)<br />
Adding a<br />
Firm<br />
To add a firm in Firm <strong>Setup</strong>:<br />
1. From the <strong>Drake</strong> Home window, go to <strong>Setup</strong> > Firm(s).<br />
2. Click Add to activate the bottom half of the Firm <strong>Setup</strong> window.<br />
3. Enter your firm’s general and banking information. Fields needed for e-filing are<br />
indicated by red text.<br />
• General Information — Enter contact and identification information, including<br />
firm name, address, phone and fax numbers, contact name, e-mail address,<br />
Employer Identification Number (EIN), and Electronic Filer’s Identification<br />
Number (EFIN). If the firm is not located in the U.S., enter the province or<br />
state, the country, and the postal code.<br />
– A DCN serial number is assigned to each return based on the firm’s<br />
EFIN and DCN. If two returns have the same DCN, the IRS rejects one of<br />
the returns. To avoid duplications, DCNs are automatically advanced for<br />
each return calculated.<br />
NOTE<br />
Offices that use multiple computers that are not networked must “stagger”<br />
DCNs to avoid duplication. DCNs should be staggered before creating<br />
any 2012 returns. For instructions on staggering DCNs, see<br />
“Staggering DCNs” on page 234.<br />
– Non-paid-prep — If the firm is not a paid preparer, enter a non-paid code<br />
here. Acceptable codes are VI (VITA), VT (VITA–T), TE (TCE–X), IP<br />
(IRS–PREPARED), AND IR (IRS–REVIEWED).<br />
• Banking Information — Choose a bank and include add-on fees.<br />
– If you’ve completed your online <strong>Drake</strong> bank application through the<br />
Enterprise Office Manager (EOM), click Retrieve to import your banking<br />
information directly from the bank application. (For information on the<br />
EOM, see “Banking Application” on page 206.)<br />
– Select a bank and enter the applicable add-on fee and the name of the person<br />
or entity that will receive the add-on fee. (This name will appear on<br />
the client’s “Bank Information Sheet,” generated with the return.) For<br />
more on available options, see Table 7-4 on page 209. For more on individual<br />
bank selections, see Chapter 7, “Banking.”<br />
20 Tax Year 2012
<strong>Drake</strong> <strong>Software</strong> User’s Manual<br />
<strong>Software</strong> <strong>Setup</strong><br />
4. Click Save. The program assigns a number for each firm entered in Firm <strong>Setup</strong>.<br />
NOTES<br />
To view a report of the revenue you’ve earned from the additional (addon)<br />
fees for e-filing, log in to <strong>Support</strong>.<strong>Drake</strong><strong>Software</strong>.com and go to My<br />
Account > Bank Application. Log in to the EOM with your EFIN and<br />
<strong>Drake</strong> password, then, from the blue sidebar menu, click Reporting.<br />
These fees are listed when the returns are funded, not as the returns<br />
are transmitted.<br />
Editing Firm<br />
Information<br />
Shortcut: Doubleclick<br />
a firm’s row to<br />
edit firm data.<br />
Deleting a<br />
Firm<br />
To edit a firm’s information:<br />
1. From the <strong>Drake</strong> Home window, go to <strong>Setup</strong> > Firm(s).<br />
2. Select the firm to edit and click Edit Firm to activate the bottom half of the Firm<br />
<strong>Setup</strong> window.<br />
3. Edit the firm information. (See “Adding a Firm” on page 20 for information on<br />
individual fields.)<br />
4. Click Save, and then click Exit to close the Firm <strong>Setup</strong> window.<br />
To delete a firm from Firm <strong>Setup</strong>:<br />
1. From the <strong>Drake</strong> Home window, go to <strong>Setup</strong> > Firm(s).<br />
2. Select the firm to delete and click Delete.<br />
3. Click Yes, and then click Exit to close the Firm <strong>Setup</strong> window.<br />
Printing a<br />
List of Firms<br />
ERO <strong>Setup</strong><br />
To print a list of firms entered in the program:<br />
1. From the <strong>Drake</strong> Home window, go to <strong>Setup</strong> > Firm(s).<br />
2. Click Print. The Report Viewer displays the report on the screen.<br />
3. Click Print to open the Print ‘<strong>Drake</strong> Report’ dialog box.<br />
4. Change any print options necessary, and then click Print again.<br />
5. Click Exit, and then click Exit again to close the Firm <strong>Setup</strong> window.<br />
An Electronic Return Originator (ERO) must complete ERO <strong>Setup</strong> in order to e-file<br />
returns, use the <strong>Drake</strong> e-mail program, download software updates, and access the<br />
online e-filing database. Required fields for e-filers are marked in the program by red<br />
text.<br />
To set up your firm as an ERO in <strong>Drake</strong>:<br />
1. From the <strong>Drake</strong> Home window, go to <strong>Setup</strong> > ERO to open the Electronic Filing<br />
<strong>Setup</strong> dialog box.<br />
2. In the General Information section, enter the account number, EFIN, <strong>Drake</strong><br />
password, name, address, ZIP code, and EIN of the ERO. Fields required for e-filers<br />
are marked by red text. (See Figure 2-4 on page 22.)<br />
Tax Year 2012 21
<strong>Software</strong> <strong>Setup</strong><br />
<strong>Drake</strong> <strong>Software</strong> User’s Manual<br />
Figure 2-4: <strong>Setup</strong> > ERO<br />
NEW FOR<br />
2012<br />
Click the Use Firm #1 Info button (Figure 2-4 on page 22) to import the<br />
information for the first firm listed in <strong>Setup</strong> > Firm(s) directly into the<br />
General Information section of the Electronic Filing <strong>Setup</strong> window.<br />
In the event you must edit your serial number, mark the Serial Number<br />
check box and enter the changes.<br />
Preparer <strong>Setup</strong><br />
3. Under Connection Settings, make a new choice if you wish to change from the<br />
default setting (Always use my existing Internet connection) which works for<br />
most computers. Contact <strong>Drake</strong> <strong>Support</strong> if you have trouble connecting to <strong>Drake</strong>.)<br />
4. If your firm is a franchise or network, complete the Franchise/Network Information<br />
fields. (See “Franchise/Network Requirements” on page 203.)<br />
5. If applicable, enter in the Disclosure or Use of Tax Information field the name<br />
of the franchise or network to which tax information must be disclosed in order to<br />
apply for bank products. (The field facilitates compliance with IRS Regulation<br />
7216; see “Taxpayer Requirements” on page 2<strong>02</strong>.)<br />
6. Click OK.<br />
Preparer <strong>Setup</strong> fields and preparer security must be completed before a preparer can<br />
begin preparing and e-filing returns. All preparers must be entered in Preparer <strong>Setup</strong>.<br />
Data entry operators can also be entered. Each time a name is added to Preparer <strong>Setup</strong>,<br />
a number is assigned to that name.<br />
TIP<br />
Include data entry operators in Preparer <strong>Setup</strong> to (1) track data entry<br />
information and (2) easily set up Front Office preparers in the Scheduler.<br />
(See “Scheduler” on page 85.)<br />
22 Tax Year 2012
<strong>Drake</strong> <strong>Software</strong> User’s Manual<br />
<strong>Software</strong> <strong>Setup</strong><br />
Adding a<br />
Preparer<br />
To apply for a<br />
PTIN, go online at<br />
www.irs.gov /For-<br />
Tax-Pros and click<br />
Apply for PTIN.<br />
Information entered here determines what preparer information appears on the tax<br />
returns. To add a new preparer in <strong>Drake</strong>:<br />
1. From the <strong>Drake</strong> Home window, go to <strong>Setup</strong> > Preparer(s).<br />
2. Click Add to activate the bottom half of the Preparer <strong>Setup</strong> window.<br />
3. Enter General Information. Fields required for e-filers are indicated by red text.<br />
Note that a PTIN is required by the IRS.<br />
4. Enter Login Information. Note that a login name is needed for e-filing and use of<br />
a password is optional.<br />
5. If applicable, click Registration to enter your state registration ID (California,<br />
Maryland, New York, Oregon, and Virginia only). Click OK to save.<br />
6. Indicate Return Signature Options.<br />
• PIN Signature — Enter the preparer’s five-digit PIN Signature.<br />
• Use PIN for:<br />
– 8879 PIN Signature — Select to activate the 8879 PIN signature.<br />
– Alternative Electronic Signature — Select to automatically populate<br />
any field requiring electronic signature with the preparer’s name.<br />
IMPORTANT<br />
The alternative electronic signature is printed on the “Preparer’s<br />
signature” at the bottom of returns that have not been e-filed and<br />
on returns where the preparer and ERO are different (for example,<br />
if an override field on screen 1 is used). To have the alternative<br />
electronic signature printed on a return that has been e-filed,<br />
you must re-enter this number in the PIN for preparer’s alternative<br />
e-signature field on the PRNT screen for that return.<br />
7. If applicable, enter the firm’s Republic Bank Identification Number (RBIN).<br />
8. Enter Power of Attorney information (necessary for Form 2848, Power of Attorney<br />
and Declaration of Representative).<br />
– Preparer Designation — Select the designation under which the preparer<br />
is authorized to practice before the IRS.<br />
– CAF Number — Enter the preparer’s Central Authorization File (CAF)<br />
number assigned by the IRS.<br />
– Jurisdiction — Enter the jurisdiction in which the preparer is authorized<br />
to practice before the IRS. If the preparer is an IRS Enrolled Agent (EA),<br />
enter the EA number here.<br />
9. Enter W-7 Acceptance Agent information for the preparer, if applicable.<br />
You are now ready to set up preparer security. If you click Save at this point, you will<br />
be reminded that security rights need to be set before the preparer can access any features<br />
in the program. If you select to close Preparer <strong>Setup</strong> now, be aware that you’ll<br />
have to return at some point to set the preparer’s security rights.<br />
To proceed, go to Step 4 in the following section, “Setting Up Preparer Security.”<br />
Tax Year 2012 23
<strong>Software</strong> <strong>Setup</strong><br />
<strong>Drake</strong> <strong>Software</strong> User’s Manual<br />
Setting Up<br />
Preparer<br />
Security<br />
This feature establishes security settings for an individual preparer. To assign the same<br />
security level to many preparers, the Group Security feature may be a better option.<br />
See “Setting Up Group Security” on page 25.<br />
NOTE<br />
Only administrative users can set security rights. Settings must be<br />
established before a preparer can begin working in the software.<br />
To customize security settings for a preparer:<br />
1. From the <strong>Drake</strong> Home window, go to <strong>Setup</strong> > Preparer(s).<br />
2. Select a preparer and click Edit Preparer.<br />
3. Select Security > Custom Security.<br />
4. In the Preparer Security <strong>Setup</strong> window, select a menu, and then select the items<br />
to which the preparer should be allowed access. Items left blank will be inaccessible<br />
to the preparer. (See Figure 2-5 on page 24.)<br />
Figure 2-5: Security setup<br />
5. Click Save. When prompted, click OK. Click Exit to close Preparer <strong>Setup</strong>.<br />
Other options available under the Security button are shown in Table 2-4.<br />
Table 2-4: Preparer Security Options<br />
Security Option<br />
Set Security to Allow No Options<br />
Set Security to Allow All Options<br />
Set Security Equal to Existing Preparer<br />
Add Preparer to Security Group<br />
Front Office (Scheduling Only)<br />
Administrator (Full ADMIN Rights)<br />
Description<br />
Employee cannot access any part of the program.<br />
Employee can access all parts of the program,<br />
except for administrative-only features.<br />
Employee is given security settings to match those<br />
of another preparer on the list.<br />
Add preparer to a pre-established security group.<br />
(See “Setting Up Group Security,” following.)<br />
Employee can access the Scheduler only.<br />
Employee can access all parts of the program,<br />
including administrative-only features.<br />
24 Tax Year 2012
<strong>Drake</strong> <strong>Software</strong> User’s Manual<br />
<strong>Software</strong> <strong>Setup</strong><br />
To remove security rights from all preparers (other than administrative users), go to<br />
<strong>Setup</strong> > Preparers and click Remove Rights. To remove rights for an individual<br />
employee, set that person’s security to Allow No Options.<br />
Setting Up<br />
Group<br />
Security<br />
Only an administrative user can apply security settings to a group of preparers. You<br />
can create as many security groups as needed, but a preparer can belong to only one<br />
security group at a time.<br />
NOTE<br />
You cannot assign a preparer to more than one security group. If you<br />
try to do this, the preparer is removed from his or her current group and<br />
added to the new one.<br />
To apply group security:<br />
1. From the <strong>Drake</strong> Home window, go to <strong>Setup</strong> > Preparers.<br />
2. Click Group Security to open the Group Security dialog box. Three security<br />
levels, listed below and shown in Figure 2-6, are available by default. If preparer<br />
data is brought forward from last year and there are preparers with any of these<br />
security levels, they are automatically added to the appropriate group.<br />
• Admin — Users with administrative rights; group cannot be deleted.<br />
• Front Office — Front Office rights for non-preparers (Scheduler access only)<br />
• Full — Users with full access to everything except administrative features<br />
3. Choose one of the following options:<br />
• To add a group, click Add Group. Under Security Group General Information<br />
(Figure 2-6), enter a Group ID and a Group Description.<br />
• To add preparers to an existing group, double-click the group row near the top<br />
of the Group Security dialog box.<br />
Figure 2-6: Security Group General Information section of Group Security dialog box<br />
4. Under Security Settings, click to mark the boxes representing the features to<br />
which the group should have access. (Accessible features cannot be edited for the<br />
Full or Admin groups.) Click Check All to mark all boxes shown in all menu categories.<br />
Tax Year 2012 25
<strong>Software</strong> <strong>Setup</strong><br />
<strong>Drake</strong> <strong>Software</strong> User’s Manual<br />
5. Under the Assign Preparers tab, select the preparers to be assigned to the group.<br />
(To select a preparer, double-click a name or click the name and click Select.<br />
Selected preparers are listed in the Preparers in Security Group column.)<br />
6. Click Save.<br />
NOTE<br />
You do not have to assign preparers when creating a group. Assign<br />
preparers at any time by returning to the Group Security dialog box.<br />
To edit group settings or members, select a group name and click Edit Group. To<br />
delete a group, select a group name and click Delete Group. Note that a group must<br />
be empty (must contain no preparers) in order to be deleted.<br />
Group<br />
Security<br />
Reports<br />
The Group Security feature allows you to view and print two reports related to group<br />
security settings:<br />
• Group Security report — Lists group security settings for each group. Groups<br />
are listed in order of creation, with default groups first.<br />
• Group Preparers report — List all groups and their assigned preparers.<br />
Reports are shown in the Report Viewer, which allows options for printing and<br />
exporting the reports. To access reports, click Print in the Group Security toolbar.<br />
The program displays the “Group Security” report first. To access the “Group Preparers”<br />
report, click Exit in the Report Viewer toolbar. Once the “Group Preparers”<br />
report is open, click Exit again to return to the Group Security dialog box.<br />
Other<br />
Features<br />
Other features available under <strong>Setup</strong> > Preparer(s) include the ability to create a preparer’s<br />
daily schedule, the ability to print a list of preparers, and the ability to run a<br />
search on preparers. To access these features, use the following procedures.<br />
To create a preparer’s daily schedule:<br />
1. From the <strong>Drake</strong> Home window, go to <strong>Setup</strong> > Preparer(s).<br />
2. Select a preparer and click Edit Preparer.<br />
3. Click Schedule.<br />
4. Select day and “in” and “out” times.<br />
5. Click Apply, and then click Save to save the schedule.<br />
See “Scheduler” on page 85 for more information on using the <strong>Drake</strong> Scheduler.<br />
To print a list of preparers entered into the program:<br />
1. From the <strong>Drake</strong> Home window, go to <strong>Setup</strong> > Preparer(s).<br />
2. Click Print. The Report Viewer displays the current preparer listing.<br />
3. Click Print, and then click Print again.<br />
4. Click Exit to close the Report Viewer. Click Exit again to close the Preparer<br />
<strong>Setup</strong> dialog box.<br />
See “Report Viewer” on page 323 for more on using the <strong>Drake</strong> Report Viewer.<br />
26 Tax Year 2012
<strong>Drake</strong> <strong>Software</strong> User’s Manual<br />
<strong>Software</strong> <strong>Setup</strong><br />
To search for preparers entered into the program:<br />
1. From the <strong>Drake</strong> Home window, go to <strong>Setup</strong> > Preparer(s).<br />
2. Click Search.<br />
3. Enter preparer information in the Find Preparer Record box. As you type, the<br />
software locates (and highlights) the record.<br />
4. Click Close. Click Exit to close the Preparer <strong>Setup</strong> dialog box.<br />
Pay Per Return <strong>Setup</strong> (PPR Clients Only)<br />
Data Locations <strong>Setup</strong><br />
For information on setting up PPR, see <strong>Drake</strong> <strong>Software</strong> User’s Manual Supplement:<br />
Pay Per Return (PPR), available on your <strong>Drake</strong> CD, through the software (from the<br />
Home window in <strong>Drake</strong>, go to Help > Online Resources) and on the <strong>Drake</strong> <strong>Support</strong><br />
site at http://<strong>Support</strong>.<strong>Drake</strong><strong>Software</strong>.com (Training Tools > Manuals).<br />
Data location settings (formerly Directories/Paths settings), which manage the locations<br />
for data access and storage, is now configured when you install the program. To<br />
change your settings (ADMIN only), select <strong>Setup</strong> > Data Locations from the Home<br />
window. For more information, see “Single Workstations and Network Options” on<br />
page 16.<br />
CAUTION<br />
Directory and path settings should not be changed during tax season.Changing<br />
a drive letter during tax season can cause problems in<br />
file storage and e-file processing. For details on setting network configurations,<br />
see “Single Workstations and Network Options” on<br />
page 16. For assistance, contact your office IT professional or <strong>Drake</strong><br />
<strong>Support</strong>.<br />
Options <strong>Setup</strong><br />
Options <strong>Setup</strong> is<br />
not required for<br />
completing or e-<br />
filing tax returns.<br />
The tax software is shipped with the most common preferences set as the defaults. Use<br />
Options <strong>Setup</strong> (accessible by clicking <strong>Setup</strong> > Options from the Home window) to<br />
view or change the defaults for the various options available. Options are categorized<br />
into tabs, as shown in Figure 2-7. (Only administrative users have the Administrative<br />
Options tab.)<br />
Figure 2-7: Tabs in Options <strong>Setup</strong><br />
Tax Year 2012 27
<strong>Software</strong> <strong>Setup</strong><br />
<strong>Drake</strong> <strong>Software</strong> User’s Manual<br />
Table 2-5 through Table 2-12 describe the options available on each tab in Options<br />
<strong>Setup</strong>.<br />
Data Entry<br />
Options<br />
Options under the Data Entry tab are described in Table 2-5.<br />
Table 2-5: Options <strong>Setup</strong>: Data Entry<br />
Option<br />
Maximize data entry screens where<br />
possible for easier viewing<br />
Size data entry screens to show most<br />
fields without scrolling<br />
Disable sizing of data entry screens<br />
Tab to ZIP code field (skip city/state<br />
and use ZIP code database)<br />
Show notes/reminders to preparer<br />
when opening a return<br />
Verify SSN when creating new return<br />
Enable Windows standard keystrokes<br />
Autofill preparer and firm number on<br />
new returns<br />
Magnify data entry<br />
Activate W-2 wage and federal withholding<br />
verification fields<br />
Do not restrict minimum font size in<br />
800x600<br />
Use grid data entry format on available<br />
screens<br />
Language Options (1040 package<br />
only)<br />
Letter case for data entry<br />
Override field indicator<br />
Adjustment field indicator<br />
Display warning for missing required<br />
fields<br />
Description<br />
Increase the size of the <strong>Drake</strong> screen to fill your monitor. Effective at all<br />
monitor resolutions.<br />
Decrease the size of large <strong>Drake</strong> screens so they fit on your monitor.<br />
Effective only when monitor resolution is set to 1<strong>02</strong>4x768 or smaller.<br />
Keep preparer from resizing screens. Effective usually for monitor resolution<br />
set to 800 x 600 or smaller.<br />
Press the TAB key while entering an address in data entry to bypass the<br />
City and State fields and go directly to the ZIP field. City and State fields<br />
are completed automatically based on the ZIP code entered.<br />
Show all notes and reminders from the NOTE and PAD screens every time<br />
you open a client file that contains notes or reminders.<br />
Require double entry of SSN or EIN, helping eliminate erroneous entries.<br />
CTRL+X = cut; CTRL+C = copy; CTRL+V = paste;<br />
SHIFT+CTRL+X = autofill amended screen;<br />
SHIFT+CTRL+C = calculate return; SHIFT+CTRL+V = view return<br />
Automatically enter the firm number and preparer number where required<br />
on data entry screens.<br />
Enlarge the active field for easier reading.<br />
To ensure accuracy of data entry, require wage and withholding amounts<br />
be entered twice on the W2 screen.<br />
This is a sizing option for computers using an 800x600 resolution. If this<br />
option is selected, the program will not attempt a font substitution to retain<br />
readability. Text on screens will shrink to fit as needed.<br />
Allows you to type information into a spreadsheet environment, which can<br />
result in faster data entry. This feature is available for the Dependents,<br />
INT, DIV, 8949, D, and 4562 screens.<br />
Choose between English and Spanish for menus, data entry screens, fieldspecific<br />
help text, and error codes.<br />
Choose between all uppercase letters and mixed case.<br />
Format override fields in data entry; see “Override & Adjustment Fields” on<br />
page 72.<br />
Format adjustment fields in data entry; see “Override & Adjustment Fields”<br />
on page 72.<br />
Choose to receive a warning: whenever a required field is empty; once per<br />
data-entry session; not at all.<br />
28 Tax Year 2012
<strong>Drake</strong> <strong>Software</strong> User’s Manual<br />
<strong>Software</strong> <strong>Setup</strong><br />
Calc &<br />
View/Print<br />
Options<br />
Options under the Calculation & View/Print tab are described in Table 2-6.<br />
Table 2-6: Options <strong>Setup</strong>: Calculation & View/Print<br />
Option<br />
Autocalculate tax return when exiting data<br />
entry<br />
Display client fee on Calculation screen<br />
Print only one overflow statement per page<br />
Go directly to form when accessing View<br />
or data entry mode<br />
Audible notification of calculation error<br />
messages<br />
Layout for depreciation schedule<br />
Pause option for calculation<br />
Number of days to store print files<br />
Print sort options for Interest/Dividends<br />
Description<br />
Returns are automatically calculated every time you exit the return.<br />
Allows the fees charged for return preparation to appear on the Calculation<br />
Results window.<br />
Each overflow statement is printed on a separate piece of paper.<br />
Go from a data entry screen to the corresponding form in View mode<br />
when you go to View mode. When the Data Entry button is clicked in<br />
View mode, the program returns to the data entry screen.<br />
When calculating a return, the program produces a “beep” to indicate<br />
an error message.<br />
Select Portrait to produce the depreciation schedule vertically using<br />
8.5 x 11 paper; select Landscape to produce it horizontally.<br />
Choose the circumstances under which the Calculation Results window<br />
appears, allowing a review of calculation results before proceeding<br />
to View mode.<br />
Select to store print files from 1 to 9 days, or to have them removed<br />
once the return is selected for e-filing. If a return is needed after the<br />
print file is removed, recalculate the return to re-create the print file.<br />
Choose how items entered on the INT and DIV screens are sorted<br />
when printed on Schedule B: alphabetically, numerically, or not at all.<br />
Form &<br />
Schedule<br />
Options under the Form & Schedule Options tab are described in Table 2-7.<br />
Table 2-7: Options <strong>Setup</strong>: Form & Schedule<br />
Option<br />
Print Schedule A only when required<br />
Print Schedule B only when required<br />
Print Form 4562 only when required<br />
Print Form 6251 only when required<br />
Next year depreciation schedule<br />
W-2/1099-R forms<br />
Description<br />
Produce Schedule A only when taxpayer qualifies to itemize.<br />
Produce Schedule B only when taxpayer has enough interest income<br />
to require filing Schedule B.<br />
Produce Form 4562, Depreciation and Amortization, only when the tax<br />
return requires it.<br />
Produce Form 6251, Alternative Minimum Tax, only when the tax<br />
return requires it.<br />
Select this option to produce a depreciation schedule for next year in<br />
addition to the one for this year.<br />
Produce and display in View mode all W-2 forms with the return.<br />
Tax Year 2012 29
<strong>Software</strong> <strong>Setup</strong><br />
<strong>Drake</strong> <strong>Software</strong> User’s Manual<br />
Table 2-7: Options <strong>Setup</strong>: Form & Schedule<br />
Print two W-2/1099-Rs per page<br />
Carryover worksheet<br />
Option<br />
Description<br />
If return has more than one W-2 or 1099-R form, print two per page.<br />
Produce any carryover worksheets associated with the return.<br />
Print page 2 of Schedule K-1 ... Produce page 2 of Schedule K-1 for Forms 1120S, 1065, and 1041.<br />
Form 8879 bank account options Select bank account printing options on Form 8879.<br />
1040A/EZ suppress<br />
Form 1045 page 2 (NOL)<br />
Select to Turn On ___ list if greater than...<br />
Automatically suppress Form 1040A or 1040EZ.<br />
Automatically produce Form 1045, page 2, if the return has NOL.<br />
Produce lists of these items (W-2, W-2G, 1099-M, 1099-R, dividends,<br />
interest, K-1) when the selected number in the drop list is exceeded.<br />
NOTE<br />
Many of these settings can be adjusted on a per-return basis. See<br />
“Making Changes on the Fly” on page 52.<br />
Optional<br />
Documents<br />
Options under the Optional Documents tab are described in Table 2-8.<br />
Table 2-8: Options <strong>Setup</strong>: Optional Documents<br />
Option<br />
Folder coversheet<br />
Prior year(s) comparison form<br />
Return summary<br />
Bill summary<br />
Federal filing instructions<br />
State filing instructions<br />
Labels<br />
Envelope Sheet (address drop<br />
lists)<br />
Estimated payment coversheet<br />
Description<br />
This option generates a folder cover sheet containing the taxpayers’ names and<br />
the name, address, and phone number of the preparer’s firm.<br />
Select this option to produce a comparison sheet containing data from the current<br />
and prior-year returns.<br />
Select this option to produce a return summary with every return prepared.<br />
Select this option to produce a summary of the taxpayer’s bill with each return.<br />
Displays detailed federal filing information, including the date to file, form to be<br />
filed, address to file, and payment amount. The instructions are listed as<br />
FILEINST.PG in View mode. Activated by default. Clear the check box to disable,<br />
or use the PRNT screen to activate or disable on a single return.<br />
Displays detailed state filing information, including the date to file, form to be<br />
filed, address to file, and payment amount. The instructions are listed as<br />
“STINST.PG” (“ST” refers to the state abbreviation; for example, OHINST.PG<br />
for Ohio instructions). Activated by default. Clear the check box to disable, or<br />
use the PRNT screen to activate or disable on a single return.<br />
Select this option to print a sheet of “mail to” addresses on Avery 5160 labels<br />
Choose the size of the envelope on which to print the addresses of the taxpayer,<br />
the IRS Service Center, the state tax department, the city tax office, and<br />
for Forms K-1.<br />
Select this option to print estimated coversheet payment addresses to envelope<br />
Nelco ENV500 dimensions for 1040 and 1041 returns with quarterly taxes.<br />
30 Tax Year 2012
<strong>Drake</strong> <strong>Software</strong> User’s Manual<br />
<strong>Software</strong> <strong>Setup</strong><br />
Table 2-8: Options <strong>Setup</strong>: Optional Documents<br />
Option<br />
NELCO hyperlink<br />
Letter Options (all packages)<br />
Include privacy letter with returns<br />
Include engagement letter with<br />
returns<br />
Include customized supplemental<br />
letter with returns<br />
Include K-1 letter with returns<br />
Referral Coupons (3 per sheet)<br />
Description<br />
Click this link to go to the NELCO website to order such <strong>Drake</strong>-compatible products<br />
as envelopes, IRS forms, and checks.<br />
Select the result letter templates to be used for each package.<br />
Select this option to print the privacy disclosure letter with every return.<br />
Select this option to print engagement letters for all packages when the return is<br />
calculated. At the end of the letter template are spaces for client and preparer<br />
signatures. Engagement letters can also be produced prior to completion of the<br />
return using Tools > Letters > Letters.<br />
Print a customized letter that can be used for various purposes.<br />
(See Table 2-14 on page 43.)<br />
Print the cover letter for individual K-1s (1065, 1120S, and 1041 packages).<br />
Enter the number of sheets per return or the coupon amount.<br />
NOTE<br />
To override the default letter for an individual client, see “Overriding<br />
Letters <strong>Setup</strong>” on page 58.<br />
Optional<br />
Items on<br />
Return<br />
Options under the Optional Items on Return tab are described in Table 2-9.<br />
Table 2-9: Options <strong>Setup</strong>: Optional Items on Return<br />
Date on return<br />
Option<br />
Print dates for taxpayer and spouse<br />
signatures (excludes 1040)<br />
Description<br />
The default is the current date. To change this date, enter the required date<br />
on the PRNT screen. If desired, select to print dates for taxpayer and spouse<br />
signatures (excluding 1040).<br />
Select this option to print the signature dates for taxpayer and spouse signatures<br />
on the return (excluding 1040).<br />
Taxpayer phone number Select this option to print the taxpayer’s phone number entered on screen 1.<br />
Third party designee<br />
Rounding amounts<br />
Interest and Penalty Calculation<br />
Select the preparer number of the preparer designated as the third-party designee<br />
to be printed on the main form of the return.<br />
Select Dollar or Penny rounding. Dollar rounding is required for e-filing.<br />
Penny rounding prints penny amounts on all forms.<br />
Calculate penalties and interest on returns filed after the due date based on<br />
interest rates entered. For more information, see “Penalty and Interest Calculation”<br />
on page 181.<br />
Tax Year 2012 31
<strong>Software</strong> <strong>Setup</strong><br />
<strong>Drake</strong> <strong>Software</strong> User’s Manual<br />
Billing Options under the Billing options tab are described in Table 2-10.<br />
Table 2-10: Options <strong>Setup</strong>: Billing<br />
Option<br />
Print taxpayer’s SSN on the bill<br />
Show preparer fees withheld from<br />
bank product<br />
Print taxpayer’s phone number on<br />
the bill<br />
Print taxpayer’s e-mail address<br />
on the bill<br />
Sales Tax<br />
Billing statement format<br />
Description<br />
Select this option to print the taxpayer's SSN on the bill.<br />
Select this option to print on the bill the preparer fees withheld from the bank<br />
product amount.<br />
Select this option to have the taxpayer’s phone number (entered on screen 1)<br />
printed on the bill.<br />
Select this option to have the taxpayer’s e-mail address (entered on screen 1)<br />
printed on the bill.<br />
Enter the sales tax rate to add to each bill. Number must be greater than 1. For<br />
example, 4.5 would represent a sales tax rate of 4.5%.<br />
Select among seven formatting options, including:<br />
- Billing by time (preparing bill based on time spent preparing return multiplied<br />
by preparer's hourly rate as defined in <strong>Setup</strong> > Preparers)<br />
- Billing by form (preparing bill based on forms necessary to complete return by<br />
price entered in <strong>Setup</strong> > Pricing); program prepares a bill summary along with<br />
the option selected here unless the Bill Summary option is cleared at <strong>Setup</strong> ><br />
Options, Optional Documents tab.<br />
Header on bill<br />
Custom Paragraph<br />
States<br />
E-filing<br />
Select among options for the header to be printed on the bill.<br />
Choose to have a custom paragraph printed on the bill. Select a location, and<br />
then write the paragraph in the supplied text box.<br />
To select options for state returns, select the States tab, and then select a state abbreviation<br />
from the drop list. When the options are displayed, select to activate or disable<br />
them as desired and click OK. Available options depend on the chosen state. For more<br />
on specific states, see the FAQ screen for each state program.<br />
Options under the EF tab are described in Table 2-11. Some can be adjusted for an<br />
individual return from the EF screen in data entry.<br />
Table 2-11: Options <strong>Setup</strong>: EF<br />
Option<br />
Auto-generate taxpayer(s) PIN<br />
Require ‘Ready for EF’ indicator on<br />
EF screen<br />
Lock client data file after EF acceptance<br />
Print 9325 when eligible for EF<br />
Description<br />
Have the software assign a randomly generated PIN. (1040 only)<br />
Requires that the Ready for EF indicator on the EF screen be marked<br />
before a return can be selected for e-filing.<br />
Locks the client's data file once it has been e-filed. Opening a locked file<br />
requires you to acknowledge a warning screen before you can edit the<br />
return. You can also access a locked file at Tools > File Maintenance ><br />
Unlock Client Files.<br />
Prints Form 9325, Acknowledgment and General Information for Taxpayers<br />
Who File Returns Electronically, for every eligible return.<br />
32 Tax Year 2012
<strong>Drake</strong> <strong>Software</strong> User’s Manual<br />
<strong>Software</strong> <strong>Setup</strong><br />
Table 2-11: Options <strong>Setup</strong>: EF<br />
Suppress federal EF<br />
Print EF status page<br />
Alert preparer when bank product is<br />
not included<br />
Activate imperfect return election in<br />
data entry<br />
Allow selection for EF from the ‘Calculation<br />
Results’ screen<br />
Enable prompting before automatic<br />
transmission of ‘Check Print<br />
Records’<br />
E-mail 9325 Notice to Taxpayer<br />
(automatic from <strong>Drake</strong> Processing<br />
Center)<br />
Default ERO<br />
Check for e-mail during EF transmit/<br />
receive<br />
Combine EF steps (Select, Transmit,<br />
Post Acks)<br />
Transmit return data to <strong>Drake</strong> for<br />
multi-office web reports<br />
State EF<br />
Option<br />
EF Selection Report Options<br />
Prevents e-filing of the federal return.<br />
Description<br />
Generates the EF Status page for any return that is eligible for e-file.<br />
Alert the preparer via an EF message that a return does not include a bank<br />
product (To override, see “Overriding Bank-Product Alert” on page 238.)<br />
Activates Imperfect Return Election check box on EF screen in data entry.<br />
Allows preparer to send the currently active return directly from the Calculations<br />
Results window to the e-filing queue. (The return is then transmitted<br />
automatically the next time you e-file returns.)<br />
Allows program to notify you before it transmits the Check Print Records.<br />
Form 9325, Acknowledgment and General Information for Taxpayers Who<br />
File Returns Electronically, is automatically e-mailed to taxpayer when<br />
return is accepted. (E-mail address must be present on screen 1.)<br />
Choose a preparer number, Paid Preparer, or None to indicate the ERO<br />
name that should appear on return documents. This choice can be overridden<br />
on screen 1 and the PREP screen in data entry.<br />
The program checks for e-mail received every time you transmit returns or<br />
pick up acknowledgments.<br />
Combines all e-filing steps. Click OK or press ESC on selected returns to e-<br />
file, pick up any new acknowledgments, and process the acknowledgments<br />
in one step.<br />
Sends Client Status Manager (CSM) data sent automatically to the Multi-<br />
Office Manager (MOM) during the EF process.<br />
Suppress e-filing of all state returns, or select states to suppress while other<br />
state returns remain eligible.<br />
Customize EF selection reports by specifying which columns (such as SSN/<br />
EIN, client name, refund/balance due, etc.) should be included in the EF<br />
selection report.<br />
Admin.<br />
Options<br />
To access the Administrative Options tab, a user must have administrative rights.<br />
Options under the Administrative Options tab are described in Table 2-12.<br />
Table 2-12: Options <strong>Setup</strong>: Administrative Options<br />
Option<br />
Use customized data entry selection<br />
menu<br />
Description<br />
Mark the check box, click the top Customize box, and then select the package<br />
and package type to customize. Click Load Menu. When the data entry<br />
screen is opened, click (uncheck) items to disable them in the Data Entry<br />
Menu. Click Save. The selected (unchecked) items will not be visible or<br />
accessible to any user other than those with administrative rights. (See<br />
“Locking Screens” on page 34.)<br />
Tax Year 2012 33
<strong>Software</strong> <strong>Setup</strong><br />
<strong>Drake</strong> <strong>Software</strong> User’s Manual<br />
Table 2-12: Options <strong>Setup</strong>: Administrative Options<br />
Option<br />
Customize user-defined data entry<br />
fields<br />
Use customized flagged fields on all<br />
returns<br />
Description<br />
Create option lists for the Miscellaneous Codes fields on screen 1 and the<br />
Adjustments and Payments fields on the BILL screen. For step-by-step<br />
instructions on this feature, see “Customized Drop Lists” on page 35.<br />
Select this box, click Flag, and select a package type. When the Data Entry<br />
Menu is opened, click the desired screen and click each field to flag. Click a<br />
field a second time to clear it. Press ESC to save your changes.<br />
Note: This option is available for federal packages only.<br />
Apply current-year Admin flag settings<br />
when updating from prior year<br />
Print due diligence documents<br />
Require applicable due diligence<br />
screens to be completed<br />
Enable logged in preparer’s Personal<br />
Client Manager<br />
Display program update availability<br />
to:<br />
Bank Products - State laws regarding<br />
fees: Charge ALL taxpayers the<br />
same fees<br />
<strong>Drake</strong> PDF Printer Password<br />
Options<br />
Return Status Notification Programs<br />
Flags set globally in 2011 are set globally after updating data from Last<br />
Year Data > Update from 2011 to 2012.<br />
Print due diligence documents generated from the EIC1, EIC2, EIC3, and<br />
EIC4 screens.<br />
Require that applicable fields on the EIC1, EIC2, EIC3, EIC4 screens be<br />
completed before the return can be e-filed.<br />
Display the Personal Client Manager on the <strong>Drake</strong> Home window for the<br />
logged-in preparer (check box is marked by default).<br />
Select which preparer groups can view update availability. Selections are<br />
Administrators (users with administrative rights) and All preparers.<br />
Select this box to charge all clients the same supplementary fees (software,<br />
franchise/network, and additional fees), regardless of whether a bank product<br />
is included. For more information, click the Program Help link.<br />
Choose to automatically password-protect any generated PDF documents.<br />
Passwords can be assigned to PDF documents that are sent using the<br />
<strong>Drake</strong> e-mail program. The default password format is the first four characters<br />
of the client’s name plus the last five digits of the client’s ID. The<br />
Default password drop list includes other format options. These settings<br />
can be overridden during printing from the Print Selection dialog box.<br />
New for 2012: Use this option to receive return status notification through<br />
TaxPoint or ABCvoice. Select to generate 7216 consent forms for the customer<br />
to sign. Select to require contact information (phone number and/or<br />
e-mail address on screen 1, or on the ABCV screen (for ABCvoice) or on<br />
the CALL screen (for TaxPoint).<br />
Locking<br />
Screens<br />
An administrative user can “lock” selected screens, making them inaccessible to other<br />
users.<br />
1. Go to <strong>Setup</strong> > Options, Administrative Options.<br />
2. Select Use Customized data entry selection menu.<br />
3. Click Customize.<br />
After loading a selected menu, click a screen’s check box to lock the screen or to make<br />
it visible or hidden. (Default is “visible.”) Examples are shown in Figure 2-8 and<br />
described below the figure.<br />
34 Tax Year 2012
<strong>Drake</strong> <strong>Software</strong> User’s Manual<br />
<strong>Software</strong> <strong>Setup</strong><br />
Figure 2-8: Locked, Visible, and Hidden screens<br />
• Locked — Menu items with a shaded check mark are not visible or accessible.<br />
• Visible — Menu items with a black check mark are both visible and accessible.<br />
• Hidden — Menu items with no check mark are not visible but can be accessed<br />
using the selector field.<br />
4. Click Save to save any changes or Cancel to close the menu with no changes<br />
saved.<br />
Selections made here do not apply for users with administrative rights.<br />
Customized<br />
Drop Lists<br />
Your firm can create drop lists for the Miscellaneous Codes on screen 1 and the<br />
Adjustment and Payment description fields on the BILL screen. Once you have created<br />
a drop list, it appears in the selected field. In Figure 2-9, a drop list has been created<br />
for Miscellaneous Code 1 and Code 2 on screen 1. As shown in the example,<br />
Code 2 has the user-defined referral codes BUSREF (business reference) and WOM-<br />
REF (word-of-mouth reference).<br />
Figure 2-9: Screen 1 drop lists and user-defined miscellaneous codes<br />
The instructions below explain how to create the drop list like the one in Figure 2-9.<br />
To create a drop list:<br />
1. From the Home window, select <strong>Setup</strong> > Options and click the Administrative<br />
Options tab.<br />
2. Click the second Customize button (Figure 2-10).<br />
Figure 2-10: Click Customize to customize user-defined data entry fields.<br />
3. In the Customizable Dropdowns in Data Entry dialog box, double-click a field<br />
to customize, or select a field and click Edit. The Edit Entries dialog box is<br />
opened.<br />
Tax Year 2012 35
<strong>Software</strong> <strong>Setup</strong><br />
<strong>Drake</strong> <strong>Software</strong> User’s Manual<br />
4. In the fields of the Add Entry section (Figure 2-11 on page 36), enter a Code<br />
(eight or fewer characters) and a Description (25 or fewer characters).<br />
Figure 2-11: Enter code and description in the Add Entry fields.<br />
5. Click Add.<br />
6. Repeat the previous two steps for additional drop list items. When added, items<br />
are displayed in the Entry List on the left side of the dialog box (Figure 2-12).<br />
Figure 2-12: Entry list of Edit Entries dialog box<br />
7. Click Save Changes to close the Edit Entries dialog box.<br />
Click Exit to return to the Administrative Options tab. The drop list is now available<br />
in data entry.<br />
The Edit Entries dialog box also offers the following options:<br />
• Changing the order of a listed item — Use the Move Up, Move Down, Sort<br />
Ascending, and Sort Descending buttons to change the order of items in the drop<br />
list. (See Figure 2-12.)<br />
• Removing a listed item — Select an item and click Remove. (See Figure 2-12.)<br />
• Editing a listed item — Double-click an item. The Selected Entry box (see<br />
Figure 2-11) is activated with the item properties. Make changes and click Save.<br />
NOTE<br />
You can also create drop lists for the Adjustments and Payments field<br />
of the BILL screen.<br />
When viewing a customized drop list in data entry, click F1 to see the<br />
item descriptions.<br />
36 Tax Year 2012
<strong>Drake</strong> <strong>Software</strong> User’s Manual<br />
<strong>Software</strong> <strong>Setup</strong><br />
Pricing <strong>Setup</strong><br />
Use Pricing <strong>Setup</strong> to enter prices and allow <strong>Drake</strong> to calculate charges and generate<br />
them on the client’s bill. Prices can be defined for each form and, on some forms, for<br />
each item. You can also enter minimum and maximum charges for a completed return.<br />
NOTE<br />
Bank-product fees are established in <strong>Setup</strong> > Firm(s).<br />
To set up pricing:<br />
1. From the Home window, go to <strong>Setup</strong> > Pricing.<br />
2. Select a package from the Form box of the Pricing <strong>Setup</strong> window. All forms for<br />
that package are displayed in the grid below. View items by category by clicking<br />
the tabs at the top of the grid (Figure 2-13).<br />
Figure 2-13: Tabs allow you to view categories of documents that can be priced.<br />
Use the scroll bar<br />
or arrow keys to<br />
find forms. Doubleclick<br />
a form to<br />
select it quickly.<br />
3. Select a form in the grid and press ENTER (or double-click the form).<br />
4. (Optional) Edit the Form Description. This description is printed on the client<br />
bill if Include on Bill is selected. Do not edit the form name.<br />
5. Enter pricing information in the Per Item and Per Form fields.<br />
• When a Per Item entry is not applicable for a form, the field is unavailable.<br />
• If Per Item pricing is allowed, the price entered will apply to all instances of<br />
the selected form that are printed for a return. (To view all items for which<br />
per-item pricing is allowed, click the Per Item Charges tab; see Figure 2-13.)<br />
6. Click Update, and then click Save.<br />
Repeat these steps for each form, or set pricing for only the most commonly used<br />
forms. You can price other forms from within the individual returns that require them.<br />
(For more information, see “Overriding the Bill Amount” on page 56.)<br />
Fee Options<br />
The program includes options to add a custom fee and a financial product assistance<br />
fee. Both fees are included in the “Forms” section of the bill.<br />
• Custom fee — The custom fee is charged on all client returns. Use item 0387 in<br />
the Pricing <strong>Setup</strong> window to assign a fee name, description, and amount.<br />
• Financial product assistance fee — Use this option (item <strong>02</strong>12 in Pricing <strong>Setup</strong>)<br />
to add a charge to all returns that include a bank product. This fee is not included<br />
on the bill if any of the following are true:<br />
Tax Year 2012 37
<strong>Software</strong> <strong>Setup</strong><br />
<strong>Drake</strong> <strong>Software</strong> User’s Manual<br />
– The firm state is Arkansas, Maryland, Maine, or New York (See Program<br />
Help link in <strong>Setup</strong> > Options, Administrative Options tab.)<br />
– In <strong>Setup</strong> > Options, Administrative Options tab, the option to charge all<br />
taxpayers the same fees is marked<br />
– In <strong>Setup</strong> > Pricing, the Include on Bill box is not marked for this fee<br />
Minimum &<br />
Maximum<br />
Fees<br />
Use the scroll bar<br />
or arrow keys to<br />
find forms.<br />
To set minimum and maximum fees to be charged for a return:<br />
1. From the Home window, go to <strong>Setup</strong> > Pricing and select a package from the<br />
Form box. All forms for that package are displayed in the grid below.<br />
2. Scroll down to Forms <strong>02</strong>55 and <strong>02</strong>56 (the minimum and maximum fee settings).<br />
3. Double-click a row and enter the fee. Repeat for the other form, if desired.<br />
4. Click Update, and then click Save.<br />
NOTE<br />
If incorrect charges are generated on bills, check the minimum and<br />
maximum fees to see if the settings are affecting the totals.<br />
Macros <strong>Setup</strong><br />
Macros are a series of commands and functions that allow a combination of keys to<br />
accomplish tasks. Also called shortcut keys, some macros are already available in the<br />
program; for example, CTRL+V opens View mode. You can edit existing macros or<br />
create new ones to meet your office’s needs.<br />
You can also use macros for data that is used often by your office. For example, if<br />
many of your local clients use Small Town Bank, you can arrange for the program to<br />
enter “Small Town Bank” every time you press a particular shortcut key combination.<br />
NEW FOR<br />
2012<br />
The <strong>Setup</strong> Macros screen has changed slightly, making it easier to<br />
enter longer macros, and a new Record feature allows you to create<br />
new macros more quickly.<br />
Using<br />
Macros<br />
Creating<br />
New Macros<br />
To view a list of<br />
macros in data<br />
entry, press<br />
CTRL+SHIFT+M.<br />
To insert macro data, place the cursor in the field and press the applicable shortcut key<br />
(macro) combination. To view available macros, press CTRL+SHIFT+M from within a<br />
field to open the Data Entry - Macros window. To insert macro data from the list,<br />
select a macro and click Execute (or double-click the row). The Data Entry - Macros<br />
window is closed automatically.<br />
To set up your own macros in <strong>Drake</strong>:<br />
1. From the <strong>Drake</strong> Home window, go to <strong>Setup</strong> > Macros. The <strong>Setup</strong> Macros dialog<br />
box shows the shortcut keys (Hot Key column) and their associated tasks (Data<br />
column).<br />
2. Double-click a line to open the Edit Macro window and enter a new macro or edit<br />
an existing macro.<br />
38 Tax Year 2012
<strong>Drake</strong> <strong>Software</strong> User’s Manual<br />
<strong>Software</strong> <strong>Setup</strong><br />
3. In the Edit Macro pane, construct a simple formula or words and operators that<br />
will enter the data you choose. Symbols for non-character shortcuts are listed in<br />
Table 2-13.<br />
4. Click Save.<br />
For instance, if you wanted to create and use an address macro for 1234 Peachtree<br />
Street, Atlanta, GA 30331, Fulton County, using keys ATL+L for your macro:<br />
1. From the <strong>Drake</strong> Home window, go to <strong>Setup</strong> > Macros.<br />
2. In the <strong>Setup</strong> Macros window, double click an empty Data line line.<br />
3. In the Edit Macro window, enter 1234 Peachtree Street>><br />
Atlanta>Ga>30331>Fulton>>GA<br />
4. Click Save.<br />
5. Go to screen 1 in <strong>Drake</strong>.<br />
6. Click in the Street address field and press ALT+L.<br />
The macro enters 1234 Peachtree Street for the Street address line,<br />
jumps the Apt # field and enters Atlanta in the City field, enters GA in the State<br />
field, enters 30331 in the ZIP code, enters Fulton in the County field, then<br />
jumps ahead two fields and enters GA in the Resident State field.<br />
TIP<br />
If a single macro is to allow data entry in multiple fields, use heads-down mode<br />
and right angle brackets (>) to jump to a field.<br />
Example: The macro EF>#25>X>#~ would open the EF screen (EF>), toggle<br />
heads-down data entry mode to ON (#), enter field 25 (25>), select the box to<br />
Suppress Federal/State EF and all Bank Products (X), toggle heads-down<br />
mode to OFF (#), and save the data and escape the EF screen (~).<br />
“Recording”<br />
Macros<br />
New for 2012: Click the Record button on the Edit Macro window and you can use<br />
key strokes to enter certain macro operators. For instance, click Record and:<br />
• The ENTER key or the TAB key inserts the “field forward” (>) operator.<br />
• SHIFT+ENTER or SHIFT+TAB inserts the “field back” () symbol is inserted in front of the selected data in a macro, the<br />
program jumps ahead one field from the active field before inserting the data. If inserted after the<br />
selected data, the program inserts the data first, and then moves the cursor forward a field.<br />
Tax Year 2012 39
<strong>Software</strong> <strong>Setup</strong><br />
<strong>Drake</strong> <strong>Software</strong> User’s Manual<br />
Table 2-13: Macro Symbols<br />
Symbol<br />
Action<br />
~ Escape. If the (~) symbol is inserted after the selected data in a macro, the program inserts the<br />
selected data, saves the data, and exits the screen.<br />
[D]<br />
Insert date. If [D] is part of a macro, the program enters the current date into the active field.<br />
# Launch heads-down data entry mode. If the (#) symbol is inserted after the selected data in a macro,<br />
the program enters the data then activates heads-down data entry. To have heads-down closed from<br />
the macro, add a second (#) symbol. (See “Heads-Down Data Entry” on page 75.)<br />
* Bypass the Existing Forms List when performing the task set by a macro. Enter an asterisk (*) only<br />
once in any macro, and place it at the beginning of the macro. (When you open a screen that has multiple<br />
records, an Existing Forms List is displayed, and you have the choice of selecting an existing<br />
record or creating a new one. To bypass the New Record option and open the first record listed, enter<br />
the (*) symbol in front of the macro. For example, *C opens the first Schedule C record. To open the<br />
second record, enter a 2 inside brackets ([2]), thus the macro *C[2] opens the second C screen,<br />
*C[3] opens the third, etc.)<br />
[New]<br />
[Home]<br />
[End]<br />
[FF:#]<br />
[FB:#]<br />
Perform the assigned task on a new record. For example, *C[New] opens a new C screen. The asterisk<br />
(*) bypasses the Existing Forms list. It must be present for the [New] function to work properly.<br />
Return to first field on a screen. If [Home] is inserted into a macro, the cursor moves to the first field<br />
on the screen.<br />
Move to last field on a screen. If [End] is inserted into a macro, the cursor moves to the last field on<br />
the screen.<br />
Cursor jumps ahead a prescribed number of fields. For instance, [FF:5] jumps the cursor ahead five<br />
fields. This macro is not compatible with macros that use, or are initiated in, heads-down mode.<br />
Cursor jumps back a prescribed number of fields. For instance, [FB:5] would jump the cursor back<br />
five fields.<br />
[FJ:#] Cursor jumps to the prescribed field number. For instance, [FJ:25] would jump the cursor to field #<br />
25. (Obtain field numbers by viewing the screen in heads-down mode. This macro is not compatible<br />
with macros that use or are initiated in heads-down mode.<br />
+ Prevents a macro from clearing a flagged field.<br />
[PAGEDOWN]<br />
[PAGEUP]<br />
[NEXTTAB]<br />
[PREVTAB]<br />
Move to the next screen in a list. For instance, in a return with several W2s screens, Dependent<br />
screens, or 4562 detail screens, press the macro to move from one screen to the next.<br />
Move to the previous screen in a list. For instance, in a return with several W2s screens, Dependent<br />
screens, or 4562 detail screens, press the macro to move from one screen to the next.<br />
Move from one linked screen to the next linked screen. For instance, for clients who receive a K-1 from<br />
a partnership, press the macro and go from the 1065 K1 13-20 screen to the Basis Worksheet<br />
screen.<br />
Move from a linked screen to the previous one. For instance, for clients who receive a K-1 from a partnership,<br />
press the macro and go from the Basis Worksheet screen to the 1065 K1 1-12 screen.<br />
Introduction to Letters in <strong>Drake</strong><br />
The letters program generates various types of client letters, from engagement letters<br />
to the return’s cover letter. In some cases, letter content is automatically based on data<br />
from the tax return. For example, if a return with a federal balance due has been e-<br />
40 Tax Year 2012
<strong>Drake</strong> <strong>Software</strong> User’s Manual<br />
<strong>Software</strong> <strong>Setup</strong><br />
filed and the client has opted to mail a check to the IRS, the accompanying result letter<br />
will state the balance due amount, provide the e-filing information, and give instructions<br />
for mailing the check.<br />
Because so much of the letters program is automatic, you may not have to edit the letter<br />
templates at all. If you do need to make changes, <strong>Drake</strong> has provided numerous<br />
options for doing so.<br />
Before making changes, please continue reading this introduction to ensure that you<br />
understand how the templates and the Client Communications Editor are structured.<br />
NOTE<br />
To view a list of Rich Text Format (RTF) keyboard shortcuts for letters,<br />
from the menu bar at the top of the Home window, select Help > <strong>Drake</strong><br />
<strong>Software</strong> Help (or press CTRL+F1). In the Contents tab, double-click<br />
<strong>Setup</strong>, double-click Letters, then select RTF Guide.<br />
Parts of a<br />
Letter<br />
A letter in the Client Communications Editor (accessed from <strong>Setup</strong> > Letters) contains<br />
three categories of letter elements: keywords, text, and conditional paragraphs.<br />
Figure 2-14: A letter template consists of keywords, text, and conditional paragraphs.<br />
Keywords appear as red text within angle brackets. A keyword is a description of the<br />
type of text to be generated and added to the letter. For example, the keyword “Current<br />
Date” is at the top of each letter. When a letter is generated, the “Current Date” keyword<br />
is replaced with the current date. (For more on keywords, see Appendix C.)<br />
Text (in black text) is displayed exactly as it will be printed in the output of the letter.<br />
Conditional paragraphs, like keywords, contain angle brackets. Each “paragraph”<br />
actually consists of a starting tag, the conditional text, and an tag.<br />
Note that both the starting and ending tags end with the word “Paragraph.”<br />
The enclosed conditional text is printed only if a particular situation applies in that letter.<br />
For example, the conditional paragraph in Figure 2-15 on page 42 is generated<br />
only if the taxpayer, who has a balance due, is paper-filing and has selected not to pay<br />
by direct debit.<br />
Tax Year 2012 41
<strong>Software</strong> <strong>Setup</strong><br />
<strong>Drake</strong> <strong>Software</strong> User’s Manual<br />
Figure 2-15: Conditional paragraph<br />
Paragraph<br />
Nesting<br />
Many conditional paragraphs are nested within larger ones. Different nesting levels<br />
are indicated by different colors. In Figure 2-16, the Federal No Dir Debit (Paper)<br />
Paragraph from Figure 2-15 is nested inside the Federal Balance Due Paragraph.<br />
The green and purple text show where each paragraph begins and ends.<br />
Figure 2-16: Nested Conditional Paragraph<br />
In this example, the Federal No Dir Debit (Paper) Paragraph is generated only if<br />
the Federal Balance Due Paragraph is generated, and only if applicable for a return.<br />
Client<br />
Communications<br />
Editor<br />
The Client Communications Editor, accessed from <strong>Setup</strong> > Letters, is where you can<br />
read, edit, re-write, print, and save the letters contained in the program. You can also<br />
add your company letterhead and logo to the letters. The right pane of the Editor displays<br />
the letter template. The left pane displays, in tree view, the applicable paragraphs<br />
and keywords by category (Figure 2-17). Click [+] to expand a category, or<br />
click [-] to contract it. Hover your pointer over a keyword to view its description.<br />
Figure 2-17: Category tree (left pane of Client Communications Editor)<br />
While the result letters are designed with keywords inserted to handle most situations,<br />
additional keywords are available if you want to further customize the letter.<br />
42 Tax Year 2012
<strong>Drake</strong> <strong>Software</strong> User’s Manual<br />
<strong>Software</strong> <strong>Setup</strong><br />
Available<br />
Letters<br />
Table 2-14 lists all available letter templates. All letters can be modified using the Client<br />
Communications Editor. Templates with an asterisk (*) indicate letters that can be<br />
generated, individually or in batches, separately from the tax return. (See “Letters” on<br />
page 301.)<br />
Table 2-14: Letter Templates Available in 2012<br />
Letter Template<br />
Result Letter<br />
Result - Template<br />
Extension Letter<br />
Amended Letter<br />
Estimate Payment<br />
Reminder*<br />
Scheduled Appointment<br />
Reminder*<br />
Referral Coupon<br />
Preseason Letter*<br />
Post-season Letter*<br />
Customized Supplemental<br />
Letter<br />
Engagement Letter*<br />
E-file Status Letter*<br />
Privacy Policy<br />
Description<br />
Provides return results for the filed returns; gives info on bank products, estimates,<br />
due dates, mailing instructions, etc., as applicable.<br />
Contains the same keywords and paragraph tags as the Result Letter, but no prewritten<br />
letter template is provided.<br />
Explains that an application for extension has been filed.<br />
Similar to the result letter, but for an amended return.<br />
Provides details for making a 2013 estimate payment; individual (1040) package<br />
only.<br />
Informs prior-year clients of this year’s appointment date and gives instructions for<br />
preparing for the appointment; individual (1040) package only.<br />
Offers client a discount for referring another client; individual (1040) package only.<br />
Reminder to 2011 clients that tax season is coming up; all applicable packages.<br />
Letter thanking 2012 clients for their business; available for all applicable packages.<br />
Fully customizable template that can be used to create a customer survey, package<br />
or product offering sheet, generic letter, client coupon, etc.<br />
Standard engagement letter for tax services.<br />
Provides 2012 clients with an acknowledgment summary of their e-filed returns;<br />
available for all applicable packages.<br />
Generic privacy policy for clients.<br />
K-1 Cover Letter Cover letter for a shareholder, partner, or fiduciary receiving a Schedule K-1; S corp,<br />
partnership, and fiduciary packages only.<br />
K-1 Amended Letter Cover letter for a shareholder, partner, or fiduciary receiving a Schedule K-1 that has<br />
been amended; S corp, partnership, and fiduciary packages only.<br />
Grantor Trust Statement<br />
Cover letter for grantor trust statement; fiduciary package only.<br />
Letters <strong>Setup</strong><br />
Use the Client Communications Editor (<strong>Setup</strong> > Letters) to edit letter templates, set<br />
up the letterhead for letters and client bills, and preview letters.<br />
NOTE<br />
Use the Letter Outline tab to find individual letter paragraphs quickly.<br />
Tax Year 2012 43
<strong>Software</strong> <strong>Setup</strong><br />
<strong>Drake</strong> <strong>Software</strong> User’s Manual<br />
Editing a<br />
Letter<br />
Template<br />
The Client<br />
Communications<br />
Editor opens to the<br />
last letter template<br />
viewed.<br />
CTRL+X deletes a<br />
selected item.<br />
To edit a letter:<br />
1. In the Client Communications Editor, click Open and select a package and letter<br />
to edit. The pane on the right displays the selected template.<br />
• To edit the letter contents, add, edit, or delete text as you would in a program<br />
like Microsoft Word. From the toolbar, specify font properties, typeface (bold,<br />
italic, underlined), and alignment; and copy, cut, and paste.<br />
• To add a keyword or conditional paragraph to the letter, place your cursor<br />
where you want the new item to go, and then locate and double-click a keyword<br />
or paragraph from the pane on the left. To delete a keyword or conditional<br />
paragraph, select it in the letter template and press DELETE.<br />
2. Click Save.<br />
NOTE<br />
The Client Communications Editor does not allow you to save any letter<br />
in which text within angle brackets (in other words, the names of<br />
keywords or conditional paragraphs) has been changed.<br />
Setting Up<br />
Letterhead<br />
You can also use<br />
the Client Communications<br />
Editor to<br />
set up letterhead<br />
for bills.<br />
Changing<br />
Letter<br />
Margins<br />
Arrange to have your firm’s information and logo generated on client bills and letters.<br />
To set up your letterhead:<br />
1. In the Client Communications Editor, go to <strong>Setup</strong> > Letterhead and Margins.<br />
2. Select options from the Letter/Bill Indicators section.<br />
3. Designate Coordinates. In the right column, number settings indicate the position<br />
of the firm information and logo. Settings for the default graphic are:<br />
• Left-most column for logo — 8<br />
• Top-most row for logo — 3<br />
• Left-most column for firm info — 25<br />
• Top-most row for firm Info — 4<br />
4. Enter the path to the graphic in the Path/Filename for Bitmap Logo text box (or<br />
use the Browse button). The full path and filename are required. To use the simple<br />
default graphic, enter C:\<strong>Drake</strong>12\CF\LOGO.BMP. (“C” indicates the<br />
drive letter to which the <strong>Drake</strong> program is installed. Change if necessary.) Leave<br />
blank for no logo.<br />
5. Click OK.<br />
The left margin of a letter can be changed to suit your printing needs. To change the<br />
left margin of the default letter:<br />
1. In the Client Communications Editor, select <strong>Setup</strong> > Letterhead and Margins.<br />
2. Enter a number under the Left Margin Adjustment box (Figure 2-18 on<br />
page 45).<br />
44 Tax Year 2012
<strong>Drake</strong> <strong>Software</strong> User’s Manual<br />
<strong>Software</strong> <strong>Setup</strong><br />
Figure 2-18: Left Margin Adjustment feature<br />
Values are in inches. An entry of 1, for example, adjusts the margin one inch to the<br />
right, and an entry of 1.5 adjusts it an inch and a half. Values can also be entered in<br />
increments of one-tenth of an inch. For example, an entry of .1 adjusts the margin<br />
one-tenth of an inch to the right (see example in Figure 2-18).<br />
3. Click OK.<br />
The appearance of the margin in the letter template will not change; however, when a<br />
letter is generated with a return, you’ll be able to see the margin change both in View<br />
mode and on the printed letter.<br />
NOTE<br />
An entry of “0” applies the default margins. <strong>Drake</strong> does not accept negative<br />
numbers or numbers with two decimal values (such as 1.25).<br />
Naming a<br />
Template<br />
Press CTRL+N to<br />
quickly access the<br />
Rename Letter<br />
dialog box.<br />
Restoring a<br />
Template<br />
Each template has a default name (see Table 2-14 on page 43). To assign a new name:<br />
1. From the Client Communications Editor, click Open and select a letter template.<br />
2. Click <strong>Setup</strong> > Rename Letter.<br />
3. Enter a new name in the Rename Letter dialog box and click OK.<br />
The new name is displayed in the Client Communications Editor title bar.<br />
To restore a template to its original (default) format, open the template and select<br />
<strong>Setup</strong> > Restore Original Letter.<br />
Tax Year 2012 45
<strong>Software</strong> <strong>Setup</strong><br />
<strong>Drake</strong> <strong>Software</strong> User’s Manual<br />
Viewing<br />
Letters for<br />
Sample<br />
Return<br />
The preview feature allows you to open View mode and view a sample letter for one<br />
of 10 return types:<br />
• An e-filed return with refund<br />
• An e-filed return with balance due<br />
• A paper-filed return with refund<br />
• A paper-filed return with balance due<br />
• An e-filed return with an extension<br />
• An e-filed return with an extension and balance due<br />
• A paper-filed return with a refund and an extension<br />
• A paper-filed return with a balance due and an extension<br />
• A paper-filed amended return with a refund<br />
• A paper-filed amended return with a balance due<br />
To access the preview feature, click the Preview button in the toolbar of the Client<br />
Communications Editor.<br />
Bringing<br />
Forward a<br />
Template<br />
To replace a current-year template with a prior-year one:<br />
1. From the Client Communications Editor, click Open and select the template to<br />
replace.<br />
2. Go to <strong>Setup</strong> > Update Prior Year Letter and click OK.<br />
3. Select the drive of the <strong>Drake</strong> program that contains the prior-year letter.<br />
4. Select a prior-year letter.<br />
5. Click Continue.<br />
6. When prompted, click Yes.<br />
Be sure to read through the replacement letter to ensure that the information is current.<br />
Color <strong>Setup</strong><br />
Use the Color <strong>Setup</strong> feature to tailor <strong>Drake</strong> screens to meet your firm’s preferences.<br />
TIP<br />
If you used <strong>Drake</strong> last year, consider customizing colors to make your<br />
2012 program look different from your 2011 program. If you must open<br />
the 2011 program during tax season, customized colors will help you<br />
avoid entering data into the old program by mistake.<br />
Program<br />
Colors<br />
Use Define<br />
Custom Colors to<br />
create a new color.<br />
To customize program colors:<br />
1. From the <strong>Drake</strong> Home window, go to <strong>Setup</strong> > Colors.<br />
2. Under Program Colors, choose one of the following options:<br />
• Use Windows System Colors — Program screens inherit the color scheme<br />
used by the operating system.<br />
• Use Custom Created Colors — The Program text color and Program<br />
background color boxes to the right become available. Click a box to view<br />
the Windows color palette and choose a color.<br />
46 Tax Year 2012
<strong>Drake</strong> <strong>Software</strong> User’s Manual<br />
<strong>Software</strong> <strong>Setup</strong><br />
3. Click OK.<br />
Data Entry<br />
Colors<br />
To change the color of a specific area in data entry:<br />
1. From the <strong>Drake</strong> Home window, go to <strong>Setup</strong> > Colors.<br />
2. Click a color box in the Data Entry Colors box to open a Windows color palette.<br />
3. Select a color and click OK.<br />
4. Once all color selections are made, click OK.<br />
5. To restore the original color settings in <strong>Setup</strong> > Colors, click Restore, and then<br />
click OK.<br />
Printing <strong>Setup</strong><br />
Use the Printer <strong>Setup</strong> to:<br />
• Establish the printer to be used with <strong>Drake</strong><br />
• Install a “Print to PDF” option that allows you to create PDF files<br />
• See if your printer is HP PCL-5e compliant<br />
NOTE<br />
TIP<br />
Your Windows default printer is designated as the <strong>Drake</strong> default printer<br />
when <strong>Drake</strong> is installed. You do not have to add or set up a printer in<br />
<strong>Drake</strong> if the printer is already set up in Windows. Printer settings are<br />
carried forward automatically each year.<br />
Watermarks can be added on the fly via the Print Selection dialog box<br />
(the box that is displayed when you click Print in <strong>Drake</strong>). You can opt to<br />
print a custom watermark that you specify (see “Watermark Text” in<br />
Table 2-15 on page 48) or to print “Client Set” or “Preparer Set” as a<br />
watermark.<br />
Editing<br />
Printer<br />
Settings<br />
To edit settings for the printer used for printing tax returns:<br />
1. From the <strong>Drake</strong> Home window, go to <strong>Setup</strong> > Printing > Printer <strong>Setup</strong>.<br />
2. Enter setup changes as needed. Details on each tab are provided in Table 2-15 on<br />
page 48.<br />
3. Click Save.<br />
Tax Year 2012 47
<strong>Software</strong> <strong>Setup</strong><br />
<strong>Drake</strong> <strong>Software</strong> User’s Manual<br />
Table 2-15: Printing <strong>Setup</strong><br />
Tab Field Description<br />
(F5) General <strong>Setup</strong><br />
— displays the current<br />
default printer for Tax<br />
Forms, Reports, Labels,<br />
and Checks, and the default<br />
for the Letterhead source<br />
tray (which allows you to<br />
print letters from a tray other<br />
than the one used for tax<br />
returns).<br />
Tray<br />
Default is “Main Paper Source.” Change the default if you have<br />
a multiple-tray printer and will not be printing from the main tray.<br />
# Copies Number of copies to print (not available for labels or checks).<br />
Duplex<br />
Staple<br />
Show dialog<br />
Directs printer to print duplex. Only forms that are approved for<br />
duplex will be printed as duplex.<br />
If the printer supports stapling after each print job, select this<br />
option to turn stapling on.<br />
Causes the Print dialog box to be opened before each print job.<br />
(F6) ‘Sets’ <strong>Setup</strong><br />
— displays the current<br />
default printer and the different<br />
types of sets that can be<br />
printed; see “Printing Printer<br />
Sets” on page 201.<br />
(F7) Options<br />
— used to set up advanced<br />
printing options not related to<br />
a specific printer.<br />
Tray<br />
Duplex<br />
Duplex all<br />
Staple<br />
Print set<br />
Watermark<br />
text<br />
PCL soft font<br />
option<br />
Classic print<br />
mode<br />
Default is “Main Paper Source.” Change the default if you have<br />
a multiple-tray printer and will not be printing from the main tray.<br />
Directs printer to print duplex. Only forms that are approved for<br />
duplex will be printed as duplex.<br />
Directs printer to duplex-print all forms (approved or not). (Not<br />
available for sets to be mailed to the IRS or a state.)<br />
If the printer supports stapling after each print job, select this<br />
option to turn stapling on.<br />
Indicates which sets should be available for printing after a<br />
return is calculated.<br />
Watermarks to be displayed on the Client and Preparer copies,<br />
respectively. Defaults are “Client Copy” and “Preparer Copy.”<br />
Many printers require soft fonts to be downloaded before tax<br />
forms can be printed. Select the desired downloading option.<br />
For preparers who prefer Basic View (See “Viewing a Return<br />
(Enhanced Mode)” on page 197), <strong>Drake</strong>’s “Classic Print” mode<br />
will be displayed when in Print mode.<br />
48 Tax Year 2012
<strong>Drake</strong> <strong>Software</strong> User’s Manual<br />
<strong>Software</strong> <strong>Setup</strong><br />
Table 2-15: Printing <strong>Setup</strong><br />
Tab Field Description<br />
(F8) Edit Printer Settings<br />
— used to edit print settings<br />
for a selected printer.<br />
Select printer<br />
Printer type<br />
DPI override<br />
Adjust margin<br />
Check adjustment<br />
- vertical<br />
Print Method<br />
Test Printer<br />
Main paper<br />
source<br />
Alternate<br />
paper source<br />
Opt. large<br />
paper source<br />
Manual feed<br />
Select the printer. For printers other than <strong>Drake</strong> PDF Printer,<br />
the fields listed below are activated. (If you select <strong>Drake</strong> PDF<br />
Printer, you’ll be given the option to launch Adobe after printing<br />
to the <strong>Drake</strong> PDF Printer.)<br />
Select the printer type from the drop list.<br />
Change the dots per inch (DPI) setting.<br />
Select this option if printed forms are running off the lower edge<br />
of the paper.<br />
Use this field if text is being printed too high or low on checks.<br />
Enter whole numbers to adjust the printed text 1/4-inch at a<br />
time. Enter 1 to move the type 1/4 inch; 2 to move 1/2 inch,<br />
etc. Positive numbers move the placement down; negative<br />
numbers move the placement up.<br />
PCL (Printer Control Language) is supported by most HP laserjet<br />
printers. If your printer supports PCL, the remaining fields on<br />
the screen will be filled automatically. The Alternate Print<br />
Method (GDI) will produce a good print quality but may be<br />
slower under some conditions.)<br />
Click the Test Printer button to see if your printer is HP PCL-5e<br />
compliant. (See “Testing Your Printer” following)<br />
Select the tray that is to be the main paper source for the<br />
selected printer.<br />
Select the paper source to be used when the main paper<br />
source is not available.<br />
Select the tray to be used as the optional large paper source.<br />
Select the tray to be used for manual feed.<br />
Testing Your<br />
Printer<br />
While there has been a huge shift towards e-filing, there are still times when returns<br />
must be paper-filed. In an effort to process those paper returns “electronically,” government<br />
agencies scan these returns, allowing them to more efficiently and accurately<br />
move the paper returns into the electronic processing system.<br />
<strong>Drake</strong> has made changes to its print engine as a part of an ongoing effort to create<br />
nearly exact replicas of tax forms on the many different makes and models of printers<br />
that are used in tax offices today. Some of these changes are necessitated by the emergence<br />
of stricter requirements enforced by some government tax agencies for paper<br />
processing.<br />
<strong>Drake</strong> has provided a way for you to print a test page in the preferred Printer Command<br />
Language (PCL) mode to see if your printer is compliant with these software<br />
changes.<br />
To test your printer, take the following steps:<br />
Tax Year 2012 49
<strong>Software</strong> <strong>Setup</strong><br />
<strong>Drake</strong> <strong>Software</strong> User’s Manual<br />
1. From the Home window of <strong>Drake</strong>, go to <strong>Setup</strong> > Printing > Printer <strong>Setup</strong>.<br />
2. Click the [F8] Edit Printer Settings tab to open the Printer <strong>Setup</strong> dialog box.<br />
3. Select your printer from the Select printer drop list. This activates the fields<br />
below.<br />
4. On the right-center of the Printer <strong>Setup</strong> dialog box, click Help Me Choose to<br />
open the Printer Test Assistant dialog box.<br />
5. From “Step 2” of the Printer Test Assistant dialog box, click Send Printer Test<br />
Page to the Selected Printer (item #1 in Figure 2-19).<br />
Figure 2-19: Click Send Printer Test Page... (item #1) to test a printer for PCL compliance<br />
6. Compare the text of the printed page to the Sample Arial Font of the dialog box<br />
(item #2 of Figure 2-19).<br />
7. Click the appropriate button (item #3 of Figure 2-19):<br />
• Yes, it matches exactly — Your printer is PCL-5e compliant and meets Arial<br />
font requirements. The software selects the PCL method automatically.<br />
• No, it does not match — Your printer doesn’t appear to support Arial font<br />
and will use the Alternate Print Method (GDI) to produce acceptable results.<br />
(GDI will produce good print quality but may be slower under some conditions.)<br />
<strong>Drake</strong> recommends you call your printer manufacturer to determine if<br />
Arial font can be added.<br />
• Nothing printed — Some printers that are not PCL-5e compliant will not<br />
accept the test print. These printers will use the Alternate Print Method (GDI)<br />
to produce acceptable results.<br />
8. Select another printer from the Step 1: Select a printer drop list and follow the<br />
same steps to test.<br />
9. When finished, click Exit to close the Printer Test Assistant.<br />
10.Click Update to save any printer changes. Click Save to exit Printer <strong>Setup</strong>.<br />
50 Tax Year 2012
<strong>Drake</strong> <strong>Software</strong> User’s Manual<br />
<strong>Software</strong> <strong>Setup</strong><br />
Printing Sets<br />
The Printing Sets feature allows you to print multiple sets of returns for different purposes.<br />
To define printing sets:<br />
1. From the <strong>Drake</strong> Home window, go to <strong>Setup</strong> > Printing > Printer <strong>Setup</strong>.<br />
2. Click the Sets button to open the Copies Per Set dialog box.<br />
3. Select a category from Form Categories. Your selection determines which forms<br />
are displayed in the grid below.<br />
4. Double-click a form in the list. The default information for that form fills the text<br />
boxes above.<br />
5. In the boxes under each set name, enter the number of copies of the form to be<br />
printed with each set. For example, to include three Schedule Cs with the Client<br />
set, enter 3 under Client.<br />
Figure 2-20: Example: Three copies of Schedule C for client<br />
6. Click Update.<br />
7. Click Save, and then click OK.<br />
Repeat this procedure for other forms as needed.<br />
Changing<br />
Print Sets “On<br />
the Fly”<br />
You can make Sets changes on the fly (in other words, without going to Printer <strong>Setup</strong>),<br />
but this will modify settings globally—not just for the active return. If you change<br />
your Sets settings on the fly, you change the settings for all returns.<br />
To change or add print settings on the fly, complete the following steps while in<br />
Enhanced View mode for a return:<br />
1. Select a form from the directory tree.<br />
2. Select <strong>Setup</strong> > Form Properties from the toolbar.<br />
3. In the Number of Copies section, edit settings and click Save.<br />
NOTES<br />
Pricing can also be changed using this option; see “Pricing for a Single<br />
Return” on page 57.<br />
If using Basic View, access this feature by right-clicking a form in Basic<br />
View and selecting Properties.<br />
Setting a Print<br />
Order<br />
Use this option to view or change the order in which forms are printed.<br />
1. From the <strong>Drake</strong> Home window, go to <strong>Setup</strong> > Printing > Printer <strong>Setup</strong>.<br />
2. Click Set Form Order (at the bottom of the Printer <strong>Setup</strong> dialog box) to open<br />
the Sort Form Order window.<br />
3. Select a package series and choose a set type. Forms are listed with their order<br />
number in parentheses to the left. Normal (Default) is the established IRS order.<br />
Tax Year 2012 51
Making Changes on the Fly<br />
<strong>Drake</strong> <strong>Software</strong> User’s Manual<br />
4. To change the sequence in which the forms are printed, click and drag form names<br />
until the forms are listed in the desired order.<br />
5. Click Save.<br />
NOTE<br />
To back up the print order and restore it to another machine, choose to<br />
back up the setup files from Tools > File Maintenance > Backup.<br />
Document<br />
Manager<br />
<strong>Setup</strong><br />
For details on how to set up and use the Document Manager, see Chapter 13, “Suite<br />
Products.”<br />
Making Changes on the Fly<br />
When you make changes “on the fly,” you override program calculations and defaults<br />
(set by either the program or by the preparer in <strong>Setup</strong>) for the open return. The rest of<br />
this chapter focuses on actions you can take while in data entry to “override” these<br />
global settings in an individual (1040) return. Comparable options for other packages<br />
(such as the business packages) are provided in the manual supplements for those<br />
packages, available at http://<strong>Support</strong>.<strong>Drake</strong><strong>Software</strong>.com.<br />
Suppressing/Forcing Documents<br />
The PRNT screen allows you to indicate which forms should and should not be generated<br />
for a return, regardless of program calculations and established defaults.<br />
Suppressing<br />
Items from<br />
Being<br />
Generated<br />
Table 2-16 lists items that can be suppressed using the PRNT screen.<br />
Table 2-16: Items That Can Be Suppressed from the PRNT Screen<br />
Item<br />
Description<br />
1040EZ<br />
1040A and EZ<br />
State short<br />
form<br />
Prevents Form 1040EZ from being prepared; program prepares either<br />
Form 1040 or 1040A instead.<br />
Prevents Forms 1040A and 1040EZ from being prepared; program prepares<br />
Form 1040 instead.<br />
Forces state return to be printed on the state long form.<br />
8801 Suppresses printing of Form 8801, Credit for Prior Year Minimum Tax -<br />
Individuals, Estates, and Trusts, if the form is not required. (This form is<br />
generated by default on certain returns that have a credit carryforward.)<br />
WK_PAL<br />
WK_6251B<br />
WK179LMT<br />
Prevents Passive Activity Deduction Worksheet from being prepared. This<br />
worksheet shows how much (if any) the taxpayer is taking in passive activity<br />
loss deductions this year and how much is being carried over.<br />
Suppresses exemption worksheet for Form 6251, Alternative Minimum Tax.<br />
Prevents section 179 Business Income Limit Worksheet from being prepared.<br />
This worksheet shows the amount (if any) of section 179 deductions<br />
taken this year and how much is being carried over.<br />
52 Tax Year 2012
<strong>Drake</strong> <strong>Software</strong> User’s Manual<br />
Making Changes on the Fly<br />
Table 2-16: Items That Can Be Suppressed from the PRNT Screen<br />
Item<br />
Proforma/<br />
organizer<br />
Description<br />
Prevents proforma/organizer for next year from being generated. See<br />
“Organizers and Proformas” on page 80.<br />
NOTES<br />
The option to print or suppress the 1040A and 1040EZ for all returns (if<br />
applicable) is set at <strong>Setup</strong> > Options, Form & Schedule Options.<br />
In the 1120S, 1065, and 1041 packages, if the option to print K-1 letters<br />
is selected at <strong>Setup</strong> > Options, you can go to the PRNT screen to suppress<br />
the printing of K-1 letters.<br />
Forcing<br />
Items to Be<br />
Generated<br />
Table 2-17 lists PRNT screen items that can be “forced,” even if the program calculations<br />
and established defaults would otherwise not generate them.<br />
Table 2-17: Items That Can Be Forced from the PRNT Screen<br />
Item<br />
Schedule A<br />
Schedule B<br />
Form 4562<br />
Form 6198<br />
Form 6251<br />
Form 8582<br />
Summary<br />
Compare<br />
Schedule A, Itemized Deductions<br />
Description<br />
Schedule B, Interest and Dividend Income<br />
Form 4562, Depreciation and Amortization<br />
Form 6198, At-Risk Limitations<br />
Form 6251, Alternative Minimum Tax for Individuals<br />
Form 8582, Passive Activity Loss Limitations<br />
Individual Diagnostic Summary; appears as SUMMARY under Miscellaneous<br />
tab in View mode.<br />
Tax return comparison; compares current-year return with returns<br />
from the two prior years and appears as COMPARE under Miscellaneous<br />
tab in View mode. (See “Comparing Data” on page 186 for<br />
more on creating a tax return comparison in <strong>Drake</strong>.)<br />
WK_SSB Social Security Benefits Worksheet provided by IRS for Forms 1040<br />
and 1040A; allows taxpayer to see if any benefits are taxable.<br />
Next-Year<br />
Depreciation List<br />
Worksheet showing the depreciation to be carried forward to 2013.<br />
Overriding Other <strong>Setup</strong> Options<br />
Envelope<br />
Coversheets<br />
When a return is generated, <strong>Drake</strong> prints envelope coversheets, if selected, for mailing<br />
with copies of the return to the taxpayer and tax authorities. Default settings for envelope<br />
coversheets are set in <strong>Setup</strong> > Options, Optional Documents tab. Use the<br />
PRNT screen to override coversheet options for a single return.<br />
Tax Year 2012 53
Making Changes on the Fly<br />
<strong>Drake</strong> <strong>Software</strong> User’s Manual<br />
Filing<br />
Instructions<br />
Due<br />
Diligence<br />
Documents<br />
Dates on the<br />
Return<br />
When a return is generated, <strong>Drake</strong> prints federal and state filing instructions. Default<br />
settings are established from <strong>Setup</strong> > Options, Optional Documents tab. Use the<br />
PRNT screen to override the default and force or suppress the filing instructions.<br />
EIC due diligence information is entered on screens EIC1, EIC2, EIC3, and EIC4.<br />
The PRNT screen includes options to print EIC due-diligence documents with a<br />
selected return. (These options are set globally from the Administrative Options tab<br />
in <strong>Setup</strong> > Options.)<br />
A default due date for filing is printed on returns and all letters and filing instructions<br />
generated with a return. Use the PRNT screen to override this default date. These<br />
changes cannot be set globally from <strong>Setup</strong>.<br />
Override the default date by entering an alternate due date in the Date to print on<br />
returns or Due date to print on letter and filing instructions fields in the Print<br />
Overrides section of the PRNT screen.<br />
Return<br />
Indicators<br />
By default, the program displays certain indicators (such as “Hurricane Katrina”) on<br />
applicable returns. Use the PRNT screen to force certain indicators to be displayed.<br />
NOTE<br />
If a return qualifies for special treatment due to a disaster, the<br />
required literal should be entered in the Disaster designation field.<br />
An entry here will be printed at the top of the main federal form and<br />
will be included in the transmission file for e-filed returns.<br />
Billing<br />
Format<br />
The following global setup options are set from <strong>Setup</strong> > Options, Billing tab, and can<br />
be changed on the fly by using the BILL screen in data entry:<br />
Table 2-18: Billing Options That Can Be Changed on the Fly<br />
Option Choices<br />
Billing Statement Format<br />
Custom Paragraph<br />
Total only; Forms and total; Forms, prices, and<br />
total; Bill by time; Charge per form<br />
None; Top of bill; Bottom of bill<br />
For more on the BILL screen, see “Overriding the Bill Amount” on page 56.<br />
NOTE<br />
Write the custom paragraph for the bill in the Custom Paragraph field<br />
at <strong>Setup</strong> > Options, Billing tab.<br />
54 Tax Year 2012
<strong>Drake</strong> <strong>Software</strong> User’s Manual<br />
Making Changes on the Fly<br />
Penalty &<br />
Interest<br />
Calculations<br />
The following global setup options are for penalty and interest calculations on latefiled<br />
returns. These are set from <strong>Setup</strong> > Options, Optional Items on Return tab,<br />
and can be changed from within a return from the LATE screen on the Taxes tab:<br />
Table 2-19: Penalty & Interest Options That Can Be Changed on the Fly<br />
Global Setting Available Overrides<br />
Calculation of penalty<br />
and interest on all returns<br />
Interest rates<br />
If the global option is selected, it can be suppressed for a single<br />
return. If the global option is not selected, it can be forced for a<br />
single return.<br />
Penalty and interest amounts can be entered manually for a single<br />
return to override program calculations based on updated or<br />
manually entered interest rates in <strong>Setup</strong> > Options.<br />
For more on the setting up the global option in Options <strong>Setup</strong> and on using the LATE<br />
screen, see “Features for Late-Filed Returns” on page 181.<br />
Listing a Different Firm, Preparer, or ERO on a Return<br />
By default, the program prints the information shown in Table 2-20 on the return.<br />
Table 2-20: Firm, Preparer, and ERO Data That Can Be Changed on the Fly<br />
Information<br />
Firm<br />
Preparer<br />
ERO<br />
Description<br />
Firm associated with Preparer #1 in <strong>Setup</strong> > Preparer(s)<br />
Preparer #1 (as entered in <strong>Setup</strong> > Preparer(s))<br />
ERO selected in <strong>Setup</strong> > Options, EF tab (default is “Paid Preparer”)<br />
To override any of these defaults for a return, go to screen 1 of the return and select a<br />
firm, preparer number or name, or ERO under Return Options (Figure 2-21).<br />
Figure 2-21: <strong>Setup</strong> override fields on screen 1<br />
Be aware of the following information when determining what information is to<br />
appear on the return:<br />
• Because both the firm and ERO information is determined by the return’s preparer,<br />
a selection in the Preparer # drop list will cause both the firm and ERO<br />
information to be overridden with the corresponding information associated with<br />
the selected preparer.<br />
Tax Year 2012 55
Making Changes on the Fly<br />
<strong>Drake</strong> <strong>Software</strong> User’s Manual<br />
• If, for Preparer # or Firm #, you select NONE/Self-Prepared Return (No Paid<br />
Preparer), nothing will be printed on the applicable lines on the return. For ERO,<br />
the program uses the information entered on the EF tab in <strong>Setup</strong> > Options.<br />
• Data entered on the PREP (Preparer Information) screen overrides the default<br />
data and the corresponding Return Options selections on screen 1. ERO information<br />
is not affected by PREP screen entries. For more on the PREP screen, see<br />
“Overriding Other Preparer Information,” following.<br />
• The Data Entry # field (shown in Figure 2-21 on page 55) is for tracking purposes<br />
only.<br />
• A firm or preparer must be entered in <strong>Setup</strong> > Firm(s) or <strong>Setup</strong> > Preparer(s) in<br />
order to show up as an option in the override drop lists on screen 1.<br />
Overriding<br />
Other<br />
Preparer<br />
Information<br />
The PREP screen in data entry allows you to override the following data for a return:<br />
• Third-party designee (See “Third-Party Designee” on page 162.)<br />
• Federal preparer information (if the preparer is not set up in Preparer <strong>Setup</strong>)<br />
• State preparer information (if the preparer is not set up in Preparer <strong>Setup</strong>)<br />
If you make an entry in the Federal Preparer Information section of the PREP<br />
screen, the program requires that full override information for both the preparer and<br />
the firm also be entered in this section.<br />
The PREP screen also includes an option not to print the preparer’s information on<br />
the letter, bill, or summary.<br />
NOTE<br />
You can now enter state preparer registration information for California,<br />
Maryland, Minnesota, New York, Oregon, and Virginia on the PREP<br />
screen. You can also enter a firm’s foreign address information in both<br />
the federal and state preparer information sections.<br />
Overriding the Bill Amount<br />
Standard rates must be established in Pricing <strong>Setup</strong>, but you can change the billing<br />
amount for a return, either by overriding the total or by adjusting individual amounts.<br />
Overriding<br />
the Total<br />
Adjusting<br />
Individual<br />
Amounts<br />
To override the total amount on a client’s bill, go to screen 1 and enter the desired<br />
amount in the Fee Override field (located in the Return Options box).<br />
Use the BILL screen to adjust individual amounts on a client’s bill. The following<br />
items are added to or subtracted from the bill using the BILL screen:<br />
• Write-in Adjustments, such as for coupons and other discounts, and adjust<br />
amounts charged for these adjustments<br />
• Balance due from prior years<br />
• Scenario Planner fees<br />
• Percentage increases and discounts<br />
• Sales tax percentage<br />
• Prior Payments<br />
56 Tax Year 2012
<strong>Drake</strong> <strong>Software</strong> User’s Manual<br />
Making Changes on the Fly<br />
NOTE<br />
To create user-defined drop lists for the write-in Adjustments and Payments<br />
screens, see “Customized Drop Lists” on page 35.<br />
You can also indicate the following adjustments from the BILL screen:<br />
• To exclude a charge for the Filing Status Optimization Report. (See “About the<br />
MFJ/MFS Report” on page 74.)<br />
• To adjust the bill as needed for a self-prepared or firm-prepared e-filed return<br />
The BILL screen also allows you to override the date printed on the bill and add a<br />
short note (separate from the custom paragraph) to the bottom of the bill.<br />
Pricing for a<br />
Single<br />
Return<br />
To override Pricing <strong>Setup</strong> and establish prices for a single return:<br />
1. In data entry, click View to access View mode for the return.<br />
2. Right-click a form in the left column and select <strong>Setup</strong> > Form Properties. The<br />
Properties dialog box is displayed (Figure 2-22).<br />
Figure 2-22: Pricing on the fly section of the Properties dialog box<br />
3. Edit the description of the form (if desired) and edit the price listed per form or per<br />
item.<br />
4. Choose to Apply to this return or Apply to all returns. Applying to all returns<br />
changes the pricing file globally (in other words, for all returns).<br />
5. Change number of copies if desired, and then click Save.<br />
You must calculate the return before you can view your changes on the bill.<br />
Tax Year 2012 57
Making Changes on the Fly<br />
<strong>Drake</strong> <strong>Software</strong> User’s Manual<br />
Overriding Letters <strong>Setup</strong><br />
Letters options and defaults can be set from both <strong>Setup</strong> > Options, Optional Documents<br />
tab and <strong>Setup</strong> > Letters. Use the LTR screen, accessible from the Other<br />
Forms tab, to override global options on a per-return basis.<br />
The LTR screen allows you to make the following changes to the letters in a return:<br />
• Have a result letter other than the default printed with the return.<br />
• Enter a personalized letter greeting.<br />
• Add a custom paragraph.<br />
In addition, it provides the following options:<br />
• Force-print a letter for a paper-filed return or extension application, even if the<br />
return/application is eligible for e-file.<br />
• Force-print a letter for an e-filed return or extension application, even if the return/<br />
application is ineligible for e-file.<br />
• Force (or suppress) a customized supplemental letter, engagement letter, or privacy<br />
policy letter.<br />
Default<br />
Result Letter<br />
The result letter is the standard letter that is printed with a return. It tells the client that<br />
the return has been prepared from the information provided, states the amount of the<br />
refund or balance due, and provides instructions for mailing the return (if paper-filing).<br />
The program uses Result Letter #1 as the default.<br />
To change the default letter for a return, go to the LTR screen and select a new letter<br />
from the Letter # drop list. In addition to other result letter templates, you can have<br />
the program generate a result letter in Spanish (Figure 2-23), an extension letter, or an<br />
amended return letter instead of the program default letter.<br />
Figure 2-23: Selecting the Spanish letter as the default letter for a return (LTR screen)<br />
NOTE<br />
To change the default letter for all returns, go to the Optional Documents<br />
tab in <strong>Setup</strong> > Options and select a template from the<br />
applicable package in the Result Letter section of the dialog box.<br />
58 Tax Year 2012
<strong>Drake</strong> <strong>Software</strong> User’s Manual<br />
Making Changes on the Fly<br />
Customized<br />
Greeting<br />
The default greeting for all letters is set in Letters <strong>Setup</strong>. To override the greeting for a<br />
return, go to the LTR screen and enter a new greeting in the Personalized letter<br />
greeting text box.<br />
NOTE<br />
To begin the greeting for the letter with one return with “Dear,” enter the<br />
greeting, along with the name, in the Personalized letter greeting<br />
field. To have all letters for a package type begin with “Dear” (or<br />
another greeting of your choice), make the change in the actual template<br />
in <strong>Setup</strong> > Letters.<br />
Adding a<br />
Custom<br />
Paragraph<br />
To add a custom paragraph to a letter, write the paragraph in the Custom Paragraph<br />
field of the LTR screen. By default, the paragraph is printed at the bottom of the letter.<br />
To have a custom paragraph appear somewhere else within the letter:<br />
1. From the <strong>Drake</strong> Home window, go to <strong>Setup</strong> > Letters.<br />
2. Click Open and select the package and letter to be generated for the client.<br />
3. Place the cursor on the line where you want the custom paragraph to appear.<br />
4. Click the plus [+] sign next to Miscellaneous in the tree directory (left column of<br />
window).<br />
5. Double-click the keyword. The keyword<br />
appears in the letter template.<br />
6. Click Save.<br />
When the return is generated, the letter displays the custom paragraph as directed.<br />
E-filing or<br />
Paper-filing<br />
If a return has an EF message when calculated, the return is considered ineligible for<br />
e-file and the program generates a result letter for a paper-filed return. If the return is<br />
considered eligible for e-file, a letter for an e-filed return is generated. You can override<br />
these defaults for the federal and state tax returns and extension applications.<br />
To override the defaults, go to the LTR screen and select EF or Paper for the selected<br />
returns (Figure 2-24). To indicate one or more state returns, select state abbreviations<br />
from the drop lists provided. In the Figure 2-24 example, the letter will be worded as if<br />
both the federal and Arizona returns are going to be e-filed—even if the return is not<br />
eligible for e-file.<br />
Figure 2-24: Select EF to force a letter to be printed as if the return is eligible for e-file.<br />
Tax Year 2012 59
Making Changes on the Fly<br />
<strong>Drake</strong> <strong>Software</strong> User’s Manual<br />
Printing<br />
Additional<br />
Letters<br />
From <strong>Setup</strong> > Options, Optional Documents tab, you can select to have the customized<br />
supplemental letter, engagement letter, and privacy policy letter printed with all<br />
returns. To override the established defaults for a single return, go to the return’s LTR<br />
screen and select Yes or No for the desired letter types. In Figure 2-24 on page 59, the<br />
user has selected not to have the engagement letter printed for the client.<br />
NOTE<br />
In the 1120S, 1065, and 1041 packages, you can print K-1 letters for a<br />
return by entering the signing information on the LTR screen. This is<br />
necessary only if the global option to print K-1 letters is not selected in<br />
Options <strong>Setup</strong>.<br />
Overriding EF <strong>Setup</strong><br />
The EF screen in data entry allows you to suppress federal and state e-filing on a perreturn<br />
basis. (The program default in <strong>Setup</strong> > Options, EF tab is that all eligible<br />
forms will be e-filed.) For more information on the EF screen, see “EF Override<br />
Options in Data Entry” on page 236.<br />
60 Tax Year 2012