

Download - O scale trains
Download - O scale trains
Download - O scale trains
- No tags were found...

You also want an ePaper? Increase the reach of your titles
YUMPU automatically turns print PDFs into web optimized ePapers that Google loves.
A Tale of Two Rail & Tie Cars<br />
Part Two<br />
By Tom Houle<br />
Our saga continues in this issue with Part Two of ”A Tale of<br />
Two Rail & Tie Cars”. In the last issue I covered the construction,<br />
in basswood, of a Jack Work rail and tie car. Jack’s original<br />
HO article ran in the October, 1968, issue of Model Railroader<br />
as one of the popular ”Dollar Car” articles. In Part Two, I’ll<br />
show you how to build a more modern rail and tie car in styrene.<br />
I based this car on an article by Merk Hobson that ran in<br />
the December, 1953, issue of Model Railroader.<br />
Merk based his HO car on a CB&Q prototype. Back in the<br />
early fifties, while walking through the CB&Q yards in Lincoln,<br />
Nebraska, Merk spotted a rail and tie car parked in an idle work<br />
train. Strolling through a rail yard with camera in hand today<br />
would be a rare, if not impossible, luxury. Luckily for us, Merk<br />
shot pictures of the Burlington car and MR included them in<br />
the article. Merk closely followed the prototype, which I also<br />
did with my O Scale car. It’s actually a simple styrene project,<br />
consisting of scratchbuilding a tie carrier, plus adding details to<br />
an existing flatcar. I’m sure the Burlington shops did it the same<br />
way, adding a shop-built wood-framed tie carrier to a flatcar no<br />
longer suitable for interchange service. My drawing of the tie<br />
carrier is shown in Figure 1 Page 16.<br />
For my project, I chose a Red Caboose flatcar kit (in CNW<br />
livery) I had on hand. Other flats are available. AHM 40’ flats,<br />
though no longer produced, are still plentifully available at<br />
swap meets and on Ebay. Weaver just released a new 40’ flat.<br />
Smoky Mountain may still have some of their resin-cast 40’ cars<br />
available. A 53’ flat could also be used and are available from<br />
Berkshire Valley, Chooch, and Weaver. Whatever flatcar you<br />
choose, be sure to adjust the tie carrier post centers to match<br />
your flatcar’s stake pocket centers. The tie carrier post centers<br />
on my drawing match the Red Caboose flat. Other flats will<br />
have different stake pocket centers.<br />
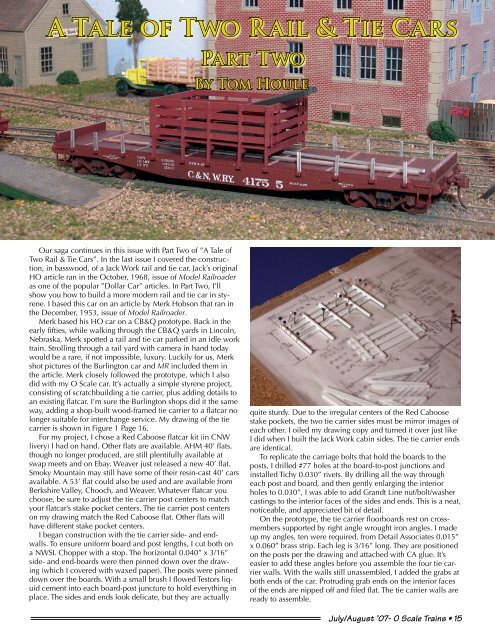
I began construction with the tie carrier side- and endwalls.<br />
To ensure uniform board and post lengths, I cut both on<br />
a NWSL Chopper with a stop. The horizontal 0.040” x 3/16”<br />
side- and end-boards were then pinned down over the drawing<br />
(which I covered with waxed paper). The posts were pinned<br />
down over the boards. With a small brush I flowed Testors liquid<br />
cement into each board-post juncture to hold everything in<br />
place. The sides and ends look delicate, but they are actually<br />
quite sturdy. Due to the irregular centers of the Red Caboose<br />
stake pockets, the two tie carrier sides must be mirror images of<br />
each other. I oiled my drawing copy and turned it over just like<br />
I did when I built the Jack Work cabin sides. The tie carrier ends<br />
are identical.<br />
To replicate the carriage bolts that hold the boards to the<br />
posts, I drilled #77 holes at the board-to-post junctions and<br />
installed Tichy 0.030” rivets. By drilling all the way through<br />
each post and board, and then gently enlarging the interior<br />
holes to 0.030”, I was able to add Grandt Line nut/bolt/washer<br />
castings to the interior faces of the sides and ends. This is a neat,<br />
noticeable, and appreciated bit of detail.<br />
On the prototype, the tie carrier floorboards rest on crossmembers<br />
supported by right angle wrought iron angles. I made<br />
up my angles, ten were required, from Detail Associates 0.015”<br />
x 0.060” brass strip. Each leg is 3/16” long. They are positioned<br />
on the posts per the drawing and attached with CA glue. It’s<br />
easier to add these angles before you assemble the four tie carrier<br />
walls. With the walls still unassembled, I added the grabs at<br />
both ends of the car. Protruding grab ends on the interior faces<br />
of the ends are nipped off and filed flat. The tie carrier walls are<br />
ready to assemble.<br />
July/August ’07- O Scale Trains • 15


