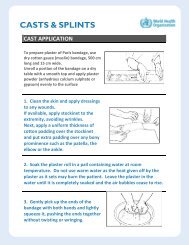
WHO Guidelines on Drawing Blood: Best Practices in Phlebotomy
WHO Guidelines on Drawing Blood: Best Practices in Phlebotomy
WHO Guidelines on Drawing Blood: Best Practices in Phlebotomy
- No tags were found...

Create successful ePaper yourself
Turn your PDF publications into a flip-book with our unique Google optimized e-Paper software.
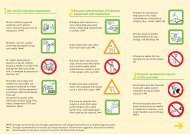
Step 1 – Assemble equipment<br />
Collect all the equipment needed for the procedure and place it with<strong>in</strong> safe and easy reach <strong>on</strong> a<br />
tray or trolley, ensur<strong>in</strong>g that all the items are clearly visible. The equipment required <strong>in</strong>cludes:<br />
• a supply of laboratory sample tubes, which should be stored dry and upright <strong>in</strong> a rack;<br />
blood can be collected <strong>in</strong><br />
––<br />
sterile glass or plastic tubes with rubber caps (the choice of tube will depend <strong>on</strong> what is<br />
agreed with the laboratory);<br />
––<br />
vacuum-extracti<strong>on</strong> blood tubes; or<br />
––<br />
glass tubes with screw caps;<br />
• a sterile glass or bleed<strong>in</strong>g pack (collapsible) if large quantities of blood are to be collected;<br />
• well-fitt<strong>in</strong>g, n<strong>on</strong>-sterile gloves;<br />
• an assortment of blood-sampl<strong>in</strong>g devices (safety-eng<strong>in</strong>eered devices or needles and<br />
syr<strong>in</strong>ges, see below), of different sizes;<br />
• a tourniquet;<br />
• alcohol hand rub;<br />
• 70% alcohol swabs for sk<strong>in</strong> dis<strong>in</strong>fecti<strong>on</strong>;<br />
• gauze or cott<strong>on</strong>-wool ball to be applied over puncture site;<br />
• laboratory specimen labels;<br />
• writ<strong>in</strong>g equipment;<br />
• laboratory forms;<br />
• leak-proof transportati<strong>on</strong> bags and c<strong>on</strong>ta<strong>in</strong>ers;<br />
• a puncture-resistant sharps c<strong>on</strong>ta<strong>in</strong>er.<br />
Ensure that the rack c<strong>on</strong>ta<strong>in</strong><strong>in</strong>g the sample tubes is close to you, the health worker, but away<br />
from the patient, to avoid it be<strong>in</strong>g accidentally tipped over.<br />
Step 2 – Identify and prepare the patient<br />
Where the patient is adult and c<strong>on</strong>scious, follow the steps outl<strong>in</strong>ed below.<br />
• Introduce yourself to the patient, and ask the patient to state their full name.<br />
• Check that the laboratory form matches the patient’s identity (i.e. match the patient’s<br />
details with the laboratory form, to ensure accurate identificati<strong>on</strong>).<br />
• Ask whether the patent has allergies, phobias or has ever fa<strong>in</strong>ted dur<strong>in</strong>g previous <strong>in</strong>jecti<strong>on</strong>s<br />
or blood draws.<br />
• If the patient is anxious or afraid, reassure the pers<strong>on</strong> and ask what would make them more<br />
comfortable.<br />
• Make the patient comfortable <strong>in</strong> a sup<strong>in</strong>e positi<strong>on</strong> (if possible).<br />
• Place a clean paper or towel under the patient’s arm.<br />
• Discuss the test to be performed (see Annex F) and obta<strong>in</strong> verbal c<strong>on</strong>sent. The patient has a<br />
right to refuse a test at any time before the blood sampl<strong>in</strong>g, so it is important to ensure that<br />
the patient has understood the procedure.<br />
For paediatric or ne<strong>on</strong>atal patients, see Chapter 6.<br />
2 <strong>Best</strong> practices <strong>in</strong> phlebotomy 13