Configuring Documentum Site Caching Services Target to XML Store
Configuring Documentum Site Caching Services Target to XML Store
Configuring Documentum Site Caching Services Target to XML Store
- No tags were found...

Create successful ePaper yourself
Turn your PDF publications into a flip-book with our unique Google optimized e-Paper software.
Ed Ramirez<br />
500 Discovery Parkway Suite 200<br />
Superior, CO 80027<br />
www.infotrustgroup.com<br />
<strong>Configuring</strong> <strong>Documentum</strong> <strong>Site</strong> <strong>Caching</strong> <strong>Services</strong> <strong>Target</strong> <strong>to</strong> <strong>XML</strong> S<strong>to</strong>re<br />
(Standalone)<br />
Abstract<br />
Per the EMC <strong>Documentum</strong> <strong>Site</strong> <strong>Caching</strong> <strong>Services</strong> Installation Guide, version 6.5, it describes the required<br />
agent.ini file parameters needed <strong>to</strong> integrate the target software <strong>to</strong> the <strong>XML</strong> S<strong>to</strong>re (Standalone). The<br />
value for the key xhive_bootstrap_path is mentioned <strong>to</strong> be either set <strong>to</strong> the absolute path <strong>to</strong> the <strong>XML</strong><br />
S<strong>to</strong>re (Standalone) bootstrap file or <strong>to</strong> the URL address of the xDB Server. The purpose of this technical<br />
paper is share my findings that I had observed while configuring the two products <strong>to</strong>gether on MS<br />
Windows OS.<br />
Setup and Configuration Setting<br />
<strong>XML</strong> S<strong>to</strong>re (Standalone)<br />
1. Prior <strong>to</strong> installing and configuring the <strong>Site</strong> <strong>Caching</strong> <strong>Services</strong> <strong>Target</strong> software, you should have the<br />
<strong>XML</strong> S<strong>to</strong>re (Standalone) software installed and have created a new xDB database. The Window<br />
Service x‐hive_server should be running prior <strong>to</strong> launching the X‐Hive/DB Administra<strong>to</strong>r client<br />
(XHAdmin) <strong>to</strong> create a new xDB database in the X‐Hive federation.<br />
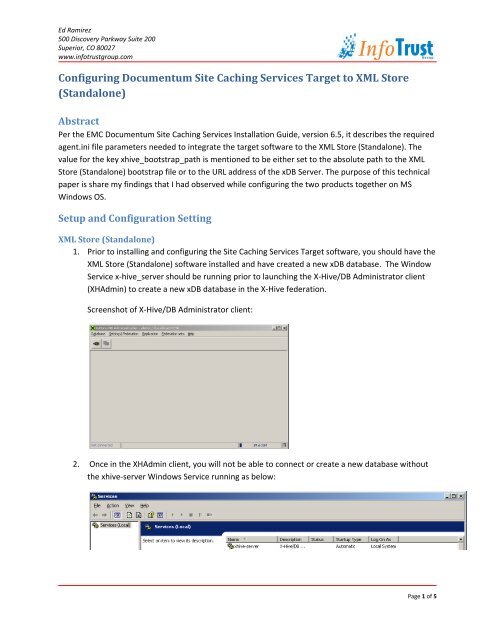
Screenshot of X‐Hive/DB Administra<strong>to</strong>r client:<br />
2. Once in the XHAdmin client, you will not be able <strong>to</strong> connect or create a new database without<br />
the xhive‐server Windows Service running as below:<br />
Page 1 of 5
Ed Ramirez<br />
500 Discovery Parkway Suite 200<br />
Superior, CO 80027<br />
www.infotrustgroup.com<br />
Create SCS <strong>Target</strong> Software Configuration<br />
1. Follow the directions under the <strong>Configuring</strong> the <strong>XML</strong> S<strong>to</strong>re (Standalone) target section in the<br />
EMC <strong>Documentum</strong> <strong>Site</strong> <strong>Caching</strong> <strong>Services</strong> Installation Guide, version 6.5 <strong>to</strong> configure an SCS<br />
target instance.<br />
2. When you have completed the installation of the SCS <strong>Target</strong>, the software configura<strong>to</strong>r <strong>to</strong>ol will<br />
have created the [Drive]:\...\webcache_target\SCS\admin\config\[port]\agent.ini file with the<br />
following default parameters:<br />
[conn]<br />
secure_connection=raw<br />
transfer_direc<strong>to</strong>ry=E:\apps\webcache_target\SCS\data\2788<br />
http_port=2788<br />
https_ca_cert=E:\apps\webcache_target\SCS\admin\keys\ca‐cert.der<br />
https_server_cert=E:\apps\webcache_target\SCS\admin\keys\server‐cert.der<br />
https_server_key=E:\apps\webcache_target\SCS\admin\keys\server‐key.der<br />
check_pass=E:\apps\webcache_target\SCS\product\<strong>to</strong>ols\dm_check_password.exe<br />
target_database_connection=jdbc:odbc:local<br />
database_user=webc_target<br />
database_user_pass=SCS_ENCR_TEXT/xxxxxxxxxxxxxxxxx<br />
log_file=E:\apps\webcache_target\SCS\admin\log\2788.log<br />
auth_server=xxxxxxxxxxxxxxxxx<br />
database_name=WebCache_2788<br />
JDBC_DRIVER=sun.jdbc.odbc.JdbcOdbcDriver<br />
clean_transfer_dir=false<br />
xhive_publish_content=true<br />
xhive_publish_metadata=true<br />
xhive_bootstrap_path=E:\apps\xhive‐8.1.1\data\XhiveDatabase.bootstrap<br />
xhive_database_name=webcache_target<br />
xhive_admin_id=Administra<strong>to</strong>r<br />
xhive_admin_password=xxxxxxxxxxxxxxx<br />
xhive_content_subscription_library=wip<br />
xhive_file_filter=all<br />
Page 2 of 5
Ed Ramirez<br />
500 Discovery Parkway Suite 200<br />
Superior, CO 80027<br />
www.infotrustgroup.com<br />
Observations<br />
Using Bootstrap Method<br />
1. As mentioned the EMC <strong>Documentum</strong> <strong>Site</strong> <strong>Caching</strong> <strong>Services</strong> Installation Guide, version 6.5, the<br />
xhive_bootstrap_path value in the agent.ini file can either be the absolute path <strong>to</strong> the <strong>XML</strong><br />
S<strong>to</strong>re (Standalone) database location (e.g. xhive_bootstrap_path=E:\apps\xhive‐<br />
8.1.1\data\XhiveDatabase.bootstrap in the above example) or the URL path if the xDB is<br />
running in server mode (e.g. xhive_bootstrap_path=xhive://localhost:1221).<br />
2. If you configure the agent.ini file <strong>to</strong> use the bootstrap file, the xhive‐server Windows Service<br />
must be turned off.<br />
3. When the xhive‐server Window Service is turned‐off, you will not be able <strong>to</strong> connect the xDB<br />
database through the X‐Hive/DB Administra<strong>to</strong>r client and you will receive the following<br />
connection error:<br />
Page 3 of 5
Ed Ramirez<br />
500 Discovery Parkway Suite 200<br />
Superior, CO 80027<br />
www.infotrustgroup.com<br />
4. Open <strong>Documentum</strong> Administra<strong>to</strong>r and create a new <strong>Site</strong> Publishing Configuration <strong>to</strong> the newly<br />
created SCS <strong>Target</strong> and run the End <strong>to</strong> End test. If this fails with the following errors<br />
May 22 15:38:54.921:T:Thread‐7: INFO: ‐‐‐‐‐‐‐‐‐‐‐‐‐‐‐‐‐‐‐‐‐‐‐‐‐‐‐‐‐‐‐‐‐‐‐‐‐‐‐‐‐‐‐‐<br />
May 22 15:38:54.937:T:Thread‐7: INFO: <strong>XML</strong> S<strong>to</strong>re Driver initialization failed.<br />
May 22 15:38:54.937:T:Thread‐7: INFO: com.documentum.webcache.utils.LCSException: <strong>XML</strong> S<strong>to</strong>re connection failed<br />
<br />
May 22 15:38:54.937:S: ERROR: Failed <strong>to</strong> connect <strong>to</strong> <strong>XML</strong> S<strong>to</strong>re database on the target.<br />
<br />
<br />
May 22 15:38:54.937:S: ERROR: Failed <strong>to</strong> connect <strong>to</strong> the target <strong>XML</strong> S<strong>to</strong>re database.<br />
<br />
Validate that the xhive‐server Windows service is NOT currently running.<br />
Using xDB database running in Server Mode<br />
1. Verify and start the xhive‐server Windows Service.<br />
2. Launch the X‐Hive/DB Administra<strong>to</strong>r client software and connect <strong>to</strong> the existing database<br />
configured for the SCS target software.<br />
3. Select the main menu option Settings/Federation ‐>Start server in adminclient option.<br />
4. Prior <strong>to</strong> selecting the OK but<strong>to</strong>n, note the port value (e.g., 1221) and select the OK but<strong>to</strong>n.<br />
Page 4 of 5
Ed Ramirez<br />
500 Discovery Parkway Suite 200<br />
Superior, CO 80027<br />
www.infotrustgroup.com<br />
5. Edit the [Drive]:\...\webcache_target\SCS\admin\config\[port]\agent.ini file with the following<br />
default parameters:<br />
xhive_bootstrap_path=xhive://localhost:1221<br />
6. Restart the SCS <strong>Target</strong> software through Windows <strong>Services</strong>.<br />
7. Open <strong>Documentum</strong> Administra<strong>to</strong>r and create a new <strong>Site</strong> Publishing Configuration <strong>to</strong> the newly<br />
created SCS <strong>Target</strong> and run the End <strong>to</strong> End test.<br />
Page 5 of 5