Firestone Air Springs Catalog - MRO Stop
Firestone Air Springs Catalog - MRO Stop
Firestone Air Springs Catalog - MRO Stop

Create successful ePaper yourself
Turn your PDF publications into a flip-book with our unique Google optimized e-Paper software.
Buy Online at http://www.mrostop.com/products/pneumatics/air-springs/firestone-air-springs.html<br />
<br />
AIRMOUNT<br />
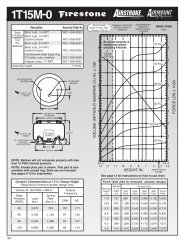
SELECTION AND ISOLATION FORMULA<br />
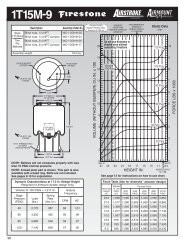
Refer to the selection guide on page 33 for <strong>Air</strong>mount load and<br />
isolation capabilities. Follow this procedure:<br />
1. LOAD CAPACITY<br />
Select one or two <strong>Air</strong>mounts that can support the load at each<br />
mounting point. It is normally best to design for pressures in<br />
the 60 to 80 psig range. Consider only the 1M1A-0 and the<br />
single and double convoluted types at first. Please notice that<br />
in the range of 210 to 63,890 pounds you will, in most cases,<br />
find both a single and double convoluted style part which will<br />
support the load.<br />
2. DETERMINE ISOLATION EFFECTIVENESS<br />
Select the disturbing frequency that is closest to the actual<br />
forced frequency (400, 800, or 1500 cpm). Then check the percentage<br />
of isolation for the parts that were selected in 1 above.<br />
3. DETERMINE DESIGN HEIGHT<br />
THE AIR SPRING SHOULD BE USED AT THE DESIGN<br />
HEIGHT GIVEN. The double convoluted part is used at a<br />
design height somewhat higher than its single convolution<br />
equivalent. Make sure that the design height falls within the<br />
height restrictions. Also, the double convoluted part will show a<br />
higher percentage of isolation (less transmitted vibration) than<br />
the single convoluted air spring. The reason for this is that the<br />
double convoluted part has a greater internal volume of air<br />
than the single convoluted version of the same size. At disturbing<br />
frequencies in the 400 to 800 cpm range, the double<br />
convoluted part is a significantly better vibration isolator than<br />
the single convoluted part. At disturbing frequencies of 800 to<br />
1500 cpm, the gap closes considerably. At frequencies of<br />
1500 cpm and above, the difference is negligible.<br />
4. DETERMINE EXACT INTERNALPRESSURE<br />
AND ISOLATION EFFECTIVENESS<br />
The chances are that your specific vibration problem does not<br />
fall neatly into the load and disturbing frequency criteria as presented<br />
in the selection guide.<br />
Therefore, once a preliminary part selection has been made,<br />
turn to the individual data page for that part in order to determine<br />
the specific internal pressure required and the<br />
percentage of isolation attainable.<br />
VIBRATION ISOLATION<br />
CONSIDER THIS EXAMPLE:<br />
Isolate a vibrating screen which weighs a total of 16,400<br />
pounds, preferably with one isolator at each corner. The vibrating<br />
mechanism is rotating at a speed of 850 rpm (cpm) with a<br />
total stroke of 5 /16 inch.<br />
a. Determine the load at each mounting point:<br />
16,400 = 4,100 lbs.<br />
4<br />
Scan down the 80 psig load column in the selection guide. It<br />
appears that either a #19 or a #22 will support the load at a<br />
pressure between 60 and 80 psig.<br />
b. Determine Isolation Effectiveness.<br />
Read the % of Isolation at 800 cpm for the #19 and #22<br />
(since 800 is closest to our machine speed of 850 cpm). A #19<br />
is at 96.0% and a #22 is at 98.2%. Looking at isolation effectiveness<br />
in terms of % TRANSMISSION, the #19 will transmit<br />
100 – 96.0, or 4.0% of the vibrations. A #22 will transmit<br />
100 – 98.2, or 1.8% of the vibrations. So, even though there<br />
does not seem to be much difference between 96.0% and<br />
98.2% isolation, the #22 is in fact a better isolator by approximately<br />
a factor of two when comparing transmitted vibration.<br />
c. Determine Design Height.<br />
Let’s say we have chosen the #22 because 96.0% isolation for<br />
a #19 is considered to be too low. A #22 should be used at 9.5<br />
inches as shown in the second column on page 33.<br />
d. Determine Exact Internal Pressure and Isolation Percentage.<br />
Turn to page 61 for detailed information on the #22.<br />
a) What exact pressure will be required to support the load<br />
of 4,100 Ibs Refer to the information in the block entitled<br />
“Dynamic Characteristics at 9.5 in Design Height.”<br />
4,280 lbs. = 53.5 in<br />
80 lbs/in 2 = effective area @ 9.5 inches<br />
2<br />
@ 80 psig<br />
Divide the actual load by the effective area:<br />
4,100 lbs. = 76.6 psig required to support<br />
53.5 in 2 4,100 lbs. at 9.5 inches<br />
Buy Online at www.<strong>MRO</strong><strong>Stop</strong>.com<br />
21