ZE-NC2010 Installation Guide Software Update - Zenec
ZE-NC2010 Installation Guide Software Update - Zenec
ZE-NC2010 Installation Guide Software Update - Zenec
- No tags were found...

Create successful ePaper yourself
Turn your PDF publications into a flip-book with our unique Google optimized e-Paper software.
<strong>ZE</strong>-<strong>NC2010</strong> <strong>Installation</strong> <strong>Guide</strong> <strong>Software</strong> <strong>Update</strong><br />
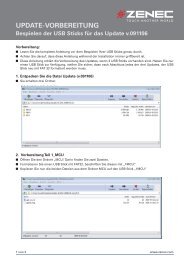
Preparation:<br />
-Carefully read the entire installation guide and keep it nearby for reference.<br />
-You need the latest device-specific <strong>ZE</strong>NEC update-set, which consist of three USB-sticks.<br />
The update preparations are described in a separate „preparations for update“ guide (recommended read<br />
for fist-time updaters).<br />
-If you are going to prepare the USB data carriers yourself make sure they are FAT32 formatted, if that isn’t<br />
the case you need to reformat and copy the necessary files again (see above mentioned prep guide).<br />
Important information:<br />
• Do not disconnect the device from the power supply during transfer communication of the updates. Also make<br />
sure that it doesn’t get coincidentally disconnected.<br />
• It’s mandatory to closely follow this installation guide step-by-step. Even a small deviation may render your<br />
precious device permanently unusable.<br />
• Do not unplug your USB data carrier during the update process.<br />
• Do not use any updates which are not expressively certified for your <strong>ZE</strong>-<strong>NC2010</strong> (i.e. no updates from similar<br />
models).<br />
If you deviate from these step-by-step instructions, you will void your warranty and risk to brake your device.<br />
In that case <strong>ZE</strong>NEC will not take any responsibility.<br />
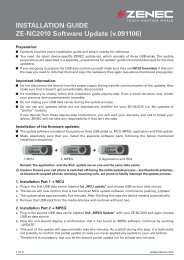
<strong>Installation</strong> of the firmware updates:<br />
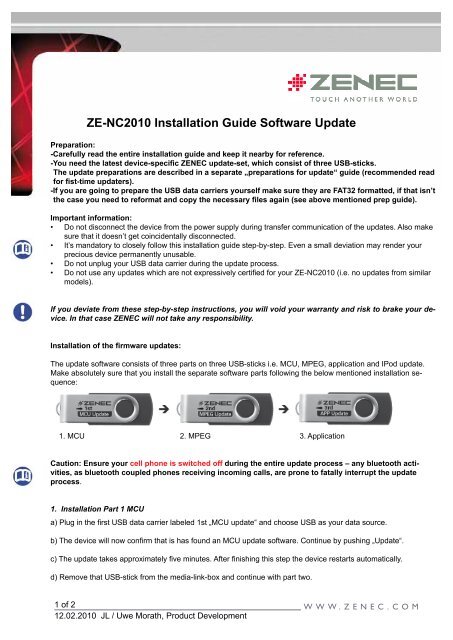
The update software consists of three parts on three USB-sticks i.e. MCU, MPEG, application and IPod update.<br />
Make absolutely sure that you install the separate software parts following the below mentioned installation sequence:<br />
1. MCU 2. MPEG 3. Application<br />
Caution: Ensure your cell phone is switched off during the entire update process – any bluetooth activities,<br />
as bluetooth coupled phones receiving incoming calls, are prone to fatally interrupt the update<br />
process.<br />
1. <strong>Installation</strong> Part 1 MCU<br />
a) Plug in the first USB data carrier labeled 1st „MCU update“ and choose USB as your data source.<br />
b) The device will now confirm that is has found an MCU update software. Continue by pushing „<strong>Update</strong>“.<br />
c) The update takes approximately five minutes. After finishing this step the device restarts automatically.<br />
d) Remove that USB-stick from the media-link-box and continue with part two.<br />
1 of 2<br />
12.02.2010 JL / Uwe Morath, Product Development
<strong>Installation</strong> Teil 2_MPEG<br />
a) Plug in the second USB data carrier labeled 2nd „MPEG <strong>Update</strong>“ with your <strong>ZE</strong>-<strong>NC2010</strong><br />
and again choose USB as data source.<br />
b) Now the unit should display a confirmation that it has found an MPEG software. Continue by<br />
pushing „UPDATE“<br />
c) This part of the update will approximately take two minutes. As a pitfall during this step, it is technically<br />
not possibly to confirm this partial update (in case you never applied any update to your unit<br />
before).<br />
Therefore it is mandatory, that you let the second partial update run for at least two minutes.<br />
If this is not a first time update your unit will, however, confirm the succesfull completion of the process<br />
by displaying the respective on-screen message.<br />
First time updaters will not see the message, but still have to restart the unit by switching it off and<br />
on again.<br />
d) Now remove the USB-stick from the media-link-box.<br />
e) Load the factory defaults by pushing (Setup > Diverse > Zurücksetzen > Ja).<br />
The unit is now in delivery condition. Re-adjust your local language and continue with part three.<br />
3. <strong>Installation</strong> Part 3 -> Application<br />
a) Connect the USB data carrier labeled 3rd „APP <strong>Update</strong>“ to your <strong>ZE</strong>-<strong>NC2010</strong>.<br />
b) Go to the setup menu and choose „Misc“ from the menu. On page two (you reach it by pressing the arrow<br />
in the lower left corner) choose „<strong>Software</strong> <strong>Update</strong>“ and confirm by pushing „YES“.<br />
c) The unit will now confirm that is has found a new application software update.<br />
Continue by pushing „UPDATE“.<br />
d) This part of the update takes approximately 1.5 minutes.<br />
The status of the process is displayed by a progress bar.<br />
e) After finishing the update, switch the unit off.<br />
2 of 3<br />
12.02.2010 JL / Uwe Morath, Product Development
4. Activation of the updates<br />
a) Now reset the unit to factory defaults: (Setup → Misc →Load Factory → Yes).<br />
<strong>Installation</strong> of the four software updates replaces the entire application software of the <strong>ZE</strong>-<strong>NC2010</strong> and all<br />
your previous custom adjustments will be lost. You will have to redo them manually.<br />
b) We recommend to restore the AF function when in tuner mode.<br />
d) This update won’t touch the bluetooth and CAN-bus part of the firmware, which have to be installed<br />
separately if necessary.<br />
5 Version check<br />
After you applied all four software updates you need to perform a version check: (Setup > General > Page2 ><br />
Version..........). Only the version numbers of MCU, MPEG and APPS are of interest.<br />
The software status after succesfull updates should look like the following:<br />
APP_V 2.88.5_0311_100129<br />
MPG_V 2.1.88_0311_100126<br />
MCU_V 2.2.72_0311_100129<br />
The display of „ADP:….“ after the version number of the MCU signifies the software status of the CAN bus<br />
interface. If any deviation from the above mentioned status should occur, you can fix it by reapplying the<br />
respective part of the software. After doing so, reassure yourself by repeating the version check until you get<br />
the desired result.<br />
CAUTION :<br />
If one or even more of the partial updates fail, you may encounter strange erratic behaviour of your<br />
unit. Therefore version check and , in case of version check failure, reinstallation of the respective<br />
firmware parts are absolutely mandatory.<br />
Remark concerning password<br />
If you changed the default code of the theft protection please note that this also has been reset to<br />
factory defaults ( now you have to enter four times zero instead of your custom password).<br />
Unlock<br />
Depending on your previous software version, your device might lock itself after the MCU update<br />
process. Don´t panic, that´s not a big deal: Try „0000“ to unlock and if that´s not going to help push<br />
„SRC and“MUTE“ simultaneously until you get the onscreen message „ENTER SUPERCODE“.<br />
Now type „123456“. Done.<br />
3 von 3<br />
12.02.2010 JL / Uwe Morath, Product Development