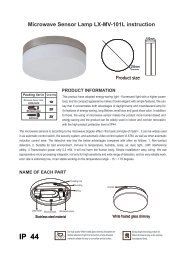
LX-PR-62 Infrared Sensor Lamp Instruction - Lexing.com.cn
LX-PR-62 Infrared Sensor Lamp Instruction - Lexing.com.cn
LX-PR-62 Infrared Sensor Lamp Instruction - Lexing.com.cn
- No tags were found...

You also want an ePaper? Increase the reach of your titles
YUMPU automatically turns print PDFs into web optimized ePapers that Google loves.
<strong>LX</strong>-<strong>PR</strong>-<strong>62</strong> <strong>Infrared</strong> <strong>Sensor</strong> <strong>Lamp</strong> <strong>Instruction</strong><br />
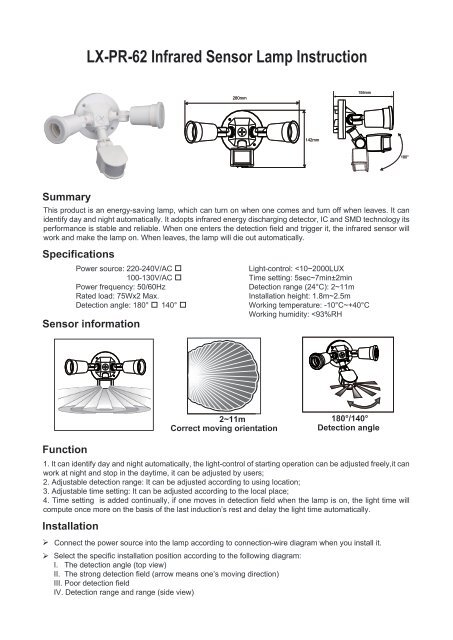
280mm<br />
155mm<br />
142mm<br />
180°<br />
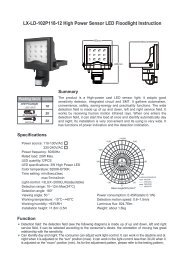
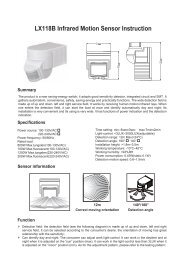
Summary<br />
This product is an energy-saving lamp, which can turn on when one <strong>com</strong>es and turn off when leaves. It can<br />
identify day and night automatically. It adopts infrared energy discharging detector, IC and SMD technology its<br />
performance is stable and reliable. When one enters the detection field and trigger it, the infrared sensor will<br />
work and make the lamp on. When leaves, the lamp will die out automatically.<br />
Specifications<br />
Power source: 220-240V/AC<br />
100-130V/AC<br />
Power frequency: 50/60Hz<br />
Rated load: 75Wx2 Max.<br />
Detection angle: 180° 140°<br />
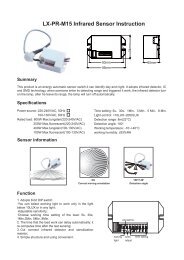
<strong>Sensor</strong> information<br />
Light-control:
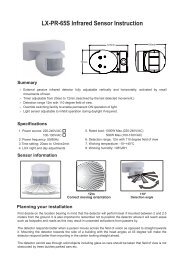
‣ Installing process:<br />
1) Unload the lamp holder, fix the base on the wall;<br />
2) Connect the power source according to connection-wire diagram on the bottom-pan;<br />
3) Fix the lamp on the base, and then electrify it.<br />
Ⅰ<br />
Ⅱ<br />
240°<br />
180°<br />
90°<br />
1 2 3 4 5 6 7 8 91011121314 M<br />
L<br />
IN<br />
N<br />
1.8~2.5m<br />
11m<br />
Ⅲ<br />
Ⅳ<br />
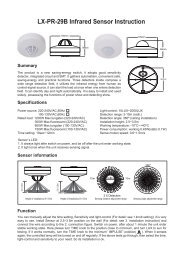
Note<br />
‣<br />
‣<br />
‣<br />
Avoid installing it where sun shine or air stream and temperature alter obviously;<br />
Avoid touching the detection window with sharp things or coarse pollutant;<br />
For maximum coverage of area the unit should be mounted 2.5m above the ground . If mounting the unit at<br />
2.5m is impractical, the unit may be mounted either or lower however the effective larger area way varies<br />
from the specifications;<br />
The unit works by sensing a moving heat source in the larger area. The sensor should be adjusted to point<br />
slightly downward for best operation. The light bulbs should also be adjusted to point slightly downward for<br />
best operation. NOTE: be sure the light heads should not be adjusted to shine directly on the PIR or close<br />
to sensor, otherwise the heat from the bulb will affect the sensor;<br />
If you are unfamiliar with electrical wire it is re<strong>com</strong>mended you secure the services of a qualified electrician<br />
who can insure the installation meets national and local electrical codes;<br />
Avoid exposing it in a rainy directly location;<br />
Floodlight is re<strong>com</strong>mended. Do not exceed 75W×2watts total.<br />
‣<br />
‣<br />
‣<br />
‣<br />
Test<br />
‣ After installing, turn TIME-knob (2) to the end (min) anti-clockwise<br />
before electrifying it; turn LUX-knob (3) to the end (max) clockwise.<br />
‣ The lamp should be on after electrifying it, make it induct again 30s<br />
after it died out.<br />
‣ If all are normal turn the time delay knob to set the lighting time<br />
according to your desire, LUX-knob (3) to set light control and<br />
SEN-knob (1) to set detection range.<br />
1 2 3<br />
Warning!<br />
Please confirm with prefessional installation.<br />
Please cut off power supply before installation and removal operations.<br />
Make sure that you have cut off the power for safety purposes.<br />
Improper operation caused losses, the manufacturer does not undertake any responsibility.