Finding a Location Using a GPS Unit Introduction to GPS GPS ...
Finding a Location Using a GPS Unit Introduction to GPS GPS ...
Finding a Location Using a GPS Unit Introduction to GPS GPS ...

Create successful ePaper yourself
Turn your PDF publications into a flip-book with our unique Google optimized e-Paper software.
<strong>Finding</strong> a <strong>Location</strong> <strong>Using</strong> a <strong>GPS</strong> <strong>Unit</strong><br />
<strong>Introduction</strong> <strong>to</strong> <strong>GPS</strong><br />
<strong>GPS</strong> technology is frequently used for general navigation. People regularly use <strong>GPS</strong><br />
technology in every day life and in some cases they may be unaware that it is a modified <strong>GPS</strong><br />
unit. A great example of this is satellite navigation systems in cars, these use <strong>GPS</strong> technology<br />
along with map information <strong>to</strong> give you road directions. SatNavs and <strong>GPS</strong> units utilize a<br />
network of satellites. These satellites transmit precise microwave signals <strong>to</strong> the <strong>GPS</strong> unit,<br />
which enables a <strong>GPS</strong> receiver <strong>to</strong> determine its’ location; speed and direction. A <strong>GPS</strong> receiver<br />
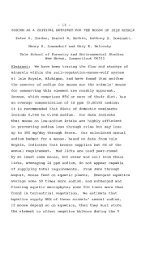
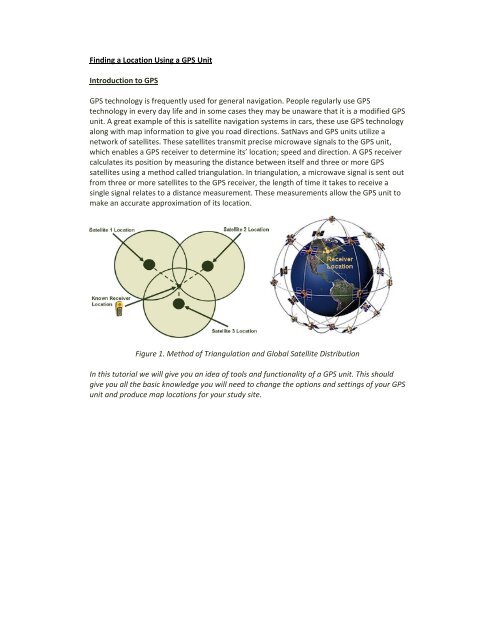
calculates its position by measuring the distance between itself and three or more <strong>GPS</strong><br />
satellites using a method called triangulation. In triangulation, a microwave signal is sent out<br />
from three or more satellites <strong>to</strong> the <strong>GPS</strong> receiver, the length of time it takes <strong>to</strong> receive a<br />
single signal relates <strong>to</strong> a distance measurement. These measurements allow the <strong>GPS</strong> unit <strong>to</strong><br />
make an accurate approximation of its location.<br />
Figure 1. Method of Triangulation and Global Satellite Distribution<br />
In this tu<strong>to</strong>rial we will give you an idea of <strong>to</strong>ols and functionality of a <strong>GPS</strong> unit. This should<br />
give you all the basic knowledge you will need <strong>to</strong> change the options and settings of your <strong>GPS</strong><br />
unit and produce map locations for your study site.
<strong>GPS</strong> Layout<br />
Before you start using your <strong>GPS</strong> unit it is important that you understand the layout of the<br />
device. There are many brands and models of <strong>GPS</strong> on the market but this tu<strong>to</strong>rial features<br />
the Garmin <strong>GPS</strong> 76 (figure 2). Although different <strong>GPS</strong> software creates slight variations in<br />
their functionality, they are generally very similar. Our study (and this tu<strong>to</strong>rial) only uses a<br />
few of the basic <strong>to</strong>ols that are available on <strong>GPS</strong> units and it therefore, should be a fairly<br />
reliable as a guide across all makes and models.<br />
But<strong>to</strong>ns<br />
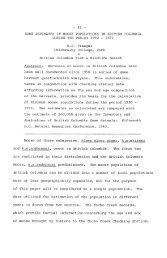
When you look at a <strong>GPS</strong>, you will realize that it has very few but<strong>to</strong>ns. Each but<strong>to</strong>n can<br />
actually perform many different actions. Once you know and understand what each but<strong>to</strong>n<br />
does you can move around the software in the devise and carryout various <strong>GPS</strong> tasks.<br />
Information on uses of each but<strong>to</strong>n is described in the diagram bellow, and later this tu<strong>to</strong>rial<br />
will explain how <strong>to</strong> use them in various contexts.<br />
Figure 2. Garmin <strong>GPS</strong> 76 Layout – But<strong>to</strong>ns and their functions
Screens<br />
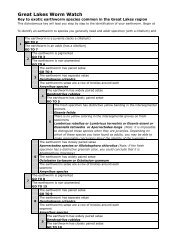
The Garmin <strong>GPS</strong> software divides the <strong>GPS</strong> device on<strong>to</strong> different screens or pages, which you<br />
can move between using the ‘Page’ but<strong>to</strong>n. The basic Garmin set up is divided in<strong>to</strong> five<br />
screens, their basic layout and description can be seen bellow in figure 3 (order and<br />
additional screens may vary between units).<br />
Figure 3. Screen Layouts<br />
The Satellite screen provides a visual reference of satellites being tracked.<br />
The Map screen displays your movements and nearby map features.<br />
The Navigation screen provides guidance <strong>to</strong> your destination.<br />
The Trip Computer screen provides a variety of trip and navigation data.<br />
The Main Menu screen provides a direc<strong>to</strong>ry of advanced features and settings.<br />
Options and Settings<br />
We require all data <strong>to</strong> be entered in a universal format, so before you carryout your study<br />
you change some of the settings on your <strong>GPS</strong> unit. The three variables you need set are;<br />
• Distance/speed in metric units.<br />
• Coordinate units in decimal degrees<br />
• DATUM set <strong>to</strong> NAD83.<br />
Changing these options can be done through the ‘Main Menu’ screen of your <strong>GPS</strong> unit. On<br />
your main menu navigate <strong>to</strong> the ‘Setup’ option using the Rocker Key and click ‘Enter’. After<br />
this, navigate <strong>to</strong> the ‘<strong>Unit</strong>s’ option and click ‘Enter’. Once you are in the ‘<strong>Unit</strong>s’ menu you<br />
can change the variables mentioned above.<br />
• To set your coordinate format click ‘Enter’ over the ‘Position Format’ drop down box,<br />
you then need <strong>to</strong> select ‘hddd,ddddd°’, this is the option for decimal degrees and click<br />
‘Enter’. The ‘Position Format’ drop down box should now show ‘hddd,ddddd°’.<br />
• To change the DATUM of your <strong>GPS</strong>, click ‘Enter’ over the ‘Map Datum’ drop down box,<br />
then select ‘NAD83’ and click ‘Enter’ again.<br />
• To change ‘Distance/speed’ units. Click ‘Enter’ over the ‘Distance/speed’ drop down<br />
box, then select ‘Metric’ and click ‘Enter’.<br />
After you have changed these three variables, you are ready <strong>to</strong> use the <strong>GPS</strong>!
<strong>Using</strong> the <strong>GPS</strong><br />
Setting up your <strong>GPS</strong><br />
When you initially turn on your <strong>GPS</strong> unit, the satellite screen will appear. The unit may take<br />
up <strong>to</strong> 5 minutes <strong>to</strong> establish a position the first time you use it outside with a clear view of<br />
the sky. When the unit has acquired enough satellite signals <strong>to</strong> determine your location<br />
(i.e. at least three), a "Ready <strong>to</strong> Navigate" message will appear.<br />
You can now move <strong>to</strong> the ‘Map’ screen by pressing the ‘Page’ but<strong>to</strong>n, if set up correctly<br />
you should now be able <strong>to</strong> see information on signal accuracy, speed etc (see figure 4).<br />
Figure 4. Example Map Screen – with accuracy highlighted in a red box.<br />
<strong>Finding</strong> your Sample Site Coordinate<br />
You could simply write down the location information that your receiver calculates and/or<br />
you can s<strong>to</strong>re the waypoint in the receiver. You will need <strong>to</strong> save your sample site location<br />
as a waypoint; this is useful as you can later use this point as a navigation guide (see<br />
‘finding a waypoint’) and it also acts as a digital copy of your coordinate, which can be,<br />
used alternative non‐paper back up.<br />
1) In order <strong>to</strong> save your location you need <strong>to</strong> first make sure you are standing at your<br />
sample site. Next navigate <strong>to</strong> the ‘map’ screen using the ‘page’ but<strong>to</strong>n.<br />
2) In the <strong>to</strong>p right hand side of this screen there should be a box titled ‘accuracy’<br />
(highlighted in a red box in figure 4) you need <strong>to</strong> write the ‘accuracy’ value down<br />
on your data sheet (value in meters). THIIS VALUE MUST BE BELOW 5 METRES.<br />
To increase your accuracy, you can try several things <strong>to</strong> help. Moving around helps<br />
locate you faster. If you are under a dense canopy, it helps <strong>to</strong> track satellites in a<br />
nearby open area first and then bring the unit back <strong>to</strong> the area you were mapping.<br />
Finally, because you are in North America, there will be more satellites in the south, so<br />
you can try holding the <strong>GPS</strong> receiver facing that direction.
3) Once you have an accuracy value at or below 5 meters you can make an accurate<br />
waypoint. Press and hold the ‘Enter’ but<strong>to</strong>n on the map screen until a ‘waypoint’<br />
screen appears. Once in this screen you can save and edit your waypoint<br />
coordinate information.<br />
4) First, before you edit your waypoint, you must write the location value on<strong>to</strong> your<br />
data sheet. This value must be given in decimal degrees (will appear on you screen<br />
as a number followed by a ‘°’ symbol).<br />
5) In the first large box you can edit the name of your waypoint (box containing<br />
‘LAND’ in figure 5), the name of the waypoint is often set as a number by default,<br />
you should change this <strong>to</strong> a name that is easily distinguishable as your sample site<br />
(for example use GLWW). <strong>Using</strong> the ‘rocker’ key highlight this box and click ‘Enter’,<br />
you can now use the ‘rocker’ <strong>to</strong> select letters using a pop up keypad, click ‘ok’<br />
once you have selected all your desired letters. You can then repeat this same<br />
method in the comment box.<br />
6) After you have edited your waypoint data select ‘ok’ using the ‘rocker’ key and<br />
press ‘enter’. This will save the waypoint coordinates in<strong>to</strong> the internal memory of<br />
the <strong>GPS</strong> unit.<br />
Figure 5. Waypoint Screen ‐ <strong>Location</strong> is given in decimal degrees yours should look identical<br />
<strong>to</strong> this.<br />
<strong>Finding</strong> a Waypoint<br />
If you are visiting your site multiple times you may find it beneficial <strong>to</strong> learn how <strong>to</strong> find your<br />
sample site using your digital waypoint. The ‘find’ <strong>to</strong>ol on your <strong>GPS</strong> acts in a very similar way<br />
<strong>to</strong> a normal compass; apart from, it can au<strong>to</strong>matically work out your location and will<br />
literally point you in the direction your digital waypoint coordinate.<br />
1) Click ‘find’, using the ‘rocker’ key highlight ‘waypoints’ and press ‘Enter’.<br />
2) This will move you <strong>to</strong> a screen with the list containing all the waypoints on your <strong>GPS</strong><br />
unit. You can search for you waypoint by typing in its name in<strong>to</strong> the digital keypad<br />
and then selecting ‘ok’.<br />
3) Highlight the locations name and click ‘Enter’.<br />
4) This will then take you <strong>to</strong> the waypoint screen. Navigate <strong>to</strong> ‘Go<strong>to</strong>’ using the ‘Rocker’<br />
key and click ‘Enter’.<br />
5) You should then move the ‘Navigation’ screen, you can now follow the arrow on<br />
your digital compass until your distance from site is 0!