30'' sheet metal machine - Grizzly Industrial Inc.
30'' sheet metal machine - Grizzly Industrial Inc.
30'' sheet metal machine - Grizzly Industrial Inc.

You also want an ePaper? Increase the reach of your titles
YUMPU automatically turns print PDFs into web optimized ePapers that Google loves.
Braking<br />
Rolling<br />
For precision braking from 2'' to 10'' lengthwise,<br />
first attach the back measurement assembly to<br />
the receiver holes in the back of the crossbeam:<br />
1. To adjust the position of the back measurement<br />
assembly, first loosen the two knobs.<br />
2. Move the assembly forward and back using<br />
the handwheel. When it is at the desired<br />
position, tighten the knobs to lock it into position.<br />
3. Using the handle assembly, raise the cross<br />
beam up to its highest position.<br />
4. Insert the workpiece in between the upper<br />
and lower braking dies.<br />
5. Rotate the handle assembly, using the<br />
appropriate amount of force to achieve the<br />
desired bending angle.<br />
6. To bend only certain portions of your workpiece,<br />
simply loosen the bolts that hold the<br />
upper braking die brackets in place and add<br />
or remove the dies as required. For small<br />
increments, use the fractional dies included<br />
with the <strong>machine</strong>. You should notch the<br />
material appropriately before bending to<br />
achieve the good results. This means you<br />
will have to make a cut between the portion<br />
of the material to be bent and the portion you<br />
wish to remain straight.<br />
The upper braking dies may become uneven.<br />
This is best handled with a wooden gauge block<br />
that is the full length of the table and is the same<br />
height all the way across. Raise the crossbeam<br />
all the way and slide the block underneath the<br />
dies. Loosen the bolts that hold the upper die<br />
bracket in place and allow the dies to drop slightly<br />
until they contact the block. Tighten the upper<br />
bracket bolts.<br />
In order to do rolling operations, move the cover<br />
back and out of the way.<br />
1. Drop the rear roll bar by loosening the adjustment<br />
knobs.<br />
2. Insert just the leading edge of the workpiece<br />
between the upper and the lower roll bars,<br />
and tighten the roll bar gap adjustment keys<br />
until the roll bars are barely snug against the<br />
workpiece.<br />
3. Advance the adjustment knobs as much as<br />
desired depending upon the tightness of the<br />
roll to be accomplished. The tighter the roll,<br />
the more the knobs should be advanced.<br />
4. Rotate the handle assembly until the proper<br />
roll has been achieved. The material will feed<br />
itself through the rollers as the handle<br />
assembly is cranked.<br />
Wire rolling is accomplished in the same manner,<br />
except the proper groove in the upper roll bar<br />
must be utilized depending upon the wire gauge<br />
being rolled.<br />
Lubrication<br />
Grease the crank arms as necessary using a<br />
grease gun on the installed grease fittings. Do not<br />
over-grease.<br />
A light coating of oil on the area where the upper<br />
arm slides will also assure ease of movement.<br />
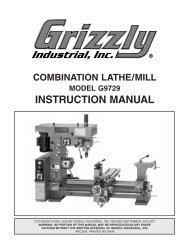
G4011 30" Sheet Metal Machine<br />
-7-