Drill Press Drill Press - This Wiki
Drill Press Drill Press - This Wiki
Drill Press Drill Press - This Wiki
You also want an ePaper? Increase the reach of your titles
YUMPU automatically turns print PDFs into web optimized ePapers that Google loves.
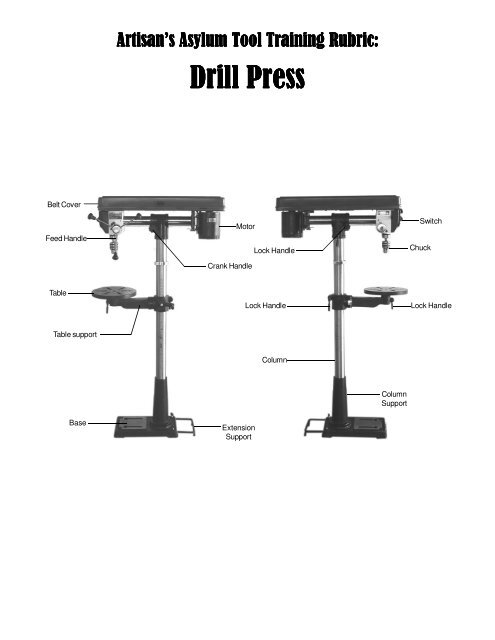
Artisan’s Asylum Tool Training Rubric:<br />
<strong>Drill</strong> <strong>Press</strong><br />
Belt Cover<br />
Feed Handle<br />
Motor<br />
Crank Handle<br />
Lock Handle<br />
Switch<br />
Chuck<br />
Table<br />
Lock Handle<br />
Lock Handle<br />
Table support<br />
Column<br />
Column<br />
Support<br />
Base<br />
Extension<br />
Support
Personal Protective Equipment<br />
• Standard shop personal protective equipment (safety glasses, tie back long hair,<br />
no flowing clothes, etc.) are required.<br />
• No gloves, no bracelets.<br />
Safe Operation<br />
• DO NOT perform any operation freehand. ALWAYS hold the workpiece firmly<br />
against the table so it will not rock or twist. Use clamps or a vise for unstable<br />
workpieces. MAKE SURE all clamps and locks are firmly tightened before<br />
drilling.<br />
• DO NOT try to drill material too small to be securely held<br />
• DO NOT USE wire wheels, router bits, shaper cutters, circle (fly) cutters, or any<br />
other tool that is not a drill bit<br />
• DO NOT exert side pressure on drill bits to widen holes.<br />
• Hold drill bits while both installing and removing from the chuck. Tighten the<br />
chuck with the chuck key. Return the chuck hey to its holder.<br />
• Never turn the drill press on before clearing the table of all objects (tools, scraps<br />
of wood, etc.)<br />
• Before starting to drilling operation, watch the drill bit to make sure it does not<br />
wobble or vibrate.<br />
• Let the spindle reach full speed before starting to drill.<br />
• Use the recommended speed for the size of bit and material.<br />
• Use appropriate cutting fluids while drilling into metals.<br />
• DO NOT force the drill too hard, and let the cutting tool do the work. “Peck” the<br />
drill to clear chips from the hole.<br />
• Ensure the spindle has come to a complete stop before touching the workpiece.<br />
• To avoid injury from accidental starting, always turn the switch “OFF” and unplug<br />
the drill press before installing or removing any accessory or attachment or<br />
making any speed adjustment.<br />
• Keep all guards in place and in working order.<br />
Common Maintenance Operations<br />
• Return drive pulleys to original configuration when finished working, remove all<br />
bits from the chuck, and clean the table<br />
Allowable Materials<br />
• Wood only on wood shop drill presses; no wood on metal shop drill presses.
Artisan’s Asylum Tool Training Test:<br />
<strong>Drill</strong> <strong>Press</strong><br />
Student’s Name:<br />
Instructor’s Name:<br />
Date of Test:<br />
____________________________<br />
____________________________<br />
____/____/____<br />
Point out the following tool features:<br />
[ ] On/Off Switch<br />
[ ] <strong>Drill</strong> Chuck Open/Close<br />
[ ] Table Lock, Table Crank<br />
[ ] Speed Selection Belts<br />
[ ] Clamping equipment<br />
Personal Protective Equipment:<br />
N/A<br />
Safe Operation:<br />
1. Demonstrate safe chucking/un-chucking of a variety of different bits.<br />
2. Raise/Lower/Lock Table.<br />
3. Demonstrate safe drilling procedures into a test piece, verifying hand position<br />
4. Demonstrate setting speeds and returning the drill press to default positioning<br />
when done.<br />
Common Maintenance:<br />
N/A<br />
Allowable Materials:<br />
N/A<br />
Passed: YES / NO<br />
Instructor’s Signature:<br />
____________________________


