Texturing a Tire â Photoshop + Maya Creating the texture in ...
Texturing a Tire â Photoshop + Maya Creating the texture in ...
Texturing a Tire â Photoshop + Maya Creating the texture in ...

Create successful ePaper yourself
Turn your PDF publications into a flip-book with our unique Google optimized e-Paper software.
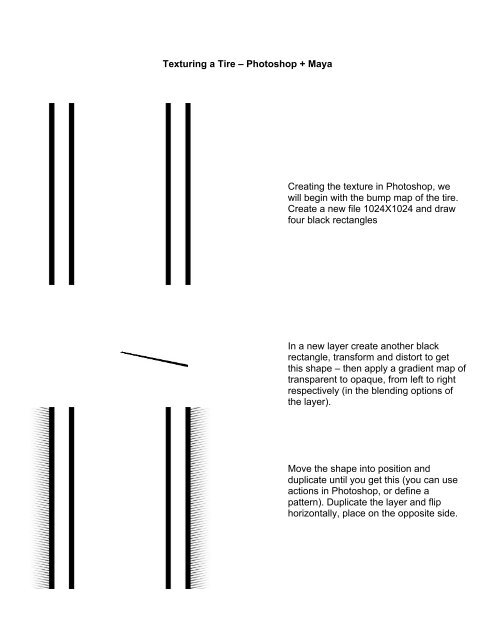
<strong>Textur<strong>in</strong>g</strong> a <strong>Tire</strong> – <strong>Photoshop</strong> + <strong>Maya</strong><br />
<strong>Creat<strong>in</strong>g</strong> <strong>the</strong> <strong>texture</strong> <strong>in</strong> <strong>Photoshop</strong>, we<br />
will beg<strong>in</strong> with <strong>the</strong> bump map of <strong>the</strong> tire.<br />
Create a new file 1024X1024 and draw<br />
four black rectangles<br />
In a new layer create ano<strong>the</strong>r black<br />
rectangle, transform and distort to get<br />
this shape – <strong>the</strong>n apply a gradient map of<br />
transparent to opaque, from left to right<br />
respectively (<strong>in</strong> <strong>the</strong> blend<strong>in</strong>g options of<br />
<strong>the</strong> layer).<br />
Move <strong>the</strong> shape <strong>in</strong>to position and<br />
duplicate until you get this (you can use<br />
actions <strong>in</strong> <strong>Photoshop</strong>, or def<strong>in</strong>e a<br />
pattern). Duplicate <strong>the</strong> layer and flip<br />
horizontally, place on <strong>the</strong> opposite side.
Create this image from 3 rectangles.<br />
Repeat <strong>the</strong> til<strong>in</strong>g process as previously<br />
described; keep more distance <strong>in</strong> this<br />
case. You may use a gradient map here<br />
as well to gradually change <strong>the</strong> height of<br />
<strong>the</strong> bump map.<br />
Create a‘Y’ shape from 3 rectangles (or<br />
draw it) and complete 2 more rows; put<br />
ano<strong>the</strong>r vertical black rectangle <strong>in</strong><br />
between <strong>the</strong>m.<br />
Make sure that <strong>the</strong> image you have<br />
created has a gap of equal size ei<strong>the</strong>r<br />
side of <strong>the</strong> pattern. When assigned to <strong>the</strong><br />
surface, this area will become <strong>the</strong> ‘side’<br />
of <strong>the</strong> tire, <strong>the</strong>refore it will need to match<br />
<strong>the</strong> model <strong>in</strong> terms of scale.
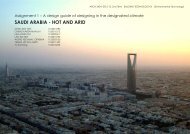
Assign <strong>the</strong> bump map to <strong>the</strong> surface,<br />
mak<strong>in</strong>g sure that <strong>the</strong> pattern of <strong>the</strong><br />
<strong>texture</strong> does not stretch around <strong>the</strong> sides<br />
of <strong>the</strong> tire. This image is a render with<br />
bump map only.<br />
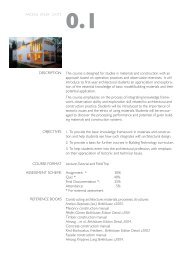
The tire is still very smooth; we’ll create a<br />
base bump. On a new layer, render<br />
clouds with shades of grey, <strong>the</strong>n use<br />
some filters to create a uniform bump<br />
(<strong>texture</strong>>texturizer – burlap with very low<br />
relief will do)<br />
Put this layer under <strong>the</strong> ma<strong>in</strong> bump and<br />
change <strong>the</strong> ma<strong>in</strong> bump layer blend mode<br />
to Multiply.<br />
Duplicate <strong>the</strong> ma<strong>in</strong> bump layer and use<br />
distort>ocean ripple on <strong>the</strong> new layer<br />
with a low value; change <strong>the</strong> blend mode<br />
of <strong>the</strong> top layer to multiply.<br />
before<br />
after
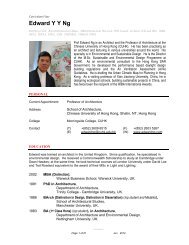
Us<strong>in</strong>g <strong>the</strong> bump base only, <strong>in</strong>sert text on<br />
<strong>the</strong> side (<strong>the</strong> direction will depend on<br />
your surface direction and how you laid<br />
<strong>the</strong> <strong>texture</strong>s <strong>in</strong> <strong>Maya</strong>)<br />
Make <strong>the</strong> text white – this will emboss it<br />
from <strong>the</strong> tire. Map this one to <strong>the</strong> default<br />
color for <strong>the</strong> bump.<br />
Embossed text<br />
And now we’ll address <strong>the</strong> color. Render<br />
clouds <strong>in</strong> a new layer. dark greens and<br />
browns will work here. Put <strong>the</strong> clouds<br />
layer on top of <strong>the</strong> bump layers and<br />
switch <strong>the</strong> blend<strong>in</strong>g to soft light duplicate<br />
<strong>the</strong> layer 2-3 times to get a darker result<br />
(I brightened this image for clarity)
Use <strong>the</strong> same clouds to create <strong>the</strong> color<br />
<strong>in</strong> <strong>the</strong> text area<br />
Color and bump map only. With no<br />
specularity and diffusion maps, <strong>the</strong> tire<br />
looks uniformly sh<strong>in</strong>y and diffuses <strong>the</strong><br />
light uniformly as well. We need to<br />
address <strong>the</strong>se problems.
We can create <strong>the</strong> specularity map from<br />
<strong>the</strong> bump map – reduce contrast and<br />
narrow <strong>the</strong> levels – we do not want to<br />
have a great range of specular here.<br />
Use this map for specular roll off,<br />
eccentricity and diffuse.
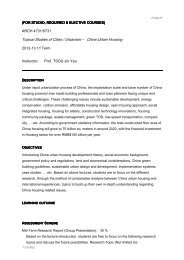
The hypershade graph<br />
The different maps are now connected to<br />
<strong>the</strong> appropriate attributes, you now need to<br />
adjust by chang<strong>in</strong>g <strong>the</strong> alpha ga<strong>in</strong> and color<br />
ga<strong>in</strong> of <strong>the</strong> images to get <strong>the</strong> right result
All maps laid on <strong>the</strong> tire – ray traced render