Brahma User Manual - Hayneedle
Brahma User Manual - Hayneedle
Brahma User Manual - Hayneedle

Create successful ePaper yourself
Turn your PDF publications into a flip-book with our unique Google optimized e-Paper software.
Ontario, California 91761<br />
_________________________________________________________________________________________________________<br />
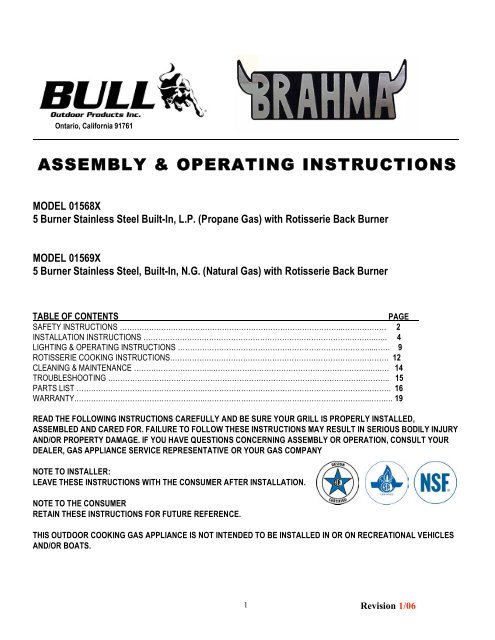
ASSEMBLY & OPERATING INSTRUCTIONS<br />
MODEL 01568X<br />
5 Burner Stainless Steel Built-In, L.P. (Propane Gas) with Rotisserie Back Burner<br />
MODEL 01569X<br />
5 Burner Stainless Steel, Built-In, N.G. (Natural Gas) with Rotisserie Back Burner<br />
TABLE OF CONTENTS<br />
PAGE<br />
SAFETY INSTRUCTIONS ………………………………………………………………………………..……………… 2<br />
INSTALLATION INSTRUCTIONS ………………………………………………………………………….………..….. 4<br />
LIGHTING & OPERATING INSTRUCTIONS ……………………………………………………………………....…… 9<br />
ROTISSERIE COOKING INSTRUCTIONS……………………………………………………………………………… 12<br />
CLEANING & MAINTENANCE …………………………...………………………………………………………..….…. 14<br />
TROUBLESHOOTING …………………………………………………………………………………………………….. 15<br />
PARTS LIST ……………………………………………..………………………………………………………….………. 16<br />
WARRANTY.……………………………………………..…………………………………………………………..…….… 19<br />
READ THE FOLLOWING INSTRUCTIONS CAREFULLY AND BE SURE YOUR GRILL IS PROPERLY INSTALLED,<br />
ASSEMBLED AND CARED FOR. FAILURE TO FOLLOW THESE INSTRUCTIONS MAY RESULT IN SERIOUS BODILY INJURY<br />
AND/OR PROPERTY DAMAGE. IF YOU HAVE QUESTIONS CONCERNING ASSEMBLY OR OPERATION, CONSULT YOUR<br />
DEALER, GAS APPLIANCE SERVICE REPRESENTATIVE OR YOUR GAS COMPANY<br />
NOTE TO INSTALLER:<br />
LEAVE THESE INSTRUCTIONS WITH THE CONSUMER AFTER INSTALLATION.<br />
NOTE TO THE CONSUMER<br />
RETAIN THESE INSTRUCTIONS FOR FUTURE REFERENCE.<br />
THIS OUTDOOR COOKING GAS APPLIANCE IS NOT INTENDED TO BE INSTALLED IN OR ON RECREATIONAL VEHICLES<br />
AND/OR BOATS.<br />
1<br />
Revision 1/06
SAFETY INSTRUCTIONS<br />
Read carefully before assembling and operating your gas grill<br />
This gas grill must be installed in accordance with local codes or, if in an area without local codes, with the latest edition of the<br />
National Fuel Gas Code ANSI Z223.1. In Canada, installation must conform to the standard CAN/ CGA 1-b149.1 and/or .2<br />
(Installation Code for Gas Burning Appliances and Equipment) and any local codes.<br />
WARNING: Fuels used in gas or oil-fired appliances and the products of combustion of such fuels, contain chemicals known to the<br />
State of California to cause cancer, birth defects and/or reproductive harm. This warning is issued pursuant to California Health &<br />
Safety Code Sec. 25249.6.<br />
THE LOCATION FOR YOUR GRILL<br />
DO NOT use your gas grill in garages, porches, breezeways, sheds or other enclosed areas. Your gas grill is to be used<br />
OUTDOORS ONLY, with at least 21” from the back and side of any combustible surface. The grill should not be placed under or on<br />
top of any surface that will burn. Do not obstruct the flow of combustion and ventilation air around the grill housing.<br />
PROTECT CHILDREN: keep them away from grill during use and until grill has cooled after you are finished. Do not allow children to<br />
operate grill.<br />
FOR YOUR SAFETY...<br />
DO NOT store or use gasoline or other flammable vapors and liquids in the vicinity of this or any other appliance.<br />
DO NOT store empty or full spare gas cylinders under or near this or any other appliance<br />
Keep the fuel hose any electrical cord away from hot surfaces. Protect fuel hose from dripping grease. Avoid unnecessary<br />
twisting of hose. Visually inspect hose prior to each use for cuts, cracks excessive wear or other damage. Replace hose, if<br />
necessary.<br />
NEVER test for gas leaks with a lighted match or open flame.<br />
NEVER light grill with lid closed or before checking to insure burner tubes are fully seated aver gas valve orifices.<br />
NEVER lean over cooking surface while lighting grill. Use barbecue tools with wood handles and good quality insulated<br />
oven mitts when operating grill.<br />
IF YOU SMELL GAS...<br />
1. Shutoff gas to the appliance at its source.<br />
2. Extinguish any open flame.<br />
3. Open grill lid to release any accumulation of fumes.<br />
4. If gas odor persists, immediately contact your gas supplier.<br />
CHECKING FOR GAS LEAKS<br />
NEVER TEST FOR GAS LEAKS WHILE THE GRILL IS LIT!...prior to first use and at the beginning of each new season (or, if using<br />
LP, whenever gas cylinder is changed), it is a must that you check for gas leaks. Follow these steps:<br />
1. Make a soap solution by mixing one part liquid detergent and one part water.<br />
Turn off heat control valve(s), and then turn on gas at source.<br />
3. Apply the soap solution to all gas connections: bubbles will appear in the soap solution if connections are not properly sealed.<br />
Tighten or repair as necessary.<br />
4. If you have a gas leak that you cannot repair, turn off the gas at the source, disconnect fuel line from grill and immediately call<br />
your grill dealer and gas supplier for professional assistance.<br />
2<br />
Revision 1/06
NATURAL GAS SAFETY<br />
Your Natural Gas grill is designed to operate on natural gas ONLY, at a pressure of 4” water column (W.C.) regulated at the natural<br />
gas regulator attached at the back of the grill. Check with your gas utility for local gas pressure and with your local municipality for<br />
building code requirements.<br />
Check with your gas utility or with local building codes for instructions to install gas supply line, or call a licensed and knowledgeable<br />
installer.<br />
It is recommended that an ON-OFF” shutoff valve be installed at the gas supply source:<br />
- Outdoors after gas line piping exits outside wall and before quick-disconnect or before gas line piping enters ground.<br />
- Indoors in the branch fuel line in an accessible location near the supply line.<br />
Pipe sealing compound or pipe thread tape of the type resistant to the action of natural gas must be used on all male pipe thread.<br />
Apply compound or tape to at least the first three threads when making the connection.<br />
Disconnect your gas grill from fuel source when the gas supply is being tested at high pressures. This appliance and its individual<br />
shutoff valve must be disconnected from the gas supply piping system during any pressure testing of that system at pressures in<br />
excess of 1/2 psig (3.5 kPa).<br />
Turn off your gas grill when the gas supply is being tested at low pressures. This appliance must be isolated from the gas supply<br />
piping system by closing its individual valve.<br />
WARNING: Gas valves are preset at the factory to operate on LP or natural gas. If you wish to convert, be sure to contact your grill<br />
dealer FIRST!<br />
PROPANE GAS SAFETY<br />
Your Propane gas grill is designed to operate on propane gas ONLY, at a pressure regulated at 11” water column (W.C.) when<br />
equipped with the correct propane orifices on the valves and a propane regulator on the supply line regulated at the residential<br />
meter.<br />
Your propane gas grill is designed to be used with a standard 20 lbs gas cylinder and must be constructed and marked in<br />
accordance with specifications of the US Department of Transportation for Propane gas cylinders.<br />
Always keep cylinder securely fastened in an upright position.<br />
Never connect an unregulated propane gas cylinder to the grill.<br />
Do not subject Propane cylinders to excessive heat.<br />
CAUTION: Never store a Propane gas cylinder inside a building or in the vicinity of any gas-burning appliance.<br />
WARNING: Gas valves are preset at the factory to operate on LP or natural gas. If you wish to convert, be sure to contact your grill<br />
dealer FIRST!<br />
SAFETY !<br />
BEWARE OF SPIDERS<br />
CAUTION: BURNER TUBES MUST BE INSPECTED AND CLEANED BEFORE FIRST USE.<br />
Spiders and small insects occasionally spin webs or make nests in the burner tubes during warehousing and transit. These webs<br />
can lead to a gas flow obstruction, which could result in a fire in and around the burner tubes. This type of fire is known as “FLASH-<br />
BACK” and can cause serious damage to your grill and create an unsafe operating condition for the user. Although an obstructed<br />
burner tube is not the only cause of “FLASH BACK’ it is the most common cause, and frequent inspection and cleaning of the burner<br />
tubes is necessary.<br />
3<br />
Revision 1/06
INSTALLATION INSTRUCTIONS<br />
PLEASE READ THESE INSTRUCTIONS BEFORE INSTALLING YOUR GAS GRILL<br />
Your Built-in Gas Grill comes to you fully assembled. We strongly recommend professional installation and hookup of the Gas BBQ<br />
grill. These instructions will provide you with the measurements necessary for you or your builder to construct a masonry structure to<br />
house your outdoor gas grill.<br />
NOTE TO INSTALLER: Leave these instructions with the consumer for future reference. Your grill must be installed in accordance<br />
with all local building codes.<br />
SPECIFICATIONS FOR BARBECUE STRUCTURE<br />
1. Masonry of your choice can be used for cabinet construction for the built-in gas grill. It must be non- combustible material.<br />
Keep in mind when choosing a location for your grill that it should NOT be located under any overhead combustible construction.<br />
Upper and ground level vents must be provided for combustion air on both sides of built-in cabinet. Vents on BBQ bowl must<br />
remain unobstructed to allow for combustion air.<br />
2. The BBQ Grill requires a wall opening of the following dimensions: See PAGE 5 & 6 for different models<br />
3. Place gas grill assembly into wall opening as shown in illustration on pages 5 and 6. BBQ rests on side and back edges of BBQ<br />
bowl.<br />
4. For Propane Gas LP TANK STORAGE AREA MUST BE ISOLATED FROM GRILL AND VENTED.<br />
5. Do not use any combustible materials for this construction. Minimum horizontal clearance to adjacent combustible surface<br />
from side and back of the grill must be 21 inches.<br />
CONNECTING TO GAS SOURCE<br />
Refer to the following instructions and illustrations for typical gas supply connections. We strongly suggest professional installation<br />
and hook-up of the Gas BBQ.<br />
IMPORTANT: Before connecting grill to gas source, make sure BBQ Grill control knobs are in “OFF” position.<br />
NATURAL GAS CONNECTIONS<br />
Pipe sealing compound or pipe thread tape of the type resistant to the<br />
action of natural gas must be used on all male pipe thread. Apply compound<br />
or tape to at least the first three threads when making the connection.<br />
Remove plastic cap from regulator installed on grill.<br />
Attach stainless steel flex line 3/8” flare-female end to the regulator.<br />
Attached the other end of flex line to shut-off valve thru a nipple.<br />
Attach a shut-off valve to gas supply pipe.<br />
PERFORM GAS LEAK CHECK -SEE PAGE 2<br />
PROPANE GAS CONNECTIONS<br />
The LP gas pressure regulator and hose assembly supplied with this unit<br />
must be used without alteration. If this assembly needs to be replaced, use<br />
only the type 1 specified in the parts list supplied with this unit.<br />
Use a LP tank with a type 1 cylinder valve. Make sure the tank is firmly<br />
secured in an upright position.<br />
Turn the black coupling nut of the hose and regulator assembly in a<br />
clockwise direction. Make sure it is completely threaded onto the cylinder<br />
valve before turning gas supply on.<br />
PERFORM GAS LEAK CHECK — SEE PAGE 2<br />
4<br />
Revision 1/06
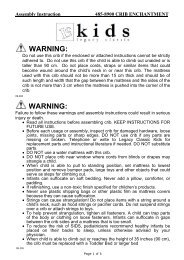
OUTDOORS NATURAL GAS BBQ INSTALLATION SPECIFICATIONS<br />
NOTE:<br />
Vents must be provided for combustion air on both sides of built-in cabinet.<br />
When choosing a location for your gas grill keep in mind that it should never be located under any overhead<br />
combustible construction.<br />
The sides and back of the grill should not be any closer than 21 inches to combustible construction.<br />
DO NOT store empty or full spare tanks under or near this or any other appliance.<br />
MODEL A<br />
4 BURNER 30 ½”<br />
5 BURNER 38 ”<br />
5<br />
Revision 1/06
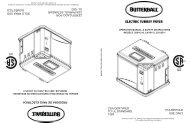
OUTDOORS PROPANE GAS BBQ INSTALLATION SPECIFICATIONS<br />
NOTE:<br />
Vents must be provided for combustion air on both sides of built-in cabinet.<br />
When choosing a location for your gas grill keep in mind that it should never be located under any overhead<br />
combustible construction.<br />
The sides and back of the grill should not be any closer than 21 inches to combustible construction.<br />
DO NOT store empty or full spare tanks under or near this or any other appliance.<br />
MODEL A<br />
4 BURNER 30 ½”<br />
5 BURNER 38”<br />
6<br />
Revision 1/06
INSPECTING I CLEANING BURNERS AND GAS VALVE ORIFICES<br />
By following these cleaning procedures on a timely basis, your grill will be kept clean and working properly with minimum effort.<br />
BURNER CLEANING<br />
1. Remove burner from the grill insert (See drawing on right). Bend a stiff<br />
wire (a light-weight coat hanger works well) into a small hook as shown<br />
below. Run the hook through each burner tube and burner several times.<br />
2. Use a narrow bottlebrush with a flexible handle. Run the hook through<br />
each burner tube and burner several times.<br />
3. Wire brush entire outside surface of burner to remove loose corrosion.<br />
4. Clean any clogged hole with a stiff wire (such as an open paper clip).<br />
5. Inspect the burner assembly for any opening caused by correction.<br />
6. Replace burner and put cotter pin back to hole of the cast peg beneath the<br />
burner.<br />
7. Check the burner for proper location after replacing. To assure the valve<br />
orifices are inside of the burner tubes. See right drawing. If the valve<br />
orifices do not fit inside the burner tubes, lighting the burners may<br />
cause explosion and/or fire.<br />
IGNITOR I ELECTRODE CHECK<br />
With all control knobs set to OFF”, check each igniter individually for presence of spark at electrode. In turn, push each control<br />
knob in fully and turn slowly about a 1/4 turn to the left (counter-clockwise) until a click is heard; the trigger hitting the strike block<br />
should produce a blue spark at the electrode tip. Return control knob to “OFF” before checking next igniter.<br />
BURNER OPERATION CHECK<br />
1. With BBQ Grill control knobs in “OFF” position, turn on the Gas supply.<br />
2. Light any burner by pushing its control knob in fully and slowly (3 to 4 seconds) turning it about 1/4 turn to the left (counterclockwise)<br />
until a click is heard. The 3 to 4 second duration should provide enough gas to light the burner. If the burner does not<br />
light, immediately return the control knob to “OFF”, wait several minutes for the gas to disperse, and repeat the process. After<br />
burner lights successfully, turn control knob to “OFF”.<br />
NOTE: Upon first assembly the gas lines and burners will be full of air. In order for the burners to light properly the lines must fill<br />
with gas. It may require several attempts at lighting the burners before you are successful.<br />
3. Repeat process for each control knob/igniter, in turn, ensuring that other knobs are in “OFF” position as you perform each<br />
check.<br />
4. If any burners fail to light after several attempts, discontinue gas supply at source and re-inspect for obstructions to gas flow<br />
and orifices.<br />
.<br />
7<br />
Revision 1/06
COOKING COMPONENT INSTALLATION<br />
IMPORTANT: Before first use wash flame tamers, cooking grids, and warming rack with warm, soapy water. Rinse and dry<br />
thoroughly. Season metal surfaces with cooking oil occasionally. (After cooking is completed, turn grill to high setting for NO<br />
MORE THAN five minutes to burn off excess grease or food residue)<br />
CAUTION: DO NOT LEAVE GRILL UNATTENDED.<br />
1. Place stainless steel heat shields on lowest ledge under / between burners in grill bowl. (See illustrated drawing on PAGE 15)<br />
2. Place stainless steel flame tamers on lower ledge above burners in grill bowl.<br />
2. Place cooking grids in grill bowl on ledge above flame tamers.<br />
NOW YOUR GAS GRILL IS READY TO USE. Before first use and at the beginning of each barbecue season:<br />
1. Please read Safety, Lighting and Operating Instructions carefully.<br />
2. Check gas valve orifices, burner tubes and burner ports for any obstructions<br />
3. PERFORM GAS LEAK CHECK -SEE PAGE 2.<br />
8<br />
Revision 1/06
LIGHTING PROCEDURES<br />
LIGHTING & OPERATING INSTRUCTIONS<br />
Lighting Main Burner(s):<br />
1. Become familiar with safety guidelines at front of manual. DO NOT SMOKE WHILE LIGHTING GRILL OR<br />
CHECKING GAS SUPPLY CONNECTIONSI<br />
2. If your grill fuel source is a LP gas cylinder, check to see that cylinder is filled.<br />
3. Check the end of each burner tube is properly located over each valve orifice.<br />
4. Make sure all gas connections are securely tightened. TEST FOR LEAKS WITH A SOAP SOLUTION, NEVER WITH A<br />
FLAME. (Gas Leak Check instructions are on page 2).<br />
5. Always open lid before lighting.<br />
6. Set ALL BBQ Grill control knobs to OFF” and open gas supply, LP cylinder or Natural Gas Valve.<br />
7. Ignite only the burners you intend to use, using the same method for each: Push in control knob fully and rotate<br />
slowly (3 to 4 seconds) about 1/4 turn to the left (counter clockwise) until a click is heard. The 3 to 4 second<br />
duration should provide enough gas to light the burner. If the burner does not light, immediately return the control<br />
knob to ‘OFF’, wait several minutes for the gas to disperse, and repeat the process. After burner ignites, repeat<br />
procedure with any other burner needed.<br />
8. Adjust control knob(s) to desired cooking temperature.<br />
NOTE: If for some reason, igniters fail to produce a spark at the electrode tip, burners can be lit with a match.<br />
NOTE: To light gas grill with a match, follow steps 1 through 6 above. Remove cooking grid and flame tamer from burner you<br />
wish to light. Insert lighted fireplace-type match or long-necked butane lighter placing flame near to burner ports. Press in control<br />
knob and rotate left to “HI” setting to release gas. Burner should light immediately. If more than one burner is needed, repeat<br />
procedure with each burner. Replace flame tamer and cooking grid. Turn off burners not needed, and adjust other burners to<br />
desired cooking temperature.<br />
Lighting Rotisserie Burner (if equipped):<br />
The rear infrared rotisserie burner allows for slow rotisserie cooking of meats and poultry. Infrared burners radiate heat onto the<br />
outer surface of the food. This allows cooking without the grease drippings burning on the flame tamers.<br />
To light Rotisserie Burner,<br />
1. Always open lid before lighting.<br />
2. Set ALL BBQ Grill control knobs to OFF” and open gas supply, LP cylinder or Natural Gas Valve.<br />
3. The Control knob is located at the middle of the Control Panel. Push in control knob fully and rotate slowly (3 to 4 seconds)<br />
about 1/4 turn to the left (counter clockwise) until a click is heard. The 3 to 4 second duration should provide enough gas to<br />
light the burner. If the burner does not light, immediately return the control knob to ‘OFF’, wait several minutes for any<br />
accumulated gas to clear out of the grill. Keep lid closed and operate burner at the “ON” position when roistering.<br />
WARNING:<br />
Never operate Rotisserie Burner with main (other) burner(s) ON<br />
Warming Rack must be removed when Rotisserie Burner is ON<br />
Do not attempt to regulate the rotisserie burner by using the control knob. This control has a fixed setting and is not<br />
adjustable.<br />
NOTE: Initially, the Ceramic Panel will have a blue flame that, after some time, will change to an orange flame and the Ceramic<br />
Panel will glow an orange color. This may not be evident in bright daylight.<br />
To light Rotisserie Burner with a match, Follow steps 1 through 2 above. Insert lighted fireplace-type match or long-necked<br />
butane lighter placing flame near to the Ceramic Panel. Press in control knob and rotate left (counter clockwise) to “HI” or “ON”<br />
setting to release gas. Burner should light immediately.<br />
9<br />
Revision 1/06
LIGHTING & OPERATING INSTRUCTIONS<br />
OPERATING PROCEDURE<br />
Burn-off: Before cooking on your gas grill for the first time, burn the grill to get rid it of any odors or foreign matter by igniting the<br />
burners, closing the lid, and operating at “HI” setting for about five minutes. You may then either set the controls to “OFF” or cook<br />
on your grill immediately by turning the control knobs to a lower setting.<br />
CAUTION: DO NOT LEAVE GRILL UNATTENDED.<br />
Preheating: It is necessary to preheat the grill for a short time before cooking certain foods, depending on the type of food and<br />
the cooking temperature. Food that requires a high cooking temperature needs preheat for five minutes; food that requires a<br />
lower cooking temperature needs only a period of two to three minutes. There is no need to preheat for casseroles or other foods<br />
that require slow cooking.<br />
COOKING TEMPERATURES<br />
HIGH Setting - Use this setting only for fast warm-up, for searing steaks and chops, and for burning food residue from the cooking<br />
grids after the cookout is over.<br />
MEDIUM SETTING - Use this setting for most grilling, roasting or baking, and for cooking hamburgers and vegetables.<br />
LOW SETTING - Use this setting for all smoke cooking, rotisserie cooking, and when cooking very lean cuts such as fish.<br />
These temperatures vary with the outside temperature and the amount of wind.<br />
Cooking With Indirect Heat: You can cook poultry and large cuts of meat slowly<br />
to perfection on one side of the grill by indirect heat from the next burner. The<br />
heat from the lighted burner circulates gently throughout the grill, cooking the<br />
meat or poultry without any direct flame touching it. This method greatly reduces<br />
flare-ups when cooking extra fatty cuts, because there is no direct flame to ignite<br />
the fats and juices that drip down during cooking. Place a drip pan slightly<br />
smaller than the cut of meat on the cooking grids or flame tamer surface under<br />
the meat being cooked. This will allow you to catch meat juices for making gravy.<br />
Flare-Ups: The fats and juices that drip from the meat cause flare-ups. Since<br />
flare-ups impart the distinctive taste and color for food cooked over an open flame, they should be expected and<br />
encouraged within reason. Nevertheless, uncontrolled flaring can result in a ruined meal. To control excessive flareups<br />
caused by too high a heat setting, turn the heat control knob to a lower setting.<br />
CAUTION: If burners go out during operation, close gas supply at source, and turn all gas valves off. Open lid and wait five<br />
minutes before attempting to re-light (this allows accumulated gas fumes to clear).<br />
CAUTION: Should a grease fire occur, close gas supply at source, turn off all burners and leave lid closed until fire is out.<br />
CAUTION: Do not attempt to disconnect any gas fitting while your barbecue is in operation.<br />
10<br />
Revision 1/06
LIGHTING & OPERATING INSTRUCTIONS<br />
ROTISSERIE COOKING<br />
Rotisserie is mostly used to cook large pieces of meat and poultry to assure slow, even cooking. The constant turning provides a<br />
self-basting action, making food cooked on a rotisserie exceptionally moist and juicy. Rotisserie cooking generally requires 1 ½<br />
to 4½ hrs to cook depending on the size and type of meat being cooked. You can have rotisserie cooking with indirect heat as<br />
shown or with infrared rotisserie burner.<br />
For successful roistering, the meat should be centered and balanced as evenly<br />
as possible on the spit rod to avoid overworking the rotisserie motor.(see rotisserie<br />
kit assembly shown below)<br />
Since indirect heat is often used in cooking on a rotisserie, a foil or aluminum<br />
drip pan is advisable to prevent excessive flare-ups. Generally, the cooking<br />
grills are removed to allow for the swing of the rotisserie. A basting pan is<br />
placed under the rotisserie area on top of the flame tamer(s) to catch the drippings.<br />
WARNING:<br />
Never operate Rotisserie Burner with main (other) burner(s) “ON”.<br />
Warming Rack must be removed when Rotisserie Burner is ON<br />
11<br />
Revision 1/06
CLEANING THE COOKING GRIDS<br />
CLEANING & MAINTENANCE<br />
After cooking, turn control knobs to “OFF” and let grill cool before attempting to clean your cooking grids. Before first use and<br />
periodically it is suggested that you wash the cooking grids in a mild soap and warm water solution. You can use a washcloth or a<br />
vegetable brush to clean your cooking grids. Take care not to chip the porcelain coating.<br />
CLEANING THE FLAME TAMER & HEAT SHIELDS<br />
Washing the flame tamers & heat shields after every use is not necessary but periodically it is suggested you wash them in a<br />
soap and warm water solution. Use a wire brush to remove stubborn burned on cooking residue. Dry the flame tamers & heat<br />
shields thoroughly before you reinstall it in the cooking insert.<br />
CLEANING THE BURNERS.<br />
IMPORTANT: Gas control knobs should be in the ‘OFF” position, and fuel line should be disconnected from gas valve manifold.<br />
To reduce the chance of FLASHBACK, the procedure below should be followed at least once a month or when your grill has not<br />
been used for an extended period of time.<br />
1. Remove burners from grill by carefully lifting each burner up and away from gas valve orifice.<br />
2. Wire brush entire outer surface of burner to remove food residue and dirt. Clean any clogged ports with a stiff wire such as an<br />
open paper clip.<br />
3. Inspect the burner for damage (cracks or holes) and if such damage is found, order and install a new burner.<br />
4. After installation, check to insure that gas valve orifices are correctly placed inside ends of burner tubes. Also check position of<br />
spark electrode.<br />
CLEANING THE GREASE TRAY<br />
The grease tray should be emptied and wiped down periodically and washed in a mild detergent and warm water solution.<br />
ANNUAL CLEANING OF GRILL HOUSING<br />
Burn-off the grill after every cookout will keep it ready for instant use, however, once a year you should give the entire grill a<br />
thorough cleaning to keep it in top operating condition.<br />
1. Shut off gas supply at source and disconnects fuel line from gas valve manifold. Protect fuel line fitting.<br />
2. Remove and clean (as explained before) the cooking grids, flame tamers and burners.<br />
3. Remove warming rack and wash with mild detergent and warm water.<br />
4. Cover the gas valve orifices with a piece of aluminum foil.<br />
5. Brush the inside and bottom of the grill with a stiff wire brush, and wash down with a mild soap and warm water solution.<br />
Rinse thoroughly and let dry.<br />
6. Remove aluminum foil from orifices and check orifices for obstruction.<br />
7. Check electrode as instructed on page 7.<br />
8. Replace flame tamers, cooking grids, and warming rack.<br />
9. Reconnect to gas source and observe burner flame for correct operation.<br />
IMPORTANT: You should NOT line the bottom of the grill housing with aluminum foil, sand or any other grease absorbent<br />
substance. Grease will not be able to drip down into grease collector and a grease fire could occur.<br />
12<br />
Revision 1/06
TROUBLESHOOTING<br />
If grill fails to operate properly<br />
1. Turn off gas at source, turn control knobs to “OFF”, and wait five minutes before trying again<br />
2. Check gas supply/connections.<br />
3. Repeat lighting procedure and, if grill still fails to operate properly, TURN “OFF” GAS AT SOURCE, TURN CONTROL<br />
KNOBS TO “OFF”, wait for grill to cool, and check the following:<br />
a. Misalignment of burner tube(s) over orifice(s)<br />
CORRECTION: Reposition burner tube to properly seat over orifice.<br />
b. Obstruction in gas line<br />
CORRECTION: Remove fuel line from grill. DO NOT SMOKEI Open gas supply for one second to blow any obstruction from<br />
fuel line. Close off gas supply at source and reconnect fuel line to grill.<br />
c. Plugged orifice<br />
CORRECTION: Remove cooking grids, flame tamers, grease draining tray. Remove burners from<br />
bottom of grill bowl by pulling cotter pin from beneath burner peg using a screwdriver or needle nose<br />
pliers. Carefully lift each burner up and away from gas valve orifice. Remove the orifice from each<br />
burner up and away from gas valve and gently clear any obstruction with a fine wire. Re-install each<br />
orifice, reinstall burners over orifices and seat each burner peg into mounting bracket at bottom of grill<br />
bowl. Replace cotter pins. Replace cooking components and grease collectors. If an obstruction is<br />
suspected in gas valve(s) or gas valve bracket, please contact your gas grill dealer or gas appliance service person for<br />
assistance.<br />
d. Misalignment of igniter on burner<br />
CORRECTION: Check for proper position of electrode tip. The tip of the electrode should be pointing forward toward the front<br />
and free from grease for spark discharging. The ignition wire should be connected to the valve ignition and electrode firmly.<br />
Replace the ignition wire if the wire were broken or cracked. With gas supply closed and all control knobs set to “OFF”, check<br />
each positive igniter individually for presence of spark at electrode. In turn, push each control knob in fully and rotate about 1/4<br />
turn to the left (counter-clockwise) until click is heard; the trigger hitting the strike block should produce a blue spark at the<br />
electrode tip. Return control knob to “OFF” before checking next igniter. If re-ignition is necessary.<br />
While the gas grill is still hot, you must wait for a minimum of five minutes before commencing to re-ignite (this allows<br />
accumulated gas fumes to clear). If all checks/corrections have been made and gas grill still fails to operate properly, consult your<br />
grill dealer or gas appliance service person.<br />
YELLOW FLAME<br />
Once the entire burner is operating, check the flame color to be sure it is mostly blue (some yellow color will be present because<br />
of impurities in the fuel). If the flame is golden or yellow in color the reason could be seasoning salts, oil film, or other foreign<br />
matter on burner.<br />
CORRECTION: Either wash burner with mild detergent, or operate burner at “HI’ setting with lid closed for about 10 minutes.<br />
FLASH BACK:<br />
When fire occurs in and around the burner tubes, immediately turn off gas at its source and turn the control knob(s) to OFF”. Wait<br />
until the grill has cooled, then clean the burner tubes and burner ports as described on page 7.<br />
13<br />
Revision 1/06
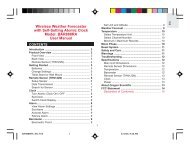
PARTS LIST<br />
Model 01568X - 5 Burner Stainless Steel, Built-In, L.P. (Propane) Gas with Rotisserie Back Burner<br />
Model 01569X - 5 Burner Stainless Steel, Built-In, Natural Gas with Rotisserie Back Burner<br />
REF # DESCRIPTION QTY<br />
1. Lid -Front 1<br />
2. Lid -Rear 1<br />
2A Cover-Rear Lid 1<br />
3. Insert Assembly 1<br />
4. Control Panel 1<br />
5. Grease Tray 1<br />
6. Grease Tray Handle 1<br />
7. Heat Shield 4<br />
8. Cast Burner (Brass) 5<br />
9. Flame Tamer 5<br />
10. Cooking Grid 5<br />
11. Warming Rack 1<br />
12. Lid Handle 1<br />
13. Warming Rack Support 2<br />
14. Flame Tamer Support 18<br />
15. Bezel 5<br />
16. Control Knob 5<br />
17. Temperature Gauge 1<br />
18. Gas Valve With Ignition 5<br />
19. Regulator (Natural Gas Model Only) 1<br />
19A Regulator (LP Model Only) 1<br />
20. Manifold 1<br />
21. Hardware Package 1<br />
22. Infrared Rotisserie Burner 1<br />
23. Back Panel 1<br />
24. Stainless Steel flex Tube 1<br />
25. Nozzle-Back Panel 1<br />
26. Ignition Wire for Back Burner 1<br />
27. Motor Bracket 1<br />
14<br />
Revision 1/06
HOW TO ORDER REPLACEMENT PARTS<br />
Please refer to the parts list on this page.<br />
To make sure you obtain the correct replacement parts for your gas grill, the following information is required to assure<br />
getting the correct part.<br />
1. Gas grill model number (see data sticker on grill) and type of gas hook up.<br />
2. Reference number of replacement part needed.<br />
3. Description of replacement part needed<br />
4. Quantity of parts needed.<br />
IMPORTANT: Use only factory authorized parts. The use of any part that is not factory authorized can be dangerous. This<br />
will also void your warranty.<br />
IMPORTANT: Keep this assembly and operating instruction manual for referral, and for replacement parts ordering.<br />
CAUTION: Gas valves are preset at the factory. If you wish to convert at some later date, be sure to contact your gas<br />
supplier or grill, dealer before making the conversion.<br />
CAUTION: A different gas valve must be installed when converting from one type of gas to another. You will also need a<br />
data plate indicating what type of gas the grill uses.<br />
15<br />
Revision 1/06
ILLUSTRATED PARTS LIST<br />
16<br />
Revision 1/06
LIMITED WARRANTY<br />
Bull Outdoor Products, Inc. warrants to the original purchaser at the original site of delivery with proof of<br />
purchase of each Outdoor Gas Grill that when subject to normal residential use, it is free from defects in<br />
workmanship and materials for the periods specified below. This warranty excludes grills used in rental or<br />
commercial applications. It does not apply to rust, corrosion, oxidation or discoloration, which may occur<br />
due to moisture or overheating, unless the affected component becomes inoperable. It does not cover labor<br />
or labor related charges. There will be a shipping and handling charge for the delivery of the warranty<br />
part(s).<br />
Component<br />
Warranty Period<br />
Cast Iron Burner ………………………………………………… ……... 5 Years<br />
Cast Brass Burner …………………………………………………...….. 20 Years<br />
Stainless Steel Flame Tamer ……………………………………………. 3 Years<br />
Porcelain Cast Iron Cooking Grids ……………………………………... 3 Years<br />
Stainless Steel Cooking Grids …………………………………………... Lifetime<br />
Gas Valves ……………………………………………………………… . 1 Year<br />
Painted Frame, Housing, Cart, Control Panel, Igniter system and others .. 1 Year<br />
Stainless Steel Frame, Housing …………………………………………… Lifetime<br />
Our obligation under this warranty is limited to repair or replacement, at our option, of the product during<br />
the warranty period. The extent of any liability of Bull Outdoor Products, Inc., under this warranty is limited<br />
to repair or replacement. This warranty does not cover normal wear of parts, damage resulting from any of<br />
the following: negligent use or misuse of the product, use on improper fuel/gas supply, use contrary to<br />
operating instructions, or alteration by any person other than our factory service center The warranty period<br />
is not extended by such repair or replacement.<br />
Warranty claim procedure: If you require service or parts for your Bull grill, please contact our Warranty<br />
Service Center for factory direct assistance. Our hours of operation are 8AM to 4 PM PST. Our phone<br />
number is (800) 521-2855 and our FAX number is (909) 988-4051. Please direct all correspondence to:<br />
Bull Outdoor Products, Inc., Ontario, CA 91761. ATTN: Warranty Service Center<br />
Product repair as provided under this warranty is your exclusive remedy. Bull Outdoor Products, Inc. shall<br />
not be liable for any incidental or consequential damages for breach of any express or implied warranty on<br />
its products. Except to the extent prohibited by applicable law, any implied warranty or merchantability or<br />
fitness for a particular purpose on this product to the duration of the above warranty. Some states do not<br />
allow the exclusion or limitation of incidental or consequential damages, or allow limitations on how long an<br />
implied warranty lasts, so the above limitations or exclusions may not apply to you. This warranty gives you<br />
specific legal rights, and you may have other rights, which vary from state to state.<br />
Model Number _______________________________ Serial Number _____________________________<br />
Date of Purchased _______________________________________________________________________ Purchased From _____________________________________________________________________<br />
17<br />
Revision 1/06