introduction - Cutters Edge
introduction - Cutters Edge
introduction - Cutters Edge

You also want an ePaper? Increase the reach of your titles
YUMPU automatically turns print PDFs into web optimized ePapers that Google loves.
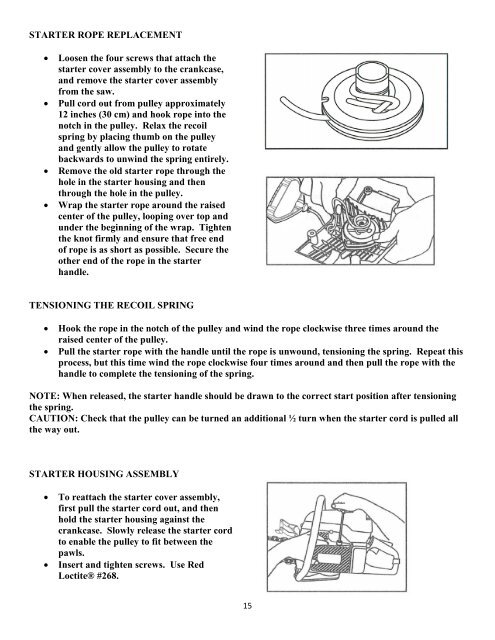
STARTER ROPE REPLACEMENT<br />
• Loosen the four screws that attach the<br />
starter cover assembly to the crankcase,<br />
and remove the starter cover assembly<br />
from the saw.<br />
• Pull cord out from pulley approximately<br />
12 inches (30 cm) and hook rope into the<br />
notch in the pulley. Relax the recoil<br />
spring by placing thumb on the pulley<br />
and gently allow the pulley to rotate<br />
backwards to unwind the spring entirely.<br />
• Remove the old starter rope through the<br />
hole in the starter housing and then<br />
through the hole in the pulley.<br />
• Wrap the starter rope around the raised<br />
center of the pulley, looping over top and<br />
under the beginning of the wrap. Tighten<br />
the knot firmly and ensure that free end<br />
of rope is as short as possible. Secure the<br />
other end of the rope in the starter<br />
handle.<br />
TENSIONING THE RECOIL SPRING<br />
• Hook the rope in the notch of the pulley and wind the rope clockwise three times around the<br />
raised center of the pulley.<br />
• Pull the starter rope with the handle until the rope is unwound, tensioning the spring. Repeat this<br />
process, but this time wind the rope clockwise four times around and then pull the rope with the<br />
handle to complete the tensioning of the spring.<br />
NOTE: When released, the starter handle should be drawn to the correct start position after tensioning<br />
the spring.<br />
CAUTION: Check that the pulley can be turned an additional ½ turn when the starter cord is pulled all<br />
the way out.<br />
STARTER HOUSING ASSEMBLY<br />
• To reattach the starter cover assembly,<br />
first pull the starter cord out, and then<br />
hold the starter housing against the<br />
crankcase. Slowly release the starter cord<br />
to enable the pulley to fit between the<br />
pawls.<br />
• Insert and tighten screws. Use Red<br />
Loctite® #268.<br />
15