introduction - Cutters Edge
introduction - Cutters Edge
introduction - Cutters Edge

You also want an ePaper? Increase the reach of your titles
YUMPU automatically turns print PDFs into web optimized ePapers that Google loves.
DRIVE SPROCKET REMOVAL<br />
• Remove the side cover, guidebar and<br />
diamond chain.<br />
CAUTION: Wear safety glasses.<br />
• Using a screwdriver, carefully pry the<br />
spring clip from the half collars.<br />
TIP: Cup your hand over the end of the<br />
shaft to prevent the spring clip from<br />
being ejected.<br />
• Remove the half collars and retaining<br />
washer from the shaft.<br />
• Slide the drive sprocket off of the splined<br />
adapter.<br />
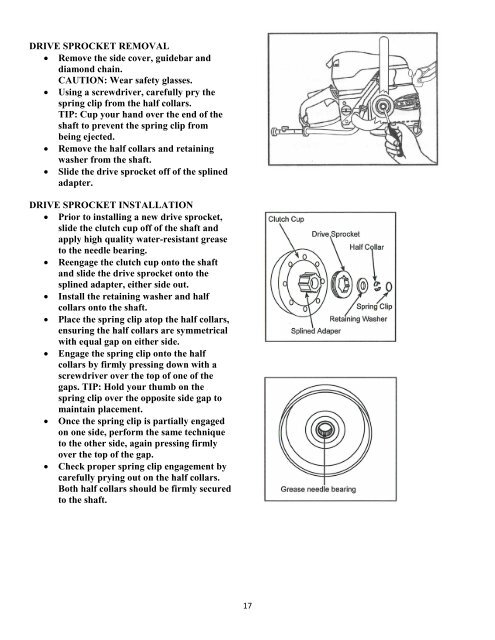
DRIVE SPROCKET INSTALLATION<br />
• Prior to installing a new drive sprocket,<br />
slide the clutch cup off of the shaft and<br />
apply high quality water-resistant grease<br />
to the needle bearing.<br />
• Reengage the clutch cup onto the shaft<br />
and slide the drive sprocket onto the<br />
splined adapter, either side out.<br />
• Install the retaining washer and half<br />
collars onto the shaft.<br />
• Place the spring clip atop the half collars,<br />
ensuring the half collars are symmetrical<br />
with equal gap on either side.<br />
• Engage the spring clip onto the half<br />
collars by firmly pressing down with a<br />
screwdriver over the top of one of the<br />
gaps. TIP: Hold your thumb on the<br />
spring clip over the opposite side gap to<br />
maintain placement.<br />
• Once the spring clip is partially engaged<br />
on one side, perform the same technique<br />
to the other side, again pressing firmly<br />
over the top of the gap.<br />
• Check proper spring clip engagement by<br />
carefully prying out on the half collars.<br />
Both half collars should be firmly secured<br />
to the shaft.<br />
17