0005-2000 res. manual
0005-2000 res. manual
0005-2000 res. manual

You also want an ePaper? Increase the reach of your titles
YUMPU automatically turns print PDFs into web optimized ePapers that Google loves.
RS6, RS5, & RS4<br />
Resolution Matched Component Systems<br />
Congratulations! You have just purchased one of the latest in a long line<br />
of KICKER high performance car audio speaker systems from Stillwater<br />
Designs. Your KICKER Resolution Matched Component System combines<br />
the best tweeters and midrange drivers KICKER has to offer with crossovers<br />
specifically designed to match your particular speakers. You can count on<br />
years of outstanding musical enjoyment when properly installed in a<br />
well-designed system. Enjoy.<br />
GENERAL INSTALLATION INFORMATION<br />
Kicker Resolution Matched Component Systems are designed from the ground up to<br />
provide the ultimate in sound quality. While the main drivers are sized to fit many of the<br />
factory cutouts in your vehicle, the tweeters are separate to allow mounting in the<br />
location that will give the best dispersion and imaging.<br />
The RS6 and RS5 systems utilize the 1-inch R25 tweeter; the RS4 system contains the<br />
.75-inch R19 tweeter. These tweeters were selected for their superior acoustical<br />
properties, reliability, and close sonic match with the midrange drivers. The tweeters are<br />
in acoustically loaded swivel mounts which may be installed flush with the panel surface,<br />
on the panel, or in our special tweeter mounting post which lets you mount the tweeter<br />
directly to the center of the midrange driver.<br />
The midrange drivers have specially formulated titanium-coated polymineral cones<br />
attached with inverted butyl rubber surrounds to rock-solid cast aluminum frames. The<br />
long-life voice coils are wound on heat-<strong>res</strong>istant Kapton formers.<br />
Unique to the Resolution System is the passive crossover. Stillwater Designs engineers<br />
know the importance of a seamless transition between the midrange and the tweeter.<br />
Your Resolution system has one of the best passive networks available in car stereo today.<br />
Not only does this network perform the function of dividing information between the<br />
midrange driver and the tweeter, it also allows for adjustment of the tweeter level<br />
to match that of the midrange. The <strong>res</strong>ult is a superbly balanced, highly musical system.<br />
SPECIFICATIONS<br />
System Frequency Mid Grill Mid Cutout Mid Mounting Tweeter Cutout Tweeter Mounting<br />
Response OD Diameter Depth Diameter Depth<br />
(Hz) (in., mm) (in., mm) (in., mm) (in., mm) (in., mm)<br />
R6 40-22k 6.2, 158 5.33, 136 2.5, 64 2.125, 54 1.2, 30<br />
R5 50-22k 6.15, 156 4.76, 121 2.375, 62 2.125, 54 1.2, 30<br />
R4 75-21k 5.15, 131 3.83, 97 1.94, 50 1.63, 42 .63, 16
INSTALLATION INSTRUCTIONS<br />
Read through these install instructions completely first. If they appear too difficult or if<br />
you lack any of the equipment required to finish the job, we strongly recommend that the<br />
installation be performed by a professional installer.<br />
Resolution System midrange drivers are specifically designed for mounting in freeair<br />
applications. While the speakers don't need a sealed box to work in, for optimum performance<br />
it is important to isolate the sound coming off the back of the driver from the sound<br />
coming off the front of the driver.<br />
This isolation is usually accomplished by using the correct size driver in a factory<br />
speaker location. Grills are included for use in installations that mount the driver in<br />
custom locations.<br />
The ideal mounting scheme is to have a sturdy panel to cut out or to reinforce an existing<br />
panel with Masonite or medium density Fiberboard. If the panel can flex at all, it will<br />
decrease the output of the driver and keep it from sounding it's best. The panel that a<br />
midrange is mounted to must isolate the information coming off the back of the driver<br />
from the information coming off the front of the driver.<br />
Since the Resolution midranges have operating capabilities down to as low as 40Hz, it is<br />
important to completely contain the back to avoid cancellations. This is possible when<br />
mounting on the door or on the package tray of a sedan. The door and trunk act like<br />
enclosu<strong>res</strong> to keep the backwave from reaching the front side of the driver. In any mounting<br />
situation, check for interference from other mechanical systems in the vehicle. Watch<br />
for window mechanisms, hinges, trunk springs, and anything that would be affected by the<br />
installation of these drivers.<br />
2
MIDRANGE DRIVER MOUNTING<br />
The easiest mounting location for the Resolution midrange is in the front factory<br />
speaker locations. This isn't always available in all vehicles due to small cutouts or no<br />
stock cutout at all.<br />
If custom door mounting locations are desired for your Resolution midrange, be<br />
careful to avoid interference from window and/or lock mechanisms. The first step is to<br />
find a location on the door panel that will accept the size of speaker chosen. Now remove<br />
the door panel from the door and check for the operation of the window all the way up<br />
and down. Also try to avoid structural metal and braces if the metal must be cut to<br />
mount the speakers.<br />
On custom locations that use the supplied grill, mount them as indicated in the<br />
below diagram. A wire grill tool is provided to help you turn and lock the grill into position.<br />
Your KICKER Resolution R6c drivers and included grills mount as illustrated in the<br />
drawing below.<br />
Mount your KICKER Resolution R5c or R4c drivers and included grills as<br />
illustrated below.<br />
3
(Mounting Instructions, continued)<br />
TWEETER MOUNTING<br />
The best location for the tweeter is usually high up on the door and as far forward as is<br />
possible without interference from the dashboard.<br />
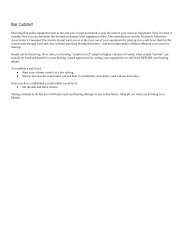
Recessed Mounting<br />
If the chosen place is flat and space behind the door panel allows the use of the<br />
recessed mounting cup, follow the mounting arrangement in the diagram below.<br />
After checking for clearance, cut the proper sized hole in the door panel. Mount the<br />
recess cup from the outside with the mounting clip on the inside of the door panel. The<br />
10-32x1/2" flathead screw joins the two pieces together.<br />
Clearance Hole 2.5"<br />
Door Body<br />
Mounting Clip<br />
10-32x1/2" Flathead<br />
Door Panel<br />
Resolution<br />
Tweeter<br />
Recess Cup<br />
See Specifications<br />
for Diameter<br />
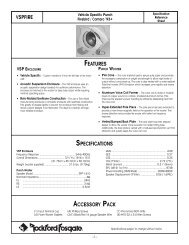
Surface Mounting<br />
If the surface mounting arrangement for the tweeter works out best, then the<br />
following diagram shows how it works.<br />
Using the surface mounting cup as a template, drill a 7/64" hole in the center for<br />
attaching and drill a 5/16" hole for the wi<strong>res</strong>. A #8 flathead sheetmetal screw is supplied<br />
to attach the surface mount cup to the door panel.<br />
Door Body<br />
Tinnerman Clip<br />
(optional)<br />
Door Panel<br />
Resolution<br />
Tweeter<br />
Surface<br />
Mount w/<br />
Screw<br />
With either tweeter mounting scheme, the wiring and insertion of the tweeter are the<br />
same. The short wi<strong>res</strong> attached to the tweeter are fed through the larger hole in the<br />
mount; then the tweeter is snapped into place.<br />
4
(Mounting Instructions, continued)<br />
If any of the drivers are mounted in the<br />
door, it is necessary to run the supplied<br />
wire through the door jamb. This wire<br />
must be kept away from sharp edges and<br />
the possibility of being pinched. An existing<br />
boot in the door jamb is the ideal place to<br />
run the wi<strong>res</strong>, but sometimes this does not<br />
exist or is inaccessible. Drilling holes to run<br />
wi<strong>res</strong> through is very tricky, and caution<br />
must be exercised not to drill into other<br />
wiring or mechanisms. Any time a wire is<br />
run through a bare hole, it is necessary to<br />
insert a rubber grommet first.<br />
The supplied crossovers should not be<br />
mounted in the doors or any other location<br />
that is subject to moisture. Inside the<br />
kickpanels or under the dash are ideal locations<br />
for the crossovers in most vehicles.<br />
Coaxial Mounting<br />
The third option is to mount the tweeter to the center of the midrange. This will effectively<br />
form a high quality coaxial speaker. To do this, unscrew the bullet shaped phase plug<br />
from the center of the midrange and remove the magnet boot.<br />
Using the included tweeter pole mount, feed the tweeter wi<strong>res</strong> through the hole in the<br />
center and snap the tweeter into the swivel mount.<br />
5
(Mounting Instructions, continued)<br />
This assembly can now be screwed in place of the phase plug in the middle of the<br />
midrange.<br />
Feed the tweeter wi<strong>res</strong> out the backplate of the midrange and through the slot that<br />
guides them to the side of the magnet. Putting the magnet boot back on will hold the<br />
wi<strong>res</strong> in place.<br />
A special grill included in this kit accommodates the pole-mounted tweeter when this<br />
system is used in custom mounting locations.<br />
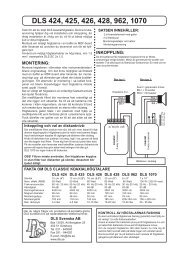
WIRING<br />
There are three sets of wi<strong>res</strong> supplied with your system. One set has two different size<br />
female connectors (.205" and .110") on one end and is designed to plug on to the terminals<br />
of the midrange driver. The other end of this wire goes to the midrange output terminals<br />
on the supplied crossover. Two sets of wi<strong>res</strong> with no connectors on either end are also<br />
supplied. One set will go from the tweeter output terminals on the crossover to the tweeter<br />
itself. This wire and the short wire coming out of the tweeter are joined using the butt<br />
connectors. The last set of wi<strong>res</strong> is used to connect the output of your source unit to the<br />
input terminals of the crossover.<br />
Crossover<br />
Source<br />
-<br />
+ - + - +<br />
+<br />
Tweeter<br />
Midrange<br />
-<br />
+<br />
-<br />
+<br />
-<br />
6
ADJUSTMENT<br />
It is quite common in car stereo systems for the tweeter to seem dominant due to<br />
<strong>res</strong>trictions on the availability of good mounting locations for the midrange.The Resolution<br />
System crossover has an adjustable tweeter level control that is designed for level matching<br />
once the system is installed and operating.<br />
Starting with the level adjustment in the 0dB position, listen to the system with a variety<br />
of music. If the tweeters sound too loud or too soft in relation to the other drivers,<br />
simply change the level setting of both crossovers to a different level of attenuation.<br />
Repeat this procedure until a balance you prefer is reached between the outputs of your<br />
tweeters and midrange drivers.<br />
If you have more questions about the installation of your KICKER component, see<br />
the Authorized KICKER Dealer where you made your purchase. You may also call our<br />
Technical Services Line at (405)624-8583 or contact us via the Technical Services<br />
page on www.kicker.com.<br />
7
SPEAKER SYSTEMS LIMITED WARRANTY<br />
Stillwater Designs warrants this product to be free from defects in material and workmanship under<br />
normal use for a period of one (1) year from date of original purchase, unless this product is labeled “B<br />
Stock”, in which case it is warranted for ninety (90) days from date of purchase. Should service be necessary<br />
under this warranty for any reason due to manufacturing defect or malfunction during the warranty<br />
period, Stillwater Designs will replace or repair (at its discretion) the defective merchandise with equivalent<br />
merchandise at no charge. Warranty replacements on “B-Stock” may have cosmetic scratches and<br />
blemishes. Discontinued products may be replaced with equivalent products.<br />
This warranty is valid only for the original purchaser and is not extended to owners of the product<br />
subsequent to the original purchaser. Any applicable implied warranties are limited in duration to a period<br />
of the exp<strong>res</strong>s warranty as provided herein beginning with the date of the original purchase at retail,<br />
and no warranties, whether exp<strong>res</strong>s or implied, shall apply to this product thereafter. Some states do not<br />
allow limitations on implied warranties, therefore these exclusions may not apply to you.<br />
This warranty gives you specific legal rights; however you may have other rights that vary from state<br />
to state.<br />
WHAT TO DO IF YOU NEED WARRANTY OR SERVICE<br />
Defective merchandise must be returned to your local Authorized Stillwater Designs<br />
(Kicker/Impulse) Dealer for warranty. Assistance in locating an Authorized Dealer can be obtained by<br />
writing or calling Stillwater Designs direct. You can confirm that a dealer is authorized by asking to see a<br />
current authorized dealer window decal.<br />
If it becomes necessary for you to return defective merchandise, call the Kicker Customer Service<br />
Department at (405)624-8510 for a Return Authorization (RA) number. Package all defective items in the<br />
original container or in a package that will prevent shipping damage, and return to<br />
Stillwater Designs, 5021 North Perkins Road, Stillwater, OK 74075<br />
The RA number must be clearly marked on the outside of the package. Return only defective components.<br />
Return of entire cabinets, system packs, pairs, etc. increases your return freight charges. Nondefective<br />
items received will be returned freight collect.<br />
Include a dated proof-of-purchase from an Authorized Dealer. Warranty expiration on items<br />
returned without proof-of-purchase will be determined from the manufacturing date code. Coverage<br />
may be invalidated if this date is greater than one (1) year previous to the date item is sent in. Freight<br />
must be prepaid; items received freight collect will be refused.<br />
Failure to follow these steps may void your warranty. Any questions can be directed to the Kicker<br />
Customer Service Department at (405)624-8510.<br />
WHAT IS NOT COVERED<br />
This warranty is valid only if the product is used for the purpose for which it was designed.<br />
It does not cover:<br />
• Install slips (screwdriver holes)<br />
• Damage caused by exposure to water<br />
and/or excessive heat.<br />
• Damage through negligence, misuse, or<br />
accident.<br />
• Items physically damaged due to abuse.<br />
• Freight damage.<br />
• The cost of shipping product to Stillwater<br />
Designs Service.<br />
• Items previously repaired by any<br />
unauthorized repair facility.<br />
• Items returned from unauthorized<br />
individuals or dealers.<br />
• Return shipping on non-defective items.<br />
• Speakers damaged due to amplifier<br />
clipping or distortion.<br />
• Speakers with silicon caulk used for gasket<br />
material.<br />
HOW LONG WILL IT TAKE<br />
Stillwater Designs maintains a goal of 24-hour service for all returns. Delays may be incurred if<br />
lack of replacement inventory or parts is encountered.<br />
INTERNATIONAL WARRANTY<br />
Contact your International Stillwater Designs dealer or distributor concerning specific<br />
procedu<strong>res</strong> for your country’s warranty policies.<br />
WARNING:<br />
P.O. Box 459 • Stillwater, Oklahoma 74076 • U.S.A. • 405 624-8510<br />
KICKER drivers are capable of producing sound levels that can permanently<br />
damage your hearing! Turning up a system to a level that has audible distortion is<br />
more damaging to your ears than listening to an undistorted system at the same<br />
volume level. The th<strong>res</strong>hold of pain is always an indicator that the sound level is<br />
too loud and may permanently damage your hearing.<br />
Please use common sense when controlling volume!<br />
MARCH <strong>2000</strong>