Download PDF - Bernina
Download PDF - Bernina
Download PDF - Bernina

You also want an ePaper? Increase the reach of your titles
YUMPU automatically turns print PDFs into web optimized ePapers that Google loves.
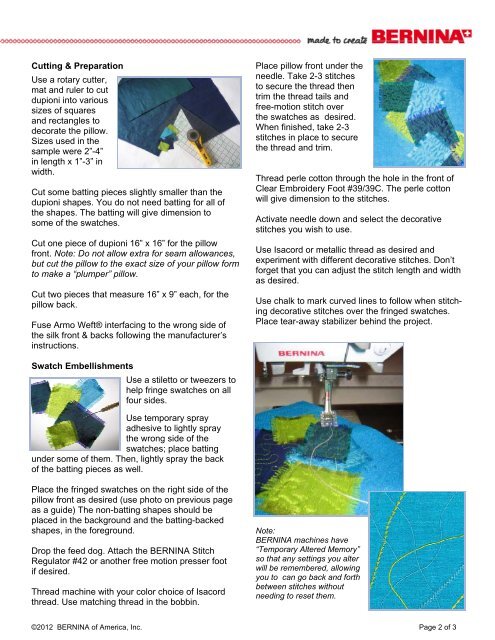
Cutting & Preparation<br />
Use a rotary cutter,<br />
mat and ruler to cut<br />
dupioni into various<br />
sizes of squares<br />
and rectangles to<br />
decorate the pillow.<br />
Sizes used in the<br />
sample were 2”-4”<br />
in length x 1”-3” in<br />
width.<br />
Cut some batting pieces slightly smaller than the<br />
dupioni shapes. You do not need batting for all of<br />
the shapes. The batting will give dimension to<br />
some of the swatches.<br />
Cut one piece of dupioni 16” x 16” for the pillow<br />
front. Note: Do not allow extra for seam allowances,<br />
but cut the pillow to the exact size of your pillow form<br />
to make a “plumper” pillow.<br />
Cut two pieces that measure 16” x 9” each, for the<br />
pillow back.<br />
Fuse Armo Weft® interfacing to the wrong side of<br />
the silk front & backs following the manufacturer’s<br />
instructions.<br />
Place pillow front under the<br />
needle. Take 2-3 stitches<br />
to secure the thread then<br />
trim the thread tails and<br />
free-motion stitch over<br />
the swatches as desired.<br />
When finished, take 2-3<br />
stitches in place to secure<br />
the thread and trim.<br />
Thread perle cotton through the hole in the front of<br />
Clear Embroidery Foot #39/39C. The perle cotton<br />
will give dimension to the stitches.<br />
Activate needle down and select the decorative<br />
stitches you wish to use.<br />
Use Isacord or metallic thread as desired and<br />
experiment with different decorative stitches. Don’t<br />
forget that you can adjust the stitch length and width<br />
as desired.<br />
Use chalk to mark curved lines to follow when stitching<br />
decorative stitches over the fringed swatches.<br />
Place tear-away stabilizer behind the project.<br />
Swatch Embellishments<br />
Use a stiletto or tweezers to<br />
help fringe swatches on all<br />
four sides.<br />
Use temporary spray<br />
adhesive to lightly spray<br />
the wrong side of the<br />
swatches; place batting<br />
under some of them. Then, lightly spray the back<br />
of the batting pieces as well.<br />
Place the fringed swatches on the right side of the<br />
pillow front as desired (use photo on previous page<br />
as a guide) The non-batting shapes should be<br />
placed in the background and the batting-backed<br />
shapes, in the foreground.<br />
Drop the feed dog. Attach the BERNINA Stitch<br />
Regulator #42 or another free motion presser foot<br />
if desired.<br />
Thread machine with your color choice of Isacord<br />
thread. Use matching thread in the bobbin.<br />
Note:<br />
BERNINA machines have<br />
“Temporary Altered Memory”<br />
so that any settings you alter<br />
will be remembered, allowing<br />
you to can go back and forth<br />
between stitches without<br />
needing to reset them.<br />
©2012 BERNINA of America, Inc. Page 2 of 3