Download PDF - Bernina
Download PDF - Bernina
Download PDF - Bernina

You also want an ePaper? Increase the reach of your titles
YUMPU automatically turns print PDFs into web optimized ePapers that Google loves.
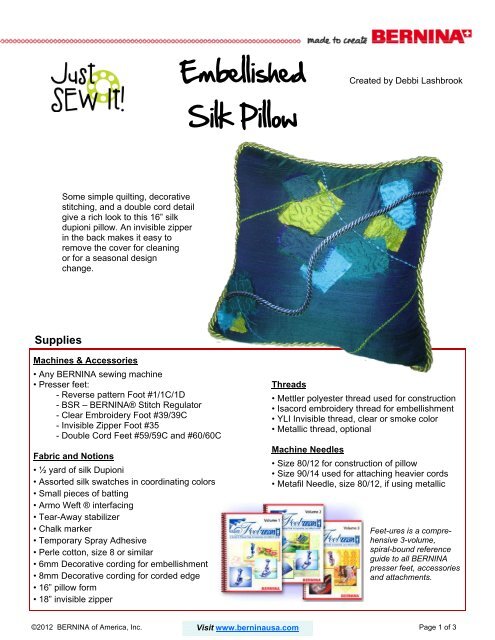
Embellished<br />
Created by Debbi Lashbrook<br />
Silk Pillow<br />
Some simple quilting, decorative<br />
stitching, and a double cord detail<br />
give a rich look to this 16” silk<br />
dupioni pillow. An invisible zipper<br />
in the back makes it easy to<br />
remove the cover for cleaning<br />
or for a seasonal design<br />
change.<br />
Supplies<br />
Machines & Accessories<br />
• Any BERNINA sewing machine<br />
• Presser feet:<br />
- Reverse pattern Foot #1/1C/1D<br />
- BSR – BERNINA® Stitch Regulator<br />
- Clear Embroidery Foot #39/39C<br />
- Invisible Zipper Foot #35<br />
- Double Cord Feet #59/59C and #60/60C<br />
Fabric and Notions<br />
• ½ yard of silk Dupioni<br />
• Assorted silk swatches in coordinating colors<br />
• Small pieces of batting<br />
• Armo Weft ® interfacing<br />
• Tear-Away stabilizer<br />
• Chalk marker<br />
• Temporary Spray Adhesive<br />
• Perle cotton, size 8 or similar<br />
• 6mm Decorative cording for embellishment<br />
• 8mm Decorative cording for corded edge<br />
• 16” pillow form<br />
• 18” invisible zipper<br />
Threads<br />
• Mettler polyester thread used for construction<br />
• Isacord embroidery thread for embellishment<br />
• YLI Invisible thread, clear or smoke color<br />
• Metallic thread, optional<br />
Machine Needles<br />
• Size 80/12 for construction of pillow<br />
• Size 90/14 used for attaching heavier cords<br />
• Metafil Needle, size 80/12, if using metallic<br />
Feet-ures is a comprehensive<br />
3-volume,<br />
spiral-bound reference<br />
guide to all BERNINA<br />
presser feet, accessories<br />
and attachments.<br />
©2012 BERNINA of America, Inc. Visit www.berninausa.com<br />
Page 1 of 3
Cutting & Preparation<br />
Use a rotary cutter,<br />
mat and ruler to cut<br />
dupioni into various<br />
sizes of squares<br />
and rectangles to<br />
decorate the pillow.<br />
Sizes used in the<br />
sample were 2”-4”<br />
in length x 1”-3” in<br />
width.<br />
Cut some batting pieces slightly smaller than the<br />
dupioni shapes. You do not need batting for all of<br />
the shapes. The batting will give dimension to<br />
some of the swatches.<br />
Cut one piece of dupioni 16” x 16” for the pillow<br />
front. Note: Do not allow extra for seam allowances,<br />
but cut the pillow to the exact size of your pillow form<br />
to make a “plumper” pillow.<br />
Cut two pieces that measure 16” x 9” each, for the<br />
pillow back.<br />
Fuse Armo Weft® interfacing to the wrong side of<br />
the silk front & backs following the manufacturer’s<br />
instructions.<br />
Place pillow front under the<br />
needle. Take 2-3 stitches<br />
to secure the thread then<br />
trim the thread tails and<br />
free-motion stitch over<br />
the swatches as desired.<br />
When finished, take 2-3<br />
stitches in place to secure<br />
the thread and trim.<br />
Thread perle cotton through the hole in the front of<br />
Clear Embroidery Foot #39/39C. The perle cotton<br />
will give dimension to the stitches.<br />
Activate needle down and select the decorative<br />
stitches you wish to use.<br />
Use Isacord or metallic thread as desired and<br />
experiment with different decorative stitches. Don’t<br />
forget that you can adjust the stitch length and width<br />
as desired.<br />
Use chalk to mark curved lines to follow when stitching<br />
decorative stitches over the fringed swatches.<br />
Place tear-away stabilizer behind the project.<br />
Swatch Embellishments<br />
Use a stiletto or tweezers to<br />
help fringe swatches on all<br />
four sides.<br />
Use temporary spray<br />
adhesive to lightly spray<br />
the wrong side of the<br />
swatches; place batting<br />
under some of them. Then, lightly spray the back<br />
of the batting pieces as well.<br />
Place the fringed swatches on the right side of the<br />
pillow front as desired (use photo on previous page<br />
as a guide) The non-batting shapes should be<br />
placed in the background and the batting-backed<br />
shapes, in the foreground.<br />
Drop the feed dog. Attach the BERNINA Stitch<br />
Regulator #42 or another free motion presser foot<br />
if desired.<br />
Thread machine with your color choice of Isacord<br />
thread. Use matching thread in the bobbin.<br />
Note:<br />
BERNINA machines have<br />
“Temporary Altered Memory”<br />
so that any settings you alter<br />
will be remembered, allowing<br />
you to can go back and forth<br />
between stitches without<br />
needing to reset them.<br />
©2012 BERNINA of America, Inc. Page 2 of 3
Adding Double Cording<br />
Place purchased<br />
cording (4-6mm in<br />
diameter) in the<br />
grooves under Foot<br />
#59C.<br />
Select a feather<br />
stitch Alter the length<br />
to 4.5mm and the<br />
width to 5.0mm.<br />
Pillow Back<br />
Activate needle<br />
down and stitch the<br />
cord as desired.<br />
Each right or left<br />
swing of the feather<br />
stitch will secure the<br />
cord to the fabric.<br />
Press under 1” along one of the 16” sides of each of<br />
the pillow backs, making each one 16” x 8.”<br />
Attach Invisible Zipper Foot #35 to the machine.<br />
Thread with Mettler thread in the needle and bobbin.<br />
Unzip the zipper. Unfold the pressed edge and lay<br />
one side of the zipper tape face down along the<br />
crease.<br />
Position the coil of the<br />
zipper in one groove on<br />
the sole of the presser<br />
foot. Stitch the length<br />
of the zipper, next to<br />
the coils.<br />
Repeat with remaining<br />
part of the pillow back<br />
and other side of zipper.<br />
Zip the zipper<br />
partially closed.<br />
Place the zipped pillow<br />
back right sides together with the decorated front.<br />
Using Reverse Pattern Foot #1/1C, stitch around all<br />
pillow edges with a ½” seam. Make sure the zipper<br />
is slightly opened so that you can unzip it after<br />
sewing the outside edges.<br />
Corded Edge<br />
Use Double Cord Foot #60C to place a larger<br />
diameter cord along the edges of a pillow, using<br />
invisible thread in the needle and in the bobbin.<br />
Select the gathering stitch and adjust the length to<br />
1.0mm and the width to 5.0mm. Note: The feather<br />
stitch can also be used with a length of 4mm and a<br />
width of 5mm.<br />
Leave an extra 2” of cording at the beginning and<br />
the end of the cording for “reweaving” at the<br />
pillow’s corner. Use transparent tape or masking<br />
tape to keep the trim from unraveling.<br />
Place the cording in the right groove under Foot<br />
#60C and align the pressed edge of the swatch<br />
under the foot so that it butts up next to the cord.<br />
Stitch along the edge, beginning and ending at a<br />
corner.<br />
To reweave the cording<br />
at the pillow edge,<br />
unravel each end of<br />
cord at the corner of the<br />
pillow and intertwine the<br />
edges so the cording<br />
looks good from the front<br />
of the pillow<br />
Stitch across the corner<br />
of the intertwined cord a<br />
zigzag stitch. Set the SL<br />
at 1.5mm; SW at 2.0mm.<br />
Bring the raveled ends<br />
to the wrong side of the<br />
pillow and secure with<br />
Zigzag Stitch # 2.<br />
Set the SL at 1.5mm;<br />
SW at 2.0mm.<br />
Trim the ends of the<br />
cord on the back of the<br />
pillow close to the<br />
zigzag stitch.<br />
Turn right side out; press lightly along edges.<br />
©2012 BERNINA of America, Inc. Page 3 of 3