

Floralicious Embroidery Appliqué Quilt-On-Point - Bernina
Floralicious Embroidery Appliqué Quilt-On-Point - Bernina
Floralicious Embroidery Appliqué Quilt-On-Point - Bernina

Create successful ePaper yourself
Turn your PDF publications into a flip-book with our unique Google optimized e-Paper software.
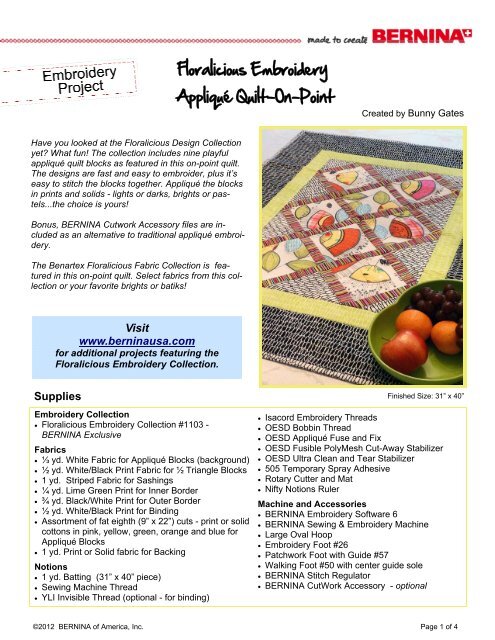
<strong>Floralicious</strong> <strong>Embroidery</strong><br />
Appliqué <strong>Quilt</strong>-<strong>On</strong>-<strong>Point</strong><br />
Created by Bunny Gates<br />
Have you looked at the <strong>Floralicious</strong> Design Collection<br />
yet? What fun! The collection includes nine playful<br />
appliqué quilt blocks as featured in this on-point quilt.<br />
The designs are fast and easy to embroider, plus it’s<br />
easy to stitch the blocks together. Appliqué the blocks<br />
in prints and solids - lights or darks, brights or pastels...the<br />
choice is yours!<br />
Bonus, BERNINA Cutwork Accessory files are included<br />
as an alternative to traditional appliqué embroidery.<br />
The Benartex <strong>Floralicious</strong> Fabric Collection is featured<br />
in this on-point quilt. Select fabrics from this collection<br />
or your favorite brights or batiks!<br />
Visit<br />
www.berninausa.com<br />
for additional projects featuring the<br />
<strong>Floralicious</strong> <strong>Embroidery</strong> Collection.<br />
Supplies<br />
<strong>Embroidery</strong> Collection<br />
<strong>Floralicious</strong> <strong>Embroidery</strong> Collection #1103 -<br />
BERNINA Exclusive<br />
Fabrics<br />
⅓ yd. White Fabric for Appliqué Blocks (background)<br />
½ yd. White/Black Print Fabric for ½ Triangle Blocks<br />
1 yd. Striped Fabric for Sashings<br />
¼ yd. Lime Green Print for Inner Border<br />
¾ yd. Black/White Print for Outer Border<br />
½ yd. White/Black Print for Binding<br />
Assortment of fat eighth (9” x 22”) cuts - print or solid<br />
cottons in pink, yellow, green, orange and blue for<br />
Appliqué Blocks<br />
1 yd. Print or Solid fabric for Backing<br />
Notions<br />
1 yd. Batting (31” x 40” piece)<br />
Sewing Machine Thread<br />
YLI Invisible Thread (optional - for binding)<br />
Finished Size: 31” x 40”<br />
Isacord <strong>Embroidery</strong> Threads<br />
OESD Bobbin Thread<br />
OESD Appliqué Fuse and Fix<br />
OESD Fusible PolyMesh Cut-Away Stabilizer<br />
OESD Ultra Clean and Tear Stabilizer<br />
505 Temporary Spray Adhesive<br />
Rotary Cutter and Mat<br />
Nifty Notions Ruler<br />
Machine and Accessories<br />
BERNINA <strong>Embroidery</strong> Software 6<br />
BERNINA Sewing & <strong>Embroidery</strong> Machine<br />
Large Oval Hoop<br />
<strong>Embroidery</strong> Foot #26<br />
Patchwork Foot with Guide #57<br />
Walking Foot #50 with center guide sole<br />
BERNINA Stitch Regulator<br />
BERNINA CutWork Accessory - optional<br />
©2012 BERNINA of America, Inc. Page 1 of 4
Design the <strong>Quilt</strong><br />
This quilt was created using the <strong>Quilt</strong>er Program in<br />
BERNINA <strong>Embroidery</strong> Software 6. It could also be<br />
created using any quilt pattern with on point<br />
blocks.<br />
<strong>Quilt</strong> Layout<br />
Open <strong>Embroidery</strong> Software 6<br />
Open <strong>Quilt</strong>er<br />
Click on <strong>Quilt</strong> Layout and select the following:<br />
Format – <strong>On</strong> <strong>Point</strong><br />
Blocks – Blocks across: 2; Blocks down: 3;<br />
Size: 5”<br />
Sashes – Width: 1”; Style: Forward<br />
Borders<br />
Add (inner border) - Style: Mitered; Width: 2”<br />
Add (click again to add the outer border) -<br />
Style: Mitered; Width: 5”<br />
Add (click again to add the quilt binding) -<br />
Style: Mitered; Width: 1”<br />
Note: The quilt binding will be cut wider than<br />
the program reflects.<br />
Click OK.<br />
Add Fabrics to the <strong>Quilt</strong> Layout<br />
To view the quilt with fabrics, click on the Fabrics<br />
icon.<br />
Select the first fabric from the Fabric Library folders<br />
and click on the fabric chip.<br />
The selected fabric will show in the top box. The<br />
Paint Brush with Plus Sign icon appears under the<br />
fabric swatch. Place the icon inside the quilt layout<br />
area to be filled and left click to fill the area.<br />
Repeat the above steps until the entire quilt has<br />
been filled with fabrics.<br />
Add <strong>Embroidery</strong> Motifs to the <strong>Quilt</strong> Layout<br />
To view the quilt with embroidery designs from the<br />
OESD <strong>Floralicious</strong> Design Collection, click the <strong>Embroidery</strong><br />
Window icon.<br />
Click File > Insert Design.<br />
Open design #BE110302. (The embroidery area of<br />
these designs is bigger than the finished block size<br />
because of the seam line that is part of the embroidery.)<br />
Left click on the Rotate<br />
45 degrees CCW / CW<br />
icon.<br />
Move the design into the<br />
top left quilt block.<br />
De-select the design by<br />
clicking off of the quilt.<br />
Repeat these steps to<br />
place the rest of the designs<br />
in the blocks.<br />
Click Print Preview.<br />
When the Print Preview<br />
box opens, select Print<br />
Block Construction for<br />
templates of the quilt<br />
(remember that the<br />
binding will be cut<br />
differently than the<br />
template reflects).<br />
Yardage requirements<br />
for the quilt<br />
can also be printed<br />
(binding will be different<br />
- see page 3).<br />
©2012 BERNINA of America, Inc. Page 2 of 4
Cutting Instructions<br />
White fabric for appliqué blocks<br />
8 blocks - 6” x 6”<br />
White/black fabric for ½ block triangles<br />
3 squares 6” x 6” - Cut each square diagonally<br />
for the triangles sides and ends<br />
2 squares 5 ¼” x 5 ¼” - Cut each square diagonally<br />
for the 4 corner triangles<br />
Striped fabric for sashing<br />
4 strips 1 ½” x width of fabric. Cut again into:<br />
Cut 12 pieces 5 ½” long<br />
Cut 2 pieces 7” long<br />
Cut 2 pieces 19” long<br />
Cut 1 piece 25” long<br />
Lime Green fabric for inner border<br />
3 strips 2 ½” x width of fabric<br />
Black/White fabric for outer border<br />
4 strips 5 ½” x width of fabric<br />
Backing fabric<br />
31” x 40”<br />
Binding<br />
4 strips 3” x width of fabric<br />
Batting<br />
31” x 40”<br />
Cutting instructions for the appliqué shapes are<br />
included in the OESD <strong>Floralicious</strong> Design Collection.<br />
BERNINA CutWork files are included in addition<br />
to the traditional pattern templates.<br />
Embroider the Appliqué Blocks<br />
Fuse a piece of OESD Fusible PolyMesh Cut-<br />
Away to the entire wrong side of each of 6” x 6”<br />
white blocks.<br />
Hoop a piece of OESD Ultra Clean and Tear Stabilizer<br />
by itself.<br />
Using the hoop template, mark the vertical and<br />
horizontal center of the hooped stabilizer.<br />
Mark the vertical and horizontal center of the quilt<br />
block fabric with a wash away marker.<br />
Spray the back of the white quilt block with 505<br />
Temporary Spray Adhesive and center on the<br />
hooped stabilizer. Finger press in place.<br />
Attach the hoop on to the embroidery machine and<br />
baste the block to the hooped stabilizer.<br />
Note: If you have a BERNINA 830 embroidery<br />
machine, basting boxes are built-in. For other<br />
BERNINA embroidery machines, download<br />
basting boxes from www.berninausa.com.<br />
Stitch Color #1. This will be the Placement Line for<br />
the appliqué pieces.<br />
Print the desired pattern<br />
templates from the CD.<br />
Cut a rectangle of Appliqué<br />
Fuse and Fix slightly<br />
larger than the size of the<br />
template.<br />
Fuse the non-paper side<br />
of each piece of Appliqué<br />
Fuse and Fix to the wrong<br />
side of the corresponding<br />
appliqué fabric. Allow to<br />
cool before handling.<br />
Cut out the paper template<br />
and trace onto the right<br />
side of the corresponding<br />
fabric.<br />
Cut out the shape from the<br />
fabric. Turn the shape<br />
over and score an “x”<br />
through the paper. Remove<br />
the paper from the<br />
center out to expose the sticky surface. (Removing<br />
the paper from the center out prevents raveling of<br />
the fabric along the edges.)<br />
Place the sticky side of the shape over the Placement<br />
Line and finger press in place. Depending on<br />
the design, there may be more than one appliqué<br />
shape to add. Continue to stitch the design.<br />
The last thread color will stitch a seam line. This<br />
will be used as a guide when piecing your quilt.<br />
Remove the hoop from the machine and remove<br />
the embroidered block from the hoop.<br />
Carefully remove the Ultra Clean and Tear Stabilizer<br />
from the back of the block.<br />
Using a rotary cutter and ruler, trim to ¼” outside<br />
of the seam line (the last color sewn). The block<br />
should now be a 5 ½”<br />
square with the design<br />
perfectly centered.<br />
Repeat above steps for<br />
the other 7 block designs.<br />
©2012 BERNINA of America, Inc. Page 3 of 4
Assemble the <strong>Quilt</strong> Top<br />
Use a ¼” seam throughout. The quilt will be<br />
trimmed after it is assembled.<br />
Step 1.<br />
Following the diagrams, sew the rows together:<br />
Row #1 – Side triangle, 5 ½” sashing, embroidered<br />
block, 5 ½” sashing, side triangle<br />
Row #2 – corner triangle, 5 ½ sashing, embroidered<br />
block, 5 ½” sashing, embroidered block, 5<br />
½” sashing, embroidered block, 5 ½” sashing,<br />
side triangle<br />
Row #3 - side triangle, 5 ½ sashing, embroidered<br />
block, 5 ½” sashing, embroidered block, 5 ½”<br />
sashing, embroidered block, 5 ½” sashing, corner<br />
triangle<br />
Row #4 - Side triangle, 5 ½” sashing, embroidered<br />
block, 5 ½” sashing, side triangle.<br />
Step 2.<br />
Following the diagram, sew the strips together with<br />
the sashings between. Make sure the sashings<br />
that are sewn in between the embroidered blocks<br />
line up.<br />
Step 3.<br />
Sew the remaining 2 corner triangles on to the quilt<br />
top.<br />
Step 4.<br />
The raw edges of the quilt top will be uneven.<br />
Square up the top using a rotary cutter and ruler to<br />
carefully trim the edges all the way around.<br />
Step 5.<br />
Add the inner border to the pieced top mitering the<br />
corners.<br />
Step 6.<br />
Add the outer border mitering the corners.<br />
Step 1 Step 2<br />
Step 3 Step 5<br />
Step 6<br />
<strong>Quilt</strong> Assembly<br />
Layer your backing, batting and top using 505<br />
Temporary Spray Adhesive; spray between the<br />
layers.<br />
Using the BERNINA Walking Foot #50 with center<br />
guide sole, stitch in the ditch around the embroidered<br />
blocks.<br />
Using the BERNINA Stitch Regulator, stipple stitch<br />
around the appliqué pieces in the blocks.<br />
Add machine quilting designs over the outside borders<br />
if desired.<br />
Attach the binding using your favorite binding technique.<br />
©2012 BERNINA of America, Inc. Page 4 of 4


