

Floralicious Embroidery Appliqué Quilt-On-Point - Bernina
Floralicious Embroidery Appliqué Quilt-On-Point - Bernina
Floralicious Embroidery Appliqué Quilt-On-Point - Bernina

Create successful ePaper yourself
Turn your PDF publications into a flip-book with our unique Google optimized e-Paper software.
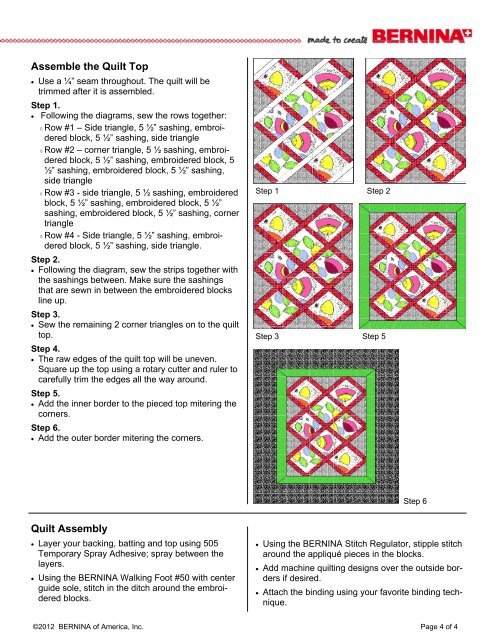
Assemble the <strong>Quilt</strong> Top<br />
Use a ¼” seam throughout. The quilt will be<br />
trimmed after it is assembled.<br />
Step 1.<br />
Following the diagrams, sew the rows together:<br />
Row #1 – Side triangle, 5 ½” sashing, embroidered<br />
block, 5 ½” sashing, side triangle<br />
Row #2 – corner triangle, 5 ½ sashing, embroidered<br />
block, 5 ½” sashing, embroidered block, 5<br />
½” sashing, embroidered block, 5 ½” sashing,<br />
side triangle<br />
Row #3 - side triangle, 5 ½ sashing, embroidered<br />
block, 5 ½” sashing, embroidered block, 5 ½”<br />
sashing, embroidered block, 5 ½” sashing, corner<br />
triangle<br />
Row #4 - Side triangle, 5 ½” sashing, embroidered<br />
block, 5 ½” sashing, side triangle.<br />
Step 2.<br />
Following the diagram, sew the strips together with<br />
the sashings between. Make sure the sashings<br />
that are sewn in between the embroidered blocks<br />
line up.<br />
Step 3.<br />
Sew the remaining 2 corner triangles on to the quilt<br />
top.<br />
Step 4.<br />
The raw edges of the quilt top will be uneven.<br />
Square up the top using a rotary cutter and ruler to<br />
carefully trim the edges all the way around.<br />
Step 5.<br />
Add the inner border to the pieced top mitering the<br />
corners.<br />
Step 6.<br />
Add the outer border mitering the corners.<br />
Step 1 Step 2<br />
Step 3 Step 5<br />
Step 6<br />
<strong>Quilt</strong> Assembly<br />
Layer your backing, batting and top using 505<br />
Temporary Spray Adhesive; spray between the<br />
layers.<br />
Using the BERNINA Walking Foot #50 with center<br />
guide sole, stitch in the ditch around the embroidered<br />
blocks.<br />
Using the BERNINA Stitch Regulator, stipple stitch<br />
around the appliqué pieces in the blocks.<br />
Add machine quilting designs over the outside borders<br />
if desired.<br />
Attach the binding using your favorite binding technique.<br />
©2012 BERNINA of America, Inc. Page 4 of 4


