

Floralicious Embroidery Appliqué Quilt-On-Point - Bernina
Floralicious Embroidery Appliqué Quilt-On-Point - Bernina
Floralicious Embroidery Appliqué Quilt-On-Point - Bernina

You also want an ePaper? Increase the reach of your titles
YUMPU automatically turns print PDFs into web optimized ePapers that Google loves.
Cutting Instructions<br />
White fabric for appliqué blocks<br />
8 blocks - 6” x 6”<br />
White/black fabric for ½ block triangles<br />
3 squares 6” x 6” - Cut each square diagonally<br />
for the triangles sides and ends<br />
2 squares 5 ¼” x 5 ¼” - Cut each square diagonally<br />
for the 4 corner triangles<br />
Striped fabric for sashing<br />
4 strips 1 ½” x width of fabric. Cut again into:<br />
Cut 12 pieces 5 ½” long<br />
Cut 2 pieces 7” long<br />
Cut 2 pieces 19” long<br />
Cut 1 piece 25” long<br />
Lime Green fabric for inner border<br />
3 strips 2 ½” x width of fabric<br />
Black/White fabric for outer border<br />
4 strips 5 ½” x width of fabric<br />
Backing fabric<br />
31” x 40”<br />
Binding<br />
4 strips 3” x width of fabric<br />
Batting<br />
31” x 40”<br />
Cutting instructions for the appliqué shapes are<br />
included in the OESD <strong>Floralicious</strong> Design Collection.<br />
BERNINA CutWork files are included in addition<br />
to the traditional pattern templates.<br />
Embroider the Appliqué Blocks<br />
Fuse a piece of OESD Fusible PolyMesh Cut-<br />
Away to the entire wrong side of each of 6” x 6”<br />
white blocks.<br />
Hoop a piece of OESD Ultra Clean and Tear Stabilizer<br />
by itself.<br />
Using the hoop template, mark the vertical and<br />
horizontal center of the hooped stabilizer.<br />
Mark the vertical and horizontal center of the quilt<br />
block fabric with a wash away marker.<br />
Spray the back of the white quilt block with 505<br />
Temporary Spray Adhesive and center on the<br />
hooped stabilizer. Finger press in place.<br />
Attach the hoop on to the embroidery machine and<br />
baste the block to the hooped stabilizer.<br />
Note: If you have a BERNINA 830 embroidery<br />
machine, basting boxes are built-in. For other<br />
BERNINA embroidery machines, download<br />
basting boxes from www.berninausa.com.<br />
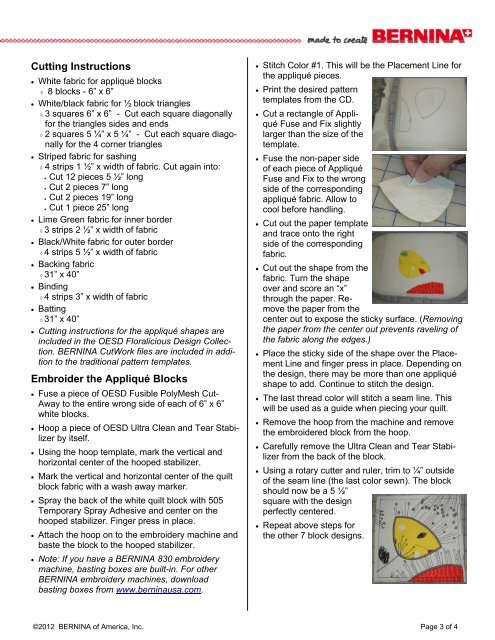
Stitch Color #1. This will be the Placement Line for<br />
the appliqué pieces.<br />
Print the desired pattern<br />
templates from the CD.<br />
Cut a rectangle of Appliqué<br />
Fuse and Fix slightly<br />
larger than the size of the<br />
template.<br />
Fuse the non-paper side<br />
of each piece of Appliqué<br />
Fuse and Fix to the wrong<br />
side of the corresponding<br />
appliqué fabric. Allow to<br />
cool before handling.<br />
Cut out the paper template<br />
and trace onto the right<br />
side of the corresponding<br />
fabric.<br />
Cut out the shape from the<br />
fabric. Turn the shape<br />
over and score an “x”<br />
through the paper. Remove<br />
the paper from the<br />
center out to expose the sticky surface. (Removing<br />
the paper from the center out prevents raveling of<br />
the fabric along the edges.)<br />
Place the sticky side of the shape over the Placement<br />
Line and finger press in place. Depending on<br />
the design, there may be more than one appliqué<br />
shape to add. Continue to stitch the design.<br />
The last thread color will stitch a seam line. This<br />
will be used as a guide when piecing your quilt.<br />
Remove the hoop from the machine and remove<br />
the embroidered block from the hoop.<br />
Carefully remove the Ultra Clean and Tear Stabilizer<br />
from the back of the block.<br />
Using a rotary cutter and ruler, trim to ¼” outside<br />
of the seam line (the last color sewn). The block<br />
should now be a 5 ½”<br />
square with the design<br />
perfectly centered.<br />
Repeat above steps for<br />
the other 7 block designs.<br />
©2012 BERNINA of America, Inc. Page 3 of 4


