

SXVF-H16 handbook.pdf - Starlight Xpress
SXVF-H16 handbook.pdf - Starlight Xpress
SXVF-H16 handbook.pdf - Starlight Xpress

You also want an ePaper? Increase the reach of your titles
YUMPU automatically turns print PDFs into web optimized ePapers that Google loves.
Handbook for the <strong>SXVF</strong>-<strong>H16</strong> Issue 1 August 2006<br />
Please take a few minutes to study the contents of this manual, which will help you to<br />
get the camera into operation quickly and without problems. I am sure that you want<br />
to see some results as soon as possible, so please move on to the ‘Quick Start’ section,<br />
which follows. A more detailed description of imaging techniques will be found in a<br />
later part of this manual.<br />
‘Quick Starting’ your <strong>SXVF</strong>-<strong>H16</strong> system<br />
In the shipping container you will find the following items:<br />
1) The <strong>SXVF</strong>-<strong>H16</strong> camera head.<br />
2) A power supply module and cable.<br />
3) A 3 metre USB2 camera cable.<br />
4) An adaptor for 1.25” drawtubes.<br />
5) An adaptor for 2” drawtubes and ‘Pentax’ thread lenses.<br />
6) A guider cable for ‘ST4’ style mount guiding inputs.<br />
7) A CD with the ‘<strong>SXVF</strong>_<strong>H16</strong>’ software.<br />
8) This manual.<br />
You will also need a PC computer with Windows 98SE, Windows 2000 or Windows<br />
XP. This machine must have at least one USB2.0 port and at least 256 Megs of<br />
memory. If you intend to view the finished images on its screen, then you will also<br />
need a graphics card capable of displaying an image in a minimum of 1024 x 768<br />
pixels and 24 bit colour. A medium specification Pentium with between 1GHz and<br />
3GHz processor speed is ideal. Please note that the <strong>SXVF</strong>-<strong>H16</strong> is not designed for<br />
USB1.1 operation and will give inferior results if used on USB1.1.<br />
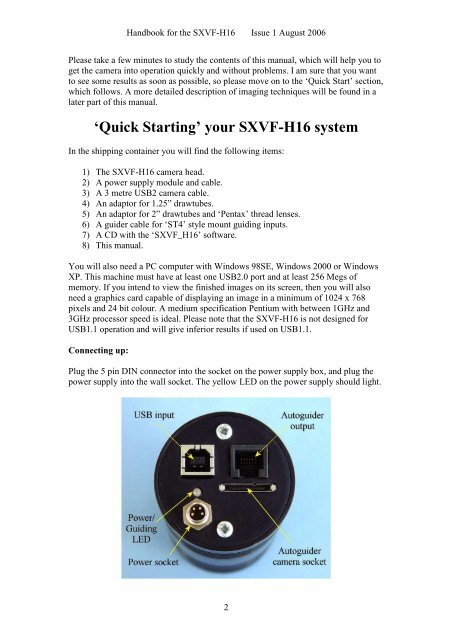
Connecting up:<br />
Plug the 5 pin DIN connector into the socket on the power supply box, and plug the<br />
power supply into the wall socket. The yellow LED on the power supply should light.<br />
2


