

SXVF-H16 handbook.pdf - Starlight Xpress
SXVF-H16 handbook.pdf - Starlight Xpress
SXVF-H16 handbook.pdf - Starlight Xpress

Create successful ePaper yourself
Turn your PDF publications into a flip-book with our unique Google optimized e-Paper software.
Handbook for the <strong>SXVF</strong>-<strong>H16</strong> Issue 1 August 2006<br />
2) Remove the two M3 screws from the camera back plate and ease the plate out of<br />
the camera body. You may need to press down with a finger on the USB socket while<br />
pulling up on the camera barrel to overcome the friction.<br />
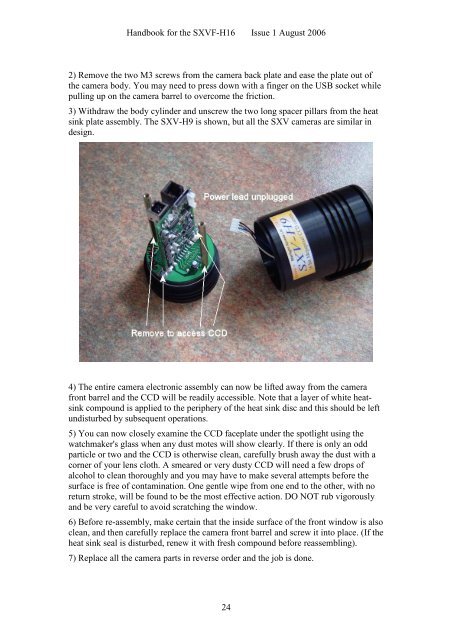
3) Withdraw the body cylinder and unscrew the two long spacer pillars from the heat<br />
sink plate assembly. The SXV-H9 is shown, but all the SXV cameras are similar in<br />
design.<br />
4) The entire camera electronic assembly can now be lifted away from the camera<br />
front barrel and the CCD will be readily accessible. Note that a layer of white heatsink<br />
compound is applied to the periphery of the heat sink disc and this should be left<br />
undisturbed by subsequent operations.<br />
5) You can now closely examine the CCD faceplate under the spotlight using the<br />
watchmaker's glass when any dust motes will show clearly. If there is only an odd<br />
particle or two and the CCD is otherwise clean, carefully brush away the dust with a<br />
corner of your lens cloth. A smeared or very dusty CCD will need a few drops of<br />
alcohol to clean thoroughly and you may have to make several attempts before the<br />
surface is free of contamination. One gentle wipe from one end to the other, with no<br />
return stroke, will be found to be the most effective action. DO NOT rub vigorously<br />
and be very careful to avoid scratching the window.<br />
6) Before re-assembly, make certain that the inside surface of the front window is also<br />
clean, and then carefully replace the camera front barrel and screw it into place. (If the<br />
heat sink seal is disturbed, renew it with fresh compound before reassembling).<br />
7) Replace all the camera parts in reverse order and the job is done.<br />
24


