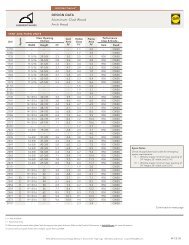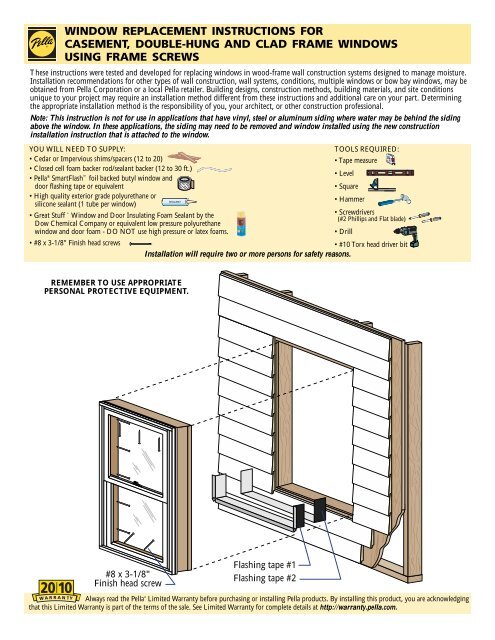
window replacement instructions for casement, double ... - Pella.com
window replacement instructions for casement, double ... - Pella.com
window replacement instructions for casement, double ... - Pella.com

Create successful ePaper yourself
Turn your PDF publications into a flip-book with our unique Google optimized e-Paper software.
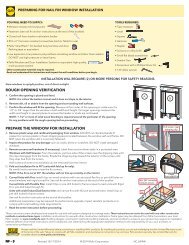
WINDOW REPLACEMENT INSTRUCTIONS FOR<br />
CASEMENT, DOUBLE-HUNG AND CLAD FRAME WINDOWS<br />
USING FRAME SCREWS<br />
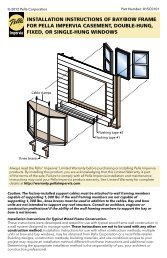
These <strong>instructions</strong> were tested and developed <strong>for</strong> replacing <strong>window</strong>s in wood-frame wall construction systems designed to manage moisture.<br />
Installation re<strong>com</strong>mendations <strong>for</strong> other types of wall construction, wall systems, conditions, multiple <strong>window</strong>s or bow bay <strong>window</strong>s, may be<br />
obtained from <strong>Pella</strong> Corporation or a local <strong>Pella</strong> retailer. Building designs, construction methods, building materials, and site conditions<br />
unique to your project may require an installation method different from these <strong>instructions</strong> and additional care on your part. Determining<br />
the appropriate installation method is the responsibility of you, your architect, or other construction professional.<br />
Note: This instruction is not <strong>for</strong> use in applications that have vinyl, steel or aluminum siding where water may be behind the siding<br />
above the <strong>window</strong>. In these applications, the siding may need to be removed and <strong>window</strong> installed using the new construction<br />
installation instruction that is attached to the <strong>window</strong>.<br />
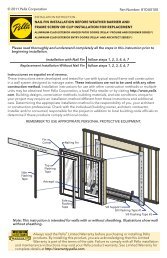
YOU WILL NEED TO SUPPLY:<br />
• Cedar or Impervious shims/spacers (12 to 20)<br />
• Closed cell foam backer rod/sealant backer (12 to 30 ft.)<br />
• <strong>Pella</strong> ® SmartFlash foil backed butyl <strong>window</strong> and<br />
door flashing tape or equivalent<br />
• High quality exterior grade polyurethane or<br />
silicone sealant (1 tube per <strong>window</strong>)<br />
SEALANT<br />
• Great Stuff Window and Door Insulating Foam Sealant by the<br />
Dow Chemical Company or equivalent low pressure polyurethane<br />
<strong>window</strong> and door foam - DO NOT use high pressure or latex foams.<br />
• #8 x 3-1/8" Finish head screws<br />
TOOLS REQUIRED:<br />
• Tape measure<br />
• Level<br />
• Square<br />
• Hammer<br />
• Screwdrivers<br />
(#2 Phillips and Flat blade)<br />
• Drill<br />
• #10 Torx head driver bit<br />
Installation will require two or more persons <strong>for</strong> safety reasons.<br />
REMEMBER TO USE APPROPRIATE<br />
PERSONAL PROTECTIVE EQUIPMENT.<br />
#8 x 3-1/8"<br />
Finish head screw<br />
Flashing tape #1<br />
Flashing tape #2<br />
Always read the <strong>Pella</strong> ® Limited Warranty be<strong>for</strong>e purchasing or installing <strong>Pella</strong> products. By installing this product, you are acknowledging<br />
that this Limited Warranty is part of the terms of the sale. See Limited Warranty <strong>for</strong> <strong>com</strong>plete details at http://warranty.pella.<strong>com</strong>.
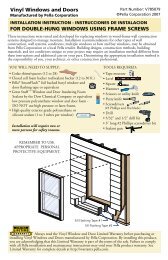
1 PREPARE THE OPENING<br />
A. Prepare the rough opening. It must be the correct size (<strong>window</strong> frame<br />
plus 3/4" in both width and height), square, plumb and the sill must be<br />
level. If needed, block in the rough opening on both sides, the top and<br />
the bottom.<br />
Note: If installing new blocking, install the blocking so it’s flush with<br />
the exterior sheathing of the house. DO NOT attempt to install a<br />
<strong>window</strong> in an undersize opening.<br />
6"<br />
1B<br />
1C<br />
3/4"<br />
1/2"<br />
1/2"<br />
6"<br />
1B<br />
B. Apply sill flashing tape #1. Cut a piece of flashing tape 12" longer than the opening width. Apply<br />
at the bottom of the opening as shown. If the sheathing or water resistive barrier is exposed, apply<br />
the flashing tape (1B) so it overhangs 1" onto the exterior sheathing or water resistive barrier.<br />
Note: The tape is cut 12" longer than the width so that it will extend 6" up each side of the opening.<br />
C. Tab the sill flashing tape and fold. Cut 1" wide tabs at each corner (1/2" from each side of corner)<br />
(1C). Fold tape to the exterior and press firmly to adhere it to the water resistive barrier.<br />
Note: This step is not required if the exterior trim has not been removed.<br />
D. Apply sill flashing tape #2. Cut a piece of flashing tape 12" longer than the opening width. Apply at<br />
the bottom, overlapping tape #1 by at least 1". Do not allow the tape to extend past the interior face<br />
of the framing (1D).<br />
E. Install and level sill spacers. Place 1" wide by 3/8" thick spacers on the bottom of the <strong>window</strong><br />
opening 1/2" from each side. Spacers are also required at points where <strong>window</strong>s are joined in multiple<br />
<strong>window</strong> applications. Add shims as necessary to ensure the spacers are level. Once level, attach spacers<br />
and shims to prevent movement.<br />
Note: Improper placement of shims or spacers may result in bowing the bottom of the <strong>window</strong>.<br />
F. Test fit the <strong>window</strong>.<br />
1"<br />
1D<br />
1E<br />
2 PREPARE THE WINDOW FOR INSTALLATION<br />
6"<br />
EVERY<br />
16"<br />
6"<br />
EVERY<br />
6" 16" 6"<br />
EVERY<br />
6" 16" 6"<br />
6"<br />
6"<br />
EVERY<br />
16"<br />
Single<br />
Window<br />
EVERY<br />
16"<br />
Multiple Windows<br />
6"<br />
6"<br />
1/2"<br />
A. Casement: On the room side of the <strong>window</strong>, drill 1/8" diameter<br />
clearance holes through the head, jambs and sill of the frame.Space<br />
the holes a maximum of 6" from each end and a maximum of 16"<br />
on center.<br />
Note: On vent <strong>casement</strong>s, place the holes so that they do not interfere<br />
with the roto operator and the latch points on the lock side of the <strong>window</strong>.<br />
Drill 1/8"<br />
clearance hole<br />
2B<br />
Clad Frame Head<br />
1"<br />
Drill 1/8"<br />
clearance hole<br />
2B<br />
Drill 1/8"<br />
clearance hole<br />
Double-Hung Head<br />
Double-Hung Jamb<br />
2A<br />
Casement Sill<br />
B. Double-Hung and Clad Frame: On the room side of the <strong>window</strong>,<br />
drill 1/8" diameter clearance holes through the frame at the<br />
locations shown. Space the holes a maximum of 6" from each end<br />
and a maximum of 16" on center.<br />
Drill 1/8"<br />
clearance hole<br />
1"<br />
Clad Frame Sill<br />
2B<br />
1/4"<br />
Drill 1/8"<br />
clearance hole<br />
1/2"<br />
Drill 1/8"<br />
clearance hole<br />
Double-Hung Sill
3 SETTING AND FASTENING THE WINDOW<br />
A. Slide the <strong>window</strong> into the opening, placing the bottom of the <strong>window</strong> on the spacers at the bottom of<br />
the opening. Position the <strong>window</strong> so that the exterior face of the frame extends a minimum of 3/4" onto<br />
the exterior wall material to allow <strong>for</strong> the application of backer rod and sealant (See illustrations in Step 4<br />
<strong>for</strong> sealant details). Center the <strong>window</strong> between the sides of the opening to allow clearance <strong>for</strong> shimming,<br />
and insert one #8 x 3-1/8" finish head screw into each of the top clearance holes. This will hold the<br />
<strong>window</strong> in place while shimming it plumb and square.<br />
B. Place shims 1" from the bottom and top of the <strong>window</strong> between the <strong>window</strong> and the sides of the opening<br />
and at the midpoint of the <strong>window</strong> side. Adjust the shims as required to plumb and square the <strong>window</strong> in<br />
the opening. Also shim behind all the pre-drilled clearance holes.<br />
Note: Do not shim above the <strong>window</strong> or in the space between the spacers at the bottom of the <strong>window</strong>.<br />
DO NOT over shim.<br />
C. Fasten the <strong>window</strong> to the opening by driving #8 x 3-1/8" finish head screws into each of the pre-drilled<br />
clearance holes.<br />
3C<br />
#8 x 3-1/8"<br />
finish head screw<br />
Double-Hung Jamb<br />
3C<br />
1/2"<br />
#8 x 3-1/8"<br />
finish head screw<br />
Double-Hung Head<br />
3C<br />
3B<br />
Clad Frame Head<br />
1"<br />
Casement Sill<br />
#8 x 3-1/8"<br />
finish head screw<br />
3C<br />
1/4"<br />
3C<br />
#8 x 3-1/8"<br />
finish head screw<br />
1/2"<br />
3C<br />
#8 x 3-1/8"<br />
finish head screw<br />
1"<br />
Double-Hung Sill<br />
Clad Frame Sill<br />
D. Check <strong>window</strong> operation (vent units only).<br />
Architect Series and Designer Series Double-Hung: Cut the checkrail bands and remove the shipping spacers. Open and<br />
close the <strong>window</strong> a few times to check <strong>for</strong> proper operation. Make sure the <strong>window</strong> will tilt correctly. Close and lock the <strong>window</strong>.<br />
ProLine Double-Hung: To remove side spacers, slide them up to approximately 4" above the bottom sash. Lift the clip by the<br />
interior leg and rotate upward to remove. Raise the bottom sash approximately 2", and tilt the sash in by depressing the jamb liner<br />
and pulling inward on the top corners of the sash. Remove the sash clips and return the sash to its original position.<br />
Casement: Unlock the <strong>window</strong> by lifting up on the lock handle. Turn the crank to open the <strong>window</strong>. Remove the shipping spacers<br />
from between the sash and <strong>window</strong> frame. Close and lock the <strong>window</strong>.<br />
Note: If there are any problems with the operation of the <strong>window</strong>, recheck shim locations and adjust <strong>for</strong> plumb and square.<br />
4 SEALING THE WINDOW TO THE EXTERIOR WALL CLADDING<br />
When applying siding, brick veneer or other exterior finish material, leave adequate space between the <strong>window</strong> frame and the material<br />
<strong>for</strong> sealant. Refer to the illustration that corresponds to your finish material.<br />
Note: The sealant details shown are standard re<strong>com</strong>mendations from the sealant industry. Contact your sealant supplier <strong>for</strong><br />
re<strong>com</strong>mendations and <strong>instructions</strong> <strong>for</strong> these and any other applications.<br />
BRICK VENEER<br />
WOOD<br />
SIDING<br />
WOOD SIDING<br />
WITH TRIM<br />
Insulate<br />
and<br />
seal per<br />
Step 5<br />
Backer Rod and<br />
Sealant typical<br />
3/8" Clearance<br />
Accessory Groove<br />
Perimeter Sealant<br />
must extend to room<br />
side of Accessory<br />
Groove.<br />
Insulate<br />
and<br />
seal per<br />
Step 5<br />
Sealant typical<br />
1/8" Clearance<br />
Accessory<br />
Groove<br />
Insulate<br />
and<br />
seal per<br />
Step 5<br />
Sealant typical<br />
3/8" Clearance<br />
Accessory Groove<br />
Perimeter Sealant<br />
must extend to room<br />
side of Accessory<br />
Groove.<br />
3/8"<br />
1/8"<br />
3/8"<br />
1/2"<br />
Min.<br />
1/2"<br />
Min.
4<br />
SEALING<br />
THE WINDOW TO THE<br />
EXTERIOR WALL CLADDING (continued)<br />
A. Insert backer rod into the space around the <strong>window</strong> deep enough to<br />
provide at least a 1/2" clearance between the backer rod and the exterior<br />
face of the <strong>window</strong>.<br />
Note: Backer rod adds shape and depth <strong>for</strong> the sealant line.<br />
4A<br />
B. Apply a bead of high quality exterior grade sealant to the entire perimeter<br />
of the <strong>window</strong>.<br />
4B<br />
C. Shape, tool and clean excess sealant. When finished, the sealant should be the shape of an hourglass.<br />
Note: This method creates a more flexible sealant line capable of expanding and contracting.<br />
5 INTERIOR SEAL<br />
Caution: Ensure use of low pressure polyurethane <strong>window</strong> and door installation foams and strictly follow the foam manufacturer’s<br />
re<strong>com</strong>mendations <strong>for</strong> application. Use of high pressure foams or improper application of the foam may cause the <strong>window</strong> to bow and<br />
hinder operation.<br />
A. Apply insulation foam. From the interior, insert the nozzle between the <strong>window</strong> frame and the rough 5B<br />
opening and apply a 1" deep bead of insulation, ensuring the insulating foam is between the <strong>window</strong><br />
frame (not the jamb extension) and the rough opening. Also ensure the insulating foam contacts the<br />
flashing tape at the bottom of the rough opening. This will allow room <strong>for</strong> expansion of the foam and<br />
will minimize squeeze out. Allow the foam to cure <strong>com</strong>pletely (usually 8 to 24 hours) be<strong>for</strong>e proceeding<br />
to the next step.<br />
Note: DO NOT <strong>com</strong>pletely fill the space from the back of the backer rod to the interior face of<br />
the opening.<br />
B. Check <strong>window</strong> operation (vent <strong>window</strong>s only) by opening and closing the <strong>window</strong>.<br />
Note: If the <strong>window</strong> does not operate correctly, check to make sure it is still plumb, level, square and that the sides are not<br />
bowed. If adjustments are required, remove the foam with a serrated knife. Adjust the shims, and reapply the insulating<br />
foam sealant.<br />
6 INTERIOR FINISHING<br />
Note: The in<strong>for</strong>mation below is effective September 15, 2007. This in<strong>for</strong>mation may be different than the printed instruction.<br />
If products cannot be finished immediately, cover with clear plastic to protect from dirt, damage and moisture. Remove any construction residue be<strong>for</strong>e<br />
finishing. Sand all wood surfaces lightly with 180 grit or finer sandpaper. DO NOT use steel wool. BE CAREFUL NOT TO SCRATCH THE GLASS.<br />
Remove sanding dust.<br />
<strong>Pella</strong> products must be finished per the below <strong>instructions</strong>; failure to follow these <strong>instructions</strong> voids the Limited Warranty.<br />
• On <strong>casement</strong> and awnings, it is optional to paint, stain or finish the vertical and horizontal sash edges.<br />
• On single-hungs and <strong>double</strong>-hungs, do not paint, stain or finish the vertical sash edges, any finish on the vertical sash edges may cause the sash to stick;<br />
it is optional to paint, stain or finish the horizontal sash edges.<br />
• On patio doors, it is optional to paint, stain or finish the vertical and horizontal panel edges.<br />
Note: To maintain proper product per<strong>for</strong>mance do not paint, finish or remove the weather-stripping, mohair dust pads, gaskets or vinyl parts. Air and<br />
water leakage will result if these parts are removed. After finishing, allow venting <strong>window</strong>s and doors to dry <strong>com</strong>pletely be<strong>for</strong>e closing them<br />
<strong>Pella</strong> Corporation is not responsible <strong>for</strong> interior paint and stain finish imperfections <strong>for</strong> any product that is not factory-applied by <strong>Pella</strong> Corporation.<br />
Use of inappropriate finishes, solvents, brickwash, or cleaning chemicals will cause adverse reactions with <strong>window</strong> and door materials and voids the<br />
Limited Warranty.<br />
For additional in<strong>for</strong>mation on finishing see the <strong>Pella</strong> Owner’s Manual or go to www.pella.<strong>com</strong>.<br />
EXTERIOR FINISH<br />
The exterior frame and sash are protected by aluminum cladding with our tough EnduraClad ® or EnduraClad Plus baked-on factory finish that needs<br />
no painting. Clean this surface with mild soap and water. Stubborn stains and deposits may be removed with mineral spirits. DO NOT use abrasives.<br />
DO NOT scrape or use tools that might damage the surface.<br />
Use of inappropriate finishes, solvents, brickwash or cleaning chemicals will cause adverse reactions with <strong>window</strong> and door materials and voids the<br />
Limited Warranty.<br />
CARE AND MAINTENANCE<br />
Care and maintenance in<strong>for</strong>mation is available in the <strong>Pella</strong> Owner’s Manual. You can obtain an owner’s manual by contacting your local <strong>Pella</strong> retailer.<br />
This in<strong>for</strong>mation is also available on www.pella.<strong>com</strong>.
NOTE<br />
Because all construction must anticipate some water infiltration, it is important that the wall system be designed and constructed to properly<br />
manage moisture. <strong>Pella</strong> Corporation is not responsible <strong>for</strong> claims or damages caused by unanticipated water infiltration; deficiencies in building<br />
design, construction and maintenance; failure to install <strong>Pella</strong> products in accordance with these <strong>instructions</strong>; or the use of <strong>Pella</strong> products in<br />
systems which do not allow <strong>for</strong> proper management of moisture within the wall systems. The determination of the suitability of all building<br />
<strong>com</strong>ponents, including the use of <strong>Pella</strong> ® products, as well as the design and installation of flashing and sealing systems are the responsibility of<br />
you, your architect, or a construction professional. Moisture problems, including unacceptable water infiltration, have been associated with<br />
barrier systems, such as EIFS (also known as synthetic stucco). <strong>Pella</strong> products should not be used in barrier EIFS systems unless <strong>Pella</strong>’s current,<br />
re<strong>com</strong>mended installation procedures <strong>for</strong> installation of <strong>window</strong>s and doors into EIFS are used. Any other use of <strong>Pella</strong> products with barrier<br />
EIFS systems will void the Limited Warranty.<br />
Product modifications that are not approved by <strong>Pella</strong> Corporation will void the Limited Warranty.<br />
CASEMENT WINDOW LOCK LEVER REMOVAL AND INSERTION<br />
Note: You may want to remove the lock lever prior to finishing the <strong>window</strong>, or if it needs to be replaced with a lock lever in a<br />
different finish.<br />
A. Unlock and open the <strong>window</strong>.<br />
Interior<br />
Exterior<br />
B. Place the lock lever in the locked position.<br />
B<br />
C<br />
C. From the exterior of the <strong>window</strong>, insert a small flat blade screwdriver into the slot<br />
behind the lock lever.<br />
D. Pry the cam away from the side of the <strong>window</strong> by rotating the screwdriver a<br />
quarter turn.<br />
Note: This will release the hook in the lever from the cam hook.<br />
Exterior<br />
Interior<br />
E. Remove the lock lever by pulling it toward the interior of the building.<br />
F. To install a lock lever, hold it in the lock position and insert it, from the interior,<br />
into the slot until it snaps into the cam.<br />
E<br />
D<br />
F<br />
©<strong>Pella</strong> Corporation 2004<br />
Part Number: 807X0000