- Page 1 and 2:
Join the discussion @ p2p.wrox.com
- Page 3 and 4:
Professional C# 4 and .neT 4 inTrod
- Page 5 and 6:
aPPendiX: Guidelines for Windows 7
- Page 7 and 8:
Professional C# 4 and .neT 4 Christ
- Page 9 and 10:
To my two girls, Angela and Stephan
- Page 11 and 12:
abouT The auThors ChrisTian nagel i
- Page 13 and 14:
CrediTs aCquisiTions ediTor Paul Re
- Page 15 and 16:
aCKnoWledgmenTs ThanKs To all aT Wi
- Page 17 and 18:
ConTenTs IntroductIon LI ParT i: Th
- Page 19 and 20:
SonTenTs ChaPTer 3: objeCTs and TyP
- Page 21 and 22:
SonTenTs IEnumerator Interface 141
- Page 23 and 24:
SonTenTs ChaPTer 11: language inTeg
- Page 25 and 26:
SonTenTs ParT ii: Visual sTudio Cha
- Page 27 and 28:
SonTenTs ChaPTer 19: insTrumenTaTio
- Page 29 and 30:
SonTenTs Permissions 562 Distributi
- Page 31 and 32:
SonTenTs ChaPTer 25: WindoWs serViC
- Page 33 and 34:
SonTenTs Exporting Metadata 760 mpo
- Page 35 and 36:
SonTenTs bject Query 876 Updates 87
- Page 37 and 38:
SonTenTs XML Indexes 978 Strongly T
- Page 39 and 40:
SonTenTs Command Bindings 1063 Tree
- Page 41 and 42:
SonTenTs ChaPTer 40: Core asP.neT 1
- Page 43 and 44:
SonTenTs Data Contract 1291 Version
- Page 45 and 46:
SonTenTs Message Queue installation
- Page 47 and 48:
SonTenTs Calculator Add-In View Cal
- Page 49 and 50:
SonTenTs Parameter Modifiers OC165
- Page 51 and 52:
SonTenTs ChaPTer 55: Web serViCes W
- Page 53 and 54:
inTroduCTion if We Were To desCribe
- Page 55 and 56:
inTroduCTion ➤ ➤ ➤ ➤ ➤
- Page 57 and 58:
inTroduCTion asP.neT mVC ASP.NET MV
- Page 59 and 60:
inTroduCTion WhaT This booK CoVers
- Page 61 and 62:
inTroduCTion erraTa We make every e
- Page 63 and 64:
PART I The C# language ⊲ ChaPTer
- Page 65 and 66:
1.neT architecture WhaT ’ s in Th
- Page 67 and 68:
The Common language runtime ❘ 5 T
- Page 69 and 70:
a Closer look at intermediate langu
- Page 71 and 72:
a Closer look at intermediate langu
- Page 73 and 74:
a Closer look at intermediate langu
- Page 75 and 76:
a Closer look at intermediate langu
- Page 77 and 78:
assemblies ❘ 15 is, therefore, le
- Page 79 and 80:
Creating .neT applications Using C#
- Page 81 and 82:
Creating .neT applications Using C#
- Page 83 and 84:
summary ❘ 21 to focus on gluing t
- Page 85 and 86:
2Core C# WhaT ’ s in This ChaPTer
- Page 87 and 88:
Your first C# Program ❘ 25 Compil
- Page 89 and 90:
Variables ❘ 27 You can also decla
- Page 91 and 92:
Variables ❘ 29 Variable scope The
- Page 93 and 94:
Predefined Data Types ❘ 31 ... pu
- Page 95 and 96:
Predefined Data Types ❘ 33 C# has
- Page 97 and 98:
Predefined Data Types ❘ 35 The Bo
- Page 99 and 100:
flow Control ❘ 37 The output from
- Page 101 and 102:
flow Control ❘ 39 However, for co
- Page 103 and 104:
flow Control ❘ 41 where: ➤ ➤
- Page 105 and 106:
flow Control ❘ 43 The foreach loo
- Page 107 and 108:
namespaces ❘ 45 } } { } case Time
- Page 109 and 110:
namespaces ❘ 47 As remarked earli
- Page 111 and 112:
The Main() Method ❘ 49 } } { } in
- Page 113 and 114:
Console i/o ❘ 51 You can compile
- Page 115 and 116:
Using Comments ❘ 53 This displays
- Page 117 and 118:
The C# Preprocessor Directives ❘
- Page 119 and 120:
The C# Preprocessor Directives ❘
- Page 121 and 122:
C# Programming Guidelines ❘ 59 ch
- Page 123 and 124:
C# Programming Guidelines ❘ 61 Th
- Page 125 and 126:
C# Programming Guidelines ❘ 63 CB
- Page 127 and 128:
3objects and Types WhaT ’ s in Th
- Page 129 and 130:
Classes ❘ 67 class PhoneCustomer
- Page 131 and 132:
Classes ❘ 69 } } } public static
- Page 133 and 134:
Classes ❘ 71 out Parameters In C-
- Page 135 and 136:
Classes ❘ 73 } { } // do whatever
- Page 137 and 138:
Classes ❘ 75 Constructors follow
- Page 139 and 140:
Classes ❘ 77 This code shows how
- Page 141 and 142:
anonymous Types ❘ 79 As noted ear
- Page 143 and 144:
structs ❘ 81 ➤ ➤ ➤ Structs
- Page 145 and 146:
Partial Classes ❘ 83 { public voi
- Page 147 and 148:
The object Class ❘ 85 ➤ ➤ ➤
- Page 149 and 150:
summary ❘ 87 { money.Amount += am
- Page 151 and 152:
4inheritance WhaT ’ s in This Cha
- Page 153 and 154:
implementation inheritance ❘ 91 I
- Page 155 and 156:
implementation inheritance ❘ 93 H
- Page 157 and 158:
implementation inheritance ❘ 95 Y
- Page 159 and 160:
implementation inheritance ❘ 97 S
- Page 161 and 162:
Modifiers ❘ 99 modifiers You have
- Page 163 and 164:
interfaces ❘ 101 For example, tak
- Page 165 and 166:
interfaces ❘ 103 You’ve declare
- Page 167 and 168:
summary ❘ 105 } public bool Withd
- Page 169 and 170:
5Generics WhaT ’ s in This ChaPTe
- Page 171 and 172:
Generics overview ❘ 109 foreach (
- Page 173 and 174:
Creating Generic Classes ❘ 111
- Page 175 and 176:
Generics features ❘ 113 } } } IEn
- Page 177 and 178:
Generics features ❘ 115 With Docu
- Page 179 and 180:
Generics features ❘ 117 inheritan
- Page 181 and 182:
Generic interfaces ❘ 119 Rectangl
- Page 183 and 184:
Generic interfaces ❘ 121 public i
- Page 185 and 186:
G e n e r i c M e t h o d s ❘ 123
- Page 187 and 188:
Generic Methods ❘ 125 IEnumerable
- Page 189 and 190:
Generic Methods ❘ 127 match is ta
- Page 191 and 192:
6arrays and Tuples WhaT ’ s in Th
- Page 193 and 194:
simple arrays ❘ 131 With the inde
- Page 195 and 196:
Jagged arrays ❘ 133 You can also
- Page 197 and 198:
array Class ❘ 135 The CreateInsta
- Page 199 and 200:
array Class ❘ 137 The output of t
- Page 201 and 202:
arrays as Parameters ❘ 139 The pe
- Page 203 and 204:
enumerations ❘ 141 the IEnumerato
- Page 205 and 206:
enumerations ❘ 143 public class H
- Page 207 and 208:
enumerations ❘ 145 } Console.Writ
- Page 209 and 210:
structural Comparison ❘ 147 The f
- Page 211 and 212:
s u m m a r y ❘ 149 The Tuple < >
- Page 213 and 214:
7operators and Casts WhaT ’ s in
- Page 215 and 216:
operators ❘ 153 arithmetic operat
- Page 217 and 218:
o p e r a t o r s ❘ 155 When you
- Page 219 and 220:
Type safety ❘ 157 For example: in
- Page 221 and 222:
Type safety ❘ 159 from long, ulon
- Page 223 and 224:
Type safety ❘ 161 int a = null; i
- Page 225 and 226:
operator overloading ❘ 163 Compar
- Page 227 and 228:
operator overloading ❘ 165 The co
- Page 229 and 230:
operator overloading ❘ 167 whatev
- Page 231 and 232:
operator overloading ❘ 169 that w
- Page 233 and 234:
operator overloading ❘ 171 You al
- Page 235 and 236:
U s e r - D e fi n e d C a s t s
- Page 237 and 238:
User-Defined Casts ❘ 175 By makin
- Page 239 and 240:
User-Defined Casts ❘ 177 To illus
- Page 241 and 242:
User-Defined Casts ❘ 179 This cod
- Page 243 and 244:
User-Defined Casts ❘ 181 book, bu
- Page 245 and 246:
8Delegates, lambdas, and events Wha
- Page 247 and 248:
Delegates ❘ 185 One good way of u
- Page 249 and 250:
Delegates ❘ 187 An instance of a
- Page 251 and 252:
Delegates ❘ 189 You call up these
- Page 253 and 254:
Delegates ❘ 191 parameter an arra
- Page 255 and 256:
D e l e g a t e s ❘ 193 BubbleSor
- Page 257 and 258:
Delegates ❘ 195 ProcessAndDisplay
- Page 259 and 260:
lambda expressions ❘ 197 param +=
- Page 261 and 262:
lambda expressions ❘ 199 Func < s
- Page 263 and 264:
events ❘ 201 public event EventHa
- Page 265 and 266:
events ❘ 203 Weak events With eve
- Page 267 and 268:
summary ❘ 205 } } public void New
- Page 269 and 270:
9strings and regular expressions Wh
- Page 271 and 272:
examining system.string ❘ 209 Ple
- Page 273 and 274:
examining system.string ❘ 211 Hel
- Page 275 and 276:
examining system.string ❘ 213 As
- Page 277 and 278:
examining system.string ❘ 215 Hen
- Page 279 and 280:
egular expressions ❘ 217 That is
- Page 281 and 282:
egular expressions ❘ 219 Suppose
- Page 283 and 284:
egular expressions ❘ 221 The foll
- Page 285 and 286:
egular expressions ❘ 223 Release
- Page 287 and 288:
10 Collec tions WhaT ’ s in This
- Page 289 and 290:
lists ❘ 227 The following example
- Page 291 and 292:
lists ❘ 229 Collection initialize
- Page 293 and 294:
lists ❘ 231 { if (action == null)
- Page 295 and 296:
lists ❘ 233 public class FindCoun
- Page 297 and 298:
lists ❘ 235 } } } else return res
- Page 299 and 300:
Queue ❘ 237 Figure 10-1 shows the
- Page 301 and 302:
Queue ❘ 239 queue, the document i
- Page 303 and 304:
linked list ❘ 241 { Console.Write
- Page 305 and 306:
linked list ❘ 243 LinkedList Six
- Page 307 and 308:
linked list ❘ 245 } { // check fo
- Page 309 and 310:
sorted list ❘ 247 var books = new
- Page 311 and 312:
Dictionaries ❘ 249 ➤ ➤ The ha
- Page 313 and 314:
Dictionaries ❘ 251 { } if (other
- Page 315 and 316:
Dictionaries ❘ 253 application by
- Page 317 and 318:
sets ❘ 255 seTs A collection that
- Page 319 and 320:
observable Collection ❘ 257 The n
- Page 321 and 322:
Bit arrays ❘ 259 The example to d
- Page 323 and 324:
Bit arrays ❘ 261 The BitVector32
- Page 325 and 326:
Concurrent Collections ❘ 263 ➤
- Page 327 and 328:
Performance ❘ 265 O(n) means that
- Page 329 and 330:
11 language integrated Query WhaT
- Page 331 and 332:
linQ overview ❘ 269 } } } public
- Page 333 and 334:
linQ overview ❘ 271 } { teams = n
- Page 335 and 336:
linQ overview ❘ 273 the Where() m
- Page 337 and 338:
standard Query operators ❘ 275 wh
- Page 339 and 340:
standard Query operators ❘ 277 Th
- Page 341 and 342:
standard Query operators ❘ 279 Se
- Page 343 and 344:
standard Query operators ❘ 281 Th
- Page 345 and 346:
standard Query operators ❘ 283 jo
- Page 347 and 348:
standard Query operators ❘ 285 {
- Page 349 and 350:
standard Query operators ❘ 287 va
- Page 351 and 352:
Parallel linQ ❘ 289 Console.Write
- Page 353 and 354:
expression Trees ❘ 291 } catch (O
- Page 355 and 356:
linQ Providers ❘ 293 } } break; c
- Page 357 and 358:
12 Dynamic language extensions WhaT
- Page 359 and 360:
The Dynamic Type ❘ 297 There are
- Page 361 and 362:
The Dynamic Type ❘ 299 IL_0031: l
- Page 363 and 364:
Hosting the Dlr scriptruntime ❘ 3
- Page 365 and 366:
Dynamicobject and expandoobject ❘
- Page 367 and 368:
summary ❘ 305 summary This chapte
- Page 369 and 370:
13 Memory Management and Pointers W
- Page 371 and 372:
Memory Management Under the Hood
- Page 373 and 374:
Memory Management Under the Hood
- Page 375 and 376:
freeing Unmanaged resources ❘ 313
- Page 377 and 378:
freeing Unmanaged resources ❘ 315
- Page 379 and 380:
Unsafe Code ❘ 317 the method conc
- Page 381 and 382:
Unsafe Code ❘ 319 If you want to
- Page 383 and 384:
Unsafe Code ❘ 321 must be explici
- Page 385 and 386:
Unsafe Code ❘ 323 You can also su
- Page 387 and 388:
Unsafe Code ❘ 325 If you want to
- Page 389 and 390:
Unsafe Code ❘ 327 Address of x is
- Page 391 and 392:
Unsafe Code ❘ 329 Compiling and r
- Page 393 and 394:
Unsafe Code ❘ 331 This idea of ap
- Page 395 and 396:
14 reflection WhaT ’ s in This Ch
- Page 397 and 398:
Custom attributes ❘ 335 error. Fo
- Page 399 and 400:
Custom attributes ❘ 337 specifyin
- Page 401 and 402:
Custom attributes ❘ 339 } } [Attr
- Page 403 and 404:
Using reflection ❘ 341 ProPerTy N
- Page 405 and 406:
Using reflection ❘ 343 need is de
- Page 407 and 408:
Using reflection ❘ 345 finding ou
- Page 409 and 410:
Using reflection ❘ 347 } "What\'s
- Page 411 and 412:
summary ❘ 349 figure 14-2 Notice
- Page 413 and 414:
15 errors and exceptions WhaT ’ s
- Page 415 and 416:
Catching exceptions ❘ 353 ➤ arg
- Page 417 and 418:
Catching exceptions ❘ 355 Now you
- Page 419 and 420:
Catching exceptions ❘ 357 } } } }
- Page 421 and 422:
Catching exceptions ❘ 359 Excepti
- Page 423 and 424:
Catching exceptions ❘ 361 { // er
- Page 425 and 426:
User-Defined exception Classes ❘
- Page 427 and 428:
User-Defined exception Classes ❘
- Page 429 and 430:
User-Defined exception Classes ❘
- Page 431 and 432:
summary ❘ 369 Finally, try the ex
- Page 433 and 434:
PART II Visual studio ⊲ ChaPTer 1
- Page 435 and 436:
16 Visual studio 2010 WhaT ’ s in
- Page 437 and 438:
Working with Visual studio 2010 ❘
- Page 439 and 440:
Working with Visual studio 2010 ❘
- Page 441 and 442:
Working with Visual studio 2010 ❘
- Page 443 and 444:
Working with Visual studio 2010 ❘
- Page 445 and 446:
Working with Visual studio 2010 ❘
- Page 447 and 448:
Working with Visual studio 2010 ❘
- Page 449 and 450:
Working with Visual studio 2010 ❘
- Page 451 and 452:
Working with Visual studio 2010 ❘
- Page 453 and 454:
Working with Visual studio 2010 ❘
- Page 455 and 456:
Working with Visual studio 2010 ❘
- Page 457 and 458:
Working with Visual studio 2010 ❘
- Page 459 and 460:
Working with Visual studio 2010 ❘
- Page 461 and 462:
Working with Visual studio 2010 ❘
- Page 463 and 464:
efactoring Tools ❘ 401 figure 16-
- Page 465 and 466:
Multi-Targeting the .neT framework
- Page 467 and 468:
WPf, WCf, Wf, and More ❘ 405 Righ
- Page 469 and 470:
17 Deployment WhaT ’ s in This Ch
- Page 471 and 472:
simple Deployment options ❘ 409 T
- Page 473 and 474:
simple Deployment options ❘ 411 X
- Page 475 and 476:
Visual studio 2010 setup and Deploy
- Page 477 and 478:
Visual studio 2010 setup and Deploy
- Page 479 and 480:
Visual studio 2010 setup and Deploy
- Page 481 and 482:
Clickonce ❘ 419 ProPerTy IsApplic
- Page 483 and 484:
Clickonce ❘ 421 application. The
- Page 485 and 486:
Visual studio 2010 editors ❘ 423
- Page 487 and 488:
Visual studio 2010 editors ❘ 425
- Page 489 and 490:
summary ❘ 427 The Launch Conditio
- Page 491 and 492:
P A R T I I I foundation ⊲ C h a
- Page 493 and 494:
18 assemblies WhaT ’ s in This Ch
- Page 495 and 496:
❘ What are assemblies 433 The sec
- Page 497 and 498:
C r e a t i n g a s s e m b l i e s
- Page 499 and 500:
C r e a t i n g a s s e m b l i e s
- Page 501 and 502:
Creating assemblies ❘ 439 using M
- Page 503 and 504:
application Domains ❘ 441 The pro
- Page 505 and 506:
application Domains ❘ 443 AppDoma
- Page 507 and 508:
shared assemblies ❘ 445 You can s
- Page 509 and 510:
shared assemblies ❘ 447 ➤ gacut
- Page 511 and 512:
shared assemblies ❘ 449 Add the f
- Page 513 and 514:
shared assemblies ❘ 451 Now, the
- Page 515 and 516:
Configuring .neT applications ❘ 4
- Page 517 and 518:
Ve r s i o n i n g ❘ 455 Version
- Page 519 and 520:
Versioning ❘ 457 < /assemblyBindi
- Page 521 and 522:
summary ❘ 459 Version dependencie
- Page 523 and 524:
19 instrumentation WhaT ’ s in Th
- Page 525 and 526:
Code Contracts ❘ 463 can also ass
- Page 527 and 528:
Code Contracts ❘ 465 invariants I
- Page 529 and 530:
Tr a c in g ❘ 467 TraCing With tr
- Page 531 and 532:
Tracing ❘ 469 The code, as it is
- Page 533 and 534:
Tr a c i n g ❘ 471 The delimited
- Page 535 and 536:
Tr a c i n g ❘ 473 To show the ca
- Page 537 and 538:
event logging ❘ 475 Figure 19-4 s
- Page 539 and 540:
event logging ❘ 477 In the event
- Page 541 and 542:
event logging ❘ 479 With the Even
- Page 543 and 544:
event logging ❘ 481 Language=Engl
- Page 545 and 546:
Performance Monitoring ❘ 483 var
- Page 547 and 548:
Performance Monitoring ❘ 485 The
- Page 549 and 550:
Performance Monitoring ❘ 487 } Re
- Page 551 and 552:
summary ❘ 489 figure 19-9 summary
- Page 553 and 554:
20 Threads, Tasks, and synchronizat
- Page 555 and 556:
asynchronous Delegates ❘ 493 publ
- Page 557 and 558:
The Thread Class ❘ 495 static voi
- Page 559 and 560:
The Thread Class ❘ 497 For passin
- Page 561 and 562:
Thread Pools ❘ 499 The time quant
- Page 563 and 564:
Tasks ❘ 501 ➤ ➤ For COM objec
- Page 565 and 566:
Tasks ❘ 503 In the code snippet t
- Page 567 and 568:
Parallel Class ❘ 505 8, task: 3,
- Page 569 and 570:
Cancellation framework ❘ 507 If y
- Page 571 and 572:
Cancellation framework ❘ 509 loop
- Page 573 and 574:
Threading issues ❘ 511 public cla
- Page 575 and 576:
Threading issues ❘ 513 } } } stat
- Page 577 and 578:
synchronization ❘ 515 ➤ ➤ ➤
- Page 579 and 580:
synchronization ❘ 517 } lock (thi
- Page 581 and 582:
synchronization ❘ 519 The thread
- Page 583 and 584:
synchronization ❘ 521 monitor The
- Page 585 and 586:
synchronization ❘ 523 The classes
- Page 587 and 588:
synchronization ❘ 525 In the thre
- Page 589 and 590:
synchronization ❘ 527 The Main()
- Page 591 and 592:
synchronization ❘ 529 for (int i
- Page 593 and 594:
synchronization ❘ 531 The ReaderW
- Page 595 and 596:
Timers ❘ 533 Writer 2 waiting for
- Page 597 and 598:
event - Based asynchronous Pattern
- Page 599 and 600:
event-Based asynchronous Pattern
- Page 601 and 602:
event-Based asynchronous Pattern
- Page 603 and 604:
event-Based asynchronous Pattern
- Page 605 and 606:
summary ❘ 543 comp.LongTaskAsync(
- Page 607 and 608:
21 security WhaT ’ s in This ChaP
- Page 609 and 610:
authentication and authorization
- Page 611 and 612:
authentication and authorization
- Page 613 and 614:
authentication and authorization
- Page 615 and 616:
encryption ❘ 553 encrypted using
- Page 617 and 618:
e n c r y p t i o n ❘ 555 First,
- Page 619 and 620:
encryption ❘ 557 } alicePubKeyBlo
- Page 621 and 622:
access Control to resources ❘ 559
- Page 623 and 624:
Code access security ❘ 561 This p
- Page 625 and 626:
Code access security ❘ 563 ➤ Fi
- Page 627 and 628:
Code access security ❘ 565 If you
- Page 629 and 630:
Distributing Code Using Certificate
- Page 631 and 632:
22 localization WhaT ’ s in This
- Page 633 and 634:
namespace system.Globalization ❘
- Page 635 and 636:
namespace system.Globalization ❘
- Page 637 and 638:
namespace system.Globalization ❘
- Page 639 and 640:
namespace system.Globalization ❘
- Page 641 and 642:
esources ❘ 579 If sorting a colle
- Page 643 and 644:
esources ❘ 581 using resource fil
- Page 645 and 646:
esources ❘ 583 /// /// A strongl
- Page 647 and 648:
Windows forms localization Using Vi
- Page 649 and 650:
Windows forms localization Using Vi
- Page 651 and 652:
Windows forms localization Using Vi
- Page 653 and 654:
localization with asP.neT ❘ 591 o
- Page 655 and 656:
localization with WPf ❘ 593 FoC
- Page 657 and 658:
localization with WPf ❘ 595 ➤
- Page 659 and 660:
localization with WPf ❘ 597 If yo
- Page 661 and 662:
a Custom resource reader ❘ 599 A
- Page 663 and 664:
Creating Custom Cultures ❘ 601 In
- Page 665 and 666:
summary ❘ 603 Because registering
- Page 667 and 668:
23 system.Transactions WhaT ’ s i
- Page 669 and 670:
Database and entity Classes ❘ 607
- Page 671 and 672:
Traditional Transactions ❘ 609 AD
- Page 673 and 674:
system.Transactions ❘ 611 } } } }
- Page 675 and 676:
system.Transactions ❘ 613 try { i
- Page 677 and 678:
system.Transactions ❘ 615 The con
- Page 679 and 680:
system.Transactions ❘ 617 tx.Comp
- Page 681 and 682:
system.Transactions ❘ 619 it with
- Page 683 and 684:
system.Transactions ❘ 621 A GUID
- Page 685 and 686:
system.Transactions ❘ 623 Creatio
- Page 687 and 688:
isolation level ❘ 625 The problem
- Page 689 and 690:
Custom resource Managers ❘ 627 ie
- Page 691 and 692:
Custom resource Managers ❘ 629 Th
- Page 693 and 694:
Custom resource Managers ❘ 631 }
- Page 695 and 696:
Transactions with Windows 7 and Win
- Page 697 and 698:
summary ❘ 635 txHandle, IntPtr.Ze
- Page 699 and 700:
24 networking WhaT ’ s in This Ch
- Page 701 and 702:
The WebClient Class ❘ 639 In this
- Page 703 and 704:
Webrequest and Webresponse Classes
- Page 705 and 706:
Displaying output as an HTMl Page
- Page 707 and 708:
Displaying output as an HTMl Page
- Page 709 and 710:
Displaying output as an HTMl Page
- Page 711 and 712:
Displaying output as an HTMl Page
- Page 713 and 714: Displaying output as an HTMl Page
- Page 715 and 716: Utility Classes ❘ 653 System.Obje
- Page 717 and 718: Utility Classes ❘ 655 In this exa
- Page 719 and 720: lower-level Protocols ❘ 657 These
- Page 721 and 722: lower-level Protocols ❘ 659 } Net
- Page 723 and 724: lower-level Protocols ❘ 661 The u
- Page 725 and 726: lower-level Protocols ❘ 663 } } }
- Page 727 and 728: summary ❘ 665 Reviewing the two c
- Page 729 and 730: 25 Windows services WhaT ’ s in T
- Page 731 and 732: Windows services architecture ❘ 6
- Page 733 and 734: Creating a Windows service Program
- Page 735 and 736: Creating a Windows service Program
- Page 737 and 738: Creating a Windows service Program
- Page 739 and 740: Creating a Windows service Program
- Page 741 and 742: Creating a Windows service Program
- Page 743 and 744: Creating a Windows service Program
- Page 745 and 746: Monitoring and Controlling Windows
- Page 747 and 748: Monitoring and Controlling Windows
- Page 749 and 750: Monitoring and Controlling Windows
- Page 751 and 752: Monitoring and Controlling Windows
- Page 753 and 754: Monitoring and Controlling Windows
- Page 755 and 756: s u m m a r y ❘ 693 figure 25-15
- Page 757 and 758: 26 interop WhaT ’ s in This ChaPT
- Page 759 and 760: .neT and CoM ❘ 697 interfaces Int
- Page 761 and 762: .neT and CoM ❘ 699 All COM object
- Page 763: .neT and CoM ❘ 701 events .NET of
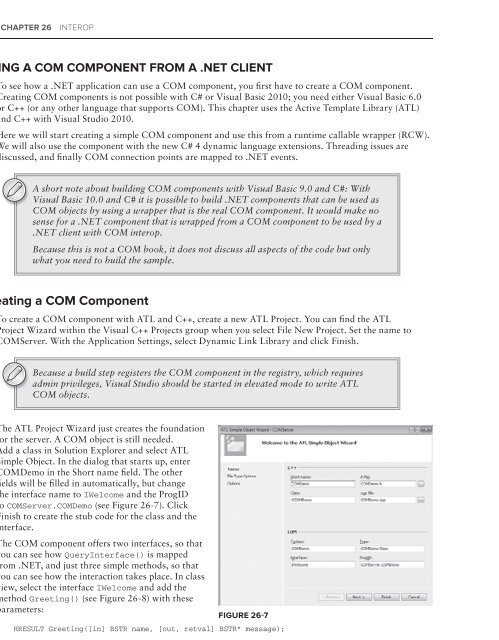
- Page 767 and 768: Using a CoM Component from a .neT C
- Page 769 and 770: Using a CoM Component from a .neT C
- Page 771 and 772: Using a CoM Component from a .neT C
- Page 773 and 774: Using a CoM Component from a .neT C
- Page 775 and 776: Using a .neT Component from a CoM C
- Page 777 and 778: Using a .neT Component from a CoM C
- Page 779 and 780: Using a .neT Component from a CoM C
- Page 781 and 782: Using a .neT Component from a CoM C
- Page 783 and 784: Using a .neT Component from a CoM C
- Page 785 and 786: Platform invoke ❘ 723 To reuse an
- Page 787 and 788: Platform invoke ❘ 725 namespace W
- Page 789 and 790: 27 Core XaMl WhaT ’ s in This Cha
- Page 791 and 792: overview ❘ 729 } } } var app = ne
- Page 793 and 794: o v e r v i e w ❘ 731 A type conv
- Page 795 and 796: Dependency Properties ❘ 733 priva
- Page 797 and 798: Dependency Properties ❘ 735 } set
- Page 799 and 800: Bubbling and Tunneling events ❘ 7
- Page 801 and 802: attached Properties ❘ 739 } } pub
- Page 803 and 804: M a r k u p e x t e n s i o n s ❘
- Page 805 and 806: Markup extensions ❘ 743 public ov
- Page 807 and 808: s u m m a r y ❘ 745 Dynamic activ
- Page 809 and 810: 28 Managed extensibility framework
- Page 811 and 812: Mef architecture ❘ 749 Let’s st
- Page 813 and 814: Mef architecture ❘ 751 attribute
- Page 815 and 816:
Mef architecture ❘ 753 operations
- Page 817 and 818:
e x p o r t s ❘ 755 The hosting a
- Page 819 and 820:
exports ❘ 757 So far, this contro
- Page 821 and 822:
e x p o r t s ❘ 759 Before contin
- Page 823 and 824:
exports ❘ 761 } } Thread.Sleep(30
- Page 825 and 826:
imports ❘ 763 add-ins with user i
- Page 827 and 828:
Containers and export Providers ❘
- Page 829 and 830:
C a t a l o g s ❘ 767 To remove e
- Page 831 and 832:
summary ❘ 769 status information
- Page 833 and 834:
29 Manipulating files and the regis
- Page 835 and 836:
Managing the file system ❘ 773
- Page 837 and 838:
Managing the file system ❘ 775 Be
- Page 839 and 840:
Managing the file system ❘ 777 Yo
- Page 841 and 842:
Managing the file system ❘ 779 if
- Page 843 and 844:
Moving, Copying, and Deleting files
- Page 845 and 846:
Moving, Copying, and Deleting files
- Page 847 and 848:
eading and Writing to files ❘ 785
- Page 849 and 850:
eading and Writing to files ❘ 787
- Page 851 and 852:
eading and Writing to files ❘ 789
- Page 853 and 854:
eading and Writing to files ❘ 791
- Page 855 and 856:
eading and Writing to files ❘ 793
- Page 857 and 858:
eading and Writing to files ❘ 795
- Page 859 and 860:
eading and Writing to files ❘ 797
- Page 861 and 862:
Mapped-Memory files ❘ 799 figure
- Page 863 and 864:
eading Drive information ❘ 801 us
- Page 865 and 866:
file security ❘ 803 { FileSecurit
- Page 867 and 868:
file security ❘ 805 adding and re
- Page 869 and 870:
eading and Writing to the registry
- Page 871 and 872:
eading and Writing to the registry
- Page 873 and 874:
eading and Writing to isolated stor
- Page 875 and 876:
eading and Writing to isolated stor
- Page 877 and 878:
PART IV data ⊲ ChaPTer 30: Core A
- Page 879 and 880:
30 Core aDo.neT WhaT ’ s in This
- Page 881 and 882:
aDo.neT overview ❘ 819 The follow
- Page 883 and 884:
Using Database Connections ❘ 821
- Page 885 and 886:
Using Database Connections ❘ 823
- Page 887 and 888:
C o m m a n d s ❘ 825 isolaTion l
- Page 889 and 890:
Commands ❘ 827 } } "WHERE Contact
- Page 891 and 892:
Commands ❘ 829 } } { data = xr.Re
- Page 893 and 894:
Commands ❘ 831 This command accep
- Page 895 and 896:
fast Data access: The Data reader
- Page 897 and 898:
Managing Data and relationships: Th
- Page 899 and 900:
Managing Data and relationships: Th
- Page 901 and 902:
Managing Data and relationships: Th
- Page 903 and 904:
Managing Data and relationships: Th
- Page 905 and 906:
Managing Data and relationships: Th
- Page 907 and 908:
XMl schemas: Generating Code with X
- Page 909 and 910:
XMl schemas: Generating Code with X
- Page 911 and 912:
XMl schemas: Generating Code with X
- Page 913 and 914:
Populating a Dataset ❘ 851 Using
- Page 915 and 916:
Persisting Dataset Changes ❘ 853
- Page 917 and 918:
Working with aDo.neT ❘ 855 The cl
- Page 919 and 920:
Working with aDo.neT ❘ 857 Key ge
- Page 921 and 922:
Working with aDo.neT ❘ 859 naming
- Page 923 and 924:
31 aDo.neT entity framework WhaT
- Page 925 and 926:
entity framework Mapping ❘ 863 Le
- Page 927 and 928:
entity framework Mapping ❘ 865
- Page 929 and 930:
entity Client ❘ 867 EntityDataRea
- Page 931 and 932:
entities ❘ 869 ReportPropertyChan
- Page 933 and 934:
object Context ❘ 871 Class or inT
- Page 935 and 936:
elationships ❘ 873 objeCTConTeXT
- Page 937 and 938:
elationships ❘ 875 or one-to-many
- Page 939 and 940:
object Query ❘ 877 The following
- Page 941 and 942:
Updates ❘ 879 objeCTquery query b
- Page 943 and 944:
Updates ❘ 881 Change information
- Page 945 and 946:
linQ to entities ❘ 883 event of t
- Page 947 and 948:
32 Data services WhaT ’ s in This
- Page 949 and 950:
Custom Hosting with Clr objects ❘
- Page 951 and 952:
Custom Hosting with Clr objects ❘
- Page 953 and 954:
HTTP Client application ❘ 891 hTT
- Page 955 and 956:
Queries with Urls ❘ 893 < categor
- Page 957 and 958:
Using WCf Data services with the aD
- Page 959 and 960:
Using WCf Data services with the aD
- Page 961 and 962:
Using WCf Data services with the aD
- Page 963 and 964:
Using WCf Data services with the aD
- Page 965 and 966:
33 Manipulating XMl WhaT ’ s in T
- Page 967 and 968:
Using system.Xml Classes ❘ 905 Th
- Page 969 and 970:
eading and Writing streamed XMl ❘
- Page 971 and 972:
eading and Writing streamed XMl ❘
- Page 973 and 974:
eading and Writing streamed XMl ❘
- Page 975 and 976:
Using the DoM in .neT ❘ 913 Readi
- Page 977 and 978:
Using the DoM in .neT ❘ 915 Selec
- Page 979 and 980:
Using XPathnavigators ❘ 917 to th
- Page 981 and 982:
Using XPathnavigators ❘ 919 If th
- Page 983 and 984:
Using XPathnavigators ❘ 921 This
- Page 985 and 986:
Using XPathnavigators ❘ 923
- Page 987 and 988:
Using XPathnavigators ❘ 925
- Page 989 and 990:
XMl and aDo.neT ❘ 927 To summariz
- Page 991 and 992:
XMl and aDo.neT ❘ 929 If you had
- Page 993 and 994:
XMl and aDo.neT ❘ 931 SqlDataAdap
- Page 995 and 996:
XMl and aDo.neT ❘ 933 ReadXml() h
- Page 997 and 998:
serializing objects in XMl ❘ 935
- Page 999 and 1000:
serializing objects in XMl ❘ 937
- Page 1001 and 1002:
serializing objects in XMl ❘ 939
- Page 1003 and 1004:
serializing objects in XMl ❘ 941
- Page 1005 and 1006:
Working with Different XMl objects
- Page 1007 and 1008:
Working with Different XMl objects
- Page 1009 and 1010:
Working with Different XMl objects
- Page 1011 and 1012:
Using linQ to Query XMl Documents
- Page 1013 and 1014:
More Query Techniques for XMl Docum
- Page 1015 and 1016:
summary ❘ 953 In this case, the f
- Page 1017 and 1018:
34 .neT Programming with sQl server
- Page 1019 and 1020:
Microsoft.sqlserver.server ❘ 957
- Page 1021 and 1022:
User-Defined Types ❘ 959 } } // P
- Page 1023 and 1024:
User-Defined Types ❘ 961 With the
- Page 1025 and 1026:
User - Defined Types ❘ 963 } } {
- Page 1027 and 1028:
User-Defined aggregates ❘ 965 ➤
- Page 1029 and 1030:
stored Procedures ❘ 967 SELECT Pu
- Page 1031 and 1032:
U s e r - D e fi n e d f u n c t i
- Page 1033 and 1034:
Triggers ❘ 971 In this example, t
- Page 1035 and 1036:
XMl Data Type ❘ 973 6460 Creating
- Page 1037 and 1038:
XMl Data Type ❘ 975 connection.Op
- Page 1039 and 1040:
XMl Data Type ❘ 977 data(/Exam[1]
- Page 1041 and 1042:
XMl Data Type ❘ 979 CREATE XML IN
- Page 1043 and 1044:
PART V Presentation ⊲ ChaPTer 35:
- Page 1045 and 1046:
35 Core WPf WhaT ’ s in This ChaP
- Page 1047 and 1048:
overview ❘ 985 namesPaCe System.W
- Page 1049 and 1050:
shapes ❘ 987 Figure
- Page 1051 and 1052:
Geometry ❘ 989 Point3="150,63" />
- Page 1053 and 1054:
Brushes ❘ 991 brushes This sectio
- Page 1055 and 1056:
Brushes ❘ 993 imagebrush
- Page 1057 and 1058:
Controls ❘ 995 simPle ConTrol Pas
- Page 1059 and 1060:
Controls ❘ 997 headeredConTenTCon
- Page 1061 and 1062:
layout ❘ 999 Label with a border
- Page 1063 and 1064:
layout ❘ 1001 Figure 35-15 shows
- Page 1065 and 1066:
styles and resources ❘ 1003 sTyle
- Page 1067 and 1068:
styles and resources ❘ 1005 < But
- Page 1069 and 1070:
styles and resources ❘ 1007 } { n
- Page 1071 and 1072:
Triggers ❘ 1009 < Window x:Class=
- Page 1073 and 1074:
Templates ❘ 1011
- Page 1075 and 1076:
Templates ❘ 1013
- Page 1077 and 1078:
Templates ❘ 1015 public class Cou
- Page 1079 and 1080:
Templates ❘ 1017 public partial c
- Page 1081 and 1082:
Templates ❘ 1019 defined with the
- Page 1083 and 1084:
animations ❘ 1021 Duration="0:0:3
- Page 1085 and 1086:
animations ❘ 1023 Depending on th
- Page 1087 and 1088:
animations ❘ 1025
- Page 1089 and 1090:
Visual state Manager ❘ 1027 With
- Page 1091 and 1092:
3 - D ❘ 1029 < /VisualStateGroup.
- Page 1093 and 1094:
3-D ❘ 1031 to define the light to
- Page 1095 and 1096:
summary ❘ 1033 After running the
- Page 1097 and 1098:
36 Business applications with WPf W
- Page 1099 and 1100:
Data Binding ❘ 1037
- Page 1101 and 1102:
Data Binding ❘ 1039 var binding =
- Page 1103 and 1104:
Data Binding ❘ 1041 With the code
- Page 1105 and 1106:
Data Binding ❘ 1043 publisher = v
- Page 1107 and 1108:
Data Binding ❘ 1045 } } } public
- Page 1109 and 1110:
Data Binding ❘ 1047 Margin="5" />
- Page 1111 and 1112:
Data Binding ❘ 1049 FirstL
- Page 1113 and 1114:
Data Binding ❘ 1051 < Label > < L
- Page 1115 and 1116:
Data Binding ❘ 1053 adding list i
- Page 1117 and 1118:
Data Binding ❘ 1055 } } } return
- Page 1119 and 1120:
Data Binding ❘ 1057 < Label Style
- Page 1121 and 1122:
Data Binding ❘ 1059 Another optio
- Page 1123 and 1124:
Commanding ❘ 1061 Instead of usin
- Page 1125 and 1126:
Tr e eV i e w ❘ 1063 Command bind
- Page 1127 and 1128:
Tr e eV ie w ❘ 1065 d:DesignHeigh
- Page 1129 and 1130:
DataGrid ❘ 1067 } { } return new
- Page 1131 and 1132:
DataGrid ❘ 1069 } } Country = r.C
- Page 1133 and 1134:
DataGrid ❘ 1071 How the group is
- Page 1135 and 1136:
summary ❘ 1073 After running the
- Page 1137 and 1138:
37 Creating Documents with WPf WhaT
- Page 1139 and 1140:
Text elements ❘ 1077 Running the
- Page 1141 and 1142:
Text elements ❘ 1079 The Span ele
- Page 1143 and 1144:
Text elements ❘ 1081 And everyw
- Page 1145 and 1146:
Text elements ❘ 1083 new SolidCol
- Page 1147 and 1148:
flow Documents ❘ 1085 floW doCume
- Page 1149 and 1150:
fixed Documents ❘ 1087 The receiv
- Page 1151 and 1152:
XPs Documents ❘ 1089 } Grid.SetRo
- Page 1153 and 1154:
Printing ❘ 1091 figure 37-14 To o
- Page 1155 and 1156:
Printing ❘ 1093 code snippet P
- Page 1157 and 1158:
38 silverlight WhaT ’ s in This C
- Page 1159 and 1160:
navigation ❘ 1097 ➤ Media — T
- Page 1161 and 1162:
navigation ❘ 1099 NavigateUri=
- Page 1163 and 1164:
navigation ❘ 1101 using System; u
- Page 1165 and 1166:
networking ❘ 1103 Creating a WCf
- Page 1167 and 1168:
networking ❘ 1105 figure 38-5 The
- Page 1169 and 1170:
networking ❘ 1107 } { EventList.A
- Page 1171 and 1172:
networking ❘ 1109 EventRegistrati
- Page 1173 and 1174:
Browser integration ❘ 1111 Callin
- Page 1175 and 1176:
silverlight out-of-Browser applicat
- Page 1177 and 1178:
summary ❘ 1115 } else { if (e1.Up
- Page 1179 and 1180:
39 Windows forms WhaT ’ s in This
- Page 1181 and 1182:
Creating a Windows forms applicatio
- Page 1183 and 1184:
Creating a Windows forms applicatio
- Page 1185 and 1186:
Control Class ❘ 1123 the Control
- Page 1187 and 1188:
standard Controls and Components
- Page 1189 and 1190:
standard Controls and Components
- Page 1191 and 1192:
standard Controls and Components
- Page 1193 and 1194:
standard Controls and Components
- Page 1195 and 1196:
standard Controls and Components
- Page 1197 and 1198:
standard Controls and Components
- Page 1199 and 1200:
standard Controls and Components
- Page 1201 and 1202:
standard Controls and Components
- Page 1203 and 1204:
standard Controls and Components
- Page 1205 and 1206:
forms ❘ 1143 The first three even
- Page 1207 and 1208:
forms ❘ 1145 DialogResult propert
- Page 1209 and 1210:
summary ❘ 1147 Creating your own
- Page 1211 and 1212:
40 Core asP.neT WhaT ’ s in This
- Page 1213 and 1214:
asP.neT Web forms ❘ 1151 Converse
- Page 1215 and 1216:
asP.neT Web forms ❘ 1153 figure 4
- Page 1217 and 1218:
asP.neT Web forms ❘ 1155 ➤ ➤
- Page 1219 and 1220:
asP.neT Web forms ❘ 1157 Note tha
- Page 1221 and 1222:
asP.neT Web forms ❘ 1159 This tim
- Page 1223 and 1224:
asP.neT Web forms ❘ 1161 ConTrol
- Page 1225 and 1226:
asP.neT Web forms ❘ 1163 ConTrol
- Page 1227 and 1228:
asP.neT Web forms ❘ 1165 For star
- Page 1229 and 1230:
asP.neT Web forms ❘ 1167
- Page 1231 and 1232:
aDo.neT and Data Binding ❘ 1169 f
- Page 1233 and 1234:
aDo.neT and Data Binding ❘ 1171 B
- Page 1235 and 1236:
aDo.neT and Data Binding ❘ 1173 t
- Page 1237 and 1238:
aDo.neT and Data Binding ❘ 1175 T
- Page 1239 and 1240:
aDo.neT and Data Binding ❘ 1177 S
- Page 1241 and 1242:
aDo.neT and Data Binding ❘ 1179
- Page 1243 and 1244:
application Configuration ❘ 1181
- Page 1245 and 1246:
summary ❘ 1183 ➤ ➤ How to bin
- Page 1247 and 1248:
41 asP.neT features WhaT ’ s in T
- Page 1249 and 1250:
User and Custom Controls ❘ 1187 a
- Page 1251 and 1252:
User and Custom Controls ❘ 1189 u
- Page 1253 and 1254:
User and Custom Controls ❘ 1191 f
- Page 1255 and 1256:
User and Custom Controls ❘ 1193 Y
- Page 1257 and 1258:
Master Pages ❘ 1195 protected voi
- Page 1259 and 1260:
Master Pages ❘ 1197 nested master
- Page 1261 and 1262:
site navigation ❘ 1199 You see an
- Page 1263 and 1264:
security ❘ 1201 You are current
- Page 1265 and 1266:
security ❘ 1203 click the refresh
- Page 1267 and 1268:
security ❘ 1205 You are curre
- Page 1269 and 1270:
Themes ❘ 1207 applying Themes to
- Page 1271 and 1272:
Themes ❘ 1209 This sort of theme
- Page 1273 and 1274:
Web Parts ❘ 1211 The use of Web P
- Page 1275 and 1276:
Web Parts ❘ 1213 This page contai
- Page 1277 and 1278:
Web Parts ❘ 1215 figure 41-11 fig
- Page 1279 and 1280:
Web Parts ❘ 1217 And final
- Page 1281 and 1282:
What is ajax ❘ 1219 Ajax is not a
- Page 1283 and 1284:
What is ajax ❘ 1221 Since DHTML,
- Page 1285 and 1286:
What is ajax ❘ 1223 ConTrol Timer
- Page 1287 and 1288:
What is ajax ❘ 1225 Panel rend
- Page 1289 and 1290:
What is ajax ❘ 1227 asP.neT ajaX-
- Page 1291 and 1292:
What is ajax ❘ 1229 Web Service R
- Page 1293 and 1294:
What is ajax ❘ 1231 ➤ ➤ Async
- Page 1295 and 1296:
What is ajax ❘ 1233 You also need
- Page 1297 and 1298:
What is ajax ❘ 1235 Using the aJa
- Page 1299 and 1300:
What is ajax ❘ 1237 The Pagereque
- Page 1301 and 1302:
What is ajax ❘ 1239 The code that
- Page 1303 and 1304:
What is ajax ❘ 1241 Before you ca
- Page 1305 and 1306:
42 asP.neT Dynamic Data and MVC Wha
- Page 1307 and 1308:
outing ❘ 1245 ➤ ➤ Defining ro
- Page 1309 and 1310:
outing ❘ 1247 Any matching URLs w
- Page 1311 and 1312:
outing ❘ 1249 If you have two rou
- Page 1313 and 1314:
Dynamic Data ❘ 1251 This code ext
- Page 1315 and 1316:
Dynamic Data ❘ 1253 For the ADO.N
- Page 1317 and 1318:
Dynamic Data ❘ 1255 This page is
- Page 1319 and 1320:
Dynamic Data ❘ 1257 that columns
- Page 1321 and 1322:
MVC ❘ 1259 //routes.Add(new Dynam
- Page 1323 and 1324:
M VC ❘ 1261 a simple asP.neT mVC
- Page 1325 and 1326:
MVC ❘ 1263 Note that none of the
- Page 1327 and 1328:
MVC ❘ 1265 There is no code-behin
- Page 1329 and 1330:
MVC ❘ 1267 At this point, hopeful
- Page 1331 and 1332:
MVC ❘ 1269 The RedirectToAction()
- Page 1333 and 1334:
MVC ❘ 1271 code snippet
- Page 1335 and 1336:
MVC ❘ 1273 using System.Component
- Page 1337 and 1338:
summary ❘ 1275 Finally, you explo
- Page 1339 and 1340:
PART VI Communication ⊲ ChaPTer 4
- Page 1341 and 1342:
43 Windows Communication foundation
- Page 1343 and 1344:
WCf overview ❘ 1281 ➤ ➤ REST
- Page 1345 and 1346:
simple service and Client ❘ 1283
- Page 1347 and 1348:
simple service and Client ❘ 1285
- Page 1349 and 1350:
simple service and Client ❘ 1287
- Page 1351 and 1352:
simple service and Client ❘ 1289
- Page 1353 and 1354:
Contracts ❘ 1291 The following se
- Page 1355 and 1356:
Contracts ❘ 1293 oPeraTionConTraC
- Page 1357 and 1358:
service implementation ❘ 1295 ser
- Page 1359 and 1360:
service implementation ❘ 1297
- Page 1361 and 1362:
service implementation ❘ 1299 } p
- Page 1363 and 1364:
Binding ❘ 1301 sTandard binding N
- Page 1365 and 1366:
Hosting ❘ 1303 To abort the servi
- Page 1367 and 1368:
Clients ❘ 1305 set the value belo
- Page 1369 and 1370:
Duplex Communication ❘ 1307 GetCa
- Page 1371 and 1372:
44 Windows Workflow foundation 4 Wh
- Page 1373 and 1374:
activities ❘ 1311 The WriteLine a
- Page 1375 and 1376:
activities ❘ 1313 The If activity
- Page 1377 and 1378:
activities ❘ 1315 to do this in a
- Page 1379 and 1380:
Custom activities ❘ 1317 The [Des
- Page 1381 and 1382:
Custom activities ❘ 1319 assembly
- Page 1383 and 1384:
Custom activities ❘ 1321 } } }; }
- Page 1385 and 1386:
Workflows ❘ 1323 This will then i
- Page 1387 and 1388:
Workflows ❘ 1325 arrive within a
- Page 1389 and 1390:
Workflows ❘ 1327 persistence prov
- Page 1391 and 1392:
Workflows ❘ 1329 Here, an instanc
- Page 1393 and 1394:
Workflows ❘ 1331 Variable roomNam
- Page 1395 and 1396:
Workflows ❘ 1333
- Page 1397 and 1398:
Workflows ❘ 1335 } vm.InitializeV
- Page 1399 and 1400:
summary ❘ 1337 whether any valida
- Page 1401 and 1402:
45 Peer - to - Peer networking WhaT
- Page 1403 and 1404:
Peer-to-Peer networking overview
- Page 1405 and 1406:
Microsoft Windows Peer - to - Peer
- Page 1407 and 1408:
Microsoft Windows Peer - to - Peer
- Page 1409 and 1410:
Building P2P applications ❘ 1347
- Page 1411 and 1412:
Building P2P applications ❘ 1349
- Page 1413 and 1414:
Building P2P applications ❘ 1351
- Page 1415 and 1416:
Building P2P applications ❘ 1353
- Page 1417 and 1418:
summary ❘ 1355 } } DisplayString
- Page 1419 and 1420:
46 Message Queuing WhaT ’ s in Th
- Page 1421 and 1422:
overview ❘ 1359 Laptop Computer,
- Page 1423 and 1424:
Message Queuing architecture ❘ 13
- Page 1425 and 1426:
Programming Message Queuing ❘ 136
- Page 1427 and 1428:
Programming Message Queuing ❘ 136
- Page 1429 and 1430:
Programming Message Queuing ❘ 136
- Page 1431 and 1432:
Programming Message Queuing ❘ 136
- Page 1433 and 1434:
Course order application ❘ 1371 T
- Page 1435 and 1436:
Course order application ❘ 1373 }
- Page 1437 and 1438:
Course order application ❘ 1375 p
- Page 1439 and 1440:
Transactional Queues ❘ 1377 to th
- Page 1441 and 1442:
Message Queuing with WCf ❘ 1379
- Page 1443 and 1444:
Message Queuing with WCf ❘ 1381 p
- Page 1445 and 1446:
Message Queuing with WCf ❘ 1383
- Page 1447 and 1448:
s u m m a r y ❘ 1385 object can b
- Page 1449 and 1450:
47 syndication WhaT ’ s in This C
- Page 1451 and 1452:
eading syndication feeds sample ❘
- Page 1453 and 1454:
offering syndication feeds sample
- Page 1455 and 1456:
offering syndication feeds sample
- Page 1457 and 1458:
summary ❘ 1395 The concrete imple
- Page 1459 and 1460:
aPPendiX Guidelines for Windows 7 a
- Page 1461 and 1462:
application recovery ❘ 1399 and C
- Page 1463 and 1464:
application recovery ❘ 1401 priva
- Page 1465 and 1466:
application recovery ❘ 1403 } tex
- Page 1467 and 1468:
User account Control ❘ 1405 An ap
- Page 1469 and 1470:
new Controls and Dialogs ❘ 1407 I
- Page 1471 and 1472:
new Controls and Dialogs ❘ 1409 [
- Page 1473 and 1474:
new Controls and Dialogs ❘ 1411 T
- Page 1475 and 1476:
new Controls and Dialogs ❘ 1413
- Page 1477 and 1478:
s u m m a r y ❘ 1415 ApplicationP
- Page 1479 and 1480:
xndeX symbols \’, 35 \ “, 35 \\
- Page 1481 and 1482:
adventureWorkslT sample application
- Page 1483 and 1484:
assembly - authorization attributes
- Page 1485 and 1486:
BooksDemo/BooksModel.Designer.cs -
- Page 1487 and 1488:
Class View window - code snippets d
- Page 1489 and 1490:
Compileandrun() - Control class opt
- Page 1491 and 1492:
Css (cascading style sheets) - data
- Page 1493 and 1494:
DataserviceKey - dependency propert
- Page 1495 and 1496:
“Dll Hell,” - Dynamicobject “
- Page 1497 and 1498:
equals() - export attribute compari
- Page 1499 and 1500:
finnish sorting (example) - functio
- Page 1501 and 1502:
Getresponse() - hosting GetResponse
- Page 1503 and 1504:
ilist‹T› - interfaces IList‹T
- Page 1505 and 1506:
Keepalive property - linQ to sQl K
- Page 1507 and 1508:
MailMessage - Message property Mail
- Page 1509 and 1510:
Monitor class - nativeobjectsecurit
- Page 1511 and 1512:
new Project dialog box - ole DB pro
- Page 1513 and 1514:
P (percentage format) - PCsWebsite3
- Page 1515 and 1516:
poison messages - properties to cla
- Page 1517 and 1518:
anges - registryKey ranges bool typ
- Page 1519 and 1520:
ightToleft - secureTransfer/Program
- Page 1521 and 1522:
shapesDemo/MainWindow.xaml - socket
- Page 1523 and 1524:
stacksample/Program.cs - structural
- Page 1525 and 1526:
system.Data.objects.DataClasses - s
- Page 1527 and 1528:
ThenBy() - Transactedfile defining,
- Page 1529 and 1530:
types - user-defined exception clas
- Page 1531 and 1532:
virtual table (vtable) - WCf (Windo
- Page 1533 and 1534:
WinCV utility - workflows Professio
- Page 1535 and 1536:
XaMl resource dictionaries - Xmlrea
- Page 1537 and 1538:
www.it-ebooks.info
- Page 1539 and 1540:
48 Graphics with GDi + WhaT ’ s i
- Page 1541 and 1542:
Understanding Drawing Principles
- Page 1543 and 1544:
Understanding Drawing Principles
- Page 1545 and 1546:
Understanding Drawing Principles
- Page 1547 and 1548:
Measuring Coordinates and areas ❘
- Page 1549 and 1550:
Measuring Coordinates and areas ❘
- Page 1551 and 1552:
Drawing scrollable Windows ❘ OC13
- Page 1553 and 1554:
Drawing scrollable Windows ❘ OC15
- Page 1555 and 1556:
World, Page, and Device Coordinates
- Page 1557 and 1558:
Colors ❘ OC19 The three parameter
- Page 1559 and 1560:
Pens and Brushes ❘ OC21 brushes G
- Page 1561 and 1562:
Drawing shapes and lines ❘ OC23 B
- Page 1563 and 1564:
Displaying images ❘ OC25 As with
- Page 1565 and 1566:
simple Text example ❘ OC27 draWin
- Page 1567 and 1568:
enumerating font families example
- Page 1569 and 1570:
editing a Text Document: The Capsed
- Page 1571 and 1572:
editing a Text Document: The Capsed
- Page 1573 and 1574:
editing a Text Document: The Capsed
- Page 1575 and 1576:
editing a Text Document: The Capsed
- Page 1577 and 1578:
editing a Text Document: The Capsed
- Page 1579 and 1580:
editing a Text Document: The Capsed
- Page 1581 and 1582:
Printing ❘ OC43 converting to upp
- Page 1583 and 1584:
Printing ❘ OC45 } if (nLines > 0)
- Page 1585 and 1586:
Printing ❘ OC47 Finally, you need
- Page 1587 and 1588:
49 Visual studio Tools for office W
- Page 1589 and 1590:
VsTo overview ❘ OC51 figure 49-2
- Page 1591 and 1592:
VsTo Project fundamentals ❘ OC53
- Page 1593 and 1594:
VsTo Project fundamentals ❘ OC55
- Page 1595 and 1596:
VsTo Project fundamentals ❘ OC57
- Page 1597 and 1598:
Building VsTo solutions ❘ OC59 }
- Page 1599 and 1600:
Building VsTo solutions ❘ OC61 ma
- Page 1601 and 1602:
Building VsTo solutions ❘ OC63 fi
- Page 1603 and 1604:
Building VsTo solutions ❘ OC65 Th
- Page 1605 and 1606:
example application ❘ OC67 This u
- Page 1607 and 1608:
example application ❘ OC69 raised
- Page 1609 and 1610:
example application ❘ OC71 foreac
- Page 1611 and 1612:
example application ❘ OC73 The ot
- Page 1613 and 1614:
summary ❘ OC75 } if (!isLoaded) {
- Page 1615 and 1616:
50 Managed add - in framework WhaT
- Page 1617 and 1618:
Maf architecture ❘ OC79 Host Host
- Page 1619 and 1620:
Maf architecture ❘ OC81 One add -
- Page 1621 and 1622:
Maf architecture ❘ OC83 ConTraCT
- Page 1623 and 1624:
add - in sample ❘ OC85 ProjeCT re
- Page 1625 and 1626:
add-in sample ❘ OC87 The class Op
- Page 1627 and 1628:
add-in sample ❘ OC89 } } } public
- Page 1629 and 1630:
add - in sample ❘ OC91 } } handle
- Page 1631 and 1632:
add-in sample ❘ OC93 To update th
- Page 1633 and 1634:
summary ❘ OC95 summary In this ch
- Page 1635 and 1636:
51 enterprise services WhaT ’ s i
- Page 1637 and 1638:
Using enterprise services ❘ OC99
- Page 1639 and 1640:
Creating a simple CoM+ application
- Page 1641 and 1642:
Deployment ❘ OC103 { public Simpl
- Page 1643 and 1644:
Component services explorer ❘ OC1
- Page 1645 and 1646:
Transactions ❘ OC107 this feature
- Page 1647 and 1648:
sample application ❘ OC109 lOrder
- Page 1649 and 1650:
sample application ❘ OC111 The or
- Page 1651 and 1652:
sample application ❘ OC113 comman
- Page 1653 and 1654:
sample application ❘ OC115 Finall
- Page 1655 and 1656:
integrating WCf and enterprise serv
- Page 1657 and 1658:
integrating WCf and enterprise serv
- Page 1659 and 1660:
summary ❘ OC121 { ProductId = 67,
- Page 1661 and 1662:
52 Directory services WhaT ’ s in
- Page 1663 and 1664:
The architecture of active Director
- Page 1665 and 1666:
The architecture of active Director
- Page 1667 and 1668:
administration Tools for active Dir
- Page 1669 and 1670:
Programming active Directory ❘ OC
- Page 1671 and 1672:
Programming active Directory ❘ OC
- Page 1673 and 1674:
Programming active Directory ❘ OC
- Page 1675 and 1676:
Programming active Directory ❘ OC
- Page 1677 and 1678:
Programming active Directory ❘ OC
- Page 1679 and 1680:
Programming active Directory ❘ OC
- Page 1681 and 1682:
Programming active Directory ❘ OC
- Page 1683 and 1684:
searching for User objects ❘ OC14
- Page 1685 and 1686:
searching for User objects ❘ OC14
- Page 1687 and 1688:
account Management ❘ OC149 figure
- Page 1689 and 1690:
account Management ❘ OC151 enumer
- Page 1691 and 1692:
DsMl ❘ OC153 } { } Console.WriteL
- Page 1693 and 1694:
summary ❘ OC155 } // retrieve all
- Page 1695 and 1696:
53 C#, Visual Basic, C++/Cli, and f
- Page 1697 and 1698:
Defining Types ❘ OC159 } } { } '
- Page 1699 and 1700:
Defining Types ❘ OC161 // C# MySt
- Page 1701 and 1702:
Methods ❘ OC163 // F# type Person
- Page 1703 and 1704:
Methods ❘ OC165 ' Visual Basic Pu
- Page 1705 and 1706:
Methods ❘ OC167 // C++/CLI public
- Page 1707 and 1708:
static Members ❘ OC169 With C# an
- Page 1709 and 1710:
Control statements ❘ OC171 If you
- Page 1711 and 1712:
loops ❘ OC173 } switch (s) { case
- Page 1713 and 1714:
exception Handling ❘ OC175 printf
- Page 1715 and 1716:
inheritance ❘ OC177 this.Method(n
- Page 1717 and 1718:
esource Management ❘ OC179 public
- Page 1719 and 1720:
esource Management ❘ OC181 } ' Vi
- Page 1721 and 1722:
Delegates ❘ OC183 Demo d = new De
- Page 1723 and 1724:
events ❘ OC185 // handler impleme
- Page 1725 and 1726:
Generics ❘ OC187 intList.Add(2) i
- Page 1727 and 1728:
C# specifics ❘ OC189 public ref c
- Page 1729 and 1730:
54 .neT remoting WhaT ’ s in This
- Page 1731 and 1732:
.neT remoting Terms explained ❘ O
- Page 1733 and 1734:
.neT remoting Terms explained ❘ O
- Page 1735 and 1736:
emote objects, Clients, and servers
- Page 1737 and 1738:
emote objects, Clients, and servers
- Page 1739 and 1740:
.neT remoting architecture ❘ OC20
- Page 1741 and 1742:
.neT remoting architecture ❘ OC20
- Page 1743 and 1744:
.neT remoting architecture ❘ OC20
- Page 1745 and 1746:
.neT remoting architecture ❘ OC20
- Page 1747 and 1748:
.neT remoting architecture ❘ OC20
- Page 1749 and 1750:
.neT remoting architecture ❘ OC21
- Page 1751 and 1752:
.neT remoting architecture ❘ OC21
- Page 1753 and 1754:
Configuration files ❘ OC215 The f
- Page 1755 and 1756:
Configuration files ❘ OC217 serve
- Page 1757 and 1758:
Configuration files ❘ OC219 retur
- Page 1759 and 1760:
Hosting servers in asP.neT ❘ OC22
- Page 1761 and 1762:
asynchronous remoting ❘ OC223 oPT
- Page 1763 and 1764:
emoting and events ❘ OC225 With t
- Page 1765 and 1766:
emoting and events ❘ OC227 The me
- Page 1767 and 1768:
emoting and events ❘ OC229 can on
- Page 1769 and 1770:
Call Contexts ❘ OC231 RemoteObjec
- Page 1771 and 1772:
55 Web services with asP.neT WhaT
- Page 1773 and 1774:
WsDl ❘ OC235 int where length
- Page 1775 and 1776:
Web services ❘ OC237 The code in
- Page 1777 and 1778:
Web services ❘ OC239 on this form
- Page 1779 and 1780:
Web services ❘ OC241 figure 55-3
- Page 1781 and 1782:
extending the event-Booking example
- Page 1783 and 1784:
extending the event-Booking example
- Page 1785 and 1786:
extending the event-Booking example
- Page 1787 and 1788:
exchanging Data Using soaP Headers
- Page 1789 and 1790:
exchanging Data Using soaP Headers
- Page 1791 and 1792:
exchanging Data Using soaP Headers
- Page 1793 and 1794:
56 linQ to sQl WhaT ’ s in This C
- Page 1795 and 1796:
linQ to sQl Using Visual studio 201
- Page 1797 and 1798:
linQ to sQl Using Visual studio 201
- Page 1799 and 1800:
How objects Map to linQ objects ❘
- Page 1801 and 1802:
How objects Map to linQ objects ❘
- Page 1803 and 1804:
How objects Map to linQ objects ❘
- Page 1805 and 1806:
Working Without the o/r Designer
- Page 1807 and 1808:
Working Without the o/r Designer
- Page 1809 and 1810:
Custom objects and the o/r Designer
- Page 1811 and 1812:
Querying the Database ❘ OC273 for
- Page 1813 and 1814:
Querying the Database ❘ OC275 } }
- Page 1815 and 1816:
summary ❘ OC277 LINQ to SQL treat
- Page 1817 and 1818:
57 Windows Workflow foundation 3.0
- Page 1819 and 1820:
activities ❘ OC281 aCTiViTies Eve
- Page 1821 and 1822:
activities ❘ OC283 WorKfloW queue
- Page 1823 and 1824:
Custom activities ❘ OC285 Last, i
- Page 1825 and 1826:
Custom activities ❘ OC287 assembl
- Page 1827 and 1828:
Custom activities ❘ OC289 The Des
- Page 1829 and 1830:
Custom activities ❘ OC291 With al
- Page 1831 and 1832:
Custom activities ❘ OC293 { } if
- Page 1833 and 1834:
Custom activities ❘ OC295 In addi
- Page 1835 and 1836:
Workflows ❘ OC297 Each workflow i
- Page 1837 and 1838:
Workflows ❘ OC299 Each state cons
- Page 1839 and 1840:
The Workflow runtime ❘ OC301 In F
- Page 1841 and 1842:
Workflow services ❘ OC303 To crea
- Page 1843 and 1844:
Workflow services ❘ OC305 The Tra
- Page 1845 and 1846:
integration with Windows Communicat
- Page 1847 and 1848:
Hosting Workflows ❘ OC309 If you
- Page 1849 and 1850:
Moving from Wf 3.x to Wf 4 ❘ OC31
- Page 1851 and 1852:
Programmer to Programmer Get more