Cut-off Wheels
Cut-off Wheels
Cut-off Wheels

Create successful ePaper yourself
Turn your PDF publications into a flip-book with our unique Google optimized e-Paper software.
DIAMOND AND CBN PRODUCTS<br />
DIAMOND AND CBN PRODUCTS<br />
Diamond and CBN Wheel Mounting, Truing and Dressing Guide<br />
To achieve the best results using Norton diamond and CBN products, the following steps for mounting, truing and dressing should be practiced:<br />
MOUNTING – Putting Wheel on Machine Spindle<br />
• Examine wheel flanges and spindle carefully.<br />
• Be sure flanges’ surfaces are clean and free of damage.<br />
• Ensure that the mounting flanges are flat and of equal diameter,<br />
especially on wheels with rigid centers, such as vitrified bond wheels.<br />
• Inspect machine spindle for excessive runout.<br />
– TIR (Total Indicated Runout) should be no greater than 0.0002".<br />
• Mount wheel between hand-tightened flanges.<br />
• Using a dial indicator, tap the wheel lightly with a rubber or wooden<br />
block to minimize runout to less than .0010".<br />
• Tighten flange securely and recheck with indicator.<br />
• Allow a newly mounted wheel to operate for one full minute<br />
before grinding.<br />
• The use of one permanent mounting for the life of the wheel is<br />
recommended whenever possible:<br />
– If the grinding machine has a tapered spindle, mount each straight,<br />
flaring cup or dish wheel on a separate collet or adapter.<br />
– When changing wheels the entire unit is removed, keeping the<br />
wheel in running truth.<br />
– When needed again, the entire unit can be placed directly on the<br />
spindle or arbor, thereby eliminating the time and abrasive lost in<br />
retruing.<br />
TRUING – Making Wheel Round and Concentric with the Spindle Axis<br />
• Prior to truing the wheel, run a wax crayon over the wheel face.<br />
Important: do not use any liquid based ink on superabrasive wheels.<br />
• Any crayon left on the wheel face after truing will reveal untrued areas.<br />
• Indicate the superabrasive wheel runout before starting... usually within<br />
.001" to .002", to minimize wheel loss.<br />
• Norton Brake Controlled Truing Devices are most commonly used to true<br />
Diamond and CBN straight, cup and cylinder wheels.<br />
– Mount the device spingle parallel to the wheel spindle to ensure<br />
proper straight face truing.<br />
– For cup wheels, the device spindle will be mounted perpendicular to<br />
the wheel spindle.<br />
– Always use Brake Controlled Truing Device dry.<br />
– Bring the diamond/CBN wheel and the truing wheel together until<br />
they almost touch.<br />
– Start the diamond/CBN wheel to normal speed; start the truing<br />
wheel in the same direction.<br />
– Bring the two wheels together until they touch.<br />
– Make sure the truing wheel is spinning at time of contact.<br />
– Traverse the wheel back and forth at 30 to 60 inches per minute.<br />
– Downfeed .0005" to .001" at the end of each traverse.<br />
– At the end of truing, the diamond/CBN wheel should be smooth and<br />
in truth.<br />
– Apply a dressing stick to sharpen the truing wheel.<br />
– See the “Diamond Tool” section for Brake Controlled Truing Devices<br />
and wheel operating recommendations.<br />
DRESSING – Opening the Face of a Trued Wheel<br />
• Dressing the abrasive – a cleaning/sharpening process to expose sharp,<br />
free-cutting grit:<br />
– For resinoid and vitrified bond wheels, the dressing stick should be<br />
one or two grit sizes finer than the abrasive in the diamond/CBN<br />
wheel – in a soft grade such as H or I.<br />
– For metal bond wheels, choose a stick with the same grit or one<br />
grit coarser than the wheel abrasive – in a medium grade (K – M).<br />
– See the “Dressing Stick” section for recommendations.<br />
• Dressing the core – The core material (the part of the wheel that holds<br />
and supports the abrasive-bearing section) should never contact the<br />
work piece during grinding; rubbing will generate excessive heat. As the<br />
abrasive section of a cup wheel wears, the core material might become<br />
exposed, necessitating dressing.<br />
– Use a single-point carbide or steel tool to dress an exposed resaloy<br />
core.<br />
– Clamp the tool in a vise.<br />
– Direct the cutting edge accurately to leave a 1/16" of abrasive<br />
section exposed.<br />
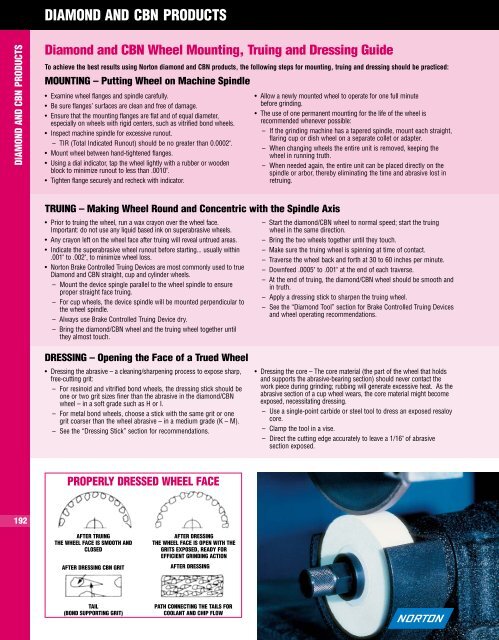
PROPERLY DRESSED WHEEL FACE<br />
192<br />
AFTER TRUING<br />
THE WHEEL FACE IS SMOOTH AND<br />
CLOSED<br />
AFTER DRESSING CBN GRIT<br />
AFTER DRESSING<br />
THE WHEEL FACE IS OPEN WITH THE<br />
GRITS EXPOSED, READY FOR<br />
EFFICIENT GRINDING ACTION<br />
AFTER DRESSING<br />
TAIL<br />
(BOND SUPPORTING GRIT)<br />
PATH CONNECTING THE TAILS FOR<br />
COOLANT AND CHIP FLOW