- Page 1 and 2: TikZ & & PGF TikZ PGF Manual for Ve
- Page 3 and 4: The TikZ and PGF Packages Manual fo
- Page 5 and 6: 8 Installation 77 8.1 Package and D
- Page 7 and 8: 14.11 The Sine and Cosine Operation
- Page 9 and 10: 19 Making Trees Grow 249 19.1 Intro
- Page 11 and 12: 31 Decoration Library 359 31.1 Over
- Page 13 and 14: 48.4 Shadows for Special Paths and
- Page 15 and 16: 61.5 Reference: Style Sheets for Li
- Page 17 and 18: 75.6 Attributes . . . . . . . . . .
- Page 19 and 20: 84 Matrices 789 84.1 Overview . . .
- Page 21 and 22: 1 Introduction The pgf package, whe
- Page 23 and 24: 4. The pgfpages package is used to
- Page 25 and 26: 2 Tutorial: A Picture for Karl’s
- Page 27 and 28: His version of the example looks li
- Page 29 and 30: While this may be nice in other sit
- Page 31 and 32: \begin{tikzpicture}[scale=3] \draw[
- Page 33 and 34: You can also fill and draw a path a
- Page 35 and 36: fill. Then, Karl can add the name p
- Page 37 and 38: that I have not mentioned are not s
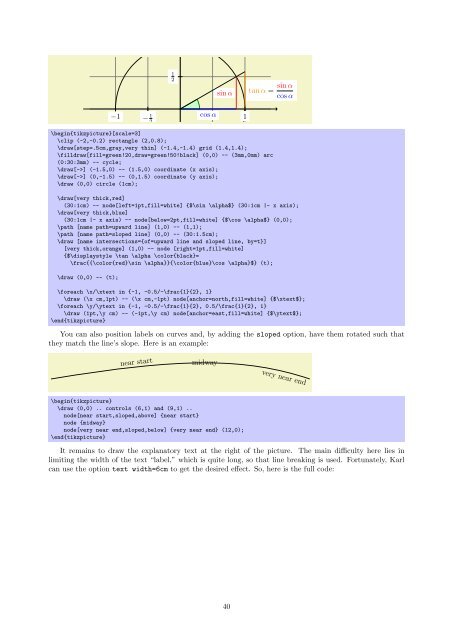
- Page 39: 1 0.5 \begin{tikzpicture}[scale=3]
- Page 43 and 44: %% Plain TeX file \input tikz.tex \
- Page 45 and 46: \begin{tikzpicture} [place/.style={
- Page 47 and 48: \begin{tikzpicture} \node[place] (w
- Page 49 and 50: \begin{tikzpicture} \node[place] (w
- Page 51 and 52: \begin{tikzpicture} \draw [->,decor
- Page 53 and 54: s ¯s 2 2 \begin{scope}[xshift=6cm]
- Page 55 and 56: 4.1.2 The Line AB The first part of
- Page 57 and 58: D A B \begin{tikzpicture} \coordina
- Page 59 and 60: 4.2 Book I, Proposition II The seco
- Page 61 and 62: 4.2.3 The Complete Code K H D C A B
- Page 63 and 64: to 3mm, she will get exactly what s
- Page 65 and 66: \begin{tikzpicture}[node distance=5
- Page 67 and 68: \begin{tikzpicture}[point/.style={c
- Page 69 and 70: \tikz \graph [grow right sep] { uns
- Page 71 and 72: 6 Tutorial: A Lecture Map for Johan
- Page 73 and 74: 2. The standard computer-science-to
- Page 75 and 76: Describing Complexity Fixed- Parame
- Page 77 and 78: color for the whole branch and (b)
- Page 79 and 80: Parallel Computation Solving Proble
- Page 81 and 82: an interval for which the calendar
- Page 83 and 84: \node [root concept] (Computational
- Page 85 and 86: 1 2 3 4 5 6 7 8 9 10 11 12 13 14 15
- Page 87 and 88: • Decide on what the graphic shou
- Page 89 and 90: seminar “very good,” nine consi
- Page 91 and 92:
• In a 3D-pie-chart the relative
- Page 93 and 94:
Part II Installation and Configurat
- Page 95 and 96:
8.2.2 MiKTeX For MiKTEX, use the up
- Page 97 and 98:
9.2.2 Terms and Conditions For Copy
- Page 99 and 100:
8. If the distribution and/or use o
- Page 101 and 102:
(a) If a component of this Derived
- Page 103 and 104:
License (gpl) was considered inappr
- Page 105 and 106:
Examples of suitable formats for Tr
- Page 107 and 108:
one entity. If the Document already
- Page 109 and 110:
10 Input and Output Formats TEX was
- Page 111 and 112:
This driver has the “complete”
- Page 113 and 114:
tikz/tex4ht node/css=〈filename〉
- Page 115 and 116:
11 Design Principles This section d
- Page 117 and 118:
oot left right child child \begin{t
- Page 119 and 120:
Next, the contents of the environme
- Page 121 and 122:
12.3 Using Scopes to Structure a Pi
- Page 123 and 124:
12.4 Using Graphic Options 12.4.1 H
- Page 125 and 126:
13 Specifying Coordinates 13.1 Over
- Page 127 and 128:
are checked, independently, whether
- Page 129 and 130:
content oriented ASCII DVI TEX L A
- Page 131 and 132:
The implicit way of specifying the
- Page 133 and 134:
tikz/cs/vertical line through={(〈
- Page 135 and 136:
intersections along the path specif
- Page 137 and 138:
13.5.2 The Syntax of Factors The
- Page 139 and 140:
\begin{tikzpicture} \draw [help lin
- Page 141 and 142:
tikz/every path (style, initially e
- Page 143 and 144:
\begin{tikzpicture} \draw[line widt
- Page 145 and 146:
tikz/at=〈coordinate〉 (no defaul
- Page 147 and 148:
\tikz[rotate=30] \draw[step=1mm] (0
- Page 149 and 150:
tikz/parabola height=〈dimension
- Page 151 and 152:
operation, these come first). The e
- Page 153 and 154:
tikz/execute at begin to=〈code〉
- Page 155 and 156:
scope. For example, if you apply a
- Page 157 and 158:
15.2 Specifying a Color The most un
- Page 159 and 160:
tikz/line cap=〈type〉 (no defaul
- Page 161 and 162:
tikz/densely dashdotdotted Shorthan
- Page 163 and 164:
tikz/double distance=〈dimension
- Page 165 and 166:
\begin{tikzpicture} \draw[pattern c
- Page 167 and 168:
\begin{tikzpicture}[path image/.sty
- Page 169 and 170:
\begin{tikzpicture} \draw[red] (0,0
- Page 171 and 172:
A fading (a term that I propose, fa
- Page 173 and 174:
Small Big \begin{tikzpicture} [ % D
- Page 175 and 176:
16 Nodes and Edges 16.1 Overview In
- Page 177 and 178:
tikz/every 〈shape 〉 node (style
- Page 179 and 180:
alias /tikz/minimum width Same as m
- Page 181 and 182:
You will have to lookup which parts
- Page 183 and 184:
appropriate value. While this key,
- Page 185 and 186:
16.4.4 Text Parameters: Height and
- Page 187 and 188:
〈offset〉 parameter, but using t
- Page 189 and 190:
This has the following effect: When
- Page 191 and 192:
The positioning package also introd
- Page 193 and 194:
For the arc operation, the position
- Page 195 and 196:
0.5 0 0.75 1 \tikz \draw (0,0) .. c
- Page 197 and 198:
s t \tikz [circle] { \node [draw] (
- Page 199 and 200:
q 0 \tikz \node [circle,fill=blue!5
- Page 201 and 202:
(We will discuss the optional apost
- Page 203 and 204:
2. You can also just use (x) as a c
- Page 205 and 206:
As described in Section 16.10.4, th
- Page 207 and 208:
\begin{tikzpicture}[remember pictur
- Page 209 and 210:
17 Specifying Graphs 17.1 Overview
- Page 211 and 212:
oot child 1 child 2 grand child 1 g
- Page 213 and 214:
The library graphs.standard defines
- Page 215 and 216:
out 1 out 5 in in 2 in in out in ou
- Page 217 and 218:
[〈options〉] -!- [〈options〉]
- Page 219 and 220:
slashes, dashes, and more (but spac
- Page 221 and 222:
tikz/graphs/typeset=〈code〉 (no
- Page 223 and 224:
tikz/set=〈set name〉 (no default
- Page 225 and 226:
tikz/graphs/simple (no value) In co
- Page 227 and 228:
is really worthwhile being able to
- Page 229 and 230:
17.5.4 Special Syntax for Options F
- Page 231 and 232:
tikz/graphs/not 〈color class name
- Page 233 and 234:
tikz/graphs/-!- Sets the default ed
- Page 235 and 236:
target vertices since just grouping
- Page 237 and 238:
\newcount\mycount \tikzgraphsset{ l
- Page 239 and 240:
Now, even though we talk about “w
- Page 241 and 242:
9 8 7 % Directions can be changed \
- Page 243 and 244:
tikz/graphs/branch up sep=〈distan
- Page 245 and 246:
1 \tikz \graph [clockwise] { subgra
- Page 247 and 248:
a 0 0 b 0 1.0 c 0 2.0 k 0 4.0 d 1.0
- Page 249 and 250:
17.9 Reference: Predefined Elements
- Page 251 and 252:
tikz/graphs/wrap after=〈number〉
- Page 253 and 254:
f a b \tikz \graph [color class=red
- Page 255 and 256:
18 Matrices and Alignment 18.1 Over
- Page 257 and 258:
Hallo X g \begin{tikzpicture}[every
- Page 259 and 260:
8 11mm 1 6 3 5 7 4 9 2 10mm 10mm 8
- Page 261 and 262:
8 1 - 3 - 7 - - 2 \begin{tikzpictur
- Page 263 and 264:
\begin{tikzpicture}[>=stealth,->,sh
- Page 265 and 266:
\begin{tikzpicture} [auto, decision
- Page 267 and 268:
When you write node {root} child[\p
- Page 269 and 270:
3. Options for all children can be
- Page 271 and 272:
oot \begin{tikzpicture} [level 1/.s
- Page 273 and 274:
tikz/missing=〈true or false〉 (d
- Page 275 and 276:
The edge to parent operation and th
- Page 277 and 278:
20 Plots of Functions 20.1 When Sho
- Page 279 and 280:
Since this case is quite common whe
- Page 281 and 282:
f(x) f(x) = x f(x) = 1 20 ex x f(x)
- Page 283 and 284:
\tikz \draw plot[mark=x,mark indice
- Page 285 and 286:
tikz/const plot mark right A varian
- Page 287 and 288:
The use of bar width and bar shift
- Page 289 and 290:
tikz/very nearly transparent (style
- Page 291 and 292:
tikz/name={〈name〉} (no default)
- Page 293 and 294:
\begin{tikzpicture}[path fading=fad
- Page 295 and 296:
\begin{tikzpicture}[opacity=.5] \dr
- Page 297 and 298:
1. The just-mentioned path morphing
- Page 299 and 300:
depend on the decoration, you will
- Page 301 and 302:
A negative 〈dimension〉 will off
- Page 303 and 304:
23 Transformations pgf has a powerf
- Page 305 and 306:
grids? (It does.) And what about th
- Page 307 and 308:
tikz/rotate=〈degree〉 Rotates th
- Page 309 and 310:
Part IV Graph Drawing by Till Tanta
- Page 311 and 312:
24 Arrow Tip Library \usepgflibrary
- Page 313 and 314:
spaced o yields thick and thin spac
- Page 315 and 316:
25.2 States With and Without Output
- Page 317 and 318:
tikz/intial distance=〈distance〉
- Page 319 and 320:
26 Background Library \usetikzlibra
- Page 321 and 322:
tikz/show background top (style, no
- Page 323 and 324:
28 Calendar Library \usetikzlibrary
- Page 325 and 326:
1 2 3 4 5 6 7 8 9 10 11 12 13 14 15
- Page 327 and 328:
1 2 3 4 5 6 7 8 9 10 11 12 13 14 15
- Page 329 and 330:
1 2 3 4 5 6 7 8 9 10 11 12 13 14 15
- Page 331 and 332:
28.1.4 Creating a Month List Arrang
- Page 333 and 334:
1 2 3 4 5 6 7 8 9 10 11 12 13 14 15
- Page 335 and 336:
28 29 30 31 February 1 2 3 \tikz \c
- Page 337 and 338:
29 30 28 27 26 25 29 3031 28 27 26
- Page 339 and 340:
01 1 2 3 4 5 6 7 8 9 10 11 12 13 14
- Page 341 and 342:
A B C 0 1 2 D \begin{tikzpicture}[s
- Page 343 and 344:
Hello World , this is \begin{tikzpi
- Page 345 and 346:
• The 〈fork node〉 is automati
- Page 347 and 348:
3Ω 1Ω 1Ω 3Ω S 1 ι 4Ω 4Ω 3Ω
- Page 349 and 350:
tikz/circuits (no value) This key s
- Page 351 and 352:
7. The marking decoration will also
- Page 353 and 354:
3Ω 4Ω \begin{tikzpicture}[circuit
- Page 355 and 356:
• You can selectively change the
- Page 357 and 358:
As explained in Section 30.2.6, for
- Page 359 and 360:
Key Appearance inside Appearance in
- Page 361 and 362:
pgf/logic gate anchors use bounding
- Page 363 and 364:
Set the symbol for the not gate. In
- Page 365 and 366:
\usetikzlibrary{circuit.ee.IEC} % L
- Page 367 and 368:
3. You can use info labels like ohm
- Page 369 and 370:
\usetikzlibrary[shapes.gates.ee] %
- Page 371 and 372:
the point (1pt, 0pt) lies at the ri
- Page 373 and 374:
\begin{tikzpicture} \node[name=s,sh
- Page 375 and 376:
Shape break contact IEC This shape
- Page 377 and 378:
This is a hint to the decoration co
- Page 379 and 380:
Decoration bumps This decoration re
- Page 381 and 382:
• angle determines the opening an
- Page 383 and 384:
\tikzset{ show curve controls/.styl
- Page 385 and 386:
1cm from end 1cm mid \begin{tikzpic
- Page 387 and 388:
pgf/decoration/mark connection node
- Page 389 and 390:
Species Result gnome human bird fel
- Page 391 and 392:
travel along the to-be-decorated pa
- Page 393 and 394:
aSome long text alon g /pgf/decorat
- Page 395 and 396:
e /pgf/decoration/text align/center
- Page 397 and 398:
32 Entity-Relationship Diagram Draw
- Page 399 and 400:
33 Externalization Library by Chris
- Page 401 and 402:
tikz/external/system call={〈templ
- Page 403 and 404:
pdflatex -shell-escape main /tikz/e
- Page 405 and 406:
\begin{document} \begin{tikzpicture
- Page 407 and 408:
A mixture is graphics if exists, it
- Page 409 and 410:
{ \pgfkeys{/pgf/images/include exte
- Page 411 and 412:
\tikzset{ % Defines a custom style
- Page 413 and 414:
34 Fading Library \usepgflibrary{fa
- Page 415 and 416:
ox \begin{tikzpicture}[inner sep=0p
- Page 417 and 418:
36 Fixed Point Arithmetic Library \
- Page 419 and 420:
37 Floating Point Unit Library by C
- Page 421 and 422:
\pgfmathfloatparsenumber{0} \pgfmat
- Page 423 and 424:
It’s not zero!It’s positive!It
- Page 425 and 426:
\pgfmathfloattoextentedprecision{
- Page 427 and 428:
38 Lindenmayer System Drawing Libra
- Page 429 and 430:
Randomizes the value in \pgflsystem
- Page 431 and 432:
\tikz[rotate=65]\draw [green!60!bla
- Page 433 and 434:
3. If your cell starts with a \path
- Page 435 and 436:
⎛ ⎜ ⎝ a 8 a 1 a 6 a 3 a 5 a 7
- Page 437 and 438:
Root concept Child concept \tikz[la
- Page 439 and 440:
\tikz [root concept/.append style={
- Page 441 and 442:
child Root concept child child \beg
- Page 443 and 444:
Note that it is not a good idea to
- Page 445 and 446:
Root concept The root concept is, i
- Page 447 and 448:
\begin{tikzpicture}[every cut/.styl
- Page 449 and 450:
\sffamily\scriptsize \begin{tikzpic
- Page 451 and 452:
43 Petri-Net Drawing Library \useti
- Page 453 and 454:
p 2 1 2 2 1 \begin{tikzpicture} \no
- Page 455 and 456:
\begin{tikzpicture}[yscale=-1.6,xsc
- Page 457 and 458:
x y z \begin{tikzpicture} \draw[gra
- Page 459 and 460:
\pgfplothandlerycomb This handler c
- Page 461 and 462:
In more detail, if (x i , y i ) and
- Page 463 and 464:
example, if you provide the list 1,
- Page 465 and 466:
45 Plot Mark Library \usepgflibrary
- Page 467 and 468:
46 Profiler Library by Christian Fe
- Page 469 and 470:
\pgfprofilenewforenvironment[〈pro
- Page 471 and 472:
tikz/ball color=〈color〉 (no def
- Page 473 and 474:
48 Shadows Library \usepgflibrary{s
- Page 475 and 476:
Furthermore, the options fill=〈fi
- Page 477 and 478:
49 Shape Library 49.1 Overview In a
- Page 479 and 480:
(s.north) (s.130) (s.north west) (s
- Page 481 and 482:
height width \begin{tikzpicture}[>=
- Page 483 and 484:
\begin{tikzpicture} \foreach \a in
- Page 485 and 486:
The pgf keys to set the number of s
- Page 487 and 488:
(s.left corner) (s.north west) (s.1
- Page 489 and 490:
tip angle dart tail angle \begin{ti
- Page 491 and 492:
(s.arc start) (s.north west) (s.nor
- Page 493 and 494:
\Huge \begin{tikzpicture} \node[nam
- Page 495 and 496:
(s.puff 2) (s.puff 1) (s.north) (s.
- Page 497 and 498:
\Huge \begin{tikzpicture} \node[nam
- Page 499 and 500:
take opposite bend styles, but the
- Page 501 and 502:
(s.before tip) (s.north east) (s.af
- Page 503 and 504:
A B \begin{tikzpicture} \node[arrow
- Page 505 and 506:
\Huge \begin{tikzpicture} \node[sha
- Page 507 and 508:
(s.north) (s.130) (s.north west) (s
- Page 509 and 510:
will be met, but any minimum width
- Page 511 and 512:
(s.north west) (s.north) (s.70) (s.
- Page 513 and 514:
The anchors for this shape are show
- Page 515 and 516:
Sets the size of the last ellipse i
- Page 517 and 518:
pgf/rounded rectangle arc length=
- Page 519 and 520:
(s.before north west) (s.north) (s.
- Page 521 and 522:
2. Alternatively, you specify the s
- Page 523 and 524:
must then use keys like minimum siz
- Page 525 and 526:
\begin{tikzpicture} [spy scope={mag
- Page 527 and 528:
52 To Path Library \usetikzlibrary{
- Page 529 and 530:
\begin{tikzpicture} \foreach \angle
- Page 531 and 532:
tikz/every loop This style is insta
- Page 533 and 534:
54 Tree Library \usetikzlibrary{tre
- Page 535 and 536:
54.2 Edges From Parent The followin
- Page 537 and 538:
tikz/turtle/left=〈angle〉 (defau
- Page 539 and 540:
56 Introduction to Data Visualizati
- Page 541 and 542:
57 Creating Data Visualizations 57.
- Page 543 and 544:
2 1.5 1 0.5 0 −1 0 1 \begin{tikzp
- Page 545 and 546:
Second, you use an option to select
- Page 547 and 548:
• data group [〈options〉] {〈
- Page 549 and 550:
tikz/data visualization/at start su
- Page 551 and 552:
58 Providing Data for a Data Visual
- Page 553 and 554:
in the list. Indeed, the \foreach s
- Page 555 and 556:
58.5 Advanced: The Data Parsing Pro
- Page 557 and 558:
58.6 Advanced: Defining New Formats
- Page 559 and 560:
59 Axes 59.1 Overview When a data p
- Page 561 and 562:
59.2.3 The Axis Attribute Range Int
- Page 563 and 564:
kind of transformation: For example
- Page 565 and 566:
30 \tikz \datavisualization [scient
- Page 567 and 568:
As an example, suppose that you hav
- Page 569 and 570:
• The x-values are surveyed and t
- Page 571 and 572:
cos d 1.0000 0.9975 0.9950 0.9925 0
- Page 573 and 574:
\begin{tikzpicture} \datavisualizat
- Page 575 and 576:
\tikz \datavisualization [scientifi
- Page 577 and 578:
Linear steps. Let us start with lin
- Page 579 and 580:
10 7.5 5 2.5 0 about= 5 20 15 10 5
- Page 581 and 582:
It is often a bit cumbersome that o
- Page 583 and 584:
4. locally specified options for th
- Page 585 and 586:
tikz/data visualization/every ticks
- Page 587 and 588:
tikz/data visualization/tick suffix
- Page 589 and 590:
ticks={major at={1,2,3,4}, major at
- Page 591 and 592:
tikz/data visualization/axis option
- Page 593 and 594:
\tikz \datavisualization data group
- Page 595 and 596:
By default, low=min and high=max ar
- Page 597 and 598:
the visualize grid command twice, o
- Page 599 and 600:
always be a short straight line - e
- Page 601 and 602:
59.5.5 Visualizing the Axis Labels
- Page 603 and 604:
\tikz \datavisualization [ our syst
- Page 605 and 606:
Methods for styling visualizers are
- Page 607 and 608:
1 \tikz \datavisualization [scienti
- Page 609 and 610:
data point/outlier=〈value〉 (def
- Page 611 and 612:
60.4 Advanced: Creating New Visuali
- Page 613 and 614:
2.5 \tikz \datavisualization [ scie
- Page 615 and 616:
2 1 \tikz \datavisualization [ scho
- Page 617 and 618:
As an example, suppose we wish to c
- Page 619 and 620:
61.4.3 Creating a New Color Style S
- Page 621 and 622:
This style alternates between varyi
- Page 623 and 624:
0.15 1 \tikz \datavisualization [ s
- Page 625 and 626:
2 x 2 1 x/2 e x −2 −1 0 1 2 −
- Page 627 and 628:
3 2.5 2 1.5 1 0.5 0 2x x 2 x 3 0 0.
- Page 629 and 630:
tikz/data visualization/legend=〈o
- Page 631 and 632:
tikz/data visualization/legend opti
- Page 633 and 634:
tikz/data visualization/legend opti
- Page 635 and 636:
tikz/data visualization/legend opti
- Page 637 and 638:
2 1 0 −1 log x x/2 −2 −1 0 1
- Page 639 and 640:
tikz/data visualization/legend entr
- Page 641 and 642:
As indicated earlier, the new legen
- Page 643 and 644:
This key is similar to label in leg
- Page 645 and 646:
tikz/data visualization/legend entr
- Page 647 and 648:
Part VII Utilities by Till Tantau T
- Page 649 and 650:
There are numerous handlers for def
- Page 651 and 652:
1. A command is executed whose argu
- Page 653 and 654:
’foo’ bar \pgfkeys{ /handlers/f
- Page 655 and 656:
63.3.4 Keys That Store Values Let u
- Page 657 and 658:
You can set up unknown key handlers
- Page 659 and 660:
\pgfkeys{/par indent/.code={\parind
- Page 661 and 662:
Key handler 〈key〉/.estyle args=
- Page 663 and 664:
\pgfkeys{/line cap/.is choice} \pgf
- Page 665 and 666:
\pgfkeys{/path/.unknown/.code={% \i
- Page 667 and 668:
63.6 Key Filtering An extension by
- Page 669 and 670:
Key handler 〈key〉/.install key
- Page 671 and 672:
\pgfqkeysactivatefamiliesandfiltero
- Page 673 and 674:
〈3 〉 The key is handled (for ex
- Page 675 and 676:
Normally, when a list item ... is e
- Page 677 and 678:
10 11 12 1 2 9 3 8 7 6 5 4 \begin{t
- Page 679 and 680:
65 Date and Calendar Utility Macros
- Page 681 and 682:
• at most=〈reference〉 as abov
- Page 683 and 684:
\pgfcalendar{cal}{2007-01-20}{2007-
- Page 685 and 686:
66 Page Management This section des
- Page 687 and 688:
• physical paper height=〈size
- Page 689 and 690:
At some point, enough logical pages
- Page 691 and 692:
• border shrink=〈size〉 specif
- Page 693 and 694:
68 Parser Module \usepgfmodule{pars
- Page 695 and 696:
69 Design Principles pgf needs to p
- Page 697 and 698:
\pgfmathpostparse At the end of the
- Page 699 and 700:
{x} (array operators) These operato
- Page 701 and 702:
pow(x,y) \pgfmathpow{x}{y} Raises x
- Page 703 and 704:
\pgfmathfrac{x} Returns the fractio
- Page 705 and 706:
acos(x) \pgfmathacos{x} Arccosine o
- Page 707 and 708:
\pgfmathrandom{x,y} This function t
- Page 709 and 710:
depth("x") \pgfmathdepth{"x"} Retur
- Page 711 and 712:
\pgfmathsetseed{〈integer〉} Expl
- Page 713 and 714:
For functions with more than nine a
- Page 715 and 716:
See section 74.1 for how to change
- Page 717 and 718:
pgf/number format/fixed relative (n
- Page 719 and 720:
If you still experience stability p
- Page 721 and 722:
pgf/number format/use comma (no val
- Page 723 and 724:
pgf/number format/verbatim (style,
- Page 725 and 726:
This command defines a class named
- Page 727 and 728:
\pgfooclass{stamp}{ % This is the c
- Page 729 and 730:
75.7 Identities Every object has a
- Page 731 and 732:
75.9 Implementation Notes For the c
- Page 733 and 734:
76 Design Principles This section d
- Page 735 and 736:
77 Hierarchical Structures: Package
- Page 737 and 738:
77.2.2 The Modules \usepgflibrary{
- Page 739 and 740:
〈environment contents〉 \endpgfp
- Page 741 and 742:
An example application of this envi
- Page 743 and 744:
pgf/text/bottom This key causes the
- Page 745 and 746:
\pgfsetxvec{〈point〉} Sets that
- Page 747 and 748:
\pgfpointdiff{〈start〉}{〈end
- Page 749 and 750:
\begin{tikzpicture} \draw[help line
- Page 751 and 752:
\pgfintersectionsortbysecondpath Us
- Page 753 and 754:
79 Constructing Paths 79.1 Overview
- Page 755 and 756:
typically be quite a bit too large.
- Page 757 and 758:
\pgfpatharcto{〈x-radius〉}{〈y-
- Page 759 and 760:
79.7 Rectangle Path Operations Anot
- Page 761 and 762:
\begin{tikzpicture} \draw[help line
- Page 763 and 764:
\pgf@picminx The minimum x-coordina
- Page 765 and 766:
• The output path refers to the p
- Page 767 and 768:
\pgfdeclaredecoration{example}{init
- Page 769 and 770:
\pgfdecoratedinputsegmentlength The
- Page 771 and 772:
contents〉 until the 〈length〉
- Page 773 and 774:
\endpgfdecoration The plain-TEX ver
- Page 775 and 776:
\pgfmetadecoratedcompleteddistance
- Page 777 and 778:
81 Using Paths 81.1 Overview Once a
- Page 779 and 780:
Use \pgfsetdash{}{0pt} to get a sol
- Page 781 and 782:
when such “double lines” are pr
- Page 783 and 784:
82 Arrow Tips 82.1 Overview 82.1.1
- Page 785 and 786:
• Inside the code, you may not us
- Page 787 and 788:
The following example shows how thi
- Page 789 and 790:
\pgfarrowsdeclarecombine*[〈offset
- Page 791 and 792:
83 Nodes and Shapes This section de
- Page 793 and 794:
anchored, but you do not wish the s
- Page 795 and 796:
pgf/outer ysep=〈dimension〉 alia
- Page 797 and 798:
Hello World! \begin{pgfpicture} \pg
- Page 799 and 800:
pgf/local bounding box=〈node name
- Page 801 and 802:
The net effect of the 〈code〉 sh
- Page 803 and 804:
\makeatletter \def\foo{foo} \pgfdec
- Page 805 and 806:
The following example shows how a s
- Page 807 and 808:
Specifying the cells and rows. spec
- Page 809 and 810:
• You can now use the optional ar
- Page 811 and 812:
85 Coordinate and Canvas Transforma
- Page 813 and 814:
\begin{tikzpicture} \draw[help line
- Page 815 and 816:
\pgftransformarcaxesattime{〈time
- Page 817 and 818:
Unlike the coordinate transformatio
- Page 819 and 820:
86 Patterns 86.1 Overview There are
- Page 821 and 822:
\pgfdeclarepatterninherentlycolored
- Page 823 and 824:
\pgfdeclareimage[interpolate=true,h
- Page 825 and 826:
%% Draw a large colorful background
- Page 827 and 828:
% In file main.tex: ... As we see i
- Page 829 and 830:
As a final remark, note that the ba
- Page 831 and 832:
% This is the file survey.tex \docu
- Page 833 and 834:
89 Creating Plots This section desc
- Page 835 and 836:
\begin{tikzpicture}[y=3cm/360] \pgf
- Page 837 and 838:
90 Layered Graphics 90.1 Overview p
- Page 839 and 840:
91 Shadings 91.1 Overview A shading
- Page 841 and 842:
Conceptually, the function will be
- Page 843 and 844:
also scaled such that the shading
- Page 845 and 846:
As a final example, let us define a
- Page 847 and 848:
\pgfdeclarefading{〈name〉}{〈co
- Page 849 and 850:
\begin{pgftransparencygroup} 〈env
- Page 851 and 852:
Internal openin handle \r@pgf@reada
- Page 853 and 854:
\begin{tikzpicture} \draw[help line
- Page 855 and 856:
Part X The System Layer by Till Tan
- Page 857 and 858:
96 Commands of the System Layer 96.
- Page 859 and 860:
96.3 Canvas Transformation System C
- Page 861 and 862:
\pgfsys@miterjoin Sets the join to
- Page 863 and 864:
\pgfsys@color@reset@inordertrue Set
- Page 865 and 866:
\pgfsys@functionalshading{〈name
- Page 867 and 868:
• a \pgfpoint... command. The fir
- Page 869 and 870:
\pgfsyssoftpath@getcurrentpath{〈m
- Page 871 and 872:
98 The Protocol Subsystem This sect
- Page 873 and 874:
Index This index only contains auto
- Page 875 and 876:
label key, 180 label distance key,
- Page 877 and 878:
’, 177 >, 144 above, 169, 170 abo
- Page 879 and 880:
matrix anchor, 243 mid left, 174 mi