Tassels supply the finishing touch - Bead and Button Magazine
Tassels supply the finishing touch - Bead and Button Magazine
Tassels supply the finishing touch - Bead and Button Magazine

Create successful ePaper yourself
Turn your PDF publications into a flip-book with our unique Google optimized e-Paper software.
a<br />
materials<br />
all tassels<br />
• Seed beads, Japanese cylinder beads,<br />
triangle beads, hex cuts, etc.<br />
• Silamide or Nymo D to match bead color<br />
• <strong>Bead</strong>ing needles, #10 or 12<br />
• Skeins of rayon, silk, or o<strong>the</strong>r smooth, soft<br />
fibers (see “sources”)<br />
• Stiff cardboard or Tatool tassel loom<br />
(see “sources”)<br />
rolled-bead tassel heads<br />
• Tassel molds, large-holed wood beads, or<br />
small turned-wood shapes (see “sources”)<br />
• E6000 glue or Terrifically Tacky Tape<br />
(see “sources”)<br />
b<br />
c<br />
<strong>the</strong> midpoint between <strong>the</strong> knotted ends,<br />
hold it, <strong>and</strong> bring <strong>the</strong> two knotted ends<br />
toge<strong>the</strong>r. Slip <strong>the</strong> end off <strong>the</strong> doorknob,<br />
<strong>and</strong> let go of <strong>the</strong> midpoint. The yarn will<br />
twist around itself, forming a decorative<br />
cord (photo c). Knot each end of <strong>the</strong><br />
doubled cord to keep it from untwisting.<br />
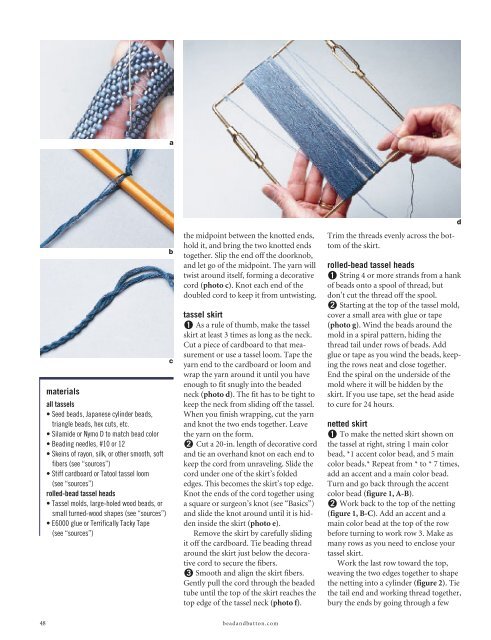
tassel skirt<br />
As a rule of thumb, make <strong>the</strong> tassel<br />
skirt at least 3 times as long as <strong>the</strong> neck.<br />
Cut a piece of cardboard to that measurement<br />
or use a tassel loom. Tape <strong>the</strong><br />
yarn end to <strong>the</strong> cardboard or loom <strong>and</strong><br />
wrap <strong>the</strong> yarn around it until you have<br />
enough to fit snugly into <strong>the</strong> beaded<br />
neck (photo d). The fit has to be tight to<br />
keep <strong>the</strong> neck from sliding off <strong>the</strong> tassel.<br />
When you finish wrapping, cut <strong>the</strong> yarn<br />
<strong>and</strong> knot <strong>the</strong> two ends toge<strong>the</strong>r. Leave<br />
<strong>the</strong> yarn on <strong>the</strong> form.<br />
Cut a 20-in. length of decorative cord<br />
<strong>and</strong> tie an overh<strong>and</strong> knot on each end to<br />
keep <strong>the</strong> cord from unraveling. Slide <strong>the</strong><br />
cord under one of <strong>the</strong> skirt’s folded<br />
edges. This becomes <strong>the</strong> skirt’s top edge.<br />
Knot <strong>the</strong> ends of <strong>the</strong> cord toge<strong>the</strong>r using<br />
a square or surgeon’s knot (see “Basics”)<br />
<strong>and</strong> slide <strong>the</strong> knot around until it is hidden<br />
inside <strong>the</strong> skirt (photo e).<br />
Remove <strong>the</strong> skirt by carefully sliding<br />
it off <strong>the</strong> cardboard. Tie beading thread<br />
around <strong>the</strong> skirt just below <strong>the</strong> decorative<br />
cord to secure <strong>the</strong> fibers.<br />
Smooth <strong>and</strong> align <strong>the</strong> skirt fibers.<br />
Gently pull <strong>the</strong> cord through <strong>the</strong> beaded<br />
tube until <strong>the</strong> top of <strong>the</strong> skirt reaches <strong>the</strong><br />
top edge of <strong>the</strong> tassel neck (photo f).<br />
Trim <strong>the</strong> threads evenly across <strong>the</strong> bottom<br />
of <strong>the</strong> skirt.<br />
d<br />
rolled-bead tassel heads<br />
String 4 or more str<strong>and</strong>s from a hank<br />
of beads onto a spool of thread, but<br />
don’t cut <strong>the</strong> thread off <strong>the</strong> spool.<br />
Starting at <strong>the</strong> top of <strong>the</strong> tassel mold,<br />
cover a small area with glue or tape<br />
(photo g). Wind <strong>the</strong> beads around <strong>the</strong><br />
mold in a spiral pattern, hiding <strong>the</strong><br />
thread tail under rows of beads. Add<br />
glue or tape as you wind <strong>the</strong> beads, keeping<br />
<strong>the</strong> rows neat <strong>and</strong> close toge<strong>the</strong>r.<br />
End <strong>the</strong> spiral on <strong>the</strong> underside of <strong>the</strong><br />
mold where it will be hidden by <strong>the</strong><br />
skirt. If you use tape, set <strong>the</strong> head aside<br />
to cure for 24 hours.<br />
netted skirt<br />
To make <strong>the</strong> netted skirt shown on<br />
<strong>the</strong> tassel at right, string 1 main color<br />
bead, *1 accent color bead, <strong>and</strong> 5 main<br />
color beads.* Repeat from * to * 7 times,<br />
add an accent <strong>and</strong> a main color bead.<br />
Turn <strong>and</strong> go back through <strong>the</strong> accent<br />
color bead (figure 1, A-B).<br />
Work back to <strong>the</strong> top of <strong>the</strong> netting<br />
(figure 1, B-C). Add an accent <strong>and</strong> a<br />
main color bead at <strong>the</strong> top of <strong>the</strong> row<br />
before turning to work row 3. Make as<br />
many rows as you need to enclose your<br />
tassel skirt.<br />
Work <strong>the</strong> last row toward <strong>the</strong> top,<br />
weaving <strong>the</strong> two edges toge<strong>the</strong>r to shape<br />
<strong>the</strong> netting into a cylinder (figure 2). Tie<br />
<strong>the</strong> tail end <strong>and</strong> working thread toge<strong>the</strong>r,<br />
bury <strong>the</strong> ends by going through a few<br />
48 bead<strong>and</strong>button.com