You also want an ePaper? Increase the reach of your titles
YUMPU automatically turns print PDFs into web optimized ePapers that Google loves.
y<br />
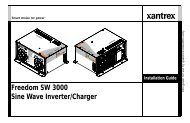
<strong>XPower</strong> <strong>Inverter</strong> <strong>400</strong><br />
t 1-800-670-0707 (toll free in North America)<br />
1-360-925-5097 (direct)<br />
f 1-800-994-7828 (toll free in North America)<br />
1-360-925-5143 (direct)<br />
e CustomerService@xantrex.com<br />
www.xantrex.com<br />
975-0164-01-01 REV A Printed in China<br />
Owner’s Guide
y<br />
<strong>XPower</strong> <strong>Inverter</strong> <strong>400</strong><br />
Owner’s Guide
About <strong>Xantrex</strong><br />
<strong>Xantrex</strong> Technology Inc. is a world-leading supplier of advanced power electronics and<br />
controls with products from 50 watt mobile units to one MW utility-scale systems for<br />
wind, solar, batteries, fuel cells, microturbines, and backup power applications in both<br />
grid-connected and stand-alone systems. <strong>Xantrex</strong> products include inverters, battery<br />
chargers, programmable power supplies, and variable speed drives that convert, supply,<br />
control, clean, and distribute electrical power.<br />
Trademarks<br />
<strong>XPower</strong> <strong>Inverter</strong> <strong>400</strong> is a trademark of <strong>Xantrex</strong> International. <strong>Xantrex</strong> is a registered<br />
trademark of <strong>Xantrex</strong> International.<br />
Other trademarks, registered trademarks, and product names are the property of their<br />
respective owners and are used herein for identification purposes only.<br />
Notice of Copyright<br />
<strong>XPower</strong> <strong>Inverter</strong> <strong>400</strong> Owner’s Guide © July 2004 <strong>Xantrex</strong> International. All rights<br />
reserved.<br />
Disclaimer<br />
UNLESS SPECIFICALLY AGREED TO IN WRITING, XANTREX TECHNOLOGY INC. (“XANTREX”)<br />
(a) MAKES NO WARRANTY AS TO THE ACCURACY, SUFFICIENCY OR SUITABILITY OF ANY<br />
TECHNICAL OR OTHER INFORMATION PROVIDED IN ITS MANUALS OR OTHER DOCUMENTATION.<br />
(b) ASSUMES NO RESPONSIBILITY OR LIABILITY FOR LOSS OR DAMAGE, WHETHER DIRECT,<br />
INDIRECT, CONSEQUENTIAL OR INCIDENTAL, WHICH MIGHT ARISE OUT OF THE USE OF SUCH<br />
INFORMATION. THE USE OF ANY SUCH INFORMATION WILL BE ENTIRELY AT THE USER’S RISK.<br />
Date and Revision<br />
July 2004 Revision A<br />
Part Number<br />
975-0164-01-01<br />
Contact Information<br />
Telephone: 1 800 670 0707 (toll free North America)<br />
1 360 925 5097 (direct)<br />
Fax: 1 800 994 7828 (toll free North America)<br />
1 360 925 5143 (direct)<br />
Email: customerservice@xantrex.com<br />
Web: www.xantrex.com
Contents<br />
1. Introduction . . . . . . . . . . . . . . . . . . . . . . . . . . . . . . . . . . . . . . . . . . 1<br />
About the <strong>Inverter</strong> . . . . . . . . . . . . . . . . . . . . . . . . . . . . . . . . . . . . . 1<br />
About this Guide . . . . . . . . . . . . . . . . . . . . . . . . . . . . . . . . . . . . . . 2<br />
2. Important Safety Information. . . . . . . . . . . . . . . . . . . . . . . . . . . . 3<br />
Warnings and Cautions . . . . . . . . . . . . . . . . . . . . . . . . . . . . . . . . . 3<br />
Additional safety guidelines . . . . . . . . . . . . . . . . . . . . . . . . . . . . . 5<br />
3. <strong>Inverter</strong> Features . . . . . . . . . . . . . . . . . . . . . . . . . . . . . . . . . . . . . . 6<br />
AC (front) panel . . . . . . . . . . . . . . . . . . . . . . . . . . . . . . . . . . . . . . 6<br />
DC (back) panel . . . . . . . . . . . . . . . . . . . . . . . . . . . . . . . . . . . . . . . 7<br />
Digital display (top) panel . . . . . . . . . . . . . . . . . . . . . . . . . . . . . . . 8<br />
Types of connections . . . . . . . . . . . . . . . . . . . . . . . . . . . . . . . . . . 10<br />
Accessories . . . . . . . . . . . . . . . . . . . . . . . . . . . . . . . . . . . . . . . . . 10<br />
4. Connecting the <strong>Inverter</strong>. . . . . . . . . . . . . . . . . . . . . . . . . . . . . . . . 11<br />
Choosing a location . . . . . . . . . . . . . . . . . . . . . . . . . . . . . . . . . . . 11<br />
Connecting for loads under 150 W . . . . . . . . . . . . . . . . . . . . . . . 12<br />
Connecting for loads over 150 W . . . . . . . . . . . . . . . . . . . . . . . . 13
5. Operating the <strong>Inverter</strong> . . . . . . . . . . . . . . . . . . . . . . . . . . . . . . . . .16<br />
Operating conditions and guidelines . . . . . . . . . . . . . . . . . . . . . 16<br />
Shutting the inverter off . . . . . . . . . . . . . . . . . . . . . . . . . . . . . . 17<br />
Operating normal loads. . . . . . . . . . . . . . . . . . . . . . . . . . . . . . . 17<br />
Operating loads with high surge requirements . . . . . . . . . . . . . 18<br />
6. Maintaining Battery Condition . . . . . . . . . . . . . . . . . . . . . . . . . .20<br />
7. Troubleshooting. . . . . . . . . . . . . . . . . . . . . . . . . . . . . . . . . . . . . . .22<br />
Common problems . . . . . . . . . . . . . . . . . . . . . . . . . . . . . . . . . . . 23<br />
Buzz in audio systems. . . . . . . . . . . . . . . . . . . . . . . . . . . . . . . . 23<br />
Television interference . . . . . . . . . . . . . . . . . . . . . . . . . . . . . . . 23<br />
Troubleshooting reference . . . . . . . . . . . . . . . . . . . . . . . . . . . . . 24<br />
8. Specifications . . . . . . . . . . . . . . . . . . . . . . . . . . . . . . . . . . . . . . . . .28<br />
9. Warranty and Return. . . . . . . . . . . . . . . . . . . . . . . . . . . . . . . . . .29
1 Introduction<br />
About the <strong>Inverter</strong><br />
Connected to the 12 V outlet in your car, truck, boat, RV, or directly<br />
from a dedicated 12 V battery, the <strong>XPower</strong> <strong>Inverter</strong> <strong>400</strong> efficiently and<br />
reliably powers a wide variety of household AC products, such as<br />
portable stereos, laptop computers, TVs, VCRs, and other similar<br />
products.<br />
The inverter uses reliable solid state power electronics for years of safe,<br />
trouble-free operation and includes the following automatic features to<br />
ensure safe and trouble-free operation:<br />
• Low battery alarm<br />
• Low voltage shutdown<br />
• High voltage shutdown<br />
• Overload shutdown<br />
• Overheating shutdown<br />
• Short-circuit protection<br />
1
About this Guide<br />
To get the best performance from your inverter, we recommend that you<br />
read this guide before connecting and using the inverter, and then save it<br />
for future reference.<br />
This guide contains:<br />
• Important safety information (page 3)<br />
• Instructions for connecting the inverter (page 11)<br />
• Operating guidelines (page 16)<br />
• Troubleshooting guidelines (page 22)<br />
• Specifications (page 28)<br />
2
2 Important Safety Information<br />
Misusing or incorrectly connecting the <strong>XPower</strong> <strong>Inverter</strong> <strong>400</strong> may<br />
damage the equipment or create hazardous conditions for users. Read<br />
the following safety instructions and pay special attention to all Caution<br />
and Warning statements in the guide.<br />
Warnings identify conditions that may result in personal injury or loss<br />
of life.<br />
Cautions identify conditions or practices that may damage the unit or<br />
other equipment.<br />
Warnings and Cautions<br />
WARNING: Shock hazard<br />
Keep children away from the inverter. The inverter generates the same<br />
lethal AC power as a normal household wall outlet. Treat the outlet with<br />
respect!<br />
WARNING: Heated surface<br />
The inverter housing may become uncomfortably warm, reaching 60°C<br />
(140°F) under extended high power operation. Ensure that at least 2" (5<br />
cm) of air surround the inverter. During operation, keep it away from<br />
materials that may be affected by high temperatures.<br />
3
WARNING: Explosion hazard<br />
Do not use the inverter in the presence of flammable fumes or gases,<br />
such as in the bilge of a gasoline-powered boat, or near propane tanks.<br />
Do not use the inverter in an enclosure containing automotive-type,<br />
lead-acid batteries. These batteries, unlike sealed batteries, vent<br />
explosive hydrogen gas, which can be ignited by sparks from electrical<br />
connections.<br />
WARNING: Crash hazard<br />
Vehicle drivers should not configure or troubleshoot the inverter while<br />
they are driving the vehicle.<br />
CAUTION: Output non-sinusoidal<br />
Some chargers for small nickel-cadmium batteries can be damaged if<br />
connected to the inverter. Do not use the inverter with the following<br />
equipment:<br />
• Small battery-operated appliances like rechargeable flashlights,<br />
some rechargeable shavers, and night lights that are plugged directly<br />
into an AC receptacle to recharge.<br />
• Battery chargers used in power tools. These chargers display a<br />
warning label stating that dangerous voltages are present at the<br />
charger battery terminals.<br />
4
CAUTION<br />
Do not connect live AC power to the inverter’s AC outlets. The inverter<br />
will be damaged even if it is turned off.<br />
Do not connect any AC load that has its neutral conductor connected to<br />
ground to the inverter.<br />
Additional safety guidelines<br />
• Do not insert foreign objects in the inverter outlets or ventilation<br />
openings.<br />
• Never connect the inverter to power utility AC distribution wiring.<br />
• Do not use the inverter in temperatures over 104°F (40°C).<br />
• Do not expose the inverter to water, rain, snow, or spray.<br />
Failure to follow these safety guidelines may cause personal injury and/<br />
or damage to the inverter. It may also void your product warranty.<br />
5
3 <strong>Inverter</strong> Features<br />
This section describes the main features of the <strong>XPower</strong> <strong>Inverter</strong> <strong>400</strong>.<br />
CAUTION<br />
To prevent overheating, ensure that all the ventilation openings on the<br />
unit are kept clear.<br />
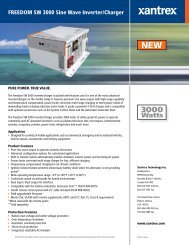
AC (front) panel<br />
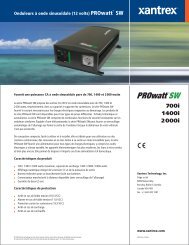
Figure 1 shows the AC panel of the inverter.<br />
Figure 1 AC Panel<br />
Two AC receptacles are located on one end of the inverter. You can plug<br />
in 120 V appliances with a combined total continuous power<br />
consumption of up to <strong>400</strong> W.<br />
6
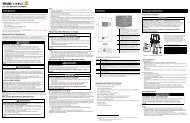
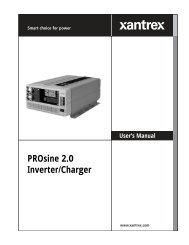
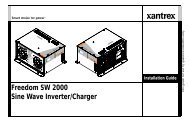
DC (back) panel<br />
Figure 2 shows the DC panel of the inverter. Use Table 1 to identify the<br />
function of each item.<br />
2B<br />
2A<br />
1<br />
Figure 2 DC Panel<br />
Table 1 DC Panel Functions<br />
Item<br />
Function<br />
1 Fan and Ventilation Openings<br />
The cooling fan on the unit is designed to operate only when output<br />
power is greater than approximately 80 W. When the inverter is turned<br />
on, the fan may operate momentarily. The ventilation openings should<br />
not be covered at any time while the inverter is operating.<br />
2 A) Positive and B) Negative Cabling Terminals<br />
Connect the ring terminals on the power cables to these terminals. To<br />
ensure correct polarity, red must be connected to red and black must be<br />
connected to black.<br />
7
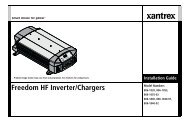
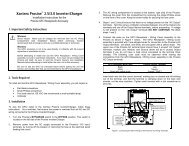
Digital display (top) panel<br />
Figure 3 shows the digital display panel. Use Table 2 to identify the<br />
function of items.<br />
3<br />
2<br />
1<br />
Figure 3 Digital Display Panel<br />
8
Table 2 Digital Display Panel Functions<br />
Item<br />
Function<br />
1 Press and hold to turn the unit on and off.<br />
When the unit is on, press to toggle the display function to show input<br />
voltage, output power or output voltage.<br />
2 Normal Operation<br />
Digital display shows input voltage, output power or output voltage.<br />
Error Mode<br />
Digital display shows error codes and alarm sounds when unit has<br />
shut down due to under-voltage, over-voltage, over-load, overheating<br />
or high-surge.<br />
3 LEDs indicate the status of the digital display.<br />
Audible Alarm<br />
An audible alarm warns you if an under-voltage shutdown is about to<br />
occur.<br />
9
Types of connections<br />
The inverter comes with accessories for making two types of<br />
connections:<br />
• For AC loads of 150 W or less: Lighter plug cable to connect the<br />
inverter to a 12 V outlet in your vehicle. See Figure 4.<br />
• For AC loads up to <strong>400</strong> W: Cable clamps to connect the inverter<br />
directly to a dedicated 12 V battery. See Figure 5.<br />
Accessories<br />
Figure 4 Lighter Plug Cable<br />
Figure 5 Cable for Direct Connection to 12 V Battery<br />
10
4 Connecting the <strong>Inverter</strong><br />
CAUTION<br />
The inverter must only be connected to a battery that has a nominal<br />
output of 12 V. It will not operate if connected to a 6 V battery and may<br />
be damaged if connected to a battery with 16 V or more.<br />
Choosing a location<br />
For best performance, place the inverter on a flat surface in a location<br />
that is:<br />
Dry<br />
Do not expose the inverter to water, rain, snow or spray.<br />
Cool Operate the inverter in ambient temperatures between 0°C<br />
and 40°C (32°F and 100°F). Keep it away from heating<br />
vents and direct sunlight.<br />
Well-ventilated<br />
Clean and free<br />
of dust and dirt<br />
Safe<br />
For proper cooling, allow at least 2" (5 cm) of clearance<br />
around the inverter.<br />
Choose a location that is free of any debris that could get<br />
into the inverter.<br />
Do not install the inverter in a compartment with batteries<br />
or flammable liquids, such as gasoline, or explosive vapors.<br />
11
Connecting for loads under 150 W<br />
For loads under 150 W, you can use the lighter plug cable.<br />
Follow these steps to connect the unit with the lighter plug cable:<br />
1. Place the inverter on a flat surface such as the floor of your vehicle.<br />
2. Make sure that the unit is off by verifying the digital display is off.<br />
3. Connect the ring terminals on the lighter plug cable to the cabling<br />
terminals on the unit. (The cabling terminals are shown in Figure<br />
2.) Fasten the positive (red) ring terminal to the positive cabling<br />
terminal, and then fasten the negative (black) ring terminal to the<br />
negative cabling terminal.<br />
CAUTION: Reverse polarity<br />
Power connections of the 12 V DC battery to the inverter must be<br />
positive to positive and negative to negative.<br />
A reverse polarity connection (positive to negative) will blow a fuse in<br />
the inverter and may permanently damage the unit. Damage caused by a<br />
reverse polarity connection is not covered by your warranty.<br />
CAUTION<br />
Make sure you connect red to red and black to black, and make sure you<br />
screw the nuts on tightly.<br />
12
4. Tighten the nut on each cabling terminal until it is snug. Do not<br />
over-tighten.<br />
5. Place the inverter’s lighter plug in the vehicle’s lighter socket or a<br />
12 V outlet.<br />
6. Turn on the unit by holding the switch located on top of the unit<br />
until 888 is shown on the display.<br />
The digital display will show the battery voltage, indicating that the<br />
inverter is operating normally and AC power is available at the<br />
outlet.<br />
7. Plug in the AC product you want to operate.<br />
8. When not in use, always turn the inverter off by holding the switch<br />
until the digital display turns off.<br />
Connecting for loads over 150 W<br />
To operate loads greater than 150 W continuously, you must connect the<br />
unit directly to a 12 V battery using the DC cable clamps. When the<br />
inverter is connected this way, you can operate loads of up to <strong>400</strong> W.<br />
WARNING: Shock hazard<br />
Batteries contain corrosive materials and present an electrical shock<br />
hazard. To prevent irritation and burns, wear protective eyewear and<br />
clothing when you install the inverter or work with the batteries. Take<br />
special care to ensure that metal tools and personal metal objects like<br />
rings and bracelets do not contact the battery terminals.<br />
13
Follow these steps to make a direct battery connection:<br />
1. Place the inverter on a flat surface.<br />
2. Make sure that the unit is off by verifying the digital display is off.<br />
CAUTION: Reverse polarity<br />
Power connections of the 12 V DC battery to the inverter must be<br />
positive to positive and negative to negative.<br />
A reverse polarity connection (positive to negative) will blow a fuse in<br />
the inverter and may permanently damage the unit. Damage caused by a<br />
reverse polarity connection is not covered by your warranty.<br />
3. Connect the ring terminals on the DC cable clamps to the cabling<br />
terminals on the unit. (The cabling terminals are shown in Figure<br />
2.) Fasten the positive (red) ring terminal to the positive cabling<br />
terminal, and then fasten the negative (black) ring terminal to the<br />
negative cabling terminal.<br />
CAUTION<br />
Make sure you connect red to red and black to black, and make sure you<br />
screw the nuts on tightly.<br />
4. Tighten the nut on each cabling terminal until it is snug. Do not<br />
over-tighten.<br />
14
5. Fasten the positive (red) clamp to the positive battery post, and then<br />
fasten the negative (black) clamp to the negative battery post.<br />
6. Turn on the unit by holding the switch located on top of the unit<br />
until 888 is shown on the display.<br />
The digital display will show the battery voltage, indicating that the<br />
inverter is operating normally and AC power is available at the<br />
outlet.<br />
7. Plug in the AC appliance you want to operate.<br />
8. When not in use, always turn the inverter off by holding the switch<br />
until the digital display turns off.<br />
15
5 Operating the <strong>Inverter</strong><br />
This section explains how to operate the inverter most efficiently.<br />
Operating conditions and guidelines<br />
This section describes normal operation as well as conditions that<br />
trigger an alarm or automatically shut down the inverter.<br />
Normal Operation When you connect the inverter to the vehicle’s<br />
lighter socket or directly to a 12 V battery and turn on the unit, the<br />
digital display will show input voltage, the input voltage LED<br />
illuminates and AC power is available at the outlets. You can now plug<br />
in your AC products and turn them on one at a time.<br />
Low Battery Alarm and Shutdown As the battery discharges, its<br />
voltage decreases. When the inverter senses that the voltage at its DC<br />
input has dropped to 11.0 V, it sounds an alarm, giving you time to shut<br />
down sensitive loads such as computers. If you ignore the alarm, and the<br />
DC input voltage drops below 10.5 V, the inverter shuts down all loads<br />
to save the battery from further discharge. The under-voltage error code<br />
‘E01’ will show on the digital display.<br />
High-input Voltage Shutdown If a defective battery charging system<br />
causes the battery voltage to rise to dangerously high levels, the inverter<br />
shuts down automatically. The over-voltage error code ‘E02’ will show<br />
on the digital display.<br />
16
Overload Shutdown If you connect an AC load that is rated too high<br />
(see Table 3) or a load that draws excessive surge power, the inverter<br />
shuts down. The overload error code ‘E03’ will show on the digital<br />
display.<br />
Overheating Shutdown The inverter shuts down automatically if it<br />
exceeds its safe operating temperature. The overheating error code<br />
‘E04’ will show on the digital display.<br />
Shutting the inverter off<br />
• If you are going to disconnect the battery, turn the inverter off first.<br />
• Turn the inverter off by holding the switch until the display turns<br />
off.<br />
Operating normal loads<br />
The inverter is capable of continuously powering most 120 V AC<br />
products with the following power rating maximums:<br />
Table 3 Power and Surge Rating<br />
Maximum Output<br />
Power Rating<br />
Maximum Surge<br />
Rating<br />
<strong>400</strong> W 700 W<br />
17
The inverter’s AC (“modified-sine wave”) output waveform is designed<br />
to function similarly to the sine wave shape of utility power. Most AC<br />
products correctly rated for the power rating maximums listed in Table 3<br />
or less will operate normally with the inverter.<br />
Operating loads with high surge requirements<br />
The power, or wattage rating, of AC loads is the average amount of<br />
power they use. Some appliances consume more power than their power<br />
rating when they are first turned on. TVs, monitors, and electric motors<br />
are some products that have high surge requirements at start up. The<br />
inverter can supply momentary surge power that is higher than its<br />
maximum power rating. Some products rated less than power rating<br />
maximum for your inverter may exceed its surge capability and trigger<br />
an overload shutdown. If this problem occurs when attempting to<br />
operate several AC products at the same time, try first turning on the<br />
inverter with all AC products turned off, then one by one turn each on,<br />
starting with the high-surge product first.<br />
18
Table 4 Wattage of Common AC Products<br />
Will operate with<br />
Product a<br />
Watts b inverter?<br />
Cell phone/camcorder charger 10 Yes<br />
Video game console 20 Yes<br />
Portable work light 25 Yes<br />
Stereo system 50 Yes<br />
Laptop computer 75 Yes<br />
13" TV 100 Yes<br />
27" TV 200 Yes<br />
20" TV/VCR combo 300 Yes<br />
Small appliances <strong>400</strong>+ No<br />
Power tools <strong>400</strong>+ No<br />
a.Power requirements for product examples are estimates only. To calculate the wattage<br />
of a product, use the following equation: amperage x 115.<br />
b.If you want to power two or more products simultaneously, add the power requirements<br />
of both products to determine the total wattage.<br />
19
6 Maintaining Battery Condition<br />
The battery operating time of the inverter depends on the charge level of<br />
the battery, battery capacity, and the amount of power drawn by the AC<br />
loads you are operating. With a typical vehicle battery, you can expect<br />
the following:<br />
Table 5 Battery Operating Times<br />
Load Sample Appliance Operating Time<br />
50 W CD player 6–8 hours<br />
100 W small TV 3–4 hours<br />
200 W TV/VCR 1–2 hours<br />
20
Here are some guidelines that will help to preserve your battery:<br />
• Vehicle batteries are not designed for repeated deep-discharge<br />
cycles, and constantly recharging a vehicle’s battery will shorten its<br />
life. Therefore, when you are using a vehicle battery as a power<br />
source, start the vehicle every hour or two to recharge the battery.<br />
• The inverter will operate while the engine is running, but the<br />
voltage drop that occurs when the engine starts may trigger a lowvoltage<br />
shutdown.<br />
• Vehicle batteries are designed to provide brief periods of very high<br />
current needed for engine starting. They are not intended for<br />
constant deep discharge. Regularly operating the inverter from a<br />
vehicle battery until the low-voltage alarm sounds will shorten the<br />
life of the battery. Consider connecting the inverter to a separate<br />
deep discharge-type battery if you will be frequently running<br />
electrical products for extended periods of time.<br />
• If you are not going to use the inverter for a few days, turn off the<br />
unit. The inverter draws 0.3 A or less when the unit is on and no<br />
load is connected, but it will eventually discharge the battery.<br />
21
7 Troubleshooting<br />
This section will help you identify the source of most problems that can<br />
occur with the <strong>XPower</strong> <strong>Inverter</strong> <strong>400</strong>.<br />
If you have a problem with the inverter, please review this section<br />
before contacting Customer Service. If you are unable to solve a<br />
problem and need to contact service, please prepare for the call by<br />
writing down the following details:<br />
• <strong>Inverter</strong>’s serial number<br />
• How long the inverter has been in use<br />
• Where it is installed<br />
• Appliances operating when the problem occurred<br />
• A brief description of the problem<br />
Customer Service Hotline: 1-800-670-0707<br />
22
Common problems<br />
WARNING: Electrical shock and burn hazard<br />
Do not disassemble the inverter. It does not contain any userserviceable<br />
parts. Attempting to service the inverter yourself<br />
could result in an electrical shock or burn.<br />
Buzz in audio systems<br />
Some inexpensive stereo systems have inadequate internal power supply<br />
filtering and buzz slightly when powered by the inverter. The best<br />
solution is to use an audio system with a high-quality filter.<br />
Television interference<br />
The inverter is shielded to minimize interference with TV signals. If TV<br />
signals are weak, you may see interference in the form of lines scrolling<br />
across the screen. Try one of these suggestions to minimize or eliminate<br />
the problem:<br />
• Adjust the orientation of the inverter, television, antenna, and<br />
cables.<br />
• Maximize TV signal strength by using a better antenna, and use<br />
shielded antenna cable where possible.<br />
• Try a different TV. Different models vary considerably in their<br />
susceptibility to interference.<br />
23
Troubleshooting reference<br />
This section describes problems, their symptoms, possible causes, and<br />
solutions.<br />
Problem: The AC load will not operate. Digital display is off.<br />
Possible Cause<br />
Battery is defective.<br />
The inverter has been connected<br />
with reverse DC input polarity.<br />
Loose cable connections.<br />
Solution<br />
Check battery and replace if required.<br />
Check connection to battery.<br />
The inverter has likely been damaged and<br />
needs to be repaired.<br />
Have the unit repaired (not covered under<br />
warranty).<br />
Check cables and connections.<br />
Tighten as required.<br />
Problem: The inverter will run some small loads, but not larger ones.<br />
Possible Cause<br />
Voltage drop across DC cables.<br />
Solution<br />
Shorten cables or use heavier cables.<br />
24
Problem: Measured inverter output is too low.<br />
Possible Cause<br />
A standard “average-reading”<br />
AC voltmeter has been used to<br />
measure output voltage,<br />
resulting in an apparent reading<br />
5–15 V too low.<br />
The battery voltage is too low.<br />
Solution<br />
For accurate measurement, the inverter<br />
modified sine wave output requires a “true<br />
RMS” voltmeter for accurate measurements.<br />
Recharge the battery.<br />
Problem: Battery run time is less than expected.<br />
Possible Cause<br />
The AC product power<br />
consumption is higher than<br />
rated.<br />
The battery is old or defective.<br />
The battery is not being charged<br />
properly.<br />
Power dissipation in DC cables.<br />
Solution<br />
Use a larger battery to make up for the<br />
increased power requirement.<br />
Replace the battery.<br />
Some chargers are not able to fully recharge<br />
a battery. Make sure that you use a powerful<br />
charger.<br />
Use shorter/heavier DC cables.<br />
25
Problem: <strong>Inverter</strong> will not deliver <strong>400</strong> watts.<br />
Possible Cause<br />
Solution<br />
The inverter is connected to a Connect the inverter directly to the battery<br />
lighter socket with the lighter using the DC cable with clips.<br />
plug cable, which is fuse limited<br />
to 180 watts.<br />
The battery does not produce<br />
enough volts to supply the<br />
inverter with sufficient power.<br />
Turn vehicle on and then connect the<br />
inverter directly to the battery using the DC<br />
cable with clips.<br />
26
Problem: The AC load will not operate, error code shows on digital<br />
display and alarm is sounding.<br />
Error Possible Cause Solution<br />
E01 Low voltage shutdown because<br />
battery is discharged.<br />
Recharge battery.<br />
Shorten cables or use heavier<br />
cables.<br />
E02<br />
E03<br />
E04<br />
E05<br />
Over-voltage shutdown because<br />
of high input voltage.<br />
The AC product(s) connected<br />
are rated at more than the<br />
inverter’s continuous power<br />
rating; overload shutdown has<br />
occurred.<br />
The inverter has overheated due<br />
to poor ventilation.<br />
Overheating shutdown has<br />
occurred.<br />
The AC products connected<br />
have a surge power that exceeds<br />
the inverter’s surge capability or<br />
the AC products connected are<br />
short-circuited and shutdown<br />
has occurred.<br />
Verify the charging system is<br />
properly regulated and the battery<br />
is 12 V nominal.<br />
Use a product with a power rating<br />
within the inverter’s continuous<br />
power rating (see Table 3).<br />
Turn inverter off and allow to cool<br />
for 15 minutes. Clear blocked fan<br />
or remove objects covering unit.<br />
Move the inverter to a cooler<br />
place. Reduce load if continuous<br />
operation is required.<br />
The products exceed the inverter’s<br />
surge capability. Use a product<br />
with a starting surge power within<br />
the inverter’s capability.<br />
Correct the short-circuit condition.<br />
27
8 Specifications<br />
Specifications are subject to change without notice.<br />
Table 6 Specifications<br />
AC output voltage (nominal)<br />
DC input voltage range<br />
Maximum AC output power<br />
Maximum AC output surge power<br />
AC output frequency<br />
AC output waveform<br />
No load current draw<br />
(at 12 V input)<br />
120 V AC<br />
10.5–15.5 V DC<br />
<strong>400</strong> W<br />
700 W<br />
60 ± 1 Hz<br />
Modified Sine Wave<br />
0.3 A<br />
Efficiency (maximum) 90%<br />
Ambient operating temperature range 32–104°F 0–40°C<br />
Low voltage alarm<br />
Low voltage shutdown<br />
High voltage shutdown<br />
Dimensions<br />
(L × W × H)<br />
Weight<br />
11.0 V<br />
10.5 V<br />
15.5 V<br />
5<br />
5 -- × 4 × 2" (137 × 102 × 51 mm)<br />
8<br />
1 lb (0.44 kg)<br />
28
9 Warranty and Return<br />
Warranty<br />
What does this warranty cover? This Limited Warranty is provided by<br />
<strong>Xantrex</strong> Technology, Inc. ("<strong>Xantrex</strong>") and covers defects in workmanship and<br />
materials in your <strong>XPower</strong> <strong>Inverter</strong> <strong>400</strong>. This warranty period lasts for 6 months<br />
from the date of purchase at the point of sale to you, the original end user<br />
customer. You require proof of purchase to make warranty claims.<br />
What will <strong>Xantrex</strong> do? <strong>Xantrex</strong> will, at its option, repair or replace the<br />
defective product free of charge, provided that you notify <strong>Xantrex</strong> of the product<br />
defect within the Warranty Period, and provided that <strong>Xantrex</strong> through inspection<br />
establishes the existence of such a defect and that it is covered by this Limited<br />
Warranty.<br />
<strong>Xantrex</strong> will, at its option, use new and/or reconditioned parts in performing<br />
warranty repair and building replacement products. <strong>Xantrex</strong> reserves the right to<br />
use parts or products of original or improved design in the repair or replacement.<br />
If <strong>Xantrex</strong> repairs or replaces a product, its warranty continues for the remaining<br />
portion of the original Warranty Period or 90 days from the date of the return<br />
shipment to the customer, whichever is greater. All replaced products and all<br />
parts removed from repaired products become the property of <strong>Xantrex</strong>.<br />
<strong>Xantrex</strong> covers both parts and labor necessary to repair the product, and return<br />
shipment to the customer via a <strong>Xantrex</strong>-selected non-expedited surface freight<br />
within the contiguous United States and Canada. Alaska and Hawaii are<br />
excluded. Contact <strong>Xantrex</strong> Customer Service for details on freight policy for<br />
return shipments outside of the contiguous United States and Canada.<br />
29
How do you get service? If your product requires troubleshooting or warranty<br />
service, contact your merchant. If you are unable to contact your merchant, or<br />
the merchant is unable to provide service, contact <strong>Xantrex</strong> directly at:<br />
Telephone: 1 800 670 0707 (toll free North America)<br />
1 360 925 5097 (direct)<br />
Fax: 1 800 994 7828 (toll free North America)<br />
1 360 925 5143 (direct)<br />
Email: customerservice@xantrex.com<br />
Direct returns may be performed according to the <strong>Xantrex</strong> Return Material<br />
Authorization Policy described in your product manual. For some products,<br />
<strong>Xantrex</strong> maintains a network of regional Authorized Service Centers. Call<br />
<strong>Xantrex</strong> or check our website to see if your product can be repaired at one of<br />
these facilities.<br />
What proof of purchase is required? In any warranty claim, dated proof of<br />
purchase must accompany the product and the product must not have been<br />
disassembled or modified without prior written authorization by <strong>Xantrex</strong>.<br />
Proof of purchase may be in any one of the following forms:<br />
• The dated purchase receipt from the original purchase of the product at<br />
point of sale to the end user, or<br />
• The dated dealer invoice or purchase receipt showing original equipment<br />
manufacturer (OEM) status, or<br />
• The dated invoice or purchase receipt showing the product exchanged<br />
under warranty<br />
What does this warranty not cover? This Limited Warranty does not cover<br />
normal wear and tear of the product or costs related to the removal, installation,<br />
or troubleshooting of the customer's electrical systems. This warranty does not<br />
apply to and <strong>Xantrex</strong> will not be responsible for any defect in or damage to:<br />
30
a) the product if it has been misused, neglected, improperly installed, physically<br />
damaged or altered, either internally or externally, or damaged from<br />
improper use or use in an unsuitable environment;<br />
b) the product if it has been subjected to fire, water, generalized corrosion,<br />
biological infestations, or input voltage that creates operating conditions<br />
beyond the maximum or minimum limits listed in the <strong>Xantrex</strong> product<br />
specifications including high input voltage from generators and lightning<br />
strikes;<br />
c) the product if repairs have been done to it other than by <strong>Xantrex</strong> or its<br />
authorized service centers (hereafter "ASCs");<br />
d) the product if it is used as a component part of a product expressly warranted<br />
by another manufacturer;<br />
e) the product if its original identification (trade-mark, serial number) markings<br />
have been defaced, altered, or removed.<br />
Disclaimer<br />
Product<br />
THIS LIMITED WARRANTY IS THE SOLE AND EXCLUSIVE WARRANTY<br />
PROVIDED BY XANTREX IN CONNECTION WITH YOUR XANTREX PRODUCT<br />
AND IS, WHERE PERMITTED BY LAW, IN LIEU OF ALL OTHER WARRANTIES,<br />
CONDITIONS, GUARANTEES, REPRESENTATIONS, OBLIGATIONS AND<br />
LIABILITIES, EXPRESS OR IMPLIED, STATUTORY OR OTHERWISE IN<br />
CONNECTION WITH THE PRODUCT, HOWEVER ARISING (WHETHER BY<br />
CONTRACT, TORT, NEGLIGENCE, PRINCIPLES OF MANUFACTURER'S<br />
LIABILITY, OPERATION OF LAW, CONDUCT, STATEMENT OR OTHERWISE),<br />
INCLUDING WITHOUT RESTRICTION ANY IMPLIED WARRANTY OR<br />
31
CONDITION OF QUALITY, MERCHANTABILITY OR FITNESS FOR A<br />
PARTICULAR PURPOSE. ANY IMPLIED WARRANTY OF MERCHANTABILITY<br />
OR FITNESS FOR A PARTICULAR PURPOSE TO THE EXTENT REQUIRED<br />
UNDER APPLICABLE LAW TO APPLY TO THE PRODUCT SHALL BE LIMITED<br />
IN DURATION TO THE PERIOD STIPULATED UNDER THIS LIMITED<br />
WARRANTY.<br />
IN NO EVENT WILL XANTREX BE LIABLE FOR ANY SPECIAL, DIRECT,<br />
INDIRECT, INCIDENTAL OR CONSEQUENTIAL DAMAGES, LOSSES, COSTS OR<br />
EXPENSES HOWEVER ARISING WHETHER IN CONTRACT OR TORT<br />
INCLUDING WITHOUT RESTRICTION ANY ECONOMIC LOSSES OF ANY KIND,<br />
ANY LOSS OR DAMAGE TO PROPERTY, ANY PERSONAL INJURY, ANY<br />
DAMAGE OR INJURY ARISING FROM OR AS A RESULT OF MISUSE OR ABUSE,<br />
OR THE INCORRECT INSTALLATION, INTEGRATION OR OPERATION OF THE<br />
PRODUCT.<br />
Exclusions<br />
If this product is a consumer product, federal law does not allow an exclusion of<br />
implied warranties. To the extent you are entitled to implied warranties under<br />
federal law, to the extent permitted by applicable law they are limited to the<br />
duration of this Limited Warranty. Some states and provinces do not allow<br />
limitations or exclusions on implied warranties or on the duration of an implied<br />
warranty or on the limitation or exclusion of incidental or consequential<br />
damages, so the above limitation(s) or exclusion(s) may not apply to you. This<br />
Limited Warranty gives you specific legal rights. You may have other rights<br />
which may vary from state to state or province to province.<br />
Warning: Limitations On Use<br />
Please refer to your product manual for limitations on uses of the product.<br />
32
SPECIFICALLY, PLEASE NOTE THAT THE XPOWER INVERTER <strong>400</strong> SHOULD<br />
NOT BE USED IN CONNECTION WITH LIFE SUPPORT SYSTEMS OR OTHER<br />
MEDICAL EQUIPMENT OR DEVICES. WITHOUT LIMITING THE GENERALITY<br />
OF THE FOREGOING, XANTREX MAKES NO REPRESENTATIONS OR<br />
WARRANTIES REGARDING THE USE OF THE XANTREX XPOWER INVERTER<br />
<strong>400</strong> IN CONNECTION WITH LIFE SUPPORT SYSTEMS OR OTHER MEDICAL<br />
EQUIPMENT OR DEVICES.<br />
Please note that the <strong>XPower</strong> <strong>Inverter</strong> <strong>400</strong> is not intended for use as an<br />
uninterruptible power supply and <strong>Xantrex</strong> makes no warranty or representation<br />
in connection with any use of the product for such purposes.<br />
33
Return Procedure<br />
Suggested method<br />
Direct to place of purchase<br />
Please return your <strong>XPower</strong> <strong>Inverter</strong> <strong>400</strong> directly to the place of purchase,<br />
preferably using the original box and packing materials.<br />
Alternative Method<br />
Direct to <strong>Xantrex</strong><br />
In the event that you no longer have access to the retail outlet that you purchased<br />
your <strong>XPower</strong> <strong>Inverter</strong> <strong>400</strong> from, you may return the product to <strong>Xantrex</strong>.<br />
1. Package the unit safely, preferably using the original box and packing<br />
materials. Please ensure that your product is shipped fully insured in the<br />
original packaging or equivalent. This warranty will not apply where the<br />
product is damaged due to improper packaging.<br />
2. Include the following:<br />
• The RMA number supplied by <strong>Xantrex</strong> Technology, Inc. clearly<br />
marked on the outside of the box.<br />
• A return address where the unit can be shipped. Post office boxes are<br />
not acceptable.<br />
• A contact telephone number where you can be reached during work<br />
hours.<br />
• A brief description of the problem.<br />
34
3. Ship the unit prepaid to the address provided by your <strong>Xantrex</strong> customer<br />
service representative.<br />
Return Material Authorization Policy<br />
Before returning a product directly to <strong>Xantrex</strong> you must obtain a Return<br />
Material Authorization (RMA) number and the correct factory "Ship To"<br />
address. Products must also be shipped prepaid. Product shipments will be<br />
refused and returned at your expense if they are unauthorized, returned without<br />
an RMA number clearly marked on the outside of the shipping box, if they are<br />
shipped collect, or if they are shipped to the wrong location.<br />
When you contact <strong>Xantrex</strong> to obtain service, please have your instruction<br />
manual ready for reference and be prepared to supply:<br />
• The serial number of your product<br />
• Information about the installation and use of the unit<br />
• Information about the failure and/or reason for the return<br />
• A copy of your dated proof of purchase<br />
If you are returning a product from outside of the USA or Canada In<br />
addition to the above, you MUST include return freight funds and are fully<br />
responsible for all documents, duties, tariffs, and deposits.<br />
If you are returning a product to a <strong>Xantrex</strong> Authorized Service Center<br />
(ASC) A <strong>Xantrex</strong> return material authorization (RMA) number is not required.<br />
However, you must contact the ASC prior to returning the product or presenting<br />
the unit to verify any return procedures that may apply to that particular facility.<br />
35
Out of Warranty Service<br />
If the warranty period for your <strong>XPower</strong> <strong>Inverter</strong> <strong>400</strong> has expired, if the unit was<br />
damaged by misuse or incorrect installation, if other conditions of the warranty<br />
have not been met, or if no dated proof of purchase is available, your inverter<br />
may be serviced or replaced for a flat fee.<br />
To return your <strong>XPower</strong> <strong>Inverter</strong> <strong>400</strong> for out of warranty service, contact <strong>Xantrex</strong><br />
Customer Service for a Return Material Authorization (RMA) number and<br />
follow the other steps outlined in “Return Procedure” on page 34.<br />
Payment options such as credit card or money order will be explained by the<br />
Customer Service Representative. In cases where the minimum flat fee does not<br />
apply, as with incomplete units or units with excessive damage, an additional fee<br />
will be charged. If applicable, you will be contacted by Customer Service once<br />
your unit has been received.<br />
36