DUAL AXIS CG-4 MOTOR DRIVE (#93522) - Celestron
DUAL AXIS CG-4 MOTOR DRIVE (#93522) - Celestron
DUAL AXIS CG-4 MOTOR DRIVE (#93522) - Celestron

You also want an ePaper? Increase the reach of your titles
YUMPU automatically turns print PDFs into web optimized ePapers that Google loves.
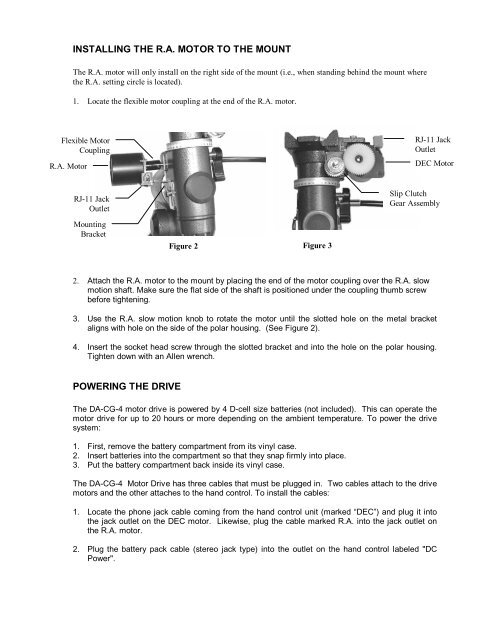
INSTALLING THE R.A. <strong>MOTOR</strong> TO THE MOUNT<br />
The R.A. motor will only install on the right side of the mount (i.e., when standing behind the mount where<br />
the R.A. setting circle is located).<br />
1. Locate the flexible motor coupling at the end of the R.A. motor.<br />
Flexible Motor<br />
Coupling<br />
R.A. Motor<br />
RJ-11 Jack<br />
Outlet<br />
DEC Motor<br />
RJ-11 Jack<br />
Outlet<br />
Slip Clutch<br />
Gear Assembly<br />
Mounting<br />
Bracket<br />
Figure 2<br />
Figure 3<br />
2. Attach the R.A. motor to the mount by placing the end of the motor coupling over the R.A. slow<br />
motion shaft. Make sure the flat side of the shaft is positioned under the coupling thumb screw<br />
before tightening.<br />
3. Use the R.A. slow motion knob to rotate the motor until the slotted hole on the metal bracket<br />
aligns with hole on the side of the polar housing. (See Figure 2).<br />
4. Insert the socket head screw through the slotted bracket and into the hole on the polar housing.<br />
Tighten down with an Allen wrench.<br />
POWERING THE <strong>DRIVE</strong><br />
The DA-<strong>CG</strong>-4 motor drive is powered by 4 D-cell size batteries (not included). This can operate the<br />
motor drive for up to 20 hours or more depending on the ambient temperature. To power the drive<br />
system:<br />
1. First, remove the battery compartment from its vinyl case.<br />
2. Insert batteries into the compartment so that they snap firmly into place.<br />
3. Put the battery compartment back inside its vinyl case.<br />
The DA-<strong>CG</strong>-4 Motor Drive has three cables that must be plugged in. Two cables attach to the drive<br />
motors and the other attaches to the hand control. To install the cables:<br />
1. Locate the phone jack cable coming from the hand control unit (marked “DEC”) and plug it into<br />
the jack outlet on the DEC motor. Likewise, plug the cable marked R.A. into the jack outlet on<br />
the R.A. motor.<br />
2. Plug the battery pack cable (stereo jack type) into the outlet on the hand control labeled "DC<br />
Power".