SkyScout Scope 90 Quick Setup Guide - Celestron
SkyScout Scope 90 Quick Setup Guide - Celestron
SkyScout Scope 90 Quick Setup Guide - Celestron

You also want an ePaper? Increase the reach of your titles
YUMPU automatically turns print PDFs into web optimized ePapers that Google loves.
www.celestron.com<br />
<strong>Quick</strong> set-up guide for:<br />
Model #21068 – <strong>SkyScout</strong> <strong>Scope</strong> <strong>90</strong><br />
Questions or Problems with Set-up?<br />
CONTACT: <strong>Celestron</strong> Technical Support:<br />
310.803.5955<br />
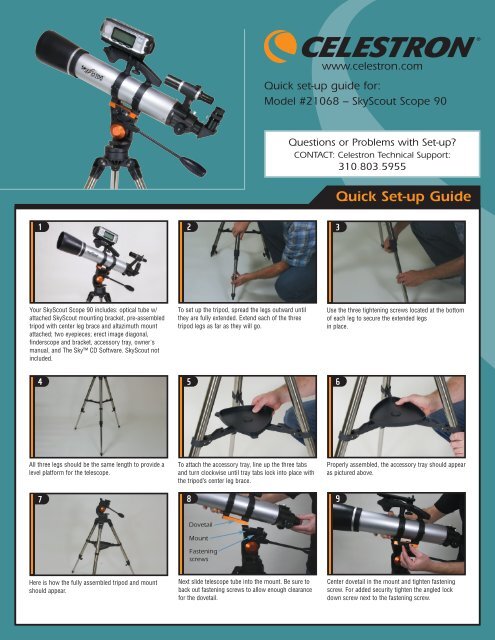
<strong>Quick</strong> Set-up <strong>Guide</strong><br />
1 2 3<br />
Your <strong>SkyScout</strong> <strong>Scope</strong> <strong>90</strong> includes: optical tube w/<br />
attached <strong>SkyScout</strong> mounting bracket, pre-assembled<br />
tripod with center leg brace and altazimuth mount<br />
attached; two eyepieces; erect image diagonal,<br />
finderscope and bracket, accessory tray, owner's<br />
manual, and The Sky CD Software. <strong>SkyScout</strong> not<br />
included.<br />
To set up the tripod, spread the legs outward until<br />
they are fully extended. Extend each of the three<br />
tripod legs as far as they will go.<br />
Use the three tightening screws located at the bottom<br />
of each leg to secure the extended legs<br />
in place.<br />
4<br />
5<br />
6<br />
All three legs should be the same length to provide a<br />
level platform for the telescope.<br />
7<br />
To attach the accessory tray, line up the three tabs<br />
and turn clockwise until tray tabs lock into place with<br />
the tripod’s center leg brace.<br />
8<br />
Properly assembled, the accessory tray should appear<br />
as pictured above.<br />
9<br />
Dovetail<br />
Mount<br />
Fastening<br />
screws<br />
Here is how the fully assembled tripod and mount<br />
should appear.<br />
Next slide telescope tube into the mount. Be sure to<br />
back out fastening screws to allow enough clearance<br />
for the dovetail.<br />
Center dovetail in the mount and tighten fastening<br />
screw. For added security tighten the angled lock<br />
down screw next to the fastening screw.
<strong>Quick</strong> Set-up <strong>Guide</strong> [cont]<br />
10<br />
11<br />
12<br />
Loosen the set screw on the focuser. Remove the<br />
plastic cap covering the end of the focuser.<br />
Insert the diagonal into the focuser and tighten the<br />
set screw.<br />
Insert the chrome barrel of the 40mm eyepiece into<br />
the diagonal and tighten the set screw.<br />
13<br />
14<br />
15<br />
Slide the finderscope into the dovetail bracket built-in<br />
to the focuser. Secure finderscope with locking screw.<br />
Hold the <strong>SkyScout</strong> with the larger targeting window<br />
towards the front end of the telescope. Align the holes<br />
at the bottom of the <strong>SkyScout</strong> with the alignment pins<br />
on the bracket. Place the holes over the pins and<br />
press the <strong>SkyScout</strong> down until it is firmly seated on<br />
the bracket.<br />
Use the adjustment knobs on the bracket to align the<br />
<strong>SkyScout</strong> with the telescope's eyepiece. See<br />
instruction manual for complete alignment procedure<br />
16<br />
17<br />
18<br />
Select an object to locate from the <strong>SkyScout</strong>'s<br />
database.<br />
Rotate the telescope's pan handle counterclockwise<br />
and move the telescope in the direction indicated by<br />
the red targeting arrows.<br />
Slowly move the telescope until all the targeting<br />
arrows are illuminated.<br />
19<br />
For detailed usage information please consult<br />
your owner’s manual.<br />
Look inside the 40mm eyepiece and center the object.<br />
Rotate the pan handle to lock the telescope in place.<br />
WARNING: Never attempt to view the sun through any telescope<br />
without proper filtering!