Celestron Off Axis Guider Instructions - First Light Optics
Celestron Off Axis Guider Instructions - First Light Optics
Celestron Off Axis Guider Instructions - First Light Optics

You also want an ePaper? Increase the reach of your titles
YUMPU automatically turns print PDFs into web optimized ePapers that Google loves.
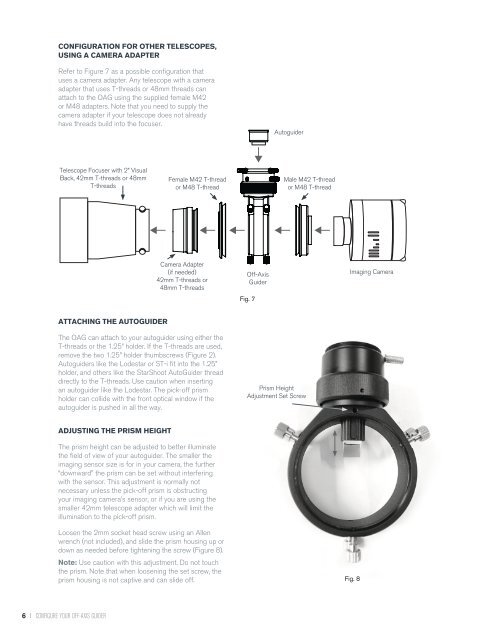
CONFIGURATION FOR OTHER TELESCOPES,<br />
USING A CAMERA ADAPTER<br />
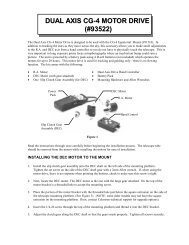
Refer to Figure 7 as a possible configuration that<br />
uses a camera adapter. Any telescope with a camera<br />
adapter that uses T-threads or 48mm threads can<br />
attach to the OAG using the supplied female M42<br />
or M48 adapters. Note that you need to supply the<br />
camera adapter if your telescope does not already<br />
have threads build into the focuser.<br />
Autoguider<br />
Telescope Focuser with 2” Visual<br />
Back, 42mm T-threads or 48mm<br />
T-threads<br />
Female M42 T-thread<br />
or M48 T-thread<br />
Male M42 T-thread<br />
or M48 T-thread<br />
Camera Adapter<br />
(if needed)<br />
42mm T-threads or<br />
48mm T-threads<br />
<strong>Off</strong>-<strong>Axis</strong><br />
<strong>Guider</strong><br />
Fig. 7<br />
Imaging Camera<br />
ATTACHING THE AUTOGUIDER<br />
The OAG can attach to your autoguider using either the<br />
T-threads or the 1.25” holder. If the T-threads are used,<br />
remove the two 1.25” holder thumbscrews (Figure 2).<br />
Autoguiders like the Lodestar or ST-i fit into the 1.25”<br />
holder, and others like the StarShoot Auto<strong>Guider</strong> thread<br />
directly to the T-threads. Use caution when inserting<br />
an autoguider like the Lodestar. The pick-off prism<br />
holder can collide with the front optical window if the<br />
autoguider is pushed in all the way.<br />
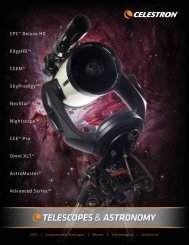
Prism Height<br />
Adjustment Set Screw<br />
ADJUSTING THE PRISM HEIGHT<br />
The prism height can be adjusted to better illuminate<br />
the field of view of your autoguider. The smaller the<br />
imaging sensor size is for in your camera, the further<br />
“downward” the prism can be set without interfering<br />
with the sensor. This adjustment is normally not<br />
necessary unless the pick-off prism is obstructing<br />
your imaging camera’s sensor, or if you are using the<br />
smaller 42mm telescope adapter which will limit the<br />
illumination to the pick-off prism.<br />
Loosen the 2mm socket head screw using an Allen<br />
wrench (not included), and slide the prism housing up or<br />
down as needed before tightening the screw (Figure 8).<br />
Note: Use caution with this adjustment. Do not touch<br />
the prism. Note that when loosening the set screw, the<br />
prism housing is not captive and can slide off.<br />
Fig. 8<br />
6 I CONFIGURE YOUR OFF-AXIS GUIDER