Belle - TUBMIX50 - Paddle Mixer - Artisan Hire Centres
Belle - TUBMIX50 - Paddle Mixer - Artisan Hire Centres
Belle - TUBMIX50 - Paddle Mixer - Artisan Hire Centres

You also want an ePaper? Increase the reach of your titles
YUMPU automatically turns print PDFs into web optimized ePapers that Google loves.
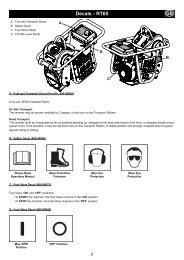
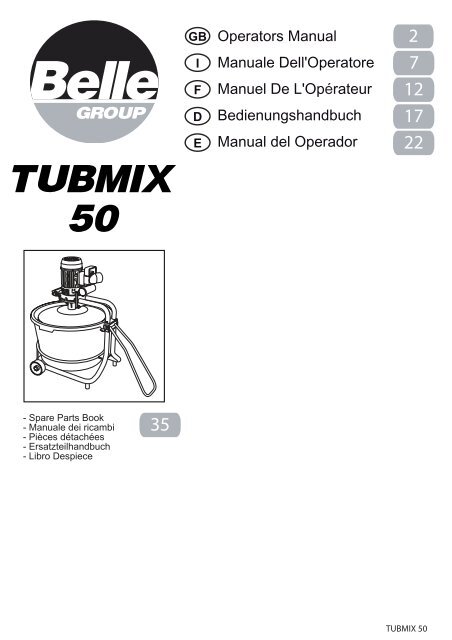
GB Operators Manual 2<br />
I Manuale Dell'Operatore<br />
F<br />
D<br />
E<br />
Manuel De L'Opérateur<br />
Bedienungshandbuch<br />
Manual del Operador<br />
7<br />
12<br />
17<br />
22<br />
- Spare Parts Book<br />
- Manuale dei ricambi<br />
- Pièces détachées<br />
- Ersatzteilhandbuch<br />
- Libro Despiece<br />
35<br />
TUBMIX 50
GB<br />
Technical data<br />
Power supply: 115V 50Hz.~ 230V 50Hz.~<br />
Max. absorbed power:<br />
1200W<br />
Max. active power:<br />
750W<br />
Capacitor (230V~50Hz.): 20 µF<br />
Capacitor (115V~50Hz.): 85 µF<br />
2. Precautions<br />
• The manufacturer declines any liability for the<br />
use of the TUBMIX with tools and materials<br />
other than the original ones and not indicated in<br />
the paragraph "RECOMMENDED USE".<br />
• The TUBMIX is designed to work exclusively<br />
according to the admissible working conditions<br />
indicated.<br />
• Never introduce foreign objects or tools into the<br />
tub during operation with the agitator in rotating.<br />
Weight:<br />
Basket capacity:<br />
25 Kg.<br />
50 Kg.<br />
Allowed functioning:<br />
S1<br />
continuous load<br />
Rotation Speed: 55 min -1<br />
IP Degree: 44<br />
Recommended use:<br />
TILE ADHESIVES, CEMENT, PLASTER, PAINTS,<br />
VARNISH AND EPOXY RESINS.<br />
3. Installation<br />
Assemble the top frame and the transporting handle<br />
as shown in Fig. 1.<br />
Insert the connecting pin fixing it with the safety clip,<br />
paying attention to the mechanical block.<br />
1<br />
CAUTION !<br />
The noise level of the machines has been<br />
measured in compliance with standard ISO3745-77.<br />
Lw<br />
Lw<br />
76,6 [dBW(A)]<br />
62,7 [dB(A)]<br />
1. Use<br />
CAUTION !<br />
Insert all the different parts in the order shown in<br />
Fig. 2, then lock everything in place using the<br />
22 mm hexagon spanner provided.<br />
Before using the machine read the safety<br />
instruction chapter carefully.<br />
All machines have been thoroughly tested and<br />
checked before leaving our factory.<br />
BELLE works for a continuous development of<br />
the machines the company manufactures,<br />
therefore the company reserves the right to<br />
modify its models. No rights can be claimed as<br />
far as the data and the pictures of this manual<br />
are concerned.<br />
2<br />
The TUBMIX is a mixing machine for tile adhesives,<br />
cement, plaster, paints, varnish and epoxy resins.<br />
2
Screw the agitator tightly into the motor shaft.<br />
The full locking of this part will take place when the<br />
machine is in motion.<br />
3<br />
MAKE SURE THE LOCKING DEVICE IS IN<br />
LOCKED POSITION WHEN THE MACHINE IS<br />
CLOSED (Fig. 6).<br />
At this point, the TUBMIX is ready for use.<br />
6<br />
CAUTION !<br />
GB<br />
Insert the tub into the lower frame, making sure to<br />
insert one of the four transport handles in the metal<br />
tang provided.<br />
This will prevent the rotation of the basket during<br />
mixing.<br />
4<br />
4. Basket removing<br />
Switch off the TUBMIX when the mixture is<br />
completed. The agitator must be positioned inside<br />
the basket as showed in Fig. 5<br />
The TUBMIX has been designed to permit the<br />
opening of the motor head only when the agitator is<br />
in this position.<br />
Keep with one hand release the locking device and<br />
with the other one lift the motor head as showed in<br />
Fig. 7.<br />
7<br />
Insert the agitator by positioning it as shown in<br />
Fig. 5.<br />
Lower the motor head in working position.<br />
5<br />
CAUTION !<br />
The plastic protection shield must never be<br />
removed. This is a safety device prescribed by<br />
law to prevent accidents.<br />
3
GB<br />
5. Transport<br />
The machine is easy to move. Lift the handle and<br />
move the machine on its wheels, as shown in Fig. 8.<br />
8<br />
THE MOTOR SHOULD ONLY BE RUN IN THE<br />
MIXING POSITION WITH THE AGITATOR<br />
POSTIONED WITHIN THE MIXING TUB.<br />
The TUBMIX are provided also with overheat<br />
protection with manual reset. This intervenes in the<br />
event of the agitator jamming. In the event of it<br />
jamming, before resetting the thermal protection,<br />
disconnect the machine from the mains electricity<br />
supply and empty the basket partially.<br />
9<br />
6. Connecting to power supply<br />
Make sure that the switch is turned off before<br />
inserting the plug.<br />
The machine is to be connected to the power supply<br />
by a residual current circuit breaker (RCCB) or class<br />
II isolation transformer with the following<br />
characteristics:<br />
RCCB<br />
Transformer<br />
230V In 10 A Id 20 mA 230 V 50 Hz 1500 W<br />
Cont. duty<br />
115V In 20 A Id 20 mA 115 V 50 Hz 1500 W<br />
Cont. duty<br />
N.B. To ensure correct functioning, periodically<br />
check the efficiency of the RCCBs by pressing<br />
the push-button on the front of the same.<br />
Prior to connecting the machine to the power<br />
supply, make sure that the voltage is the same as<br />
indicated on the machine data plate. The machine<br />
must be connected to an effective earth wire. In<br />
case of doubt, do not connect the machine.<br />
INFORMATION<br />
Please be aware that when the mixing head and<br />
agitator are raised out of the mixing tub an<br />
automatic safety switch is engaged preventing the<br />
operation of the motor.<br />
7. Preparation of the mixture<br />
Proceed as follows to prepare the mixture:<br />
• Always start the machine only when it is empty.<br />
• Proceed as follows or as directed for the type of<br />
material to be mixed.<br />
CAUTION !<br />
Adhesive for floor and wall tiles<br />
A) Carefully read the instructions on the glue sack<br />
you are going to use.<br />
B) Pour in the tub the quantity of water necessary<br />
to prepare the desired adhesive quantity<br />
following the manufacturer's instructions.<br />
C) Start the TUBMIX 50, then tip the first 25 kg of<br />
powder at a speed of 10 kg/min directly on the<br />
plastic protection, which will centrifuge the<br />
material to obtain an appropriate mixture.<br />
Continue with this operation in a continuous and<br />
uniform manner with the second sack (25 kg)<br />
and wait for the whole product to be properly<br />
mixed. In this way the mixture will be free from<br />
lumps.<br />
4
• If necessary, allow the adhesive to rest for 5-15<br />
minutes and then mix it again for few minutes.<br />
The machine may be moved to the position<br />
where the adhesive is to be used.<br />
Cement<br />
• The mixing machine is suitable for preparing<br />
mortar and plaster containing lime, cement,<br />
gypsum and fine sized aggregates. It is not<br />
suitable for mixing concrete or mortar<br />
containing medium-large sized gravel or<br />
aggregates.<br />
• For the preparation of mortar for plaster,<br />
proceed as for adhesive for floor and wall tiles.<br />
• As the mortar is a highly hygroscopic<br />
preparation, in order to prevent excessive<br />
hardening of the compound, a great deal of<br />
attention must be paid to the addition of lime,<br />
cement, gypsum or aggregates when nearing<br />
the end of the mixing process.<br />
Epoxy resins<br />
• For mixing epoxy resin, check the viscosity and<br />
the density of the products to be prepared, so<br />
that the mixer motor is not overloaded.<br />
• Pour into the tub the quantity of resin, hardener<br />
and any powders indicated by the product<br />
supplier.<br />
• Mix carefully to prevent bubbles or lumps<br />
forming in the mixture.<br />
Paints<br />
• Pour the paint to be mixed into the mixer drum<br />
and add the necessary amount of water<br />
required for the solution.<br />
8. Maintenance<br />
The machine's reduction unit is lubricated with<br />
semi-fluid type synthetic grease suited for the<br />
lubrication of enclosed gears in casings.<br />
When changing the grease, use only products with<br />
the characteristics listed below:<br />
NLGI Degree: 0<br />
Dropping point: °C 115<br />
Thickening agent SODIUM SOAPS<br />
To change the grease, contact your local dealer.<br />
9. Disposal<br />
• In the event of the tub becoming worn or<br />
damaged, it must be disposed of in accordance<br />
with the methods laid down by current<br />
legislation.<br />
• In the event of scrapping the complete machine,<br />
it must be disposed of in accordance with the<br />
methods laid down by current legislation.<br />
Aluminium<br />
Steel<br />
Copper<br />
Poiyamide<br />
Steel<br />
Poiyamide<br />
CAUTION !<br />
Electric Motor<br />
Machine’s Framework<br />
GB<br />
AL<br />
AC<br />
CU<br />
PA<br />
AC<br />
PA<br />
CAUTION !<br />
! The use of chemical products or solvents<br />
may affect the properties of the tub, made of<br />
high density polyethyiene PET.<br />
! Check the compatibility of the products to be<br />
mixed with the properties of the machine<br />
before use.<br />
Polyethylene<br />
Tub<br />
PET<br />
5
GB<br />
10. Troubleshooting<br />
HAVE YOUR TOOL REPAIRED BY A QUALIFIED PERSON<br />
This electric tool complies with the relevant safety rules. Repairs should only be carried out by<br />
qualified persons using original spare parts, otherwise this may result in considerable danger to the<br />
user.<br />
Fault<br />
The machine does not function.<br />
Cause<br />
The power supply cable is<br />
damaged or not properly<br />
connected.<br />
No voltage in the socket.<br />
The thermal protection has been<br />
activated.<br />
Internal emergency switch has<br />
been damaged.<br />
Remedy<br />
Press the plug firmly into the<br />
power socket.<br />
Have the socket checked.<br />
Remove the power supply cable<br />
from the main socket and reset<br />
the thermal protection. In case<br />
this is not possible, wait a few<br />
minutes to allow it to cool.<br />
Consult local dealer.<br />
Machine is difficult to start.<br />
Mixture too hard.<br />
The agitator is encountering<br />
obstacles whilst rotating (stones<br />
or lumps).<br />
Start capacitor is damaged.<br />
Bearings or bushings of reduction<br />
gear are damaged.<br />
Remove part of the mixture from<br />
the basket, than try to start the<br />
machine.<br />
Remove the stones which are too<br />
big or the lumps. Proceed as<br />
above indicated.<br />
Consult local dealer.<br />
Consult local dealer.<br />
Unusual noise coming from the<br />
reduction gear.<br />
Reduction gear damaged.<br />
Switch off the machine<br />
immediately and contact your<br />
local dealer.<br />
6
GB<br />
SAFETY INSTRUCTIONS<br />
Warning! When using electric tools, the<br />
following safety precautions should always be<br />
followed to reduce the risk of fire, electric shock<br />
and personal injuries. Read and follow all these<br />
instructions before attempting to operate this<br />
product and save them with care!<br />
SAVE THESE INSTRUCTIONS WITH CARE.<br />
Keep your work area perfectly clean<br />
- Cluttered areas invite injuries.<br />
Consider work area environment<br />
- Don't expose tools to rain.<br />
- Don't use tools in damp or wet locations. Keep<br />
work area well lit.<br />
- Don't use tools in presence of flammable liquids or<br />
gases.<br />
Guard against electric shocks<br />
- Prevent body contact with grounded surfaces.<br />
Keep children away!<br />
- Do not let third parties contact tool or extension<br />
cord. All visitors should be kept away from work<br />
area.<br />
Store your tools in a save place<br />
- When not in use, tools should be stored in dry and<br />
save places, out of the reach of children.<br />
Don't force tool<br />
- It will function better and in a safer way at the rate<br />
for which it was intended.<br />
Use the right tool<br />
- Don't use low duty tools or accessories to do the<br />
job of a heavy-duty tools. Don't use tools for<br />
purposes not intended.<br />
Dress properly<br />
- Rubber gloves and non-slip footwear are<br />
recommended when working outdoors. Wear<br />
protective hair covering to contain long hair. Use<br />
safety glasses.<br />
- Use a mask if working operations are dusty.<br />
Don't abuse cord<br />
- Never carry tool by cord or yank it to disconnect it<br />
from socket.<br />
- Keep cord from heat, oil and sharp edges.<br />
Avoid unsteady positions<br />
- Be sure to work in a safe and balanced position.<br />
cords periodically and replace them if damaged.<br />
Keep handles dry, clean and free from oil and<br />
grease.<br />
Disconnect tools<br />
- When not in use, before servicing, and when<br />
changing accessories subject to wear.<br />
Remove service keys from tool<br />
- Form the habit of checking to see that keys and<br />
adjusting wrenches are removed from tool before<br />
turning it on.<br />
Avoid unintentional starting<br />
- Be sure that the switch is off when plugging in the<br />
tool.<br />
Extension cords for outdoor works<br />
- When tool is used outdoors, use only extension<br />
cords intended for this particular use and so<br />
marked.<br />
Stay alert<br />
- Watch what you are doing. Use common sense.<br />
Do not operate tool when you are inattentive.<br />
Check tool for damaged parts<br />
- Before further use of the tool, check it and the<br />
safety devices for damages and be sure that they<br />
operate properly. Check for functioning and<br />
binding of moving parts, breakage of parts, correct<br />
mounting, and any other conditions that may affect<br />
the correct operation of the tool.<br />
- Damaged safety devices or other parts should be<br />
properly repaired or replaced by an authorised<br />
Service Centre unless otherwise indicated<br />
elsewhere in this instruction manual.<br />
- Have defective switches replaced by an<br />
authorised Service Centre.<br />
- Do not use tool if its switch cannot be turned on or<br />
off.<br />
Warning<br />
- For your personal safety use only accessories<br />
recommended in this instruction manual or in the<br />
relevant catalogues The use of any other<br />
accessory or attachment other than those<br />
recommended in this instruction manual or in the<br />
relevant catalogue may present a risk of personal<br />
injury.<br />
Have tools repaired by qualified personnel<br />
- This electric appliance is in accordance with the<br />
safety rules in force. Only qualified experts may<br />
carry out repairing of electric appliances otherwise<br />
it may cause considerable danger for the user.<br />
Maintain tools with care<br />
- Keep tools sharp and clean for better and safer<br />
performance.<br />
- Follow all maintenance advice and instructions to<br />
replace accessories subject to wear. Inspect tool<br />
cords periodically and, if damaged, have them<br />
repaired by an authorised expert. Check extension<br />
28
To order parts, contact your <strong>Belle</strong> dealer or <strong>Belle</strong> Engineering (01298 84050)<br />
Please state - model name & serial number - part number (e.g. 0300) & quantity
I GB F D<br />
DICHIARAZIONE CE<br />
DI CONFORMITÁ<br />
EC DECLARATION<br />
OF CONFORMITY<br />
DECLARATION CE<br />
DE CONFORMITE<br />
EG-<br />
KONFORMITÄTSERKLÄRUNG<br />
Il sottoscritto, rappresentante il seguente<br />
costruttore<br />
The undersigned, representing the<br />
following manufacturer<br />
Le soussigné, représentant le constructeur<br />
ci-aprés<br />
Der Unterzeichner, der den nachstehenden<br />
Hersteller vertritt<br />
BELLE GROUP<br />
Sheen, Nr.Buxton, Derbyshire, SK17 OEU, UK<br />
dichiara qui di seguito che il mescolatore<br />
per adesivi per piastrelle, cemento, vernici,<br />
resine epossidiche<br />
herewith declares that the universal mixer<br />
with agitator for tile adhesives, cement,<br />
paints, varnish, epoxy resins<br />
déclare par la présente que le mélangeur<br />
universel avec fouet pour adhesifs destines aux<br />
carrelages, ciment, vernis, résines epoxydes<br />
erklärt hiermit, daß Mehrzweckmischer mit<br />
spiralförmiges Rührwerk für Fliesenkleber,<br />
Zement, Farben, Lacke und Epoxidharze<br />
TUBMIX 50 TUBMIX 50<br />
230V~50 Hz. 1200 W . 60 min -1 / IP 44 115V~50 Hz. 1200 W . 60 min -1 / IP 44<br />
MOTOR CLASS F MOTOR CLASS F<br />
risulta in conformità a quanto previsto dalle<br />
seguenti direttive comunitarie:<br />
DIRETTIVA 98/37/CE, DIRETTIVA<br />
89/336/CEE, DIRETTIVA 93/68/CEE,<br />
DIRETTIVA 92/31/CEE, DIRETTIVA<br />
73/23/CEE.<br />
e che sono state applicate tutte le norme<br />
e/o specifiche tecniche indicate.<br />
is in conformity with the provisions of the<br />
following EC directives:<br />
98/37/CE, 89/336, 93/68/CEE, 92/31,<br />
73/23.<br />
and that the standards and/or technical<br />
specifications referenced have been<br />
applied.<br />
est conforme aux dispositions des<br />
directives CE suivantes:<br />
DIRECTIVE 98/37/CE, DIRECTIVE<br />
89/336/CEE, DIRECTIVE 93/68/CEE,<br />
DIRECTIVE 92/31/CEE, DIRECTIVE<br />
73/23/CEE.<br />
et que les normes et/ou spécifications<br />
techniques ont été appliquées.<br />
in Übereinstimmung ist mit den Bestimmungen<br />
der nachstehenden EG-Richtlinien:<br />
EG RICHTLINIE 98/37/CE, EG<br />
RICHTLINIE 89/336, EG RICHTLINIE<br />
92/31, EG RICHTLINIE 93/68/CEE, EG<br />
RICHTLINIE 73/23.<br />
und daß die Normen und/oder technischen<br />
Spezifikationen, zur Anwendung gelangt sind.<br />
EN 292-1, EN 292-2, EN 60335-1, EN 55014, EN 60204-1,<br />
CEI 107-55 (CENELEC HD 423.1.S1), ISO 3745.77, D.P.R. 27/04/55 N° 547, CIRC. 17/06/82 N° 76<br />
Data di costruzione N° di Serie: Date of manufacture Series N. Date de fabrication N° de série Produktionsdatum Seriennummer<br />
Direttore Generale <strong>Belle</strong> Group<br />
Ray Neilson<br />
<strong>Belle</strong> Group Managing Directors<br />
Ray Neilson<br />
Directeur Général <strong>Belle</strong> Group<br />
Ray Neilson<br />
<strong>Belle</strong> Group Generaldirektor<br />
Ray Neilson
No.1 for Light Construction Equipment<br />
www.<strong>Belle</strong>Group.com<br />
<strong>Belle</strong> Group Head Office<br />
Sheen, nr. Buxton<br />
Derbyshire. SK17 OEU GB.<br />
Tel: +44 (0)1298 84000<br />
Fax: +44 (0)1298 84722<br />
email: sales@belle-group.co.uk<br />
<strong>Belle</strong> Group France<br />
70, av du Général de Gaulle<br />
94022 Creteil, Cedex.<br />
FRANCE<br />
Tel: +33 (0) 1 49 81 68 32<br />
Fax: +33 (0) 1 43 39 94 40<br />
Ventes : 0800 902 461<br />
SAV : 0800 905 336<br />
SAV Fax : 0800 909 895<br />
<strong>Belle</strong> Equipos SL<br />
Calle Doctor Calero Cial 19,<br />
Local 22, 28220 Majadahonda<br />
Madrid, Spain<br />
Tel: +34 (0) 91 636 2043<br />
Fax: +34 (0) 91 634 1535<br />
email:belleequipos@belleequipos.com<br />
<strong>Belle</strong> Group Deutschland<br />
Husumer Straße 45 a,<br />
D-33729,<br />
Bielefield<br />
Deutschland<br />
Tel : +49(0) 5217 707505<br />
Fax : +49 (0) 5217 707506<br />
Sales: 0800 1808069<br />
Spares: 0800 1816673<br />
<strong>Belle</strong> Poland sp. z.o.o.<br />
96-200 Rawa Mazowiecka<br />
Ul. Mszczonowska 36,<br />
Polska<br />
Tel: +48 (0) 46 8144091<br />
Fax: +48 (0) 46 8144700<br />
<strong>Belle</strong> Group Portugal<br />
Rua Laura Alves, 225, 2° F<br />
2775-116 Parede<br />
Portugal<br />
Tel: +35 1 (21) 453 59 91<br />
Fax: +35 1 (21) 453 59 91<br />
<strong>Belle</strong> Group Netherlands<br />
Tel: 0800 249861<br />
<strong>Belle</strong> Group Belguim<br />
Tel: 0800 80295<br />
<strong>Belle</strong> Group Austria<br />
Tel: 0800 291544<br />
<strong>Belle</strong> Group Russia<br />
64 Nevsky pr.<br />
St, Petersburg<br />
Russia<br />
Tel : +7(812)314-81-34<br />
Moscow : +7(495)589-64-32<br />
<strong>Belle</strong> Group South East Asia<br />
21, Jalan Ara AD 7/3B,<br />
Pandar Sri Damansara<br />
S2200 Kuala Lumpar, Malaysia<br />
Tel: +60 (0) 3 62721678<br />
+60 (0) 3 6272 9308<br />
Fax: +60 (0) 3 6272 9528<br />
<strong>Belle</strong> Group (GB), Shanghai Office<br />
Room 213, Zhonghuang Building,<br />
1007 Zhongshan Nan Er Road,<br />
Xuhui, Shanghai 200030 China<br />
Tel: 00 - 86 - 21 - 5461 5228<br />
Mobile: 00 - 86 - 133 8172 2653<br />
Fax: 00 - 86 - 21 - 5461 5369<br />
email: morgan.liu@bellegroup.com.cn<br />
<strong>Belle</strong> Group Inc<br />
3959 Electric Rd<br />
Roanoake<br />
Suite 360<br />
VA 24018. USA.<br />
Tel: +1.540.345.5090<br />
Fax: +1.540.345.5091<br />
Toll free 866 540 5090<br />
e-mail: sales@bellegroup.net<br />
<strong>Belle</strong> Group World Parts Centre<br />
Unit 5, Bode Business Park<br />
Ball Haye Green,<br />
Leek,<br />
Staffordshire,<br />
ST13 8BW<br />
Tel: 44+ 1538 380000<br />
Fax: 44+ 1538 380038<br />
www.<strong>Belle</strong>Group.com<br />
No.1 for Light Construction Equipment<br />
COMPACTING... MIXING... CONCRETING... CUTTING... BREAKING... MOVING