
Create successful ePaper yourself
Turn your PDF publications into a flip-book with our unique Google optimized e-Paper software.
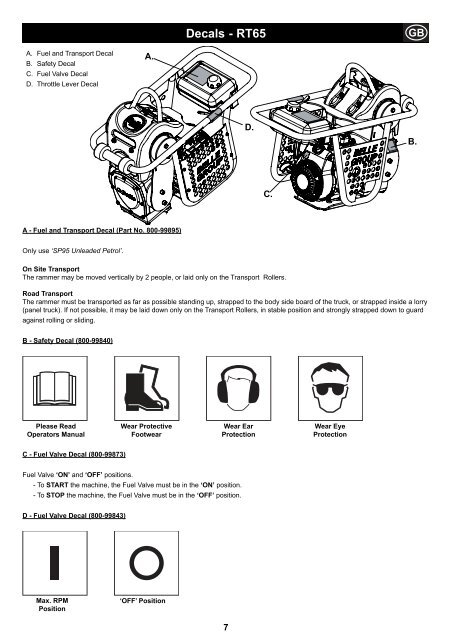
<strong>Decals</strong> - <strong>RT65</strong>GBA. Fuel and Transport DecalB. Safety DecalC. Fuel Valve DecalD. Throttle Lever DecalA.D.B.C.A - Fuel and Transport Decal (Part No. 800-99895)Only use ‘SP95 Unleaded Petrol’.On Site TransportThe rammer may be moved vertically by 2 people, or laid only on the Transport Rollers.Road TransportThe rammer must be transported as far as possible standing up, strapped to the body side board of the truck, or strapped inside a lorry(panel truck). If not possible, it may be laid down only on the Transport Rollers, in stable position and strongly strapped down to guardagainst rolling or sliding.B - Safety Decal (800-99840)Please ReadOperators ManualWear ProtectiveFootwearWear EarProtectionWear EyeProtectionC - Fuel Valve Decal (800-99873)Fuel Valve ‘ON’ and ‘OFF’ positions.- To START the machine, the Fuel Valve must be in the ‘ON’ position.- To STOP the machine, the Fuel Valve must be in the ‘OFF’ position.D - Fuel Valve Decal (800-99843)Max. RPMPosition‘OFF’ Position7
Technical DataGBModel RT66 RT74Engine Models Honda GX120K1 & Honda GX120K1Robin EH12-2DEngine Type (Honda) 4 Stroke, OHV, Air Cooled 4 Stroke, OHV, Air CooledEngine Type (Robin) 4 Stroke, OHV, Air Cooled N/AMaximum Output (Honda) 2.6 kW 2.8 kWMaximum Output (Robin) 2.8 kW N/AFuel Type Unleaded Petrol Unleaded PetrolFuel Tank Capacity 3.0 Litres 3.0 LitresStarting Mechanism Recoil Starter Recoil StarterOperational Weight (Honda) 69Kg 77KgOperational Weight (Robin) 66Kg N/AOverall Dimensions (LxWxH) 763 x 420 x 1045mm 755 x 420 x 985mmRamming Shoe Size (WxL) 280 x 332mm 300 x 335mmVibration Frequency 550-620 v.p.m 550-620 v.p.mNoise Level 107 dB(A) (Robin) / 108 dB(A) (Honda) 108 dB(A)3 Axis Vibration 22.63 m/sec 2 13.54 m/sec 2Vibration Level: Minimum Level - EN500 Part 4.General SafetyGBFor your own personal protection and for the safety of those around you, please read and ensure you fully understand the followingsafety information. It is the responsibility of the operator to ensure that he/she fully understands how to operate this equipment safely.If you are unsure about the safe and correct use of your RT, consult your supervisor or Belle Group of companies.CAUTIONImproper maintenance or use can be hazardous. Read and Understand this section before you perform anymaintenance, service or repairs.• This machine must only be used for its intended purpose. This machine must be operated only by well trained personnel.• The owner of this machine must observe, and train the user of the machine to observe, the effective Labour ProtectionRegulation in the country of application.• This equipment is heavy and must not be lifted single-handedly, either GET HELP or use suitable lifting equipment.• This machine must be operated on ground where stability is guaranteed. When working near the rim of excavated trenches, use themachine properly so that the machine may not collapse or fall down.• Cordon off the work area and keep members of the public and unauthorised personnel at a safe distance.• Personal Protective Equipment (PPE) must be worn by the operator whenever this equipment is being used (See Health & SafetySection).• Make sure you know how to safely switch this machine OFF before you switch it ON in case you get into diffi culty.• Always switch OFF the engine before transporting, moving it around the site or servicing it.• During use the engine becomes very hot, allow the engine to cool before touching it.• Never leave the engine running and unattended.• Never remove or tamper with any guards fitted, they are there for your protection. Always check guards for condition and security, ifany are damaged or missing, DO NOT USE THE RT until the guard has been replaced or repaired.• Do not operate the RT when you are ill, feeling tired, or when under the infl uence of alcohol or drugs.• This machine is designed to eliminate the possible risks arising from its use. However, risks DO reside, and these residual risks arenot clearly recognisable and may cause personal injury, property damage and possible death. If such unpredictable and unrecognisablerisks become apparent, the machine must be stopped immediately, and the operator or his supervisor must take the appropriatemeasures to eliminate such risks. It is sometimes necessary for the manufacturer to be informed of such an event for futurecounter measuring.WARNINGFuel is flammable. It may cause injury and property damage. Shut down the engine, extinguish all openflames and do not smoke while fi lling the fuel tank. Always wipe up any spilled fuel.• Before refuelling, switch off the engine and allow it to cool.• When refuelling, DO NOT smoke or allow naked flames in the area.• When refuelling, use a proper funnel, and avoid spilling fuel over the engine.• Spilt fuel must be made safe immediately, using sand. If fuel is spilt on your clothes, change them.• Store fuel in an approved, purpose made container away from heat and ignition sources.9
GBHealth & SafetyVibrationSome vibration from the machines operation is transmitted through the handle to the operator’s hands. The Belle Group RT range hasbeen specifi cally designed to reduce hand/arm vibration levels. Refer to specifications & technical data for vibration levels and usagetimes (recommended maximum daily exposure time). DO NOT exceed the maximum usage times.PPE (Personal Protective Equipment)Personal injury or property damage may be caused by knocks, crushing, slipping, tripping, falling, or by fl ying chips due mainly to theimproper or careless handling of the machine, or working in a confi ned area.Suitable PPE must be worn when using this equipment i.e. Safety Goggles, Gloves, Ear Defenders, Dust Mask and Steel Toe cappedfootwear. Wear clothing suitable for the work you are doing. Tie back long hair and remove any jewellery which may catch in theequipment’s moving parts.DustThe compaction process can produce dust, which may be hazardous to your health. Always wear a mask that is suited to the type ofdust being produced.FuelOil and fuel used in this machine may cause the following hazards.• Poisoning if the fuel or oil vapour is inhaled.• Allergies if the fuel or oil spills on the skin.• Fire and explosion if the fuel and oil is handled near smoking or open fi res.• Do not ingest fuel or inhale fuel vapours and avoid contact with your skin. Wash fuel splashes immediately. If you get fuel in youreyes, irrigate with copious amounts of water and seek medical attention as soon as possible.Exhaust FumesWARNINGThe exhaust fumes produced by this equipment are highly toxic and can kill!Do not operate your RT Rammer indoors or in a confi ned space, make sure the work area is adequately ventilated.GBIntended UseThis machine is intended for base preperation, driveways, foundations, curbs, and footings. It canalso be used for repair work on streets, highways and/or sidewalks/pavements.GBPre-Start ChecksPre start-up inspectionThe following Pre-start-up inspection must be performed before the start of each work session or after every four hours of use, whicheveris first. Please refer to the service section for detailed guidance. If any fault is discovered, the RT must not be used until the fault isrectified.1. Thoroughly inspect the RT for signs of damage.2. Check hoses, fi ller openings, drain plugs and any other areas for signs of leakage. Fix anyleaks before operating.3. Check the engine oil level and top up as necessary.3.1 Place the machine on a level surface, and check the oil level in the engine.3.2 Remove the oil guage, and observe that the oil is up to the rim of the fi ller port.Use proper engine oil with the proper viscosity. SAE 10W-30 recommended)4. Check the engine fuel level and top up as necessary. Use clean fuel. Use of contaminatedfuel may damage the fuel system.CAUTIONNOTICE: This machine uses Unleaded Gasoline/Petrol.NEVER fill the fuel tank with a mixture of Oil and Gasoline/Petrol.5. Check that the air fi lter is clean. Excessive dust/dirt accumulation within the fi lter element will cause erratic engine operation.Clean the air fi lter element when it is contaminated (See Maintenance section).10
GBStart & Stop ProcedureGBCAUTIONImproper operation can be hazardous. Read and understand this section before you start the machine.1. Open the fuel cock.2. Set the engine switch to the ON position.3. Set the speed control lever to the STARTING position (Halfway between HIGH and LOW position).4. Move the choke lever to the CLOSED position.5. Taking a fi rm hold of the Operating handle with one hand, grasp the recoil starter handle with the other, Pull the recoil starterhandle until engine resistance is felt, then let starter return.6. Taking care not to pull the starters rope fully out, pull the starter handle briskly.7. Repeat until the engine fires.8. Once the engine fi res gradually set the choke lever to the OPEN position.9. Let the engine run at idle for a few minutes to warm up.10. After the engine has warmed up, the machine is ready for operation.11. Move the throttle lever to the high speed ‘H’ position quickly to prevent damage from occuring to the clutch. The ‘FullThrottle’ position of this machine has been preset at the factory to achieve optimum machine performance.12. With the engine running in the full throttle position, the machine will move forward and compact loose ‘lifts’13. In preparation for stopping the engine, move the throttle lever to the LOW position.14. Allow the engine to idle for 1-3 minutes.15. Set the engine switch to the OFF position. Do not touch the HOT engine part at this time.16. Close the fuel cock.17. Pull the recoil starter slowly until you feel resistance. Then release your hand from the starter knob to set it back to itsoriginal position. This will prevent any air or humidity from entering into the cylinder.NOTICE: The optimum maximum engine revolution has been set at the factory as follows:Model Engine Maximum RPMOptimumUpper LimitRT50 Robin EH09D 3,800 +/- 50 4,000RT50 Honda GX100 3,800 +/- 50 4,000<strong>RT65</strong> Honda GX100 3,750 +/- 50 4,000RT66 Robin EH12-2D 3,650 +/- 50 3,700RT66 Honda GX120 3,400 +/- 50 3,450RT74 Honda GX120 3,400 +/- 50 3,450The Max rpm as shown above is the number of ignitions per minute. GX120K1 engine for RT66 and RT74 have the fi nal gears at theration of 17/16, and the number of ignitions per minute is different from the number of rotations of the engines Power Take-Off Shaft.CAUTIONDO NOT alter this setting since irregular vibration or damage to the gear transmission mechanism can result,and both engine and machine warranties will be automatically voided.11
GBOperationLiftingWhere it is necessary to use lifting equipemnt to position the RT, check and confi rm that the rubber isolators on the operation handle isnot damaged or cracked. If they are cracked or damaged, replace the rubber isolators before attempting to lift the machine. Also makesure that the lifting equipment has a WLL (Working Load Limit) suitable for the RT’s weight (See specifi cation chart on page 5 or themachine number plate). Attach suitable chains or slings ONLY to the lifting point on top of the RT’s operating handle.• NEVER leave the engine running whilst transporting or moving the RT, even if it is only a short distance.• The height of the operating handle can be adjusted within the range of 850 ~ 880 mm. Loosen three bolts at each side of theoperating handles base, and retighten them at the desired handle height. Note, that when the handle is set too high,excessive vibration may be transmitted through the handle.Having carried out the checks listed in the ‘pre-start’ section, you may start the engine.The Belle Group RT range of tampers are fitted with a centrifugal clutch, thisallows the engine to run at idle without driving the crankmechanism. As the engine speed is increased the clutch will engage and the engine will drive the crank mechanism.• To avoid damage to the centrifugal clutch, move the throttle lever quickly from the L to H position. For correct operation, theengine speed should be set to maximum.• Avoid operating the machine on a fully compacted, hard, or non-yielding surface. Otherwise, the gear transmission mechanismwill be damaged, and the life of the machine will be greatly reduced.• When working in a narrow trench, if the ramming shoe should get caught between the walls of the trench, the rammer may missstrikeand can be severly damaged. The ramming shoe may especially be damaged severely.• Make certain that the rammer is steered only by using the handle grip. It should only be pushed. The rammer must not bepressed into the materials being compacted. Excessive pressure on the operating handle will lead to the unsatisfactorycompaction due to the fact that the jumping action is hindered.Transportation.When transporting or storing the machine, place the machine in an upright position if at all possible. Should the machine be required tobe laid down, NEVER attempt to lay the machine in a manner that the air cleaner faces downwards. Otherwise, the oil in the cylindermay get into the combustion chamber or in the air cleaner, which may result in starting diffi culties. Laying the machine forwards (Thecrankcase cover of the rammer facing downwards) may not cause any spill of the engine oil into the cylinder or air cleaner of the engine.However, if the engine is still hot, spilt fuel on the engine may cause fi re. Lay the machine after the machine is completely cooled.The machine fi tted with the transporting roller on the operating handle may be easily loaded to and unloaded from a vehicle. Tilt themachine forwards until the transporting roller touches the fl oor of the vehicle. Lift the lower part of the machine using the grab handleprovided at the ramming shoe, and push forward to load the machine. During transportation, the machine should be tied fi rmly, andplaced in an upright position if at all possible. To unload the machine, tilt the machine forward, until the roller touches the fl oor. Slightlylift the lower part of the machine, and pull the machine out.Operation at High AltitudeFor continuous High-Altitude operation above 1,000m (3,000FT), it will be necessary to change the engine main jet to a type that will allowfor correct fueling of the engine. Otherwise, the unit will suffer from a lack of engine power and not work correctly.Please contact BELLE group companies for details.GBTrouble Shooting GuideProblem Cause RemedyEngine will not start No fuel Fill Fuel TankFuel Tap has been closed Open fuel tap.Engine turned OFFTurn engine ONSpark Plug contaminated Replace spark plug.or damaged.Faulty CarburettorService the CarburettorEngine stops suddenly, or stops when the See Above See Aboveengine rpm is increased Main jet of the Carburettor Take out the main jet of the Carburettor andclogged with dirtclean with Compressed air.Air filter element dirtyClean the element.Spark plug cap is loose Tightly fi t cap to plug.Engine runs, but machine does not produce impact. Lack of engine power See above.Clutch is slippingDismantle clutch assembly, Clean shoeand drum with proper solvent. Replaceclutch shoe if necessary.Crank mechanism is damaged Contact Dealer.12
GBTransportCAUTIONPlease ensure that you have read and fully understand the information below before attempting totransport the RT Rammer.ON SITE TRANSPORTThe rammer may be moved vertically by 2 people, or laid only on the Transport Rollers (See Image Below)ROAD TRANSPORTThe rammer must be transported as far as possible standing up, strapped to the body side board of the truck, or strapped inside a lorry(panel truck).If not possible, it may be laid down only on the Transport Rollers, in stable position and strongly strapped down to guard against rollingor sliding.LiftingEyeTransportRollerGBWarrantyYour new Belle Group Rammer Tamper is warranted to the original purchaser for a period of one-year (12 months) from the originaldate of purchase.The Belle Group warranty is against defects in design, materials an workmanship.The following are not covered under the Belle Group warranty:1. Damage caused by abuse, misuse, dropping or other similar damage caused by or as a result of failure to follow assembly,operation or user maintenance instructions.2. Alterations, additions or repairs carried out by persons other than Belle Group or their recognised agents.3. Transportation or shipment costs to and from Belle Group or their recognised agents, for repair or assessment against awarranty claim, on any machine.4. Materials and/or labour costs to renew, repair or replace components due to fair wear and tear.The following components are not covered by warranty.· Engine air fi lter· Engine spark plugBelle Group and/or their recognised agents, directors, employees or insurers will not be held liable for consequential or other damages,losses or expenses in connection with or by reason of or the inability to use the machine for any purpose.Warranty ClaimsAll warranty claims should firstly be directed to Belle Group, either by telephone, by Fax, by Email, or in writing.For warranty claims:Tel : +44 (0)1538 380000, Fax : +44 (0)1538 380038, Email : Warranty@belle-group.co.ukor Write to:Belle Group Warranty Department,Unit 5 Bode Business Park,Ball Haye Green,Leek,Staffordshire,ST13 8BW,England14